background image

INSTALLATION AND OPERATION MANUAL


NWKSP3

COMNET SOLAR POWERED SYSTEM

Thank you for purchasing NetWave® from ComNet. This manual will cover how to 
install hardware on your enclosure, Configure batteries, cabling and mounting of the 
enclosure.

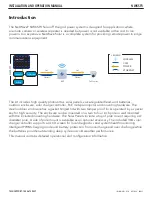
The NetWave® NWKSP3 Solar off the grid power system is designed for applications 
where a remote camera or wireless repeater is needed but power is not available 
or the cost to run power is too expensive. NetWave Solar is a complete system for 
providing remote power to edge communications equipment. The kit includes 
high quality photovoltaic solar panels, valve-regulated lead-acid batteries, outdoor 
enclosure, solar charge controller, PoE midspan injector and mounting hardware. 
The steel outdoor enclosure has a gasket hinged lid with two tamper proof locks 
operated by a special key for high security. The enclosure can be mounted on a two 
to four inch pole or wall mounted with the included mounting hardware. The Solar 
Panels include a top of pole mount requiring a 4” diameter pole. A side of pole 
mount is available as an optional accessory. The included 30A solar charge controller 
supports an LCD screen for local diagnostics and system health monitoring, 
Intelligent PWM charging mode and battery protection from overcharge and over 
discharge while the batteries provide outstanding deep cycle and cold weather 
performance.

Содержание netwave NWKSP3

Страница 1: ...lar panels valve regulated lead acid batteries outdoor enclosure solar charge controller PoE midspan injector and mounting hardware The steel outdoor enclosure has a gasket hinged lid with two tamper...

Страница 2: ...anual Solar Panel mounting instructions included with the mounting hardware Website For information on ComNet s entire product line please visit the ComNet website at http www comnet net Support For a...

Страница 3: ...out This Guide 2 Related Documentation 2 Website 2 Support 2 Safety 2 Overview 4 Legal Information 4 Introduction 5 Typical Setup 6 Mounting Assembly 7 Preparing the Enclosure 10 Pole Mount 12 Solar P...

Страница 4: ...by any means electronic and mechanical for any purpose without the express written permission of ComNet Copyright Copyright 2014 ComNet All rights reserved Disclaimer ComNet reserves the right to make...

Страница 5: ...id batteries outdoor enclosure solar charge controller PoE midspan injector and mounting hardware The steel outdoor enclosure has a gasket hinged lid with two tamper proof locks operated by a special...

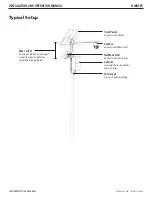
Страница 6: ...Setup Camera Connects to NetWave Unit Cabinet Houses Batteries Controller Power Injector Drip Loops Use on all exterior cabling NetWave Unit Connects to Power Injector Solar Panel Connects to Control...

Страница 7: ...ole remove the orange panel mount from inside the cabinet Orange Panel Mount Removed from Cabinet Attach the horizontal mounting braces to the cabinet at the top and bottom Connect the two halves of t...

Страница 8: ...INS_NWKSP3_REV 07 10 14 PAGE 8 INSTALLATION AND OPERATION MANUAL NWKSP3 TECH SUPPORT 1 888 678 9427 Mounting Hardware Pole Mount...

Страница 9: ...n back of enclosure Reinstall the orange panel after the pole mounting hardware is installed If mounting the enclosure to a wall you can skip this step and mount the enclosure directly to a wall by at...

Страница 10: ...ure Attach grounding wire to the door and enclosure Remove plastic covers on copper studs Add grounding cable to the two studs and use the copper washers and nuts to secure Grounding Cable Installed M...

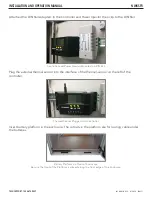
Страница 11: ...Power Injector Mounted on DIN Rail Plug the external thermal sensor into the interface of the thermal sensor on the left of the controller Thermal Sensor Plugged into Controller Insert battery platfor...

Страница 12: ...pole use the 6 included Stainless Hose clamps to secure the enclosure to a pole For your safety we highly recommend mounting the enclosure before installing the batteries Enclosure Mounted to Pole wit...

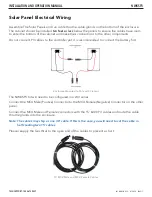
Страница 13: ...ables to the controller yet it is recommended to connect the battery first Enclosure Mounted to Pole with Clamps The NWKSP3 Kit will need to be configured in a 24V series Connect the MC4 Male Positive...

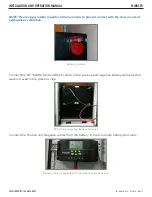
Страница 14: ...nto the enclosure on their side and stack them Batteries Placed into the Enclosure Connect battery cables The NWKSP3 Kit will need to be configured in a series then connected to the controller First c...

Страница 15: ...he door in case of earthquake or vibration Rubber Insulator Connect the 24 10AWG Red and Black cables to the positive and negative battery terminals that were not used in the previous step PV Cable Co...

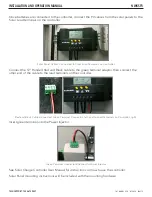
Страница 16: ...ct the 12 Bonded Red and Black cable to the green terminal adaptor then connect the other end of the cable to the load terminals on the controller Red and Black Cable Connected Green Terminal Connecto...

Страница 17: ...dential area is likely to cause harmful interference in which case the user will be required to correct the interference at his own expense Industry Canada This Class A digital apparatus complies with...

Страница 18: ...Ireland Austria Belgium Denmark Finland France Germany Ireland Italy Netherlands Norway Portugal Romania Switzerland Sweden Installer Compliance Responsibility Devices must be professionally installed...

Страница 19: ...granted a license to that software under the terms of either the GNU General Public License or GNU Lesser General Public License License copies of which are available from http www gnu org licenses li...

Страница 20: ...Y LEEDS UK LS27 7LE T 44 0 113 307 6400 F 44 0 113 253 7462 INFO EUROPE COMNET NET ComNet Customer Service Customer Care is ComNet Technology s global service center where our professional staff is re...

Отзывы: