background image


Contents 


Safety warnings & instructions ....................................................................................................... 14


General Information .......................................................................................................................... 15


How it works? .................................................................................................................................... 15


Points to Note: ........................................................................................................................................... 15


1.


Installation ............................................................................................................................................................. 15


2.


Solar Heater Operating Pressure .......................................................................................................................... 15


3.


Linking Additional Solar Heaters ........................................................................................................................... 16


Solar Heater Installation ................................................................................................................... 16


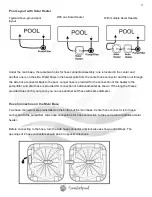
Pool Layout with Solar Heater .................................................................................................................. 17


Hose Connectors on the Main Base ......................................................................................................... 17


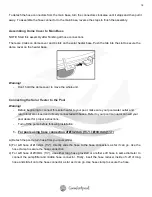
Assembling Dome Cover to Main Base .................................................................................................... 18


Connecting the Solar Heater to the Pool .................................................................................................. 18


1.


For pools using hose connection of Ø 32 mm (1¼") / Ø 38 mm (1½") ................................................................. 18


2.


For pools using hose connection of Ø 57 mm (2¼") ............................................................................................. 19


3.


For multiple solar heaters ...................................................................................................................................... 20


Initial Operation ................................................................................................................................. 21


Winterizing and Maintenance ........................................................................................................... 22


Troubleshooting ................................................................................................................................ 22


Exploded Drawing ............................................................................................................................. 23


Содержание CP-2910

Страница 1: ...SOLAR BOL Installatie gebruikershandleiding SOLAR DOME Installation Operation Manual...

Страница 2: ...solar bol 6 Lay out van de solar bol 7 Slangaansluitingen op het hoofdpaneel 7 Monteren van de koepel op het hoofdpaneel 8 De solar bol aansluiten op het zwembad 9 1 Zwembaden met een 32 mm of 38 mm a...

Страница 3: ...Heater Installation 16 Pool Layout with Solar Heater 17 Hose Connectors on the Main Base 17 Assembling Dome Cover to Main Base 18 Connecting the Solar Heater to the Pool 18 1 For pools using hose conn...

Страница 4: ...andere verhoging is op eigen risico Een defect veroorzaakt door montage op elke andere ondergrond dan de grond valt dan ook niet onder de garantie Dit is geen SPEELGOED Laat kinderen niet alleen in de...

Страница 5: ...andachtspunten 1 Installatie Zorg er v r de installatie van de solar voor dat uw opzetzwembad of opblaaszwembad met water gevuld is en dat de benodigde filterslangen zijn verbonden met de zwembadpomp...

Страница 6: ...r de zwembadfilterpomp aan staat Schakel de pomp altijd uit voordat u een solar bol installeert of loskoppelt Installatie van de solar bol Controleer voor het installeren van de solar bol of alle onde...

Страница 7: ...t midden via de verwarmingsspoel naar de slangaansluiting aan de zijkant vanwaar het weer terug naar het zwembad stroomt De langere zwembadslang is voor de aansluiting van de solar bol op de zwembadpo...

Страница 8: ...tingen met de klok mee los totdat deze niet verder kunnen en trek ze los Om de slang aan te sluiten op het hoofdpaneel keer deze stappen om Monteren van de koepel op het hoofdpaneel BELANGRIJK Begin p...

Страница 9: ...ingen Gebruik de slangklem om de slangaansluiting te vast te maken c Voor een connectie met een 38 mm flexibele zwembadslang gebruik ofwel de meegeleverde lange zwembadslang of een andere zachte slang...

Страница 10: ...schroefdraadaansluiting van de zwembadslang en de slangaansluiting met schroefdraad geplaatst wordt 3 Meerdere solar bollen aansluiten Afhankelijk van de weersomstandigheden wordt aangeraden om 1 sola...

Страница 11: ...e waterstroom vanaf de pomp door de solar bol sturen wat de waterdruk zal verlagen Wanneer u bepaalde accessoires wilt aansluiten op de filterpomp zoals bijvoorbeeld een zwembadstofzuiger heeft u ook...

Страница 12: ...l en koepel Altijd buiten bereik van kinderen bewaren Probleemoplossing Probleem Mogelijkheden oplossingen Verwarmt het water niet Zorg dat de zwembadfilterpomp werkt en het water circuleert De zonkra...

Страница 13: ...aad 1 9 Platte afdichtring voor slangaansluiting met schroefdraad 1 10 O ring voor slangaansluiting met schroefdraad 1 2018 Comfortpool Alle rechten voorbehouden Niets uit deze uitgave mag gekopieerd...

Страница 14: ...A defect caused by installation on the roof or any other structure is therefore not covered by warranty This is not a TOY Do not leave children alone and unsupervised around the solar panel Children a...

Страница 15: ...with the filter and pump The solar heater will become very heavy after filling with water Select a proper site for the solar heater before installation The solar heater should be installed lower than...

Страница 16: ...stand 1 x Heater Dome Cover 2 x Hose reducer 32mm 1 38 mm 1 1 x Flat gasket for connection of Threaded Nut Hose connector to Threaded Nut hose 1 x Threaded nut hose connector preinstalled with O ring...

Страница 17: ...ater to the pump filter and short hose is provided for connection of additional heater as shown If the length of hoses provided does not fit your pools you can use another soft hose with same diameter...

Страница 18: ...ar heater to your pool make sure your pool water outlet and return inlet are closed and already connected with hoses Refer to your pool manual or consult your pool dealer for proper instructions Turn...

Страница 19: ...pump filter Make sure the hose is secured by the hose clamp c Screw the threaded nut hose connector to the side hose connector Make sure the O ring is inside the threaded nut hose connector d Screw t...

Страница 20: ...Make sure to have enough hose clamps and hose reducers before linking additional solar heaters A hose reducer is required for 38mm 1 1 2 in hose connection and a hose clamp should be used to secure al...

Страница 21: ...de the solar heater becomes too high it can cause damages A bypass allows only a portion of the water flow to enter the solar heater which will lower the water pressure If you want to connect certain...

Страница 22: ...out of reach of children Troubleshooting Problem Possibilities Solution Does not heat up the water Make sure the filtration system works to circulate the water Sunshine is not strong Additional solar...

Страница 23: ...lamp 2 8 Threaded nut hose connector 1 9 Flat gasket for threaded nut hose connector 1 10 O ring for threaded nut hose connector 1 2018 Comfortpool All rights reserved No part of this document may be...

Отзывы: