background image


Courtesy of Main Resource, Inc.  Visit us at 

www.MainResource.com

 or call 800 362-6740 for all your 

telecom needs. 

Page 1 of 6


Comdial Digitech DSU Impact Telephones 

Administrator’s Guide 


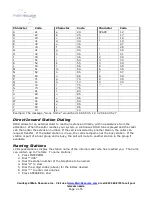
Creating LCD Response Messages 

Your system provides two messages that can be used to alert other system users of your station 
status, “Back at…” and “Call at…”.  You may add up to 8 customized messages.  To store the LCD 
messages: 

1.  Write your message on a piece of paper (each message can have up to 16 characters). 
2.  Use the letter table code to assign a number for each letter. 
3.  Write the numbers on a piece of paper. 
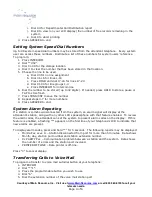
4.  Press INTERCOM 
5.  Dial “*#05”. 
6.  Dial a message location number (1-9 and 0). 
7.  Dial “#” to clear the current message in that location. 
8.  Enter the 2-digit codes you wrote down in step 3. 
9.  Dial “*” to save the message. 
10. Repeat as needed. 
11. Press SPEAKER to end. 

 
When the messages are programmed, make a list of the stored messages and their location 
numbers for each user on your system. 

Содержание Impact 8024S LCD Speakerphone

Страница 1: ...o store the LCD messages 1 Write your message on a piece of paper each message can have up to 16 characters 2 Use the letter table code to assign a number for each letter 3 Write the numbers on a piece of paper 4 Press INTERCOM 5 Dial 05 6 Dial a message location number 1 9 and 0 7 Dial to clear the current message in that location 8 Enter the 2 digit codes you wrote down in step 3 9 Dial to save ...

Страница 2: ...ternal caller to reach an extension directly with no assistance from the attendant When the caller reaches your system a continuous DISD tone is played and the caller can then enter the extension number If the call is answered by another station the caller can request transfer If the called station is in use the call is camped on at the busy station If the station is part of a hunt group and is bu...

Страница 3: ... Night Transfer Button To program 1 Press INTERCOM 2 Dial 1 3 Press one of the programmable buttons 4 Press INTERCOM 5 Dial 03 6 Press SPEAKER to end Setting the System Clock From the attendant station 1 Press INTERCOM 2 Dial 01 3 Dial 2 digits for year 4 Dial 2 digits for month 5 Dial 2 digits for day 6 Dial 2 digits for the hour 00 23 7 Dial 2 digits for minutes 8 Press SPEAKER to end Printing S...

Страница 4: ...ress TRNS CNF to save the number 8 Repeat steps 3 7 for more numbers 9 Press SPEAKER to end System Alarm Reporting If a station is somehow disconnected from the system an alarm signal will display at the attendant s station along with any other LCD speakerphone with that feature enabled To review the alarm codes the attendant can set the system to present alarm codes on the display If this feature...

Страница 5: ...essionally supplied recording in to the DVA memory You may have up to 4 messages and use up to 2 minutes total time Storing DVA Messages 1 Press INTERCOM 2 Dial 08 3 Dial 1 for DISD for callers making Direct Inward Station Dial calls message Dial 2 for DCD for callers making Department Call Distribution Calls message 4 Choose DVA station ports Select 10 57 and press 5 Press to erase all 4 messages...

Страница 6: ...ht to four thirty Monday through Friday Please call us back during those hours Recall Messages Department Call Distribution Calls Please hold an agent will be with you shortly Direct Inward Station Dial Calls The party you have dialed is not available Please try another extension or dial operator extension for the operator Direct Inward Station Dial Calls Where the Tracker Paging System is Install...

Отзывы: