CNC Router Parts
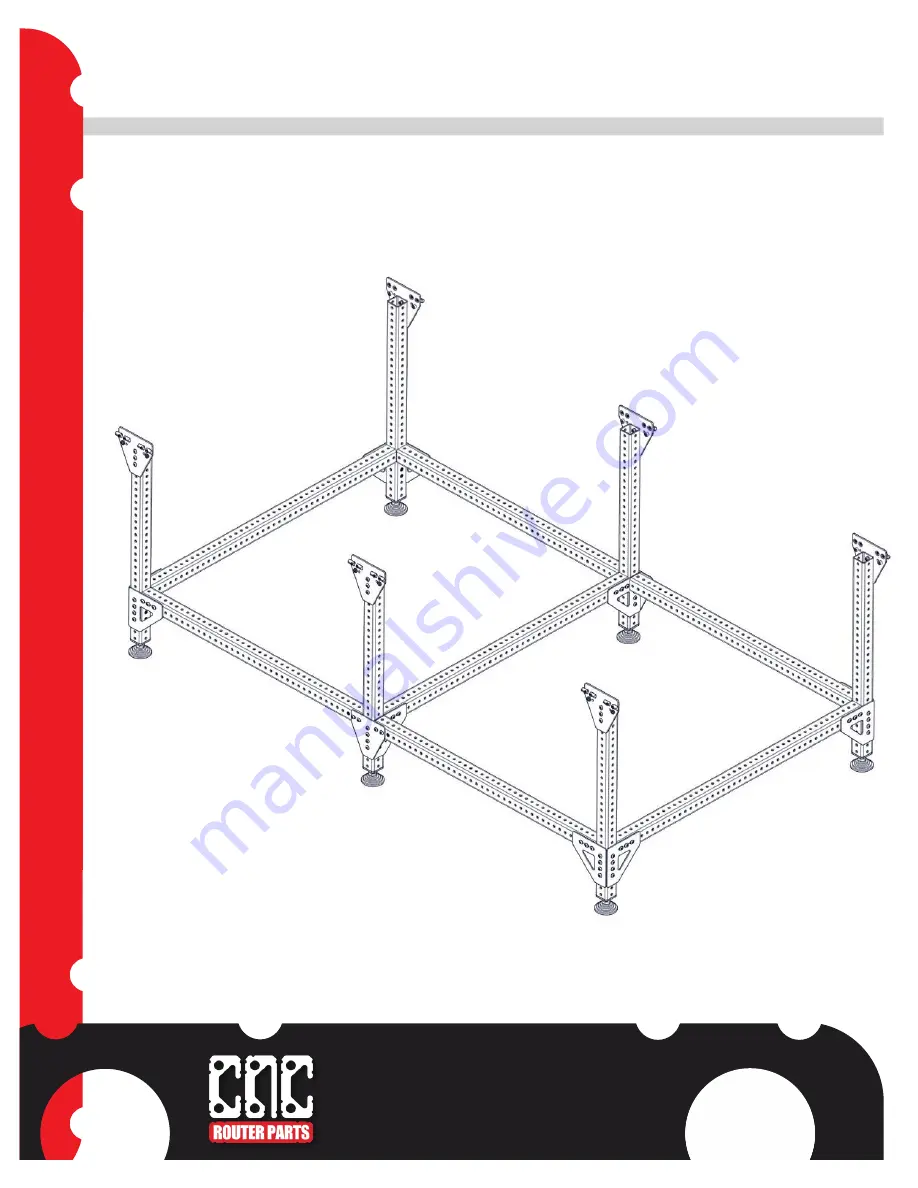
PRO4896 Leg Kit Assembly Instructions
1
Leg Kit Assembly Instructions
Version 2015Q3.1
Copyright©2015 CNC Router Parts LLC. All Rights Reserved.
Страница 1: ...CNC Router Parts PRO4896 Leg Kit Assembly Instructions 1 Leg Kit Assembly Instructions Version 2015Q3 1 Copyright 2015 CNC Router Parts LLC All Rights Reserved...
Страница 2: ...CNC Router Parts PRO4896 Leg Kit Assembly Instructions 2 Leg Kit Assembly Instructions Version 2015Q3 1 Copyright 2015 CNC Router Parts LLC All Rights Reserved Included Parts...
Страница 3: ...s 3 Leg Kit Assembly Instructions Version 2015Q3 1 Copyright 2015 CNC Router Parts LLC All Rights Reserved Attach the CRP113 09 Machine Connection Bracket to the top of the 30 steel tubes as shown Thr...
Страница 4: ...ructions 4 Leg Kit Assembly Instructions Version 2015Q3 1 Copyright 2015 CNC Router Parts LLC All Rights Reserved Attach one CRP113 07 corner bracket to TWO of the 40 inch tubes as shown Ensure the si...
Страница 5: ...t Assembly Instructions 5 Leg Kit Assembly Instructions Version 2015Q3 1 Copyright 2015 CNC Router Parts LLC All Rights Reserved Attach one CRP113 07 corner bracket and one CRP113 19 bracket to the re...
Страница 6: ...ts PRO4896 Leg Kit Assembly Instructions 6 Leg Kit Assembly Instructions Version 2015Q3 1 Copyright 2015 CNC Router Parts LLC All Rights Reserved Loosely attach the CRP113 07 Corner Brackets to the re...
Страница 7: ...y Instructions 7 Leg Kit Assembly Instructions Version 2015Q3 1 Copyright 2015 CNC Router Parts LLC All Rights Reserved Attach the 40 inch tubes with CRP113 10 brackets to the legs as shown Note that...
Страница 8: ...s 8 Leg Kit Assembly Instructions Version 2015Q3 1 Copyright 2015 CNC Router Parts LLC All Rights Reserved Ensure that the end of the crossmember tube is flush with the side of the leg tube and tighte...
Страница 9: ...ts PRO4896 Leg Kit Assembly Instructions 9 Leg Kit Assembly Instructions Version 2015Q3 1 Copyright 2015 CNC Router Parts LLC All Rights Reserved Use two of the 45 inch tubes to complete the first hal...
Страница 10: ...PRO4896 Leg Kit Assembly Instructions 10 Leg Kit Assembly Instructions Version 2015Q3 1 Copyright 2015 CNC Router Parts LLC All Rights Reserved Again ensure the tubes are flush and tighten the remaini...
Страница 11: ...ly Instructions 11 Leg Kit Assembly Instructions Version 2015Q3 1 Copyright 2015 CNC Router Parts LLC All Rights Reserved Attach the remaining 40 inch tubes to the remaining legs as shown Note that th...
Страница 12: ...ter Parts PRO4896 Leg Kit Assembly Instructions 12 Leg Kit Assembly Instructions Version 2015Q3 1 Copyright 2015 CNC Router Parts LLC All Rights Reserved Attach the remaining leg assemblies to the mai...
Страница 13: ...Router Parts PRO4896 Leg Kit Assembly Instructions 13 Leg Kit Assembly Instructions Version 2015Q3 1 Copyright 2015 CNC Router Parts LLC All Rights Reserved Complete the frame with the remaining 45 t...
Страница 14: ...PRO4896 Leg Kit Assembly Instructions 14 Leg Kit Assembly Instructions Version 2015Q3 1 Copyright 2015 CNC Router Parts LLC All Rights Reserved Again ensure the tubes are flush and tighten the remaini...
Страница 15: ...ion 2015Q3 1 Copyright 2015 CNC Router Parts LLC All Rights Reserved Attach the socket heads and hex nuts to the Machine Connection Bracket The axis extrusion of your machine will be supported by the...