13
Speed Controller
ELECTRICAL COMPONENTS
SPEED CONTROLLER
See General Warnings on page 1-2.
TESTING THE SPEED CONTROLLER
See Test Procedure 14 – A1 and A2 Motor Voltage on page 12-29.
SPEED CONTROLLER REMOVAL
1.
Disconnect the batteries and discharge the controller.
See Disconnecting the Batteries – Electric Vehicles,
2.
Remove the speed controller cover.
See Removing the Speed Controller Cover on page 13-6.
3.
Disconnect all wires and multi-pin connectors from the speed controller.
4.
Remove the four bolts that hold the speed controller to the component mounting plate and remove the controller
from the vehicle.
SPEED CONTROLLER INSTALLATION
1.
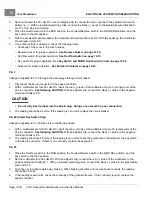
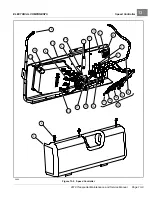
Install the four bolts (12) that hold the speed controller (23) to the component mounting plate and tighten to 50
in·lb (5.6 N·m)
2.
Using the wiring diagram, install the multi-pin connectors and all wires as illustrated. Tighten bolts (8) to 13.5 ft·lb
(18.3 N·m). Tighten bolts (22) to 11 ft·lb (14.9 N·m)
.
3.
Install the speed controller cover.
See Installing the Speed Controller Cover on page 13-6.
4.
Connect the batteries.
See Connecting the Batteries – Electric Vehicles, Section 1, Page 1-4.
5.
Place the Run/Tow switch in the RUN position.
6.
Inspect the vehicle for proper operation:
– Make sure that the vehicle operates in the forward direction when the Forward/Reverse switch is in the
FORWARD position.
– Make sure that the vehicle operates in the reverse direction when the Forward/Reverse switch is in the
REVERSE position. The reverse buzzer will sound as a warning when the Forward/Reverse switch is in
REVERSE.
– Make sure that the vehicle does not operate when the Forward/Reverse switch is in the NEUTRAL position.
Page 13-8
2019 Transporter Maintenance and Service Manual
Содержание TransPorter 4
Страница 2: ......
Страница 18: ...Pagination Page 1 General Warnings SAFETY Page 1 6 2019 Transporter Maintenance and Service Manual ...
Страница 112: ...8 Tires WHEELS AND TIRES Figure 8 2 Inflate Tire Page 8 4 2019 Transporter Maintenance and Service Manual ...
Страница 271: ...ELECTRIC MAIN HARNESS Wiring Diagrams Electric Main Harness 18 ...
Страница 272: ... Page intentionally left blank ...
Страница 273: ...ELECTRIC INSTRUMENT PANEL HARNESS Wiring Diagrams Electric Instrument Panel Harness 18 ...
Страница 274: ... Page intentionally left blank ...
Страница 275: ...ELECTRIC ACCESSORIES HARNESS Wiring Diagrams Electric Accessories Harness 18 ...
Страница 276: ... Page intentionally left blank ...
Страница 282: ...NOTES ...
Страница 283: ...NOTES ...
Страница 284: ...NOTES ...
Страница 285: ......
Страница 286: ......


