


FE400 ENGINE
General Information
Page 13-2
2006-2010 Turf/Carryall 272/472 and XRT 1200/1200 SE Maintenance and Service Manual
13
SPARK PLUG
Spark plugs are selected to suit specific engine design and vehicle operating conditions. The spark plug (CC
P/N AM1232301) is designed for FE400 engines, providing maximum life and efficient combustion of fuel. The
spark gap should be set to 0.027 - 0.031 inches (0.69 - 0.79 mm).
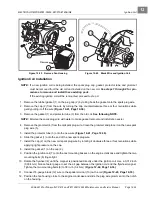
Spark Plug Removal
See General Warning, Section 1, Page 1-1.
CAUT ION
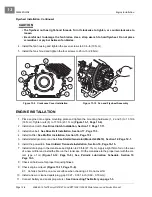
• Before removal and disassembly, clean the engine.
Remove all dirt from plug base in the cylinder head before removing plug. Use a 13/16 deep well socket
wrench or 13/16-inch plug wrench to loosen the plug.
Spark Plug Cleaning, Inspection and Repair
Examine the plug. The deposits on the plug base and electrode are an indication of the correct heat range and
efficiency as well as a guide to the general condition of the engine, fuel and air mixture and ignition system. If
all of the above conditions are proper, the spark plug should be a light brown color. There should be no bridg-
ing between the electrode and base. The electrode should not be eroded. Black color, excessive carbon and/
or a wet plug indicate a too rich condition. White, burned or melted electrodes indicate a too lean condition or
pre-ignition. Oily deposits on the plug electrode are an indication of worn rings, valve guides, cylinder wall,
etc. Also examine the spark plug wire. Remove rubber boot and inspect internal spring for damage. Inspect
spark plug wire for damage and be sure spring coil is securely attached to spark plug.
See following WARN-
ING
.
ý
WARNING
• Remove spark plug wire to avoid accidental start up of the engine when servicing vehicle. To
avoid ignition of fuel and serious personal injury or death, never try to start the engine with
plug removed from engine.
Testing the Spark Plug
Check the sparking ability of a cleaned and regapped plug on a sparking comparator if possible. Spark should
be blue and strong and able to jump a 5/16-inch (8 mm) gap.
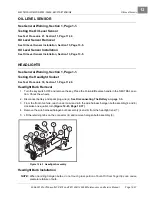
Setting the Spark Gap
1. Pass a contact point file between the electrodes to produce flat, parallel surfaces to facilitate accurate
gauging.
2. Use a wire type gauge. Bend the outside or ground electrode so only a slight drag on the gauge is felt
when passing it between the electrode. Never make an adjustment by bending the center electrode. Set
gap (A) to 0.027 - 0.031 inches (0.69 - 0.79 mm).
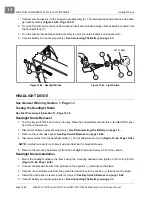
Spark Plug Installation
NOTE:
Before installing the plug, check the condition of the threads in the cylinder head. Soften deposits
in cylinder head threads with penetrating oil and clean the threads with a tap if necessary.
Use a high temperature, anti-seize lubricant on the threads of the spark plug to reduce friction
when installing a new plug and reduce gauling and thread seizing for future replacements.
1. Install the spark plug and thread it in until finger-tight, then tighten the spark plug to 20 ft-lb (27 N·m).
Содержание CARRYALL 272
Страница 2: ......
Страница 14: ......
Страница 18: ...1...
Страница 52: ...5...
Страница 90: ...6...
Страница 110: ...7...
Страница 112: ...8...
Страница 128: ...10...
Страница 170: ...11...
Страница 224: ...13...
Страница 284: ...16...
Страница 302: ...17...
Страница 308: ......
Страница 309: ...Club Car R NOTES...
Страница 310: ...Club Car R NOTES...
Страница 311: ......


