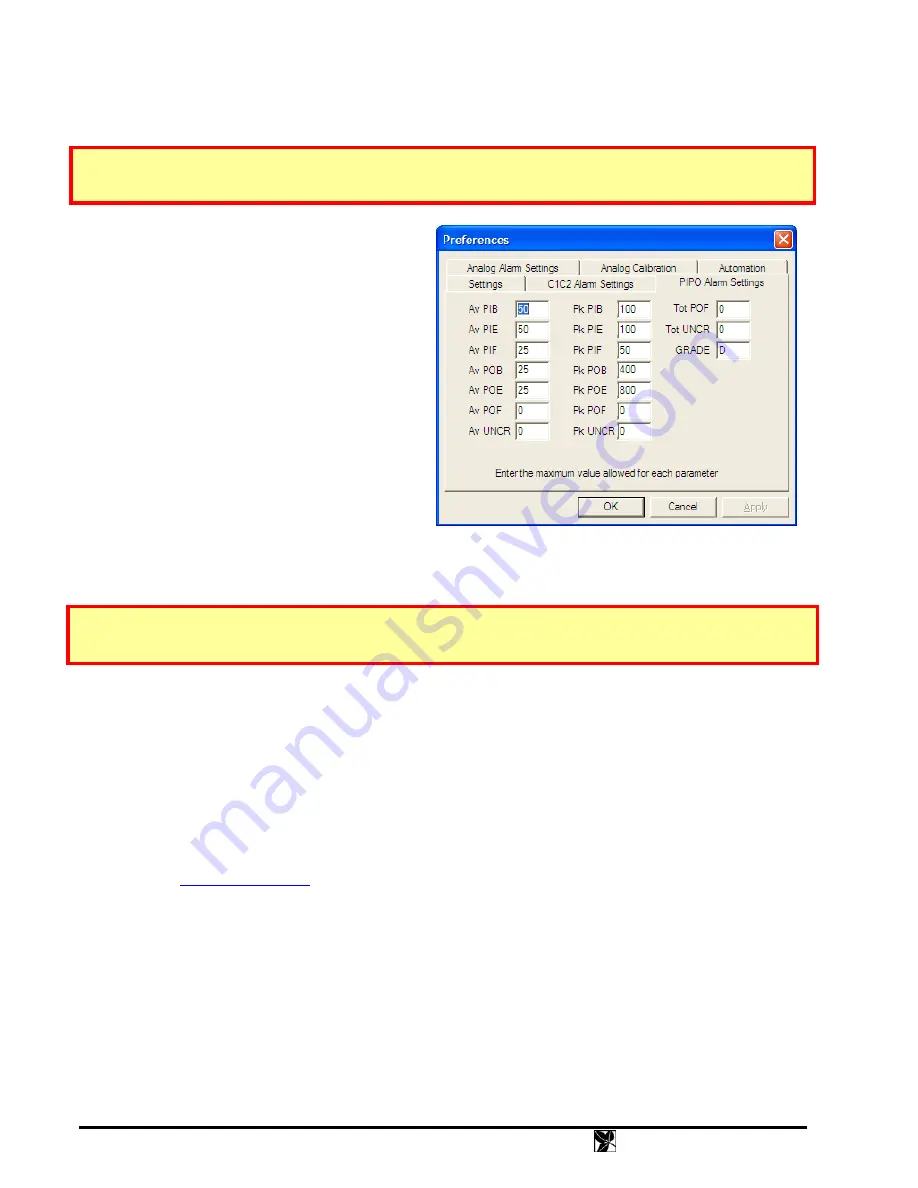
To set these limits, select
Preferences
in the main menu. Now select the
C1C2
Alarm Settings, PIPO Alarm Settings ,
or
Analog Alarm Settings
tab. After making changes, press Apply or OK. The Alarm Settings are password protected
to avoid inadvertent changes. Enter your password and click “OK”.
The default password is “Clover”. The password is case sensitive
.
This property sheet will allow you to enter values for
each parameter. Average value limits can be entered
with one decimal digit. Peak values of error rates,
however, must be integers. Note that the value you
enter is the maximum allowed, so that the value must be
larger than this number to generate an alarm. All alarm
settings are permanently saved when you click OK.
20
DVX
Instruction
Manual
How Good is Good Enough?
Each user must decide what criteria to use for pass/fail.
The higher the cost of failure, the more critical you want
to be. Start with the factory defaults, then as you get
more experience, you may wish to fine-tune the settings.
Changing the Alarm Settings Password
To change the password, first enter the current
password, and then set the
Change
checkbox, and press
“OK”. You will now be prompted to enter a new password. After pressing OK again, you will be prompted to confirm
the new password. If the two entries match, the password will be changed to the new entry.
Fig. 11 - Alarm Settings Property Sheet
Note:
The default password is “Clover”. The password is case sensitive, so you must type it exactly as shown (without
the quotes). If you change the password, then forget what it is, you must call the factory for instructions to recover it.
MAKING CHARTS
There are two types of charts: Single Chart, and All Chart. The Single Chart displays any or all error types in one
graph. The All Chart displays individual charts of each parameter. On charts with multiple parameters, the individual
traces will be color-coded. If you have a color printer, they will be printed in color.
Main Window Charts
The charts in the main window always display all error and analog data. You can change the axes by double-clicking
on the axis. This will open a dialog that allows you to change the axis. When Auto Set X-Axes is enabled in
Preferences
… then the X-axis will be set automatically according to the length of the disc. Each chart can be
customized; see
Single Charts
To graph one or more errors or analog values in a single chart, select
Chart
in the main menu or toolbar. A dialog box
will appear which allows you to select which parameters you wish to display. Check the boxes of the errors you want
to display then click OK. To select a different chart, just press
Chart
again to bring up the selection dialog. To print
the chart, select
File
|
in the main menu or click the printer icon in the toolbar.
Содержание DVX-4
Страница 1: ...D DV VX X 4 4 DVD CD ANALYZER OPERATING MANUAL Version 3 1 TM...
Страница 2: ...COPYRIGHT 2005 2012 CLOVER SYSTEMS ALL RIGHTS RESERVED...
Страница 43: ...Fig 23 CD HF Eye Pattern DVX Instruction Manual 35...
Страница 57: ...Fig 28 CD Error Test with QuickScan Fig 29 CD Error Test without QuickScan DVX Instruction Manual 49...
Страница 58: ...Fig 30 DVD Error Test without QuickScan Fig 31 DVD Error Test with QuickScan 50 DVX Instruction Manual...


