CLIMAVENETA i-EM2 Скачать руководство пользователя страница 1

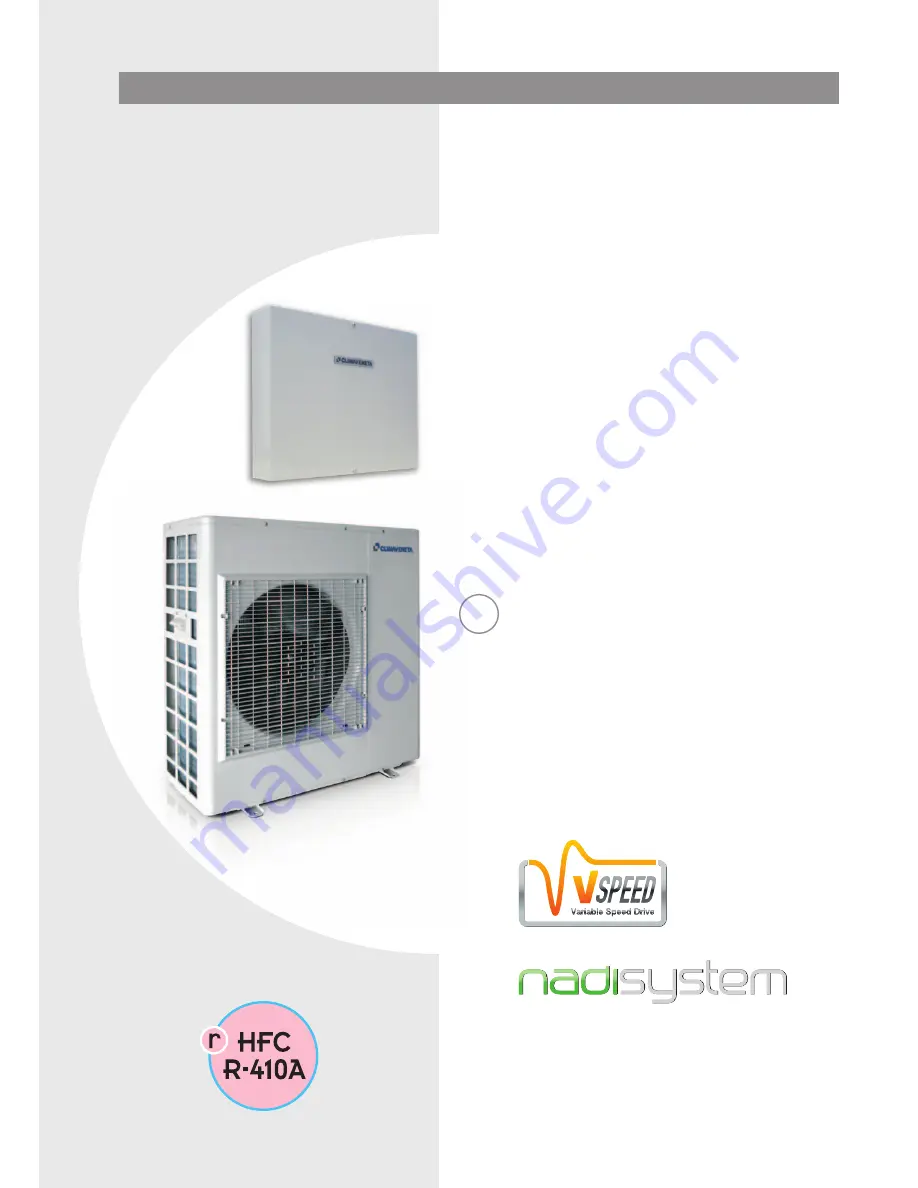
INSTALLATION - USER - MAINTENANCE MANUAL 

i-KI MTD air/water heat pump, heating
only, with DC inverter-driven
compressors, domestic hot water
production, axial-flow fans and hydronic
unit for outdoor installation

i-KIR MTD reverse-cycle air/water heat
pump with DC inverter-driven
compressors, domestic hot water
production, axial-flow fans and hydronic
unit for outdoor installation

EN

i-KI MTD / i-EM2
i-KIR MTD / i-EMR2
0011m ÷ 0061m

Содержание i-EM2

Страница 1: ...sors domestic hot water production axial flow fans and hydronic unit for outdoor installation i KIR MTD reverse cycle air water heat pump with DC inverter driven compressors domestic hot water product...

Страница 2: ...installation 11 Water connections 12 Electrical connections 16 Inside module electrical panel layout 17 Mains power supply connections 18 Installer connections to be performed 20 on the inside module...

Страница 3: ...without authori sation and instructions from the manufacturer Do not pull detach or twist the electrical cables coming from the unit even when disconnected from the mains electricity supply Do not op...

Страница 4: ...ting by crane 2 Use slings with hooks suitable for the weight being lifted Secure the hook to the lifting bracket fixed to the unit use always four equal length slings as shown in the figure to ensure...

Страница 5: ...DHW storage water temperature probe BT8 outside air temperature probe BT11 must be installed probe BT9 only to be installed when supplementary source is available system return BT1 and outlet BT2 wate...

Страница 6: ...unit s spare parts If service is required the following information must be pro vided to the service centre Model serial number year of production Installation and maintenance operations are much more...

Страница 7: ...E i EM2 i EMR2 VERSIONS AVAILABLE i KI MTD air water heat pump heating only with DC inverter driven compressors domestic hot water production axial flow fans and hydronic unit i KIR MTD reverse cycle...

Страница 8: ...ater outlet Anchoring foot 6 411 333 75 HEAT PUMP i KI i KIR 0011m INSIDE MODULE i EM2 i EMR2 850 881 5 335 522 5 110 180 357 155 540 155 60 90 275 330 116 Anchoring foot Water inlet Water outlet HEAT...

Страница 9: ...an 100 mm More than 300 mm More than 600 mm HEAT PUMP 0011m More than 600 mm More than 100 mm More than 100 mm More than 600 mm More than 300 mm HEAT PUMP 0061m Wiring cover More than 600 mm More than...

Страница 10: ...ing mode the unit produces a significant quantity of condensate which must be suitably drained Condensate drainage must not cause problems to objects or people If the outside air temperature is less t...

Страница 11: ...ration the unit must be installed indoors the unit must be installed by fastening to a vertical wall safety distances between the unit and other equipment careful attention must be paid to structures...

Страница 12: ...ting in outlet 4 Two thermometers intake and outlet 5 All the pipes must be insulated with suitable material to prevent the formation of condensate and heat loss The insulating material must be a vapo...

Страница 13: ...ection factor cdp pressure drop correction factor Water quality The manufacturer is not liable for obstruction breakage or noise resulting from the failure to install filters or vibration dampers Part...

Страница 14: ...uitable for the radiant panel sys tem hydronic terminal system and radiator system with fol lowing installation maximum water content expansion vessel pre charged to 150 kPa max 12 metre height differ...

Страница 15: ...sate drain elbow fitting Hose FILLING THE SYSTEM Before starting to fill place the unit mains switch QF1 in the OFF position Before filling check that the system drain valve is closed Open all system...

Страница 16: ...the unit In the case of three phase units ensure the phases are connected correctly Do not use water pipes to earth the unit WARNING The power supply current rating must be equal to the sum of the cu...

Страница 17: ...PANEL LAYOUT I A INSTALLER TERMINAL BLOCK U N 6 7 9 10 1112 13 2122 25 26 2728 2930 33 3439 40 414243 44 45 46 47 48 49 50 5152 53 5455 5657 58 59 60 PE PE PE FU5 KA1 KA6 KA7 KA8 TC1 A1 A3 FU6 FU7 FU...

Страница 18: ...DE MODULE SUPPLIED WITH CONNECTION TO THE HEAT PUMP If power is supplied to the inside module via a connection to the heat pump connect power to the heat pump and the commu nication cable to the insid...

Страница 19: ...move the main switch QF1 outside the appliance to ON Make sure that all the protective devices removed to make the electrical connections have been repositioned before powering up the unit Reposition...

Страница 20: ...MODULE only The maximum length of probe cables is 100 m for 1 mm2 cables and 50 m for 0 5 mm2 cables H H 2 1 N N W m 5 2 n i m Water outlet and return temperature probe BT1 and BT2 connection to heat...

Страница 21: ...ary If the room controller is removed from its base it discon nects from the power supply and consequently is no longer operating min 10 cm Installation procedure Assembly Separate the front from the...

Страница 22: ...0 C Use three way valves with pressure drop below 20 kPa For further details see the chapter Operating characteris tics If three way valves with a travel time greater than 10 sec onds are used modify...

Страница 23: ...C sec 43 44 6 7 230V 400V BT9 N Solution 2 System with heat pump and outlet electric heater WITHOUT storage tank Position probe BT9 on the system outlet pipe Outlet electric heater control A REPLACEME...

Страница 24: ...eater not enabled 1 Electrical Heater enabled Type of outlet electric heater oper ation 0 Supplementary 1 Replacement Enable boiler 0 Boiler not enabled 1 Boiler enabled Activation with low outside ai...

Страница 25: ...he trend in water temperature as shown on the graph in figure 4 Description Enable electric heater 0 Heater not enabled 1 Heater enabled Activation Boiler 0 Boiler not enabled 1 Boiler enabled Type of...

Страница 26: ...g the boiler when not needed Integration time to activate boiler Menu Mn03 Mn03 Mn01 Mn03 Mn03 Mn03 Mn06 Mn06 Parameter no 0300 0301 010H 0306 0307 0311 0618 0619 Value to be set 0 1 0 0 Example 5 C 2...

Страница 27: ...1 electric heater only 2 heat pump electric heater Legionella prevention function with 0 heat pump only 1 electric heater only 2 heat pump electric heater Enable Legionella prevention function 0 Not...

Страница 28: ...ondary circuit Configure the contact selecting the desired function by set ting parameter 015A Description Enable the contact as 0 Alarm signal 1 Dehumidifier 3 Secondary circuit pump Menu Mn01 Parame...

Страница 29: ...ontact closed Domestic hot water only Contact open Domestic hot water System Set the following parameters Description Enable remote contact 0 remote contact enabled 1 remote contact disabled selection...

Страница 30: ...contact closed the domestic hot water set point is 50 C as shown in the example with the contact open it s 47 C This allows operation at a higher temperature within the unit s operating limits exploit...

Страница 31: ...4 15 3 22 4 00 Heating capacity 3 kW 5 30 9 00 14 70 5 30 9 00 14 70 Total power consumption 3 kW 1 74 2 90 4 55 1 74 2 90 4 55 COP EN14511 3 3 05 3 10 3 23 3 05 3 10 3 23 Cooling capacity 4 kW 4 00...

Страница 32: ...flow conditions 7 l min MAX return temperature to heat pump 55 C MAX outlet temperature to heat pump for DHW production 58 C Water circuit pressure min max 1 3 bar Maximum glycol percentage 40 The tem...

Страница 33: ...ble at the water connections 1 0 10 20 30 40 50 60 70 80 90 100 110 120 2 3 4 5 6 7 8 9 10 11 12 13 14 15 16 17 18 19 20 L min kPa 0011m 2 0 10 20 30 40 50 60 70 80 4 6 8 10 12 14 16 18 20 22 24 26 28...

Страница 34: ...learances have been respected Water connections have been carried out as indicated in the instruction manual All water connections are tight Make sure the water circuit has been washed and drained The...

Страница 35: ...eat pump the user must config ure the type of system See the chapter System configuration check the applica tion diagrams that the control unit is able to manage Set the current date and time on the A...

Страница 36: ...point 5 Relative humidity 6 Time band 7 Day of the week 8 Actuator operating 9 Secondary field 10 Active time band Function Heating Cooling automatic mode changeover based on outside air temperature...

Страница 37: ...ollowing information Additional information displayed During operation of the unit pressing the knob displays the information described below Press the knob Room temperature set point Press the knob H...

Страница 38: ...seconds Press the knob The hours flash Turn the knob to select the hour value Press the knob to confirm The minutes flash Turn the knob to select the minutes value Press the knob to confirm The day f...

Страница 39: ...UTOMATIC mode changeover selected Press the mode button COOLING mode selected Press the mode button HEATING mode selected Selecting the room temperature set point Turn the knob The room temperature se...

Страница 40: ...omestic hot water set point The domestic hot water temperature is measured by the probe installed inside the DHW storage tank x3 sec Press thei buttons together for 3 seconds Turn the knob and select...

Страница 41: ...41 EN 10 2010 i KI MTD i KIR MTD Press the button twice until reaching the main display Main display 10 11 OPERATION AND FUNCTIONS OF THE ROOM CONTROLLER A...

Страница 42: ...the knob B Press the knob to confirm Time band 1 Press the knob to confirm Time band 1 start hours A Turn the knob B Press the knob to confirm the hour value Time band 1 start minutes A Turn the knob...

Страница 43: ...it programming mode Time band program example Below is an example of a time band program with two temperature levels Comfort 20 C Economy 18 C and OFF Time band 1 Time band 2 Time band 3 Time band 4 T...

Страница 44: ...econds Unit OFF ZONE OFF x3 sec 1 2 3 Switching OFF The button disables operation of the pump or the zone valve controlled by the room controller the heat pump is deactivated using the button as shown...

Страница 45: ...ob to confirm Press the button twice until reaching the main display Main display 7 8 9 4 5 6 10 11 OPERATION AND FUNCTIONS OF THE ROOM CONTROLLER A A B Press the knob to confirm A Turn the knob to se...

Страница 46: ...oint compensation diagram in HEAT ING The compensation curve in heating mode can be modified to allow correct heat pump operation depending on the heat ing system used radiant panels radiators fan coi...

Страница 47: ...vice versa This allows the outlet temperature to adapt quickly to changes in the conditions inside the room The function can only be ENABLED if the A5 room controller is positioned in the room and use...

Страница 48: ...termines the water outlet temperature in the mixed circuit For systems configured with mixed zones the SYSTEM curve and ZONE curve must be selected The system and zone curve work in cascading the mixe...

Страница 49: ...nimum value shown in the paragraph on water connections parameter 0143 should be set to 0 CONTROL AND OPERATING CHARACTERISTICS A Description Automatic mode changeover set point in HEATING Automatic m...

Страница 50: ...tive even when the heat pump is off The system and domestic hot water pumps are activated when the outside air temperature falls below the value set for parameter 0141 CONTROL AND OPERATING CHARACTERI...

Страница 51: ...he following table describes the system configurations available Configuration 0 does NOT require additional expansion modules Configurations from 1 to 3 require 1 additional N EM1 expansion module Co...

Страница 52: ...DAMPER JOINT SHUT OFF VALVE SAFETY VALVE WITH PIPED DISCHARGE CHECK VALVE THERMOSTATIC MIXER VENT VALVE MEMBRANE EXPANSION VESSEL KEY TO THE SYMBOLS DRAIN VALVE CALIBRATING VALVE HEAT PUMP OUTLET HEAT...

Страница 53: ...uthority Mn01 0164 30 MINIMUM return set point limit for SYSTEM curve Mn01 0165 30 C MAXIMUM return set point limit for SYSTEM curve Mn01 0166 48 C SYSTEM compensation curves in cooling mode Enable SY...

Страница 54: ...WITH THE HEAT PUMP REMOVABLE METAL MESH FILTER 1 1 4 1 1 2 OR 2 1 1 4 THREE WAY SELECTOR VALVE FOR DHW PRODUCTION DHW STORAGE TANK MODEL HWC 300 OR HWC 500 ELECTRIC HEATER KIT 1 2 3 kW STORAGE TANK F...

Страница 55: ...7 8 9 SELECTOR VALVE TERMINAL BLOCK Brown Black Blue Red Green Yellow Green Ausiliary contact Brown Black Blue OUTSIDE INSIDE OUTSIDE AIR PROBE TERMINAL BLOCK ELECTRIC HEATER PANEL TERMINAL BLOCK ELE...

Страница 56: ...point limit for SYSTEM curve Mn01 0165 30 C MAXIMUM return set point limit for SYSTEM curve Mn01 0166 48 C SYSTEM compensation curves in cooling mode Enable SYSTEM compensation curve 0 Disabled 1 Enab...

Страница 57: ...g alarms Alarm log The alarm log can only be displayed using the service key pad Contact an authorised service centre The room controller can display the most recently activated alarm code from Mn11 p...

Страница 58: ...be 2 A064 Temperature probe in low temperature zone LT3 expansion 3 Probe faulty or disconnected A075 Water temperature too high in mixed circuit expansion module 1 A077 Water temperature too high in...

Страница 59: ...the refrigerant and then recharge to the specified mass A2 Overcurrent protec tion Direct current DC measurement ABNORMAL CURRENT DRAW Check the installation position intake and outlet air blocked Che...

Страница 60: ...OTOR 1 Check FAN MOTOR voltage If the voltage is correct replace the FAN MOTOR If the voltage is not correct replace the CONTROL BOARD PCB 0011 CONTROL BOARD PCB CONTROLLER 0011 0031 C4 POWER MODULE t...

Страница 61: ...K Check the service valve and the refrigerant circuit After having repaired the leak collect all the refrigerant and then recharge to the specified mass 0011 0031 WATER CIRCUIT BLOCKED Check the tempe...

Страница 62: ...position Place QF1 in the OFF position see wiring diagram Deactivate the indoor terminal units by placing the switch of each unit in the OFF position Close the water valves If the outside temperature...

Страница 63: ...ng with a suitable leak detector The refrigerant circuit must not be charged with a refrigerant other than that indicated on the rating plate and in this manual The use of a different refrigerant may...

Страница 64: ...ATING Mn01 0153 C Enable SYSTEM compensation curve 0 Disabled 1 Enabled Mn01 0154 Fixed return water temperature set point in COOLING Mn01 0155 C Enable compensation for room humidity SYSTEM 0 Disable...

Страница 65: ...lant and ambient 0 Unit work on ambient request 1 Unit work indipendent Mn01 011D Installer password Mn01 011G Enable compensation curve for LT3 in HEATING 0 Disabled fixed set point operation 1 Enabl...

Страница 66: ...YES NO If YES has the system been developed completely in accordance with the design YES NO Installation date ____________________________________ Systems included Winter heating AT radiators Winter h...

Страница 67: ...Checking and starting up the unit Two pressure gauges with a suitable scale are installed on the inlet and outlet The unit is positioned as described in the chapter on Positioning in this manual The f...

Страница 68: ...ge for the unit Unbalance between phases is less than 2 for three phase units Maintenance clearances comply with the specifications in the Installation manual under the section on POSITIONING Power su...

Страница 69: ......

Страница 70: ...n Tel 34 963 195 600 Fax 34 963 615 167 topclima topclima com www climaveneta com Climaveneta Chat Union Refrig Equipment Co Ltd 88 Bai Yun Rd Pudong Xinghuo New dev zone 201419 Shanghai China Tel 008...

Отзывы: