background image

16 

English

Windows Control Panel & Desktop

Most of the control panels, utilities and applications with-
in 

Windows 

are accessed from the 

Start

 menu in 

Win-

dows 7

, and from the 

Desktop

 in 

Windows 8

.

Throughout this manual you will see an instruction to
open the 

Control Panel

. In 

Windows 7 

click the Start

menu and select 

Control Panel

. In 

Windows 8

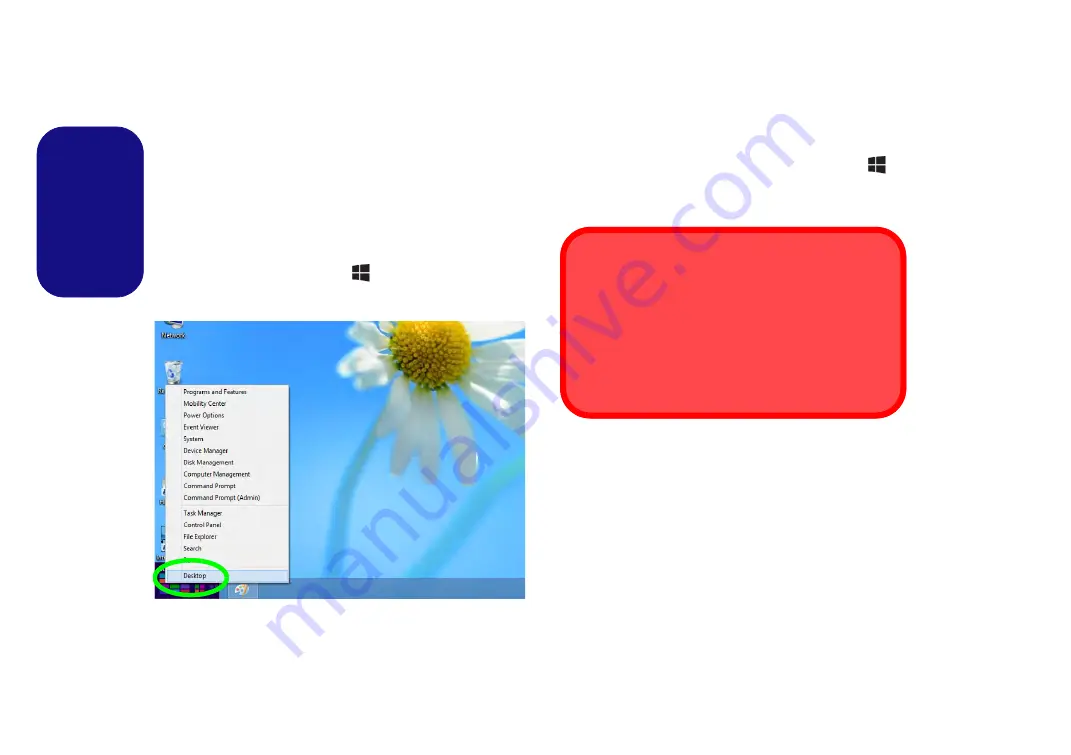
 right-click

the lower left hot corner to bring up the context menu (or
use the 

Windows Logo Key 

 + X 

key combination)

and select 

Control Panel

.

Figure 11 - Windows 8 Context Menu

The desktop interfaces for both 

Windows 7 & 8

 are similar

(

Windows 8 

has no start button). To access the Desktop

App in 

Windows 8 

use the 

Windows Logo Key 

 + D

key combination or Desktop App in the Metro UI Start
Screen (

Windows 7

’s standard interface is the desktop).

Move the mouse to the

and right-click to access 

bottom left of the screen 

the menu.

Screen Resolution for Metro Style Apps 

(Windows 8)

The minimum resolution in which Metro style apps will
run is 1024x768. 

The minimum resolution required to support all the fea-
tures of 

Windows 8

 (including multitasking with snap) is

1366x768.

Содержание P370EM

Страница 1: ......

Страница 2: ......

Страница 3: ... version française de ce guide commence à la page 77 Le Manuel de l Utilisa teur étendu se trouve sur le disque de Pilotes Utili taires Manuel de l Utilisateur disque Device Drivers Utilities User s Manual Introducción Español Esta Guía del Usuario Concisa le presenta las caracterís ticas principales de su ordenador La versión española de esta guía comienza en la página 115 El Manual del usua rio ...

Страница 4: ...rt Technology 34 Troubleshooting 36 Specifications 37 Inhalt Über das Ausführliche Benutzerhandbuch 39 Schnellstart 42 RAID Setup für Windows 8 43 Systemübersicht Ansicht von vorne mit geöffnetem LCD Bildschirm 46 LED Anzeigen 47 Tastatur Funktionstasten 48 Control Center Steuerzentrum 50 Systemübersicht Ansicht von vorne links und rechts 52 Systemübersicht Ansicht von hinten und unten 53 Windows ...

Страница 5: ... Technology 109 Intel Rapid Start Technology 110 Dépannage 112 Spécifications 113 Contenidos Acerca de esta Guía del Usuario Concisa 115 Guía rápida para empezar 118 Software de sistema 119 Configuración RAID para Windows 8 119 Mapa del sistema Vista frontal con panel LCD abierto 122 Indicadores LED 123 Teclado teclas de función 124 Control Center Centro de control 126 Mapa del sistema Vistas fron...

Страница 6: ...del sistema Vista anteriore sinistra e destra 166 Descrizione del sistema Vista posteriore e inferiore 167 Pannello di controllo e Desktop di Windows 168 Funzioni video 169 Opzioni risparmio energia 172 Funzionalità audio 172 Installazione driver 175 Camera PC Opzione 177 Modulo LAN Wireless Opzione 178 Lettore d impronte digitali 180 Modulo Bluetooth Opzione 181 TPM Trusted Platform Module 183 In...

Страница 7: ...en t or you are planning to re configure or re install portions of the system refer to the expanded User s Manual The Device Drivers Utilities User s Manual disc does not contain an operating system Regulatory and Safety Information Please pay careful attention to the full regulatory notices and safety information contained in the expanded User s Manual on the Device Drivers Utilities Us er s Manu...

Страница 8: ...ady uninterrupted power supply If you are unsure of your local power specifications consult your ser vice representative or local power company The AC DC adapter may have either a 2 prong or a 3 prong grounded plug The third prong is an important safety feature do not defeat its purpose If you do not have access to a compat ible outlet have a qualified electrician install one When you want to unpl...

Страница 9: ... the computer yourself may violate your warranty and expose you and the computer to electric shock Refer all servicing to qualified service personnel particularly under any of the following conditions When the power cord or AC DC adapter is damaged or frayed If the computer has been exposed to any liquids If the computer does not work normally when you follow the operating instructions If the comp...

Страница 10: ...ortable viewing angle do not to exceed 135 degrees use the other hand as illustrated in Figure 1 to support the base of the computer Note Never lift the computer by the lid LCD 7 Press the power button to turn the computer on Figure 1 Opening the Lid LCD Computer with AC DC Adapter Plugged In 135 ゚ Shut Down Windows 7 Note that you should always shut your computer down by choosing Shut Down from t...

Страница 11: ...for either fault tolerance or performance Table 1 RAID Description RAID Level Description RAID 0 at lease two hard disks needed Identical drives reading and writing data in par allel to increase performance RAID 0 imple ments a striped disk array and the data is broken into blocks and each block is written to a separate disk drive RAID 1 at lease two hard disks needed Identical drives in a mirrore...

Страница 12: ...ble computer 3 Copy the f6flpy x64 folder from the location below D denotes your DVD drive on the Device Drivers Utilities User s Manual disc to the USB flash drive or external USB hard disk Windows 8 64bit D Options 00_IRST f6flpy f6flpy x64 4 Start up your notebook computer and press F2 to enter the BIOS 5 Go to the Boot menu select OS Select and press Enter 6 Set OS Select to Windows 8 and set ...

Страница 13: ...y boot from the Windows 8 OS DVD you will be prompted to press a key to boot from the DVD Make sure your USB Flash drive or external USB hard disk is attached to one of the USB ports on the computer 27 Press F7 as the computer starts up to bring up the boot device menu 28 Select the DVD drive containing the Windows 8 OS DVD and press Enter 29 Press a key at system startup to begin installing Windo...

Страница 14: ...utton zones at the bottom of the pad measure about 15mm from the bottom of the pad and the left and right buttons are divided roughly down the middle as il lustrated below Press the left button zone for a left click and right button zone for a right click action Figure 5 Front View with LCD Panel Open 1 PC Camera Optional 2 PC Camera LED When the PC camera is in use the LED will be illuminated in ...

Страница 15: ...eric Keypad Acti vated White Caps Lock Activated White Scroll Lock Activated Wireless Device Operation Aboard Aircraft The use of any portable electronic transmission devices aboard aircraft is usually prohibited Make sure the wireless modules are OFF or in Airplane mode for Windows 8 only if you are using the computer aboard aircraft Icon Color Description Orange The AC DC Adapter is Plugged In B...

Страница 16: ...tors Keys Function Visual Indicators Fn Play Pause in Audio Video Programs Fn F11 WLAN Module Power Toggle Fn F1 Touchpad Toggle Fn F12 Bluetooth Module Power Toggle Fn F2 Turn LCD Backlight Off Press a key to or use Touchpad to turn on NumLk Number Lock Toggle Fn F3 Mute Toggle ScrLk Scroll Lock Toggle Fn F4 Sleep Toggle Caps Lock Caps Lock Toggle Fn F5 F6 Volume Decrease Increase Fn Power But to...

Страница 17: ...k a color swatch to apply the color to the selected sec tion when not overidden by any effect applied Click on any of the effect buttons to apply random colors wave or flashing effects etc Figure 7 Keyboard Backlight Application Effect Buttons Help Table 6 LED Effect Buttons Keyboard LED Function key Combinations Fn Launch the Key board Backlight Application Fn Toggle the Key board LED On Off Fn K...

Страница 18: ... key combination in Windows 8 and not from the Start Screen in the Metro UI Figure 8 Control Center Click on any button to turn any of the modules e g Touchpad Camera on off Click on Power Conservation to switch between Performance Balanced or Energy Star modes Click on the buttons or just click and hold the mouse button to adjust the slider for Brightness Volume Click on Display Switch Time Zone ...

Страница 19: ... Sleep Click the Sleep button to bring up the Hibernate or Sleep buttons and click either button to have the computer enter the appropriate power saving mode Display Switch Click the Display Switch button to ac cess the menu or use the P key combination and select the appropri ate attached display mode Time Zone Clicking the Time Zone button will access the Date and Time Windows control panel Desk...

Страница 20: ...f but still powered by the AC DC adapter plugged into a working outlet or powered by the battery with a capacity level above 20 this may not work with certain devices see page 36 Toggle power to this port by using Fn power button 12 9 4 Figure 9 Front Left Right Views 1 LED Indicators 2 Security Lock Slot 3 RJ 45 LAN Jack 4 Multi in 1 Card Reader 5 Line In Jack 6 S PDIF Out Jack 7 Microphone Jack ...

Страница 21: ...sides the built in LCD you can also use an external VGA moni tor CRT external Flat Panel Display or TV connected to the HDMI Out port Dis playPort as your dis play device 1 1 1 CPU The CPU is not a user serviceable part Ac cessing the CPU in any way may violate your warranty Overheating To prevent your com puter from overheat ing make sure nothing blocks any vent while the computer is in use 1 1 1...

Страница 22: ...mbination and select Control Panel Figure 11 Windows 8 Context Menu The desktop interfaces for both Windows 7 8 are similar Windows 8 has no start button To access the Desktop App in Windows 8 use the Windows Logo Key D key combination or Desktop App in the Metro UI Start Screen Windows 7 s standard interface is the desktop Move the mouse to the and right click to access bottom left of the screen ...

Страница 23: ...ontrol Panel from the menu To access the Catalyst Control Center 1 Win 7 Right click the desktop and select Graphics Proper ties Win 8 Right click the desktop use the Windows Logo Key D key combination to access the desktop and select Graphics Properties OR 2 Double click the icon or right click the icon and select Configure Graphics in the notification area of the taskbar make sure Enable System ...

Страница 24: ...el B Computers Only features a built in 3D IR emitter The effective viewing angles of the emitter are illustrated in Figure 14 on page 19 Make sure that you are viewing the notebook screen within the area highlighted in order to get the proper stereoscopic 3D effect Figure 12 IR Emitter Location Important Safety Instructions Make sure you read all the enclosed safety instructions and precautions i...

Страница 25: ...ring the setup procedure you will need to click to answer questions on what you see in 3D on the screen 8 Configure the stereoscopic 3D from the control panels make sure you charge the 3D shutter glasses by plugging them into one of the computer s USB ports using the USB cable provided 9 You can also select Run Setup Wizard or Run Medical Image Test from this menu at the bottom of the control pane...

Страница 26: ...ions Audio Features You can configure the audio options on your computer from the Sound control panel in Windows or from the Realtek HD Audio Manager icon in the notifica tion area control panel right click the notification area icon to bring up an audio menu The volume may also be adjusted by means of the Fn F5 F6 key combination Audio Setup for HDMI HDMI supports video and audio signals In some ...

Страница 27: ...Control Panel 2 Click Realtek HD Audio Manager or right click the notification area icon and select Sound Manager 3 Click Speakers tab and click Speaker Configuration tab 4 Select 5 1 Speaker or 7 1 Speaker from the Speaker Configuration pull down menu 5 Plug the front speaker cables into the Headphone Out Jack 6 Plug in the cables you may require an adapter to connect each cable to the appropriat...

Страница 28: ...ble click the Sound Blaster icon on the desktop the Start Screen and click the Activate button 3 The program will connect to the internet to verify the activation key 4 Click Finish to complete the application activation 5 Restart the computer Sound Blaster Application Win 7 The application can be run from the shortcut in the Start menu Start All Programs Creative Sound Blaster X Fi MB 2 Win 8 Run...

Страница 29: ... make sure your computer is powered by the AC DC adapter connected to a working power source Some drivers draw a significant amount of power during the installation procedure and if the re maining battery capacity is not adequate this may cause the system to shut down and cause system problems note that there is no safety issue involved here and the battery will be rechargeable within 1 minute Dri...

Страница 30: ... settings button and click Next 4 Click Accept button and click Yes 5 Click Finish Yes to restart the computer LAN 1 Click 3 Install LAN Driver Yes 2 Click Next Install Finish CardReader 1 Click 4 Install Cardreader Driver Yes 2 Click Finish Touchpad 1 Click 5 Install Touchpad Driver Yes 2 Click Next 3 Click the button to accept the license and click Next 4 Click Finish Restart Now to restart the ...

Страница 31: ... avi format 1 Run the camera application from the desktop shortcut 2 Go to the Capture menu heading and select Start Capture 3 Click OK the file location will be displayed in the pop up box to start capturing the video and press Esc to stop the capture you can view the file using the Windows Media Player Metro UI Camera App Win 8 1 Make sure the PC Camera is turned on by using the Fn F10 key combi...

Страница 32: ... the instructions below WLAN WLAN and Bluetooth Combo Intel 1 Click Option Drivers button 2 Win 7 Click 2 Install WLAN Driver Yes Win 8 Click 1 Install WLAN Driver Yes 3 Click Next Next 4 Click the button to accept the license and click Next 5 Click Typical buttom or Custom buttom 6 Click Install Finish WLAN and Bluetooth 4 0 Combo Third Party 1 Click Option Drivers button 2 Win 7 Click 2 Install ...

Страница 33: ...ss icon click the active connection and then click Disconnect button WLAN Configuration in Windows 8 Make sure the Wireless LAN module is turned on and not in Airplane Mode before configuration begins 1 Go to the Charms Bar 2 Select Settings and then click the WiFi icon it should read Available under the icon and Airplane mode should be Off 3 A list of available access points will appear 4 Double ...

Страница 34: ...ready done so at this point click OK to confirm the password entry 6 Swipe the finger until the progress bar reaches 100 to enroll that finger 7 You will be prompted to select another finger for enrollment it is recommended that you enroll a number of fingers 8 Click the button to continue once you have enrolled a number of fingerprints 9 Enter the required information and click the button to regi...

Страница 35: ... the instructions below WLAN and Bluetooth Combo Intel 1 Click Option Drivers button 2 Win 7 Click 4 Install Combo BT Driver Yes Win 8 Click 3 Install Combo BT Driver Yes 3 Click Next Next 4 Click the button to accept the license and click Next 5 Click Next Finish WLAN and Bluetooth 4 0 Combo Third Party 1 Click Option Drivers button 2 Win 7 Click 4 Install Combo BT Driver Yes Win 8 Click 3 Instal...

Страница 36: ...the Search Help box and then click the magnifying glass icon to find more information on Blue tooth transfer Bluetooth Configuration in Windows 8 Make sure the Bluetooth module is turned on and not in Airplane Mode before configuration begins 1 Turn your Bluetooth device e g PDA mobile phone etc on 2 Make the device discoverable to do this check your device documentation 3 Go to the Charms Bar 4 S...

Страница 37: ...the changes and restart the computer 7 As the computer restarts press F2 to enter the BIOS again and go to the TPM Configuration menu 8 Select Pending TPM operation press Enter and select the option you require if you are initializing TPM you should select Enable Take Ownership You will then need to press F4 to save the changes and restart the computer 9 You can now install the TPM driver and then...

Страница 38: ...ou want to use from the drop down menu and click Next 6 Choose the Security Platform Features you want to use by clicking the appropriate tickbox 7 Enter a Basic User Password and re type to confirm it and click Next 8 Click Next to confirm the settings 9 The computer will then initialize the settings 10 Click Finish 11 Click the tabs and control panels to adjust the settings 12 Double click the t...

Страница 39: ...oftware installed A Solid State Drive SSD with a minimum capacity of 18 6GB Enabling Intel Smart Response Technology 1 Win 7 Run the Intel Rapid Storage Technology application from the All Programs menu Win 8 Double click the icon Intel Rapid Storage Technol ogy on the Start Screen 2 Click Enable acceleration either under Status or Accelerate 3 Select the SSD to be used as a cache device 4 Select ...

Страница 40: ... and Security Computer Management Storage Disk Management 3 Right click the SSD and select Shrink Volume from the menu 4 Enter the figure which should be equal to amount of system memory RAM in your computer in Enter the amount of space to shrink in MB 5 Click Shrink any unallocated file space may be formatted for storage use 6 Click the Start menu and type CMD in the search box 7 Click CMD from t...

Страница 41: ...lly set the partition ID will appear 19 Close the CMD window 20 Go the Windows control panel and double click Administrative Tools System and Security Computer Management Storage Disk Management 21 The disk partition should read Healthy Hibernation Partition 22 Restart the computer Intel Rapid Start Technology Driver Instal lation 1 Click Option Drivers button 2 Win 7 Click 8 Install Rapid Start D...

Страница 42: ...ear any sound The audio driver is not installed Install all the drivers as instructed in the section Driver Installation and make sure you install the audio driver The computer is off or in Sleep Mode but powered by the AC DC adapter plugged in to a working outlet or powered by the battery with a capacity level above 20 I have plugged a device into the powered USB port in order to charge it but th...

Страница 43: ...BIOS AMI BIOS 48Mb SPI Flash ROM Security Security Kensington Type Lock Slot BIOS Password Fingerprint Reader Module TPM 1 2 Video Adapter Model A AMD Radeon HD 7970M PCIe Video Card 2GB GDDR5 Video RAM on board Microsoft DirectX 11 2nd Generation Compatible Supports AMD CrossFireX Technology nVIDIA GeForce GTX 670M PCIe Video Card 1 5GB GDDR5 Video RAM on board Microsoft DirectX 11 Compatible Sup...

Страница 44: ...or WLAN Module or Combo WLAN and Bluetooth Module Slot 2 for mSATA SSD Communication Built in 10 100 1000Mb Ethernet LAN Factory Option 2 0M FHD PC Camera Module Factory Option Bluetooth 2 1 EDR Module WLAN Bluetooth Half Mini Card Modules Factory Option Intel Centrino Ulti mate N 6300 Wireless LAN 802 11a g n Factory Option Intel Centrino Advanced N 6235 Wireless LAN 802 11a g n Bluetooth 4 0 Fac...

Страница 45: ...on ohne Vorankündigung zu überarbeiten und den Inhalt zu verändern Einige oder alle Funktionen des Computers sind bereits eingerichtet worden Falls das nicht der Fall ist oder wenn Sie ein zelne Teile des Systems neu konfigurieren oder neu installieren möchten finden Sie eine Anleitung im erweiterten Benut zerhandbuch Die Disc Device Drivers Utilities User s Manual enthält nicht das Betriebssystem...

Страница 46: ...ale Benutzung vorge sehen sein benötigt aber trotzdem eine gleichmäßige ununterbro chene Stromversorgung Wenn Sie sich über Ihre lokalen Stromspezifikationen nicht im klaren sind wenden Sie sich an Ihren Servicevertreter oder Ihre lokale Stromgellschaft Der AC DC Adapter kann einen zwei oder dreipoligen geerdeten Netzstecker haben Der dritte Pol hat eine wichtige Sicherheitsfunk tion Setzen Sie di...

Страница 47: ...sanweisungen nicht korrekt arbeitet Wenn der Computer heruntergefallen ist oder beschädigt wurde berühren Sie nicht die giftige Flüssigkeit des LCD Bildschirms Wenn ein ungewöhnlicher Geruch Hitze oder Rauch aus dem Compu ter entweicht Reinigung Reinigen Sie den Computer mit einem weichen sauberen Tuch Tragen Sie das Reinigungsmittel nicht direkt auf den Computer auf Verwenden Sie keine flüchtigen...

Страница 48: ...uf einen angenehmen Sichtwinkel jedoch nicht weiter als 135 Mit der anderen Hand halten Sie das Unterteil des Computers fest siehe Abb 1 Hinweis Heben Sie den Computer niemals am Deckel LCD hoch 7 Drücken Sie auf den Netzschalter um den Computer einzuschalten Abb 1 Öffnen des Deckels LCD Computers mit angeschlossenem AC DC Adapter 135 ゚ Herunterfahren Windows 7 Bitte beachten Sie daß der Computer ...

Страница 49: ... Beschreibung RAID Ebene Beschreibung RAID 0 mindestens zwei Fest platten erforder lich Identische Laufwerke lesen und schreiben Daten parallel um die Leistung zu verbessern Bei RAID 0 wird ein Striped Disk Array verwendet die Daten wer den in Blöcke aufgeteilt und jeder Block wird auf ein anderes Laufwerk geschrieben RAID 1 mindestens zwei Fest platten erforder lich Identische Laufwerke mit einer...

Страница 50: ...y x64 auf den USB Stick oder auf eine externe USB Festplatte Windows 8 64bit D Options 00_IRST f6flpy f6flpy x64 4 Starten Sie den Computer und drücken Sie auf die Taste F2 um in das BIOS zu gelangen 5 Gehen Sie zum Menü Boot wählen Sie OS Select und drücken Sie auf die Eingabetaste 6 Wählen Sie bei OS Select als Betriebssystem Windows 8 Wählen Sie UEFI Boot drücken Sie auf die Eingabetaste und wä...

Страница 51: ...ndet Während der Computer hochfährt startet dieser automa tisch von der Windows 8 DVD Sie werden aufgefordert eine Taste zu drücken um den Systemstart von der DVD auszuführen Stellen Sie sicher dass ein USB Stick oder eine externe USB Fest platte an einen der USB Anschlüsse des Computers angeschlossen ist 27 Drücken Sie während des Computerstarts auf F7 um das Menü zum Festlegen des Bootgeräts auf...

Страница 52: ... immer optimal arbeitet muss die Oberfläche sauber und frei von Fingerabdrücken usw sein Reinigen Sie das Touchpad mit dem mitgelieferten Reinigungstuch Deaktivieren des Touchpads Sie können das Touchpad mit der Tastenkombination Fn F1 oder mit der Control Center Taste deakti vieren Abb 5 Ansicht von vorne mit geöffnetem LCD Bild schirm 1 PC Kamera optional 2 LED der PC Kamera Wenn die PC Kamera v...

Страница 53: ...Weiß Die Nummerntastatur ist aktiviert Weiß Caps Lock ist aktiviert Weiß Scroll Lock ist aktiviert Die Benutzung drahtlos angeschlossener Geräte in Flugzeugen In der Regel ist die Benutzung jeglicher tragbarer elektroni scher Funkgeräte in Flugzeugen verboten Achten Sie darauf daß die Wireless Module AUSGESCHAL TET sind oder im Flugzeugmodus nur für Windows 8 wenn Sie den Computer im Flugzeug benu...

Страница 54: ... aktivieren deaktivieren Fn F1 Touchpad aktivieren deaktivieren Fn F12 Bluetooth Modul aktivieren deaktivieren Fn F2 LCD Hintergrundlicht ausschalten zum Einschalten beliebige Taste drücken oder Touchpad berühren Num Ein Ausschalten der Nummerntastatur Fn F3 Stummschaltung Stummschal tung aufheben Rollen Ein Ausschalten des Scroll Modus Fn F4 Wechsel Schlaf Wiederaufnahme Ein Ausschalten der Fests...

Страница 55: ...auf eine Farbschaltfläche um diese Farbe auf den ausgewählten Bereich anzuwenden falls diese nicht von einem anderen Effekt überlagert wird Klicken Sie auf eine beliebige Effekt Taste um z B Zufallsfar ben Wellen oder Blinkeffekte anzuwenden Abb 7 Anwendung für das Tastatur Hintergrundlicht Effekttasten Hilfe Tabelle 6 LED Effekttasten Tastatur LED Funktionstastenkombinationen Fn Startet die Anwen...

Страница 56: ...der Metro UI erreichbar Abb 8 Control Center Klicken Sie auf eine beliebige Taste um ein Modul z B Touchpad Kamera ein auszuschalten Klicken Sie auf Power Conservation Strom sparen um einen der Modi Performance Leistung Balanced Ausgeglichen oder Energy Star auszuwählen Klicken Sie auf die Tasten oder drücken Sie nur auf die Maustaste und halten Sie diese gedrückt um die Helligkeit Lautstärke Brig...

Страница 57: ...ar Sleep Schalter Klicken Sie auf den Schalter für den Ru hezustand um die Schaltflächen Ruhezu stand oder Schlaf aufzurufen Klicken Sie dann auf eine der beiden Tasten um den Computer in den jeweiligen Modus zu versetzen Display Switch Anzeige wechseln Klicken Sie auf die Taste zum Wechseln des Anzeigegeräts um das Menü aufzu rufen Sie können dazu auch die Tastenkombination P verwenden und wählen...

Страница 58: ...mit mehr als 20 Ladung mit Strom ver sorgt wird die Stromversorgung kann bei bestimmten Geräten u U nicht funktionieren siehe Seite 74 Dieser Anschluss wird mit der Tastenkombination Fn Netzschalter eingeschaltet 12 Abb 9 Ansicht von vorne links und rechts 1 LED Anzeigen 2 Sicherheitsschloß Buchse 3 RJ 45 LAN Buchse 4 Multi in 1 Kartenleser 5 Line Eingangsbuchse 6 S PDIF Ausgang Buchse 7 Mikrofon ...

Страница 59: ...nen Sie auch einen externen Moni tor Flachbildschirm oder ein Fernsehgerät an den HDMI Ausgangsan schluss DisplayPort ange schlossen als Anzeigegerät anschließen CPU Die CPU darf nicht vom Anwender repariert wer den Jeglicher Zugriff auf die CPU führt zum Verlust der Garantiean sprüche Überhitzung Zum Schutz vor Überhit zung Ihres Computers dürfen die Luftungsoff nung en nicht während das Notebook...

Страница 60: ... Windows 8 Abb 11 Kontextmenü Windows 8 Die Desktop Oberflächen sind bei Windows 7 und 8 ähnlich bei Windows 8 gibt es keine Start Taste Sie können die Desktop App bei Windows 8 öffnen indem Sie die Windows Logo Taste und die Taste D oder die Desk top App auf dem Metro UI Startbildschirm klicken die Standardoberfläche von Windows 7 ist der Desktop Verschieben Sie die Maus in die linke untere Ecke ...

Страница 61: ... So öffnen Sie das Catalyst Control Center 1 Win 7 Klicken Sie mit der rechten Maustaste auf den Desktop Win 8 Klicken Sie mit der rechten Maustaste auf den Desktop verwenden Sie die Tastenkombination D um den Desktop aufzurufen und die Option Catalyst Control Center wählen Oder 2 Klicken Sie doppelt auf das Symbol in der Taskleiste oder mit der rechten Maustaste auf das Symbol klicken und Grafike...

Страница 62: ... Computer Optional nur für Modell B verfügt über einen integrierten 3D IR Sender Die effektiven Sichtwinkel des Senders sind abgebildet in Abb 14 auf Seite 57 Den eigentlichen Stereo 3D Effekt erhalten Sie wenn Sie innerhalb des gekennzeichneten Bereichs auf den Notebookbildschirm sehen Abb 12 Position des IR Senders Wichtige Sicherheitsanweisungen Lesen Sie sich unbedingt alle im NVIDIA 3D Vision...

Страница 63: ... Notebook verfügt über einen integrierten Sender 7 Während dieses Vorgangs müssen Sie Fragen beantworten was Sie auf dem Bildschirm in 3D sehen können 8 Konfigurieren Sie über die Bedienfelder die Stereoskopische 3D Funktion Laden Sie die 3D Shutterbrille auf indem Sie sie mit dem mitgelieferten USB Kabel an einen USB Anschluss des Computers anschließen 9 Aus diesem Menü können Sie auch die Option...

Страница 64: ... Konfiguration aufzurufen Audiofunktionen Die Audioeinstellungen können Sie bei Windows durch An klicken des Soundsymbols oder des Realtek HD Audio Manager Symbols im Infobereich in der System steuerung aufrufen wenn Sie mit der rechten Maustaste auf das Symbol im Infobereich klikken wird das Audiomenü aufgerufen Die Lautstärke können Sie durch Drücken der Tastenkombination Fn F5 F6 ändern Audio S...

Страница 65: ...dio Manager oder klicken Sie mit der rechten Maustaste auf das Symbol im Infobereich und wählen Sie Sound Manager 3 Klicken Sie auf Lautsprecher Registerkarte und klicken Sie auf Lautsprecherkonfiguration Registerkarte 4 Wählen Sie bei Lautsprecherkonfiguration die Option 5 1 Lautsprecher oder 7 1 Lautsprecher 5 Schließen Sie die Kabel der vorderen Lautsprecher an die Kopfhörer Ausgangsbuchse an 6...

Страница 66: ...pelt auf das Symbol Sound Blaster auf dem Desktop auf dem Startbildschirm und klicken Sie auf Aktivieren 3 Das Programm stellt eine Verbindung zum Internet her um den Aktivierungsschlüssel zu prüfen 4 Klicken Sie auf Finish Fertig stellen um die Aktivierung der Anwendung abzuschließen 5 Starten Sie den Computer neu Anwendung Sound Blaster Win 7 Die Anwendung kann über die Verknüpfung im Menü Start...

Страница 67: ...en Tabelle 7 Installationsvorgang Treiberinstallation und Stromversorgung Während die Treiber installiert werden muss der Computer über den AC DC Adapter mit Strom versorgt werden Einige Treiber benötigen für den Installationsvorgang sehr viel Strom Wenn der Akku nicht mehr über genügend Strom verfügt kann sich das System während der Installation ausschalten was zu Systemfehlern führen kann das is...

Страница 68: ... und klicken auf Ja 5 Klicken Sie auf Fertig stellen Ja um das Notebook neu zu starten LAN 1 Klicken Sie auf 3 Install LAN Driver Ja 2 Klicken Sie auf Weiter Installieren Fertig stellen Kartenleser 1 Klicken Sie auf 4 Install Cardreader Driver Ja 2 Klicken Sie auf Fertig stellen Touchpad 1 Klicken Sie auf 5 Install Touchpad Driver Ja 2 Klicken Sie auf Weiter 3 Klicken Sie auf die Schaltfläche Ich ...

Страница 69: ...eranwendung über die Verknüpfung auf dem Desktop 2 Gehen Sie zum Menü Aufnahme und wählen Sie dann Aufnahme starten 3 Klicken Sie auf OK der Speicherort der Datei wird im Pop up Fenster angezeigt um die Aufzeichnung zu starten und auf Esc um sie zu stoppen Die Datei können Sie sich dann mit Windows Media Player ansehen Metro UI Kamera App Win 8 1 Schalten Sie die PC Kamera ein indem Sie die Tasten...

Страница 70: ...haltfläche 2 Win 7 Klicken Sie auf 2 Install WLAN Driver Ja Win 8 Klicken Sie auf 1 Install WLAN Driver Ja 3 Klicken Sie auf Weiter Weiter 4 Klicken Sie auf die Schaltfläche Ich akzeptiere die Bedingungen der Lizenzvereinbarung und dann auf Weiter 5 Klicken Sie auf Standard Schaltfläche oder Benutzerdefiniert Schaltfläche 6 Klicken Sie auf Installieren Fertig stellen WLAN und Bluetooth 4 0 Combo a...

Страница 71: ...ymbol in der Taskleiste dann auf die aktive Verbindung und dann auf Trennen Schaltfläche WLAN Konfiguration in Windows 8 Stellen Sie vor der Konfiguration sicher dass das WLAN Modul eingeschaltet ist Flugzeugmodus deaktiviert 1 Rufen Sie die Charms Bar auf 2 Wählen Sie Einstellungen und klicken Sie dann auf das WiFi Symbol unter dem Symbol steht Verfügbar und der Flugzeugmodus muss Aus sein 3 Eine...

Страница 72: ...n Klicken Sie auf OK um das Passwort zu bestätigen 6 Führen Sie den Finger zum Registrieren des Abdrucks so lange über den Sensor bis der Fortschrittsbalken 100 erreicht hat 7 Sie werden nun aufgefordert einen weiteren Finger anzumelden es wird empfohlen mehrere Finger anzumelden 8 Wenn Sie mehrere Fingerabdrücke angemeldet haben klicken Sie zum Fortfahren auf die Schaltfläche 9 Geben Sie die erfo...

Страница 73: ...tel 1 Klicken Sie auf Option Drivers Schaltfläche 2 Win 7 Klicken Sie auf 4 Install Combo BT Driver Ja Win 8 Klicken Sie auf 3 Install Combo BT Driver Ja 3 Klicken Sie auf Weiter Weiter 4 Klicken Sie auf die Schaltfläche um die Lizenzvereinbarung anzunehmen und klicken Sie dann auf Weiter 5 Klicken Sie auf Weiter Fertig stellen WLAN und Bluetooth 4 0 Combo andere Hersteller 1 Klicken Sie auf Optio...

Страница 74: ...Lupen Symbol Sie erhalten dann wei tere Informationen zur Bluetooth Übertragung Bluetooth Konfiguration in Windows 8 Stellen Sie vor der Konfiguration sicher dass das Bluetooth Modul eingeschaltet ist Flugzeugmodus deaktiviert 1 Schalten Sie Ihr Bluetooth Gerät z B PDA Mobiltelefon ein 2 Schalten Sie das Gerät in den Erkennbar Modus eine Beschreibung dazu finden Sie in der dazugehörigen Dokumentat...

Страница 75: ...ken Sie beim Neustart des Computers auf F2 um das BIOS erneut aufzurufen und gehen Sie zum Menü TPM Configuration 8 Wählen Sie Pending TPM operation Laufende TPM Operation drücken Sie auf die Eingabetaste und wählen Sie die benötigte Option aus wenn Sie TPM initialisieren sollten Sie Enable Take Ownership Besitz übernehmen aktivieren auswählen Sie müssen anschließend auf F4 drücken um die Änderung...

Страница 76: ...ter 6 Wählen Sie die gewünschten Funktionen der Security Platform durch Anklicken der entsprechenden Kästchen aus 7 Geben Sie ein Basic User Password Benutzerkennwort ein und ein zweites Mal zur Bestätigung und klicken Sie auf Weiter 8 Klicken Sie auf Weiter um die Einstellungen zu bestätigen 9 Der Computer wird die Einstellungen anschließend initialisieren 10 Klicken Sie auf Fertig stellen 11 Kli...

Страница 77: ...talliert Ein SSD Laufwerk mit einer Mindestkapazitat von 18 6GB Aktivieren der Intel Smart Response Techno logy 1 Win 7 Starten Sie die Anwendung Intel Rapid Storage Technology aus dem Menu Alle Programme Win 8 Klicken Sie Doppelt auf das Symbol Intel Rapid Sto rage Technology auf dem Startbildschirm 2 Klicken Sie bei Status oder Beschleunigen auf Beschleunigung aktivieren 3 Wahlen Sie das SSD Lau...

Страница 78: ...SSD und wahlen Sie aus dem Menu die Option Volume verkleinern 4 Geben Sie bei Zu verkleinernder Speicherplatz in MB einen Wert ein Dieser sollte mit der Grose des Systemspeichers RAM Ihres Computers ubereinstimmen 5 Klicken Sie auf Verkleinern jeder nicht zugewiesene Speicherbereich kann fur die Speicherverwendung formatiert werden 6 Klicken Sie auf Start und geben Sie in das Suchfeld CMD ein 7 Kl...

Страница 79: ...zt angezeigt 19 Schliesen Sie das CMD Fenster 20 Rufen Sie die Windows Systemsteuerung auf und klicken Sie doppelt auf Verwaltung System und Sicherheit Computerverwaltung Speicher Datentragerverwaltung 21 Diese Laufwerkspartition tragt nun die Bezeichnung Fehlerfrei Ruhezustandpartition 22 Starten Sie den Computer neu Installieren des Intel Rapid Start Technologie Treiber 1 Klicken Sie auf Option ...

Страница 80: ... nicht installiert Installieren Sie alle Treiber entsprechend der Anleitung unter Installation der Treiber Stellen Sie sicher dass auch der Audiotreiber installiert wird Der Computer ist ausgeschaltet oder im Energiesparmodus wird aber über den an das Stromnetz angeschlossenen AC DC Adpater mit Strom versorgt oder über einen Akku mit mehr als 20 Ladung mit Strom versorgt wird Ich habe ein Gerät an...

Страница 81: ...re Logic Intel HM77 Chipsatz BIOS AMI BIOS 48Mb SPI Flash ROM Sicherheit Öffnung für Sicherheitsschloß Typ Kensington BIOS Paßwort Fingerabdruckleser TPM 1 2 Videoadapter Modell A AMD Radeon HD 7970M PCI E Video karte 2GB GDDR5 Video RAM On Board Kompatibel mit MS DirectX 11 2nd Generation Unterstützt CrossFireX Technologie von AMD nVIDIA GeForce GTX 670M PCI E Video karte 1 5GB GDDR5 Video RAM On...

Страница 82: ...platz 1 für Wireless LAN Modul o Kombinierte Bluetooth und WLAN Modul Steckplatz 2 für mSATA SSD Laufwerk Kommunikation 10 100 1000Mb Ethernet LAN eingebaut Werkseitige Option 2 0M FHD PC Kamera Modul Werkseitige Option USB Bluetooth 2 1 EDR Modul WLAN Bluetooth Half Mini Card Module Werkseitige Option Intel Centrino Ultimate N 6300 Wireless LAN 802 11a g n Werkseitige Option Intel Centrino Advanc...

Страница 83: ...blication ou de modifier son conte nu sans préavis Certains ou tous les éléments de l ordinateur peuvent avoir été déjà installés Si ce n est pas le cas ou si vous avez l intention de reconfigurer ou réinstaller des portions du système reportez vous au Manuel de l Utilisateur complet Le disque Device Drivers Utilities User s Manual ne contient pas de système d exploitation Informations de réglemen...

Страница 84: ... vous n êtes pas sûr des caractèristiques du réseau électrique local consultez notre représentant de service ou la compagnie électrique locale L adaptateur AC DC que vous utilisez peut être à 2 broches ou à 3 broches comprenant une prise de terre Cette prise de terre est un des éléments de sécurité importants ne vous en passez pas Si une prise murale compatible n est pas disponible demandez à un é...

Страница 85: ...ombé par terre ou a été endommagé si l écran LCD est cassé ne touchez pas le liquide car il contient du poison Si une odeur inhabituel de la chaleur ou de la fumée apparaissait sor tant de votre ordinateur Nettoyage Utilisez un chiffon propre et doux pour nettoyer l ordinateur mais n appliquez pas d agent de nettoyage directement sur l ordinateur N utilisez pas de produit de nettoyage volatil des ...

Страница 86: ...s dépasser 135 degrés de l autre main comme illustré dans la Figure 1 maintenez la base de l ordinateur Remarque Ne soulevez jamais l ordinateur par le couvercle LCD 7 Pressez le bouton de mise en marche pour allumer Figure 1 Ouvrir le couvercle LCD ordinateur avec un adaptateur AC DC branché 135 ゚ Arrêt Windows 7 Veuillez noter que vous devriez toujours éteindre votre ordinateur en utilisant la c...

Страница 87: ...iption RAID Niveau RAID Description RAID 0 deux disques durs minimum sont nécessaires Disques identiques lisant et écrivant des données en parallèle pour améliorer les performances RAID 0 implémente une matrice de disques agrégés et les données sont décomposées en blocs et chaque bloc est écrit sur un disque séparé RAID 1 deux disques durs minimum sont nécessaires Des disques identiques dans une c...

Страница 88: ...iez le dossier f6flpy x64 depuis l emplacement ci dessous D représente votre lecteur de DVD du disque Device Drivers Utilities User s Manual sur le lecteur flash USB ou le disque dur USB externe Windows 8 64bit D Options 00_IRST f6flpy f6flpy x64 4 Allumez l ordinateur et appuyez sur F2 pour aller dans le BIOS 5 Allez au menu Boot sélectionnez OS Select et appuyez sur Entrée 6 Paramétrez OS Select...

Страница 89: ...quement à partir du DVD du SE Windows 8 vous serez invité à appuyer sur une touche pour démarrer à partir du DVD Assurez vous que votre lecteur Flash USB ou votre disque dur USB externe est branché à l un des ports USB de l ordinateur 27 Appuyez sur F7 au démarrage de l ordinateur pour faire apparaître le menu des périphériques d amorçage 28 Sélectionnez le lecteur de DVD contenant le DVD du SE Wi...

Страница 90: ... surface propre et exempte d empreintes digitales et de marques etc Utilisez le chiffon de nettoyage fourni pour maintenir propre la surface du Touchpad Désactiver le Clickpad Touchpad Utilisez Fn F1 ou le bouton de contrôle central pour désactiver le Touchpad Figure 5 Vue de face avec l écran LCD ouvert 1 Caméra PC optionnelle 2 Indicateur LED de caméra PC Quand la caméra PC est en cours d utilis...

Страница 91: ...ique activé Blanc Verrouillage majuscule activé Blanc Verrouillage défilement activé Blanc Le disque dur est en cours d utilisation Utilisation des appareils sans fil à bord d un avion L utilisation de tout appareil électronique de transmission est généralement interdite à bord d un avion Assurez vous que les modules sans fil sont éteints ou en Mode Avion seulement pour Windows 8 si vous utilisez ...

Страница 92: ...vidéo Fn F11 Activer Désactiver le module LAN sans fil Fn F1 Activer Désactiver le Touchpad Fn F12 Activer Désactiver le module Bluetooth Fn F2 Eteindre le rétroéclairage LCD Appuyez sur une touche ou utilisez le Touchpad pour allumer Verr Num Activer Désactiver le pavé numérique Fn F3 Allume Éteind le son ArrêtDét Activer Désactiver l arrêt défilement Fn F4 Permutation veille Basculer entre majus...

Страница 93: ...électionnée lorsqu elle n est pas remplacée par un effet appli qué Cliquez sur l un des boutons d effet pour appliquer des effets aléatoires de couleurs de vagues ou clignotants etc Figure 7 Application de rétroéclairage du clavier Boutons d effets aide Tableau 6 Boutons d effets LED Combinaisons de touches de fonction de LED du clavier Fn Lancer l application de rétroéclairage du clavier Fn Activ...

Страница 94: ...t non à partir de l écran d accueil de l interface utilisateur Metro Figure 8 Control Center Cliquez sur un bouton pour activer désactiver l un des modules par exemple Touchpad Appareil photo Cliquez sur Power Conservation Économie d énergie pour basculer entre les modes Performance Performances Balanced Equilibré ou Energy Star Cliquez sur les boutons ou cliquez et maintenez simplement le bouton ...

Страница 95: ...our faire apparaître les boutons Veille Prolongée ou Vieille et cliquez sur l un des boutons pour que l ordinateur entre dans le mode d économie d énergie approprié Display Switch Permutation d affi chage Cliquez sur le bouton Permutation d af fichage pour accéder au menu ou utilisez la combinaison de touches P et sé lectionnez le mode d affichage approprié Time Zone Fuseau horaire Cliquer sur le ...

Страница 96: ...a batterie avec un niveau de capacité supérieur à 20 ceci peut ne pas fonctionner avec certains appareils voir la page 112 Basculer l alimentation sur ce port en utilisant la combinaison Fn bouton d alimentation 12 Figure 9 Vues de face gauche droite 1 Indicateurs LED 2 Fente de verrouillage de sécurité 3 Prise réseau RJ 45 4 Lecteur de carte Multi en 1 5 Prise d entrée de ligne 6 Prise de sortie ...

Страница 97: ...VGA ex terne écran plat ou TV connecté à la prise de sortie HDMI au Dis playPort comme péri phérique d affichage CPU Veuillez ne pas essayer d ouvrir ou de forcer le processeur UC de votre ordinateur Le fait d ac céder au CPU de quelque manière que ce soit risque de violer la garantie Surchauffe Afin de ne pas causer une surchauffe de votre ordinateur verifiez que rien ne bouche la les ventilation...

Страница 98: ...eau de Configura tion Figure 11 Menu contextuel Windows 8 Les interfaces du bureau pour Windows 7 8 sont similaires Windows 8 n a pas de bouton Démarrer Pour accéder à l application Bureau dans Windows 8 utilisez la combinaison de touches Touche Logo de Windows D ou l applica tion Bureau dans l écran d accueil de l interface utilisateur Métro L interface standard de Windows 7 est le bureau Déplace...

Страница 99: ...ez vous que Activer le menu de la barre d état système est coché dans Préférences Pour accéder au Panneau de configuration NVIDIA 1 Allez au Panneau de Configuration 2 Cliquez sur Panneau de configuration NVIDIA dan Apparence et personnalisation catégorie OU 3 Win 7 Cliquez droit sur le bureau et sélectionnez Panneau de configuration NVIDIA Win 8 Cliquez droit sur le bureau utilisez la combinaison...

Страница 100: ...os copie Cet ordinateur Modèle B seulement inclut un émetteur IR 3D intégré Les angles de vue effectif de l émetteur sont il lustrés dan la Figure 14 à la page 95 Vérifiez que vous vi sualisez bien l écran de l ordinateur portable dans les zones en surbrillance ci dessous afin d obtenir l effet 3D stéréos copique adéquat Figure 12 Emplacement de l émetteur IR Instructions de sécurité importantes L...

Страница 101: ...metteur intégré 7 Pendant la procédure d installation cliquez pour répondre aux questions concernant ce que vous voyez en 3D à l écran 8 Configurer 3D stéréoscopique depuis les panneaux de contrôle Chargez les lunettes à obturation en les branchant à l un des ports USB de l ordinateur en utilisant le câble USB fourni 9 Vous pouvez également sélectionner Exécution du test d image médicale ou Exécut...

Страница 102: ...stiques audio Vous pouvez configurer les options audio sur votre ordina teur à partir du panneau de configuration de Sons dan Windows ou à partir de l icône du Gestionnaire audio DD Realtek dans la zone de notification dans le Pan neau de Configuration faites un clic droit sur l icône de la zone de notification pour faire apparaître un menu audio Le volume peut aussi être réglé à l aide de la comb...

Страница 103: ...avec le bouton droit de la souris sur l icône de zone de notification et sélectionnez Gestionnaire de sons 3 Cliquez sur Haut parleurs onglet et cliquez sur Configuration du haut parleur onglet 4 Sélectionnez 5 1 Haut parleur ou 7 1 Haut parleur à partir du menu déroulant Configuration du haut parleur 5 Connectez les câbles du haut parleur avant à la prise de sortie casque 6 Branchez les câbles vo...

Страница 104: ...d Blaster sur le bureau dans l écran d accueil et cliquez sur le bouton Activer 3 Le programme va se connecter à Internet pour vérifier la clé d activation 4 Cliquez sur Terminer pour terminer l activation de l application 5 Redémarrez votre ordinateur Application Sound Blaster Win 7 L application peut être exécutée à partir du raccourci dans le menu Démarrer Démarrer Programmes Tous les programme...

Страница 105: ...assurez vous que votre ordi nateur est alimenté par l adaptateur AC DC connecté à une source d alimentation Certains pilotes consomment une quan tité importante d énergie pendant la procédure d installation et si la capacité restante de la batterie n est pas suffisante cela peut provoquer l arrêt du système et entraîner des problèmes de système à noter qu il n y a pas ici de problème de sécurité e...

Страница 106: ...t cliquez Oui 5 Cliquez sur Terminer Oui pour redémarrer votre ordinateur Réseau 1 Cliquez sur 3 Install LAN Driver Oui 2 Cliquez sur Suivant Installer Terminer Lecteur de carte 1 Cliquez sur 4 Install Cardreader Driver Oui 2 Cliquez sur Terminer Touchpad 1 Cliquez sur 5 Install Touchpad Driver Oui 2 Cliquez sur Suivant 3 Cliquez sur le bouton J accepte les termes de ce contrat de licence puis cli...

Страница 107: ... raccourci sur le bureau 2 Allez à l en tête du menu Capture et sélectionnez Démarrer la capture 3 Cliquez sur OK l emplacement du fichier s affichera dans la fenêtre contextuelle pour démarrer la capture et appuyez sur Echap pour arrêter vous pouvez visionner le fichier en utilisant Windows Media Player Prendre des Photos Capturer une Vidéo Win 8 1 Assurez vous que la caméra PC est allumée en uti...

Страница 108: ...luetooth Intel 1 Cliquez sur Option Drivers bouton 2 Win 7 Cliquez sur 2 Install WLAN Driver Oui Win 8 Cliquez sur 1 Install WLAN Driver Oui 3 Cliquez sur Suivant Suivant 4 Cliquez sur le bouton J accepte les termes de ce contrat de licence puis cliquez sur Suivant 5 Cliquez sur Par défaut bouton ou Personnalisée bouton 6 Cliquez sur Installer Terminer Combo LAN sans fil et Bluetooth 4 0 tiers 1 C...

Страница 109: ...LAN sans fil de la barre des tâches cliquez sur la connexion active puis cliquez sur Déconnecter bouton Configuration WLAN dans Windows 8 Assurez vous que le module LAN sans fil est activé et non en Mode Avion avant que la configuration commence 1 Allez à la barre des charmes 2 Sélectionnez Paramètres et cliquez sur l icône Wi Fi elle devrait indiquer Disponible sous l icône et Mode Avion devrait ...

Страница 110: ...à fait à ce stade cliquez sur OK pour confirmer la saisie du mot de passe 6 Appuyez le doigt jusqu à ce que la barre de progression atteigne 100 pour inscrire ce doigt 7 Vous serez invité à sélectionner un autre doigt pour l enregistrement il est recommandé d enregistrer un certain nombre de doigts 8 Cliquez sur le bouton pour continuer une fois que vous avez enregistré un certain nombre d emprein...

Страница 111: ... Bluetooth Intel 1 Cliquez sur Option Drivers bouton 2 Win 7 Cliquez sur 4 Install Combo BT Driver Oui Win 8 Cliquez sur 3 Install Combo BT Driver Oui 3 Cliquez sur Suivant Suivant 4 Cliquez sur le bouton pour accepter le contrat de licence puis cliquez sur Suivant 5 Cliquez sur Suivant Terminer Combo LAN sans fil et Bluetooth 4 0 tiers 1 Cliquez sur Option Drivers bouton 2 Win 7 Cliquez sur 4 Ins...

Страница 112: ... Aide de recherche puis cliquez sur l icône de la loupe pour rechercher plus d infor mations à propos du transfert Bluetooth Configuration Bluetooth dans Win dows 8 Assurez vous que le module Bluetooth est activé et non en Mode Avion avant que la configuration commence 1 Allumez votre périphérique Bluetooth ex PDA téléphone mobile etc 2 Rendez le périphérique détectable pour cela consultez la docu...

Страница 113: ...marrer l ordinateur 7 Pendant le redémarrage de l ordinateur appuyez sur F2 pour accéder au BIOS et allez dans le menu TPM Configuration Configuration de TMP 8 Sélectionnez Pending TMP operation appuyez sur Entrée et sélectionnez l option adaptée si vous initialisez le TPM sélectionnez Enable Take Ownership Appuyez ensuite sur F4 pour enregistrer les modifications et redémarrer l ordinateur 9 Main...

Страница 114: ...oulant et cliquez sur Suivant 6 Choisissez les Fonctions de Security Platform que vous souhaitez utiliser en cliquant la case correspondante 7 Entrez un Mot de passe utilisateur de base et retapez le pour le confirmer et cliquez sur Suivant 8 Cliquez sur Suivant pour confirmer les paramètres 9 L ordinateur initialisera les paramètres 10 Cliquez sur Terminer 11 Cliquez sur les onglets et les pannea...

Страница 115: ...ve d une capacité minimum de 18 6Go Activation de la technologie Intel Smart Res ponse Technology 1 Win 7 Exécutez l application Intel Rapid Storage Technology à partir du menu Tous les programmes Win 8 Double cliquez sur l icône Intel Rapid Storage Tech nology dans l écran d accueil 2 Cliquez sur Activer l accélération sous État ou Accélérer 3 Sélectionnez le disque SSD à utiliser comme dispositi...

Страница 116: ...ez Réduire le volume dans le menu 4 Entrez le chiffre qui doit être égale à la quantité de mémoire système RAM dans votre ordinateur dans Quantité d espace à réduire en Mo 5 Cliquez sur Réduire tout espace non alloué du fichier peut être formaté pour une utilisation de stockage 6 Cliquez sur le menu Démarrer et tapez CMD dans le champ de recherche 7 Cliquez sur CMD dans la liste trouvée 8 Tapez DI...

Страница 117: ...ble cliquez sur Outils d administration Système et Sécurité Gestion de l ordinateur Stockage Gestion des disques 21 La partition du disque devrait indiquer Sain Partition de mise en veille prolongée 22 Redémarrez votre ordinateur Installation du pilote du Intel Rapid Start Technology 1 Cliquez sur Option Drivers 2 Win 7 Cliquez sur 8 Install Rapid Start Driver Oui Win 8 Cliquez sur 7 Install Rapid...

Страница 118: ...ends aucun son Le pilote audio n est pas installé Installez tous les pilotes comme indiqué dans la section Installation du pilote et prenez soin d installer le pilote audio L ordinateur est éteint ou en mode Veille mais alimenté par l adaptateur AC DC branché à une prise qui fonctionne ou alimenté par la batterie avec un niveau de capacité supérieur à 20 J ai branché un périphérique sur le port US...

Страница 119: ...ipset Intel HM77 BIOS AMI BIOS SPI Flash ROM de 48Mb Sécurité Fente de verrouillage de sécurité type Kensington Mot de Passe du BIOS Lecteur d empreintes digitales TPM 1 2 Adaptateur Vidéo Modèle A Carte vidéo PCI E AMD Radeon HD 7970M RAM Vidéo interne GDDR5 2Go Compatible avec MS DirectX 11 2ème génération Prennent en charge la technologie AMD CrossFireX Carte vidéo PCI E NVIDIA GeForce GTX 670M...

Страница 120: ...te Logement 1 pour module LAN sans fil o module combo Bluetooth et LAN sans fil Logement 2 pour lecteur SSD mSATA Communication 10 100 1000Mb réseau Ethernet intégré Option d usine 2 0M FHD caméra PC USB Option d usine Module Bluetooth 2 1 EDR USB Modules Half Mini carte LAN sans fil Bluetooth Option d usine LAN sans fil 802 11a g n Intel Centrino Ultimate N 6300 Option d usine Bluetooth 4 0 et LA...

Страница 121: ... revisar esta publicación o cambiar su contenido sin previo aviso Algunas o todas las características del ordenador pueden haberse configurado de antemano Si no lo están o si desea reconfigurar o reinstalar partes del sistema consulte el Manual del usuario completo El disco Device Drivers Utilities User s Manual no contiene un sistema operativo Información de regulación y seguridad Por favor prest...

Страница 122: ...ero puede que necesite una fuente de alimentación continuada Si no está seguro de las especificaciones de alimentación locales consulte con el servicio de asistencia o compañía de electricidad del lugar El adaptador de alimentación puede tener un enchufe de 2 dientes o un enchufe con tierra de 3 dientes El tercer diente es una característica de seguridad no lo elimine Si no tiene acceso a un enchu...

Страница 123: ...guir las instrucciones de uso Si el ordenador se ha caído o dañado no toque el líquido venenoso si el panel LCD se rompe Si hay un olor fuera de lo normal calor o humo que sale del ordenador Limpieza Utilice un trapo limpio y suave para limpiar el ordenador pero no aplique limpiador directamente en el ordenador No utilice limpiadores volátiles derivados del petróleo o limpiadores abrasivos en ning...

Страница 124: ...ión cómodo no exceder 135 grados mientras utiliza la otra mano como se muestra en la Figura 1 para sostener la base del ordenador Nota Nunca levante el ordenador por la tapa LCD 7 Presione el botón de encendido para encender Figura 1 Abrir la tapa LCD ordenador con el adaptador AC DC enchufado 135 ゚ Apagar Windows 7 Por favor tenga en cuenta que debería siempre apagar el ordenador eligiendo la opc...

Страница 125: ...e RAID Descripción RAID 0 se necesitan al menos dos dis cos duros Unidades idénticas leyendo y escribiendo datos en paralelo para aumentar el rendimiento RAID 0 implementa una matriz de discos dividida los datos se dividen en dos bloques y cada uno se escribe en una unidad de disco diferente RAID 1 se necesitan al menos dos dis cos duros Se usan unidades idénticas en una configuración de espejo mi...

Страница 126: ... D indica la unidad DVD en el disco Device Drivers Utilities User s Manual a la unidad Flash USB o disco duro externo USB Windows 8 64bit D Options 00_IRST f6flpy f6flpy x64 4 Inicie su ordenador y pulse F2 para entrar en la BIOS 5 Vaya al menú Boot seleccione OS Select y pulse Entrar 6 Ajuste OS Select a Windows 8 y ajuste UEFI Boot a Enabled 7 Pulse Esc para salir del menú y vaya al menú Advance...

Страница 127: ...a tecla para iniciar desde el DVD Asegúrese de que la unidad Flash USB o el disco duro externo USB esté conectado a uno de los puertos USB del ordenador 27 Presione F7 mientras el ordenador se reinicia para abrir el menú de dispositivo de arranque 28 Seleccione la unidad DVD que contiene el DVD Windows 8 OS y presione Entrar 29 Presione una tecla mientras el sistema arranca para comenzar a instala...

Страница 128: ...ouchpad debe mantener la superficie limpia y sin huellas dactilares ni marcas etc Utilice el trapo de limpieza incluido para mantener la superficie del Touchpad limpia Deshabilitar el Touchpad Utilice Fn F1 o el botón central de control para desactivar el Touchpad 9 Figura 5 Vista frontal con panel LCD abierto 1 Cámara PC opcional 2 LED de cámara PC Cuando la cámara PC esté en uso el LED se ilumin...

Страница 129: ...umLk está acti vado Blanco El bloqueo de mayúsculas está acti vado Blanco El bloqueo de desplazamiento está activado Uso de dispositivos inalámbricos a bordo El uso de dispositivos electrónicos portátiles a bordo de un avión suele estar prohibido Compruebe que los módulos inalámbricos estén DESCONECTADOS o en Modo avión sólo para Windows 8 si va a utilizar el ordenador en el avión Icono Color Desc...

Страница 130: ...usar en los programas Audio Vídeo Fn F11 Activar desactivar el módulo LAN Wireless Fn F1 Activar desactivar el Touchpad Fn F12 Activar desactivar el módulo Bluetooth Fn F2 Apagar luz de fondo del LCD presione una tecla o utilice el Touchpad para encenderlo Bloq Num Activar disactivar el teclado numérico Fn F3 Conmutación mudo BloqDespl Cambiar el bloqueo de desplazamiento Fn F4 Conmutación dormir ...

Страница 131: ...onada cuando no sea anulado por ningún efecto aplicado Haga clic en cualquier botón de efecto para aplicar los colores aleatoriamente efectos de onda parpadeo etc Figura 7 Aplicación Retroiluminación de teclado Botones de efectos ayuda Tabla 6 Botones de efectos LED Combinaciones de teclas para la función LED del teclado Fn Abre la aplicación Retroiluminación de teclado Fn Enciende o apaga retroil...

Страница 132: ... la pantalla de Inicio en la interfaz de usuario Metro Figura 8 Control Center Haga clic en cualquier botón para activar o desactivar cualquiera de los módulos p ej Touchpad Cámara Haga clic en Power Conservation Ahorro de energía para cambiar entre los modos Performance Rendimiento Balanced Equilibrado o Energy Star Haga clic en los botones o simplemente haga clic y mantenga presionado el botón d...

Страница 133: ...eep Suspender Haga clic en el botón Suspender para abrir los botones Hibernar o Suspender y haga clic en uno de esos botones para que el equipo entre en el modo de ahorro de energía elegido Display Switch Cambiar pantalla Haga clic en el botón Cambiar pantalla para acceder al menú o utilice la combinación de teclas P y seleccione el modo de pantalla apropiado Time Zone Zona horaria Si hace clic en...

Страница 134: ... abajo 13 Puertos USB 3 0 USB El color de los puertos USB 3 0 es azul USB 3 0 transfiere los datos mucho más rápido que USB 2 0 y es compatible con su antecesor USB 2 0 Cuando el puerto USB 3 0 alimentado está activado suministrará energía para cargar dispositivos no para el uso de dispositi vos cuando el sistema esté apagado pero estando alimentado por el adaptador AC DC en chufado en una toma de...

Страница 135: ...del LCD incorpo rado también puede utili zar un monitor VGA pantalla plana o TV co nectado al puerto de sali da de HDMI DisplayPort como dispositivo de pan talla CPU El usuario no debe manipular la CPU El acceso a la CPU de cualquier modo puede anular su garantía Recalentamiento Para evitar que su ordenador se reca liente compruebe que nada bloquea la s rejilla s con el equipo encendido 3 2 1 4 5 ...

Страница 136: ...nel de Control Figura 11 Menú contextual Windows 8 Las interfaces del escritorio para Windows 7 y 8 son similares Windows 8 no tiene botón Inicio Para acceder a la app Escritorio en Windows 8 utilice la combinación Tecla de Windows tecla D o la app Escritorio en la pantalla de Inicio de la interfaz de usuario Metro la interfaz estándar de Windows 7 es el escritorio Mueva el ratón a la esquina infe...

Страница 137: ...e NVIDIA en el menú Para acceder al Catalyst Control Center 1 Win 7 Haga clic con el botón derecho en el escritorio y seleccione Propiedades de gráficos en el menú Win 8 Haga clic con el botón derecho en el escritorio utilice la combinación Tecla de Windows tecla D para acceder al escritorio y seleccione Propiedades de gráficos en el menú O 2 Haga doble clic en el icono o haga clic con el botón de...

Страница 138: ...stereoscópico 3D Este ordenador Sólo Modelo B incorpora un emisor de IR 3D Los ángulos de visión efectivos del emisor se ilustran en la Figura 14 en la página 133 Asegúrese de visualizar el portátil dentro del área resaltada para obtener el efecto 3D estereoscópico apropiado Figura 12 Ubicación del emisor IR Instrucciones de seguridad importantes Asegúrese de leer todas las instrucciones de seguri...

Страница 139: ...para continuar con los pasos este portátil tiene un emisor incorporado 7 Durante el proceso de instalación necesitará hacer clic para responder a preguntas sobre lo que ve en 3D en la pantalla 8 Configure 3D estereoscópica en los paneles de control asegúrese de cargar las gafas de obturación 3D enchufándolas en uno de los puertos USB del ordenador con el cable USB incluido 9 También puede seleccio...

Страница 140: ... de audio Puede configurar las opciones de audio de su ordenador en el panel de control de Sonido o desde el icono de Administrador de sonido Realtek HD en el área de notificación o en el Panel de Control haga clic con el botón derecho en el icono del área de notificación para abrir el menú de audio El volumen también puede ajustarse con la combinación de teclas Fn F5 F6 Configuración de audio par...

Страница 141: ...sonido Realtek HD o haga clic con el botón derecho en el icono del área de notificación y seleccione Administrador de sonido 3 Haga clic en Altavoces ficha y haga clic en Configuración de los altavoces ficha 4 Seleccione 5 1 altavoces o 7 1 altavoces en el menú desplegable Configuración de altavoces 5 Enchufe los cables del altavoz frontal en el conector de salida de auriculares 6 Enchufe los cabl...

Страница 142: ...doble clic en el icono Sound Blaster en el escritorio en la pantalla de Inicio y haga clic en Activar botón 3 El programa se conectará a Internet para verificar la clave de activación 4 Haga clic en Finalizar para completar la activación de la aplicación 5 Reinicie el sistema Aplicación Sound Blaster Win 7 La aplicación puede ejecutarse desde el acceso di recto en el menú Inicio Inicio Programas T...

Страница 143: ...e que el ordenador esté alimentado por el adaptador AC DC conectado a una fuente de corriente activa Algunos controladores consumen una cantidad significativa de corriente durante el proceso de instalación y si la batería se consume puede provocar que el sistema se apague causando problemas en el sistema tenga en cuenta que esto no supone un problema de seguridad y la batería podrá recargarse en 1...

Страница 144: ...ceptar botón y haga clic en Sí 5 Haga clic en Finalizar Sí para reiniciar el sistema Red LAN 1 Haga clic en 3 Install LAN Driver Sí 2 Haga clic en Siguiente Instalar Finalizar Lector de tarjetas 1 Haga clic en 4 Install Cardreader Driver Sí 2 Haga clic en Finalizar Touchpad 1 Haga clic en 5 Install Touchpad Driver Sí 2 Haga clic en Siguiente 3 Haga clic en el botón Acepto este contrato luego haga ...

Страница 145: ...desde el acceso directo en el escritorio 2 Vaya al menú de Capture Capturar y seleccione Start Capture Iniciar captura 3 Haga clic en OK Aceptar la ubicación del archivo aparecerá en el cuadro emergente para iniciar la captura y pulse Esc para detenerla puede ver el archivo usando Windows Media Player App Cámara de la interfaz de usuario Metro Win 8 1 Asegúrese de que la cámara PC está encendida u...

Страница 146: ...ic en Option Drivers botón 2 Win 7 Haga clic en 2 Install WLAN Driver Sí Win 8 Haga clic en 1 Install WLAN Driver Sí 3 Haga clic en Siguiente Siguiente 4 Haga clic en el botón Acepto los términos del contrato de licencia luego haga clic en Siguiente 5 Haga clic en Tipica botón o Personalizada botón 6 Haga clic en Instalar Finalizar WLAN y Bluetooth 4 0 Combo de tercera parte 1 Haga clic en Option ...

Страница 147: ... en el icono de la LAN inalámbrica hacer clic en la conexión activa y luego en Desconectar botón Configuración de WLAN en Windows 8 Asegúrese de que el módulo LAN inalámbrica esté encendi do y no en Modo avión antes de comenzar la configura ción 1 Vaya a la barra Charms 2 Seleccione Configuración y haga clic en el icono Wi Fi debería leerse Disponible bajo el icono y el Modo avión debería estar De...

Страница 148: ...duzca su contraseña de Windows deberá crear una contraseña si no la tiene aún en este punto haga clic en Aceptar para validar la contraseña 6 Coloque el dedo hasta que la barra de progreso alcance 100 para registrarlo 7 Se le pedirá que seleccione otro dedo para su registro se recomienda que registre un número de dedos 8 Haga clic en el botón para continuar una vez registrado un número de huellas ...

Страница 149: ...ombo Intel 1 Haga clic en Option Drivers botón 2 Win 7 Haga clic en 4 Install Combo BT Driver Sí Win 8 Haga clic en 3 Install Combo BT Driver Sí 3 Haga clic en Siguiente Siguiente 4 Haga clic en el botón para aceptar el acuerdo de licencia luego haga clic en Siguiente 5 Haga clic en Siguiente Finalizar WLAN y Bluetooth 4 0 Combo tercera parte 1 Haga clic en Option Drivers botón 2 Win 7 Haga clic e...

Страница 150: ...n el cuadro Buscar ayuda y haga clic en el icono de la lupa para buscar más información sobre la transferencia por Bluetooth Configuración de Bluetooth en Windows 8 Asegúrese de que el módulo Bluetooth esté encendido y no en Modo avión antes de comenzar la configuración 1 Encienda su dispositivo Bluetooth p ej PDA teléfono móvil etc 2 Deje al dispositivo accesible para hacerlo consulte la document...

Страница 151: ...ara entrar en la BIOS de nuevo y vaya al menú TPM Configuration Configuración de TPM 8 Seleccione Pending TPM operation Operación TPM pendiente presione Entrar y seleccione la opción necesaria si está inicializando TPM debería seleccionar Enable Take Ownership Activar tomar posesión Luego deberá presionar F4 para guardar los cambios y reiniciar el ordenador 9 Ahora puede instalar el controlador TP...

Страница 152: ...a clic en Siguiente 6 Elija las Características de Security Platform que desee usar haciendo clic en la casilla apropiada 7 Escriba una Contraseña básica de usuario y vuelva a escribirla para confirmarla y haga clic en Siguiente 8 Haga clic en Siguiente para confirmar la configuración 9 El ordenador inicializará la configuración 10 Haga clic en Finalizar 11 Haga clic en las fichas y paneles de con...

Страница 153: ...talado Una unidad Solid State SSD con capacidad mínima de 18 6GB Habilitar Intel Smart Response Technology 1 Win 7 Ejecute la aplicación Intel Rapid Storage Technology en el menú Todos los programas Win 8 Haga doble clic en el icono Intel Rapid Storage Technology en la pantalla de Inicio 2 Haga clic en Activar aceleración en Estado o Acelerar 3 Seleccione la unidad SSD que se va a usar como dispos...

Страница 154: ...ento Administración de discos 3 Haga clic con el botón derecho en SSD y seleccione Reducir volumen en el menú 4 Escriba el número que debería ser igual a la cantidad de memoria del sistema RAM en su equipo en Tamaño del espacio que desea reducir en MB 5 Haga clic en Reducir el espacio de archivos no asignado puede ser formateado para uso de almacenamiento 6 Haga clic en el menú Inicio y escriba CM...

Страница 155: ...n 19 Cierre la ventana CMD 20 Vaya al Panel de control de Windows y haga doble clic en Herramientas administrativas Sistema y Seguridad Administración de equipos Almacenamiento Administración de discos 21 La partición del disco debería aparecer como Correcto Partición de hibernación 22 Reinicie el sistema Instalación del controlador Intel Rapid Start Technology 1 Haga clic en Option Drivers botón ...

Страница 156: ...har ningún sonido El controlador de audio no está instalado Instale todos los controladores como se indica en la sección Instalación de controladores y asegúrese de instalar el controlador de audio El ordenador está apagado o en modo Suspensión pero alimentado con el adaptador AC DC enchufado en una toma de corriente o alimentado por la batería con un nivel de carga superior al 20 He enchufado un ...

Страница 157: ...ic Chipset Intel HM77 BIOS AMI BIOS SPI Flash ROM de 48Mb Seguridad Ranura para cierre de seguridad tipo Kensington Contraseña de BIOS Módulo lector de huellas digitales TPM 1 2 Adaptador de vídeo Modelo A Tarjeta de vídeo AMD Radeon HD 7970M PCI E 2GB de RAM de vídeo GDDR5 Compatible con MS DirectX 11 segunda generación Soporta la Tecnología AMD CrossFireX Tarjeta de vídeo NVIDIA GeForce GTX 670M...

Страница 158: ... Ranuras Ranura 1 para módulo LAN inalámbrica o módulo combo Bluetooth y LAN Inalámbrica Ranura 2 para mSATA SSD Comunicaciones LAN Ethernet de 10 100 1000Mb incorporada Opción de fábrica Módulo cámara PC 2 0M FHD Opción de fábrica Módulo Bluetooth 2 1 EDR USB Módulos Half Mini Card WLAN Bluetooth Opción de fábrica LAN inalámbrica 802 11a g n Intel Centrino Ultimate N 6300 Opción de fábrica Blueto...

Страница 159: ...re la presente pubblicazione o di modificarne il contenuto senza preavviso È possibile che alcune o tutte le funzionalità del computer siano già state configurate In caso contrario o se si sta pianificando di riconfigurare o reinstallare componenti del sistema fare riferimento al Manuale per l utente completo Il disco Device Drivers Utilities User s Manual non contiene il sistema operativo Informa...

Страница 160: ... alimentazione stabile e conti nua Se non si è certi delle specifiche elettriche locali consultare l assistenza tecnica o la società locale di fornitura elettrica L adattatore di alimentazione deve avere una spina dotata di messa a terra a due o tre poli Il terzo polo costituisce un importante funziona lità di sicurezza Non rinunciare al suo impiego Se non è disponibile una presa compatibile farne...

Страница 161: ...e istruzioni operative Se il computer è caduto o si è danneggiato non toccare il liquido velenoso in caso di rottura dello schermo LCD Se c è un odore non usuale calore o fumo che fuoriesce dal computer Pulizia Per pulire il computer utilizzare solo un panno morbido e pulito evi tando di applicare detergenti direttamente sul computer Non utilizzare detergenti volatili distillati di petrolio o abra...

Страница 162: ... i 135 gradi mentre con l altra mano come illustrato nella Figura 1 si mantiene la base del computer nota non sollevare mai il computer tenendolo dal coperchio LCD 7 Premere il pulsante di alimentazione per accendere Figura 1 Apertura del coperchio LCD Computer con alimentatore AC DC collegato 135 ゚ Spegnimento Windows 7 È importante tenere presente che è sempre neces sario spegnere il computer sc...

Страница 163: ...ella 1 Descrizione del RAID Livello di RAID Descrizione RAID 0 sono neces sari almeno due dischi rigidi Unità identiche leggono e scrivono dati in parallelo per aumentare le prestazioni RAID 0 implementa un array di dischi in configurazione striped e i dati vengono spezzati in blocchi Ciascun blocco viene scritto su un unità disco separata RAID 1 sono neces sari almeno due dischi rigidi Unità iden...

Страница 164: ...uter utilizzabile 3 Copiare la cartella f6flpy x64 dalla posizione seguente la lettera D rappresenta l unità DVD sul disco Device Drivers Utilities User s Manual all unità flash USB o al disco rigido USB esterno Windows 8 64bit D Options 00_IRST f6flpy f6flpy x64 4 Accendere il computer e premere F2 per entrare nel BIOS 5 Aprire il menu Boot selezionare OS Select e premere Invio 6 Impostare OS Sel...

Страница 165: ...istema Windows 8 viene richiesto di pre mere un tasto per avviare il computer dal DVD Accertarsi che l unità flash USB o il disco rigido USB esterno sia collegato a una delle porte USB del computer 27 Premere F7 appena il computer si avvia per aprire il menu di avvio del dispositivo 28 Selezionare l unità DVD che contiene il sistema operativo Windows 8 e premere Invio 29 Premere un tasto qualsiasi...

Страница 166: ...ulita e libera da impronte macchie segni e così via Utilizzare il panno di pulizia fornito a corredo per tenere pulita la superficie del Touchpad Disattivazione del touchpad È possibile disattivare il touchpad con la combinazione di tasti Fn F1 o con l apposito pulsante del Control Center 9 Figura 5 Vista anteriore con pannello LCD aperto 1 Camera PC opzionale 2 LED della camera PC Quando si utili...

Страница 167: ...umerico è attivata Bianco Bloc Maiusc è attivato Bianco Bloc Scorr è attivato Bianco Il disco rigido è in uso Funzionamento del dispositivo senza fili a bordo di un aereo Solitamente l uso di qualsiasi dispositivo di trasmissione elet tronica è proibito a bordo di un aereo Accertarsi che i moduli wireless siano spenti o in Modalità aereo solo per Windows 8 quando si utilizza il computer in aereo I...

Страница 168: ...io video Fn F11 Attiva disattiva il modulo LAN Wireless Fn F1 Attiva disattiva il touchpad Fn F12 Attiva disattiva il modulo Bluetooth Fn F2 Spegne la retroilluminazione dello schermo LCD premere un tasto o utilizzare il touchpad per ripristinare lo schermo NumLk Attiva disattiva il tastie rino numerico Fn F3 Commutazione mute ScrLk Attiva disattiva il blocco dello scorrimento Fn F4 Commutazione S...

Страница 169: ...lore alla sezione selezionata quando questa non prevede già un effetto applicato Fare clic su uno dei pulsanti di effetto per applicare colori casuali effetti di onde e lampeggiamento e così via Figura 7 Applicazione di retroilluminazione della tastiera Pulsanti degli effetti guida Tabella 6 Pulsanti degli effetti LED Combinazione tasti funzione LED tastiera Fn Avviarel applicazione di retroillumi...

Страница 170: ...in Windows 8 e non dalla dalla schermata Start di Metro Figura 8 Control Center Fare clic su uno dei pulsanti per attivare disattivare i moduli ad esempio il Touchpad o la fotocamera Fare clic su Power Conservation Risparmio energetico per selezionare le modalità Performance Prestazioni Balanced Bilanciate o Energy Star Fare clic sui pulsanti oppure semplicemente fare clic e tenere premuto il tast...

Страница 171: ...re clic sul pulsante Sospensione per mostrare i pulsanti Ibernazione e So spensione quindi scegliere uno dei pulsanti per porre il computer nella mo dalità di risparmio energetico desiderata Display Switch Switch visualizza zione Fare clic sul pulsante Switch visualizza zione per accedere al menu o utilizzare la combinazione di tasti P e sele zionare la modalità di visualizzazione ap propriata Tim...

Страница 172: ...n livello di capacità superiore al 20 potrebbe non funzionare con alcuni dispositivi vedere la pagina 188 Attivare disattivare la porta utilizzando Fn Pulsante di alimentazione 12 Figura 9 Vista anteriore sinistra e destra 1 Indicatori LED 2 Slot blocco di sicurezza 3 Jack di rete tipo RJ 45 4 Lettore di schede Multi in 1 5 Jack di ingresso di linea 6 Jack uscita S PDIF 7 Jack ingresso del microfo...

Страница 173: ... possibile uti lizzare un monitor VGA LCD a schermo piatto o una TV collegato alla porta uscita HDMI al Di splayPort come periferi ca di visualizzazione CPU La CPU non è un componente che necessita assistenza da parte dell utente Accedere alla CPU in qualsiasi modo implica una violazione della garanzia Surriscaldamento Per prevenire il surriscaldamento del computer accertarsi che non vi sia nulla ...

Страница 174: ...onare Pannello di controllo Figura 11 Menu contestuale Windows 8 Le interfacce del Desktop di Windows 7 e 8 sono simili Windows 8 non ha alcun pulsante Start Per accedere all app Desktop in Windows 8 utilizzare la combinazione di tasti Tasto logo Windows D o app Desktop nella schermata Start di Metro l interfaccia standard di Windows 7 è il Desktop Spostare il mouse in bas so a sinistra dello sche...

Страница 175: ...trollo NVIDIA dal menu Per accedere all ATI Catalyst Control Center 1 Win 7 Fare clic con il pulsante destro del mouse sul desktop e scegliere Proprietà grafiche Win 8 Fare clic con il pulsante destro del mouse sul Desktop utilizzare la combinazione di tasti Tasto logo Windows D per accedere al Desktop e scegliere Proprietà grafiche O 2 Fare doppio clic sull icona oppure fare clic con il pulsante ...

Страница 176: ... a infrarossi 3D incorporato Nella Figura 14 a pagina 171 sono illustrati gli angoli di visione effettivi dell emettitore Guardare lo schermo del notebook tenendosi nell area indicata per poter godere di un corretto effetto 3D stereoscopico Figura 12 Punto di emissione infrarossi Importanti istruzioni per la sicurezza Leggere attentamente tutte le istruzioni per la sicurezza fornite e le precauzio...

Страница 177: ...o di un emettitore incorporato 7 Durante la procedura di configurazione sarà necessario selezionare le risposte ad alcune domande relative alla visualizzazione in 3D sullo schermo 8 Configurare il 3D stereoscopico dai pannelli di controllo assicurarsi di aver caricato gli occhiali 3D collegandoli a una delle porte USB del computer con il cavo USB fornito a corredo 9 Da questo menu è possibile anch...

Страница 178: ...lità audio Funzionalità audio È possibile configurare le opzioni audio del computer dal pannello di controllo Audio di Windows oppure dall icona Gestione Audio Realtek HD nell area di notifica pannello di controllo fare clic con il pulsante destro del mouse sull icona dell area di notifica per aprire un menu audio Il volume può essere regolato anche con la combinazione di tasti Fn F5 F6 Configuraz...

Страница 179: ...di controllo 2 Fare clic su Gestione Audio Realtek HD oppure fare clic con il pulsante destro del mouse sull icona nell area di notifica e selezionare Gestione Sonoro 3 Fare clic su Altoparlanti scheda e fare clic su Configurazione casse scheda 4 Selezionare 5 1 casse o 7 1 casse dal menu Configurazione casse 5 Collegare i cavi delle casse frontali nel jack di uscita delle cuffie 6 Collegare i cav...

Страница 180: ...ll icona Sound Blaster sul desktop nella schermata Start e fare clic su Activate Attivare 3 Il programma si connetterà a Internet per verificare la chiave di attivazione 4 Fare clic su Finish Fine per completare l attivazione dell applicazione 5 Riavviare il computer Applicazione Sound Blaster Win 7 L applicazione potrà essere avviata dal collegamen to presente nel menu Start Start Programmi Tutti...

Страница 181: ...river assicurarsi che il computer sia alimentato con l alimentatore collegato a una fonte di corrente funzionante Alcuni driver assorbono una quantità considerevole di energia durante la procedura d installazione e se la capacità rimanente della batteria non è sufficiente il computer potrebbe spegnersi e causare problemi al sistema si noti che non si tratta di un problema legato alla sicurezza e c...

Страница 182: ...su Avanti 4 Fare clic su Accetta pulsante e fare clic su Sì 5 Fare clic su Fine Sì per riavviare il computer Rete LAN 1 Fare clic su 3 Install LAN Driver Sì 2 Fare clic su Avanti Installa Fine Lettore di schede 1 Fare clic su 4 Install Cardreader Driver Sì 2 Fare clic su Fine Touchpad 1 Fare clic su 5 Install Touchpad Driver Sì 2 Fare clic su Avanti 3 Fare clic sul pulsante Accetto il contratto qu...

Страница 183: ...l applicazione della camera dal collegamento sul desktop 2 Aprire il menu Cattura e selezionare Avvia cattura 3 Fare clic su OK la collocazione del file verrà visualizzata nella casella a scomparsa per avviare la cattura quindi premere Esc per interromperla è possibile visualizzare il file utilizzando Windows Media Player App per camere per Metro Win 8 1 Assicurarsi che la camera PC sia attivata t...

Страница 184: ...el 1 Fare clic su Option Drivers pulsante 2 Win 7 Fare clic su 2 Install WLAN Driver Sì Win 8 Fare clic su 1 Install WLAN Driver Sì 3 Fare clic su Avanti Avanti 4 Fare clic sul pulsante Accetto i termini del contratto di licenza quindi fare clic su Avanti 5 Fare clic su Tipica pulsante o Personalizzata pulsante 6 Fare clic su Installa Fine WLAN e Bluetooth 4 0 Combo terze parti 1 Fare clic su Opti...

Страница 185: ...N wireless dell area di notifica scegliere la connessione attiva e quindi fare clic sul pulsante Disconnetti Configurazione WLAN in Windows 8 Accertarsi che il modulo Wireless LAN sia attivato e non in Modalità aereo prima di iniziare la configurazione 1 Andare alla barra Charms 2 Selezionare Impostazioni e fare clic sull icona Wi Fi si dovrebbe leggere Disponibile sotto l icona e la Modalità Aere...

Страница 186: ...liere OK per confermare la password immessa 6 Registrare il dito appoggiandolo con un colpetto finché la barra di avanzamento raggiunge il 100 7 Verrà richiesto di selezionare un altro dito per la registrazione si consiglia di registrare diverse dita 8 Una volta registrare diverse impronte digitali fare clic sul pulsante per continuare 9 Immettere le informazioni richieste e fare clic sul pulsante...

Страница 187: ... Combo Intel 1 Fare clic su Option Drivers pulsante 2 Win 7 Fare clic su 4 Install Combo BT Driver Sì Win 8 Fare clic su 3 Install Combo BT Driver Sì 3 Fare clic su Avanti Avanti 4 Fare clic sul pulsante di accettazione dell accordo di licenza quindi fare clic su Avanti 5 Fare clic su Avanti Fine WLAN e Bluetooth 4 0 Combo terze parti 1 Fare clic su Option Drivers pulsante 2 Win 7 Fare clic su 4 I...

Страница 188: ...re Bluetooth nel riquadro Cerca A questo punto fare clic sull icona della lente d ingrandimento per trovare altre informazioni sul trasferimento tramite Bluetooth Configurazione Bluetooth in Windows 8 Accertarsi che il modulo Bluetooth sia attivato e non in Mo dalità aereo prima di iniziare la configurazione 1 Accendere il proprio dispositivo Bluetooth PDA cellulare ecc 2 Rendere da trovare il dis...

Страница 189: ...iavvia premere F2 per entrare di nuovo nel BIOS e passare al menu TPM Configuration 8 Selezionare Pending TPM operation Operazione TPN in attesa premere Invio e selezionare l opzione desiderata se si sta inizializzando TPM occorre selezionare Enable Take Ownership Attiva presa di proprietà Sarà necessario premere F4 per salvare le modifiche e riavviare il computer 9 A questo punto è possibile inst...

Страница 190: ...er utilizzarle selezionando l apposita casella di spunta 7 Immettere una Password utente di base e digitarla di nuovo per confermarla e fare clic su Avanti 8 Fare clic su Avanti per confermare le modifiche di configurazione apportate 9 Il computer inizializza le impostazioni 10 Fare clic su Fine 11 Selezionare le schede e i pannelli di controllo per regolare le impostazioni 12 Fare doppio clic sul...

Страница 191: ... State Drive SSD con capacità minima di 18 6GB Attivazione della Intel Smart Response Tech nology 1 Win 7 Eseguire l applicazione Intel Rapid Storage Technology dal menu Tutti i programmi Win 8 Fare doppio clic sull icona Intel Rapid Storage Technology nella schermata Start 2 Fare clic su Attiva accelerazione in Status Stato o Accelera 3 Selezionare la SSD da utilizzare come dispositivo cache 4 Se...

Страница 192: ...ne disco 3 Fare clic con il pulsante destro del mouse sulla SSD e selezionare Riduci volume dal menu 4 Immettere la cifra che dovrebbe essere uguale alla quantità di memoria di sistema RAM del computer in Specificare la quantità di spazio da ridurre in MB 5 Fare clic su Riduci tutto lo spazio libero può essere formattato per l uso di archiviazione 6 Fare clic sul menu Start e digitare CMD nella ca...

Страница 193: ... della partizione specificata completata 19 Chiudere la finestra di CMD 20 Aprire il pannello di controllo di Windows e fare doppio clic su Strumenti di amministrazione Sistema e sicurezza Gestione computer Archiviazione Gestione disco 21 La partizione del disco dovrebbe divenire Integro Partizione per ibernazione 22 Riavviare il computer Installazione del driver Intel Rapid Start Technology 1 Far...

Страница 194: ... il sistema operativo Windows 7 ma non sento alcun audio Il driver audio non è installato Installare tutti i driver seguendo le istruzioni della sezione Installazione driver e assicurarsi di installare correttamente il driver audio Il computer è spento o in modalità Sospensione ma alimentato dall alimentatore collegato in una presa funzionante o dalla batteria con un livello di capacità superiore ...

Страница 195: ...l core Chipset Intel HM77 BIOS AMI BIOS SPI Flash ROM da 48Mb Sicurezza Slot blocco di sicurezza tipo Kensington Password del BIOS Modulo lettore d impronte digitali TPM 1 2 Adattatore Video Modello A Scheda video AMD Radeon HD 7970M PCI E 2GB GDDR5 Video RAM On Board Compatibile con MS DirectX 11 2 gener azione Supporto per tecnologia AMD CrossFireX Scheda video NVIDIA GeForce GTX 670M PCI E 1 5G...

Страница 196: ...o Wireless LAN o modulo combo Bluetooth e Wireless LAN Slot 2 per il modulo per SSD mSATA Comunicazione 10 100 1000Mb LAN Ethernet integrata Opzione di fabbrica Modulo di camera PC FHD 2 0M Opzione di fabbrica Modulo Bluetooth 2 1 EDR Moduli Half Mini Card WLAN Bluetooth Opzione di fabbrica Intel Centrino Ultimate N 6300 Wireless LAN 802 11a g n Opzione di fabbrica Intel Centrino Advanced N 6235 B...

Отзывы: