background image

Windows XP Information

D - 14 NVIDIA Video Driver Controls

D

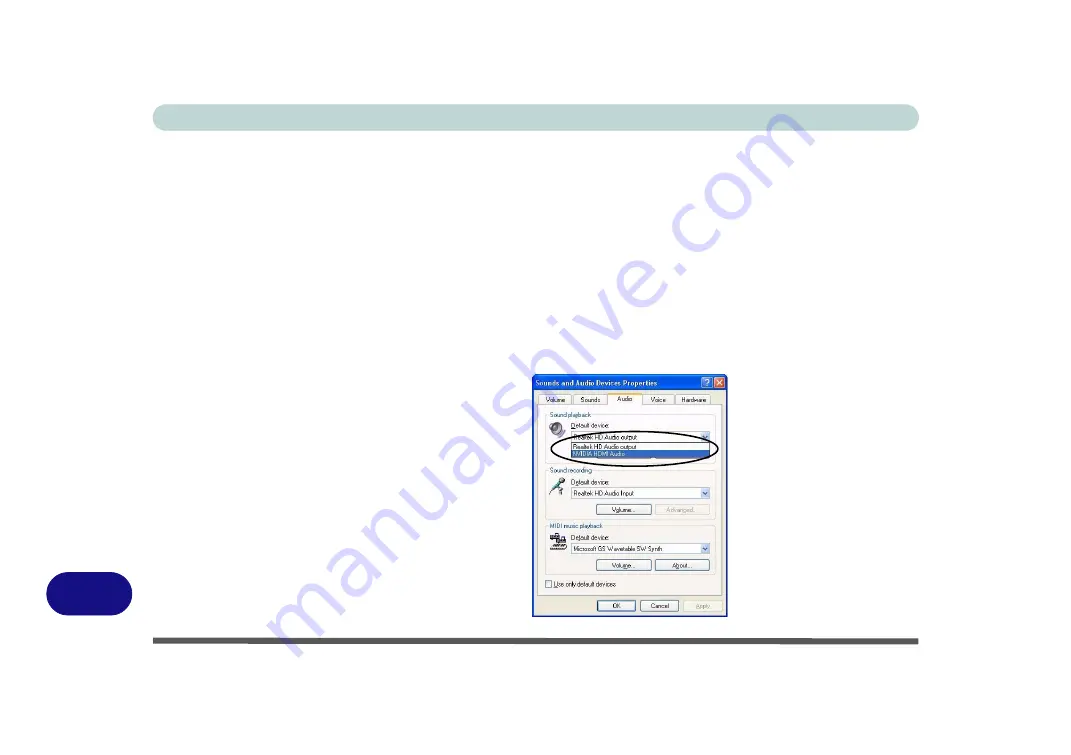
HDMI Audio Configuration

As HDMI (High-Definition Multimedia Interface) carries both 

audio

 and video sig-

nals you will need to configure the audio output as per the instructions below.

Windows Audio Setup for HDMI

1. Connect a device with HDMI support to the HDMI-Out port.
2. Go to the 

Start

 menu and point to 

Settings

 (or just click 

Control Panel

) and click

Control Panel

, then double-click the 

Sounds & Audio Devices

 icon (

Sounds,

Speech, and Audio Devices 

in Category View).

3. Click 

Audio (tab)

.

4. Click 

Default device

 (

Sound Playback

) and select 

NVIDIA HDMI Audio

.

5. Click 

OK

 to close the control panel (see overleaf).

Figure D - 9

Sounds and Audio 

Devices Properties

Содержание M570TU

Страница 1: ......

Страница 2: ......

Страница 3: ...r backup purposes Brand and product names mentioned in this publication may or may not be copyrights and or registered trade marks of their respective companies They are mentioned for identification p...

Страница 4: ...communications However there is no guarantee that interference will not occur in a particular installation If this equipment does cause harmful interference to radio or television reception which can...

Страница 5: ...t forth for an uncontrolled environment This equipment should be installed and operated with a minimum distance of 20 centimeters between the radiator and your body Warning Use only shielded cables to...

Страница 6: ...l shock from lightning 3 Do not use the telephone to report a gas leak in the vicinity of the leak 4 Use only the power cord and batteries indicated in this manual Do not dispose of batteries in a fir...

Страница 7: ...d of heating ele ment This is an electrical appliance If water or any other liquid gets into it the computer could be badly dam aged Do not expose the computer to any shock or vibration Do not place i...

Страница 8: ...nd don t forget to save your work Remember to periodically save your data as data may be lost if the battery is depleted 5 Take care when using peripheral devices Do not turn off the power until you p...

Страница 9: ...trician install one When you want to unplug the power cord be sure to disconnect it by the plug head not by its wire Make sure the socket and any extension cord s you use can support the total current...

Страница 10: ...from and promptly dispose of a damaged battery Always dispose of batteries carefully Batteries may explode or leak if exposed to fire or improperly handled or discarded Keep the battery away from met...

Страница 11: ...en refer servicing to qualified service personnel under any of the following conditions When the power cord or AC DC adapter is damaged or frayed If the computer has been exposed to rain or other liqu...

Страница 12: ...adapters 6 Put the notebook in its carrying bag and secure it with the bag s straps 7 If you re taking any peripherals e g a printer mouse or digital camera pack them and those devices adapters and or...

Страница 13: ...ata Pass your computer and disks around the devices Ask security officials to hand inspect them you may be asked to turn it on Note Some airports also scan luggage with these devices Fly safely Most a...

Страница 14: ...rms wrists and hands in a relaxed position Your knees should be slightly higher than your hips Place your feet flat on the floor or on a footrest if necessary Use a chair with a back and adjust it to...

Страница 15: ...autions Set the Windows Power Plans to turn the screen off after a few minutes of screen idle time Use a rotating moving or blank screen saver this prevents an image from being displayed too long Rota...

Страница 16: ...XIV Preface...

Страница 17: ...6 Configuring the OS Setting 1 6 Enabling Trusted Platform Module for Windows Vista 1 7 System Map LCD Panel Open 1 8 LED Indicators 1 9 Hot Key Buttons Keyboard 1 10 Function Hot Key Indicators 1 11...

Страница 18: ...Information 3 10 Battery Power 3 10 Conserving Battery Power 3 11 Battery Life 3 12 New Battery 3 12 Recharging the Battery with the AC DC Adapter 3 12 Proper handling of the Battery Pack 3 13 Battery...

Страница 19: ...ort Advanced Menu 5 9 Boot time Diagnostic Screen Advanced Menu 5 10 Fan Control Advanced Menu 5 10 Power On Boot Beep Advanced Menu 5 10 Legacy OS Boot Advanced Menu 5 10 Reset Configuration Data Adv...

Страница 20: ...anced Startup Options 7 31 USB TV Tuner Module 7 43 Consumer Infrared Remote Control Unit Driver 7 44 TV Tuner Driver Installation 7 44 Digital TV Broadcast Signal 7 46 TV Recording and Power Plans 7...

Страница 21: ...2 Core Logic C 2 LCD C 2 Security C 3 Memory C 3 Video Adapter Options C 3 BIOS C 3 Storage C 4 Audio C 4 Keyboard Pointing Device C 4 ExpressCard Slot C 4 Mini Card Slots C 4 I O Ports C 5 Communica...

Страница 22: ...talling Individual Drivers D 26 Driver Installation Procedure D 27 Found New Hardware Wizard D 27 Chipset D 27 Video D 27 Audio D 27 Modem D 27 LAN D 28 Card Reader ExpressCard D 28 TouchPad D 28 Hot...

Страница 23: ...r 4 The installation of the drivers and utilities essential to the operation or improvement of some of the computer s subsystems Chapter 5 An outline of the computer s built in software or BIOS Basic...

Страница 24: ...vered in the remainder of the User s Manual but do not worry if you do not understand every thing the first time Keep this manual nearby and refer to it to learn as you go You may find it useful to re...

Страница 25: ...nt e g a wireless network module It is very important that you install the drivers in the order listed in Table 4 1 on page 4 3 You will be unable to use most advanced controls until the necessary dri...

Страница 26: ...Information on page D 1 Operating System Version Note Windows XP Home Edition or Professional Windows Vista Service Pack 1 64 bit Home Basic Edition In order to run Windows Vista without limitations o...

Страница 27: ...d move the right latch outwards towards the sides of the computer and hold it in position to release the top cover 5 Use one hand to raise the lid LCD to a comfortable viewing angle use the other hand...

Страница 28: ...lect Menu Enter Select Sub Menu F10 Save and Exit Item Specific Help Select the operating system installed on your system which you will use most commonly Note An incorrect setting can cause some oper...

Страница 29: ...s Enter to exit the BIOS and reboot the computer Phoenix SecureCore tm Setup Utility Main Advanced Security Boot Exit F1 Help Select Item Change Values F9 Setup Defaults Esc Exit Select Menu Enter Sel...

Страница 30: ...7 6 2 1 5 8 6 4 3 9 Wireless Device Operation Aboard Aircraft The use of any portable elec tronic transmission devices e g WLAN or Bluetooth aboard aircraft is usually pro hibited Make sure any wire...

Страница 31: ...n The Computer is On Orange The Battery is Charging Blinking Green The Computer is In Sleep Mode Blinking Orange The Battery has Reached Critically Low Power Status Orange The AC DC Adapter is Plugged...

Страница 32: ...easy numer ic data input and features Function Keys to allow you to change operational features instantly Activate the Number Lock feature by pressing the Num Lk key at the top right of the keyboard Y...

Страница 33: ...ar Table 1 4 Function Hot Key Combo Indicators Keys Function Keys Function Fn Play Pause in Audio Video Programs Fn F8 F9 Brightness Decrease Increase Fn F1 TouchPad Toggle Fn F10 PC Camera Power Togg...

Страница 34: ...you install the Intel Ma trix driver for e SATA sup port in Windows Vista 1 1 2 3 4 5 6 7 9 12 13 Overheating To prevent your computer from overheating make sure nothing blocks the Vent Fan Intake Ou...

Страница 35: ...port only supports SELF POWERED IEEE 1394 devices ExpressCard Slot The ExpressCard Slot accepts either ExpressCard 34 or ExpressCard 54 formats 7 in 1 Card Reader The card reader allows you to use th...

Страница 36: ...ppy disk CD DVD while the system is accessing it This may cause the system to crash Changing DVD Regional Codes Go to the Control Panel and double click Device Manager Hardware and Sound then click th...

Страница 37: ...se Latches 5 Component Bay Cover 6 Infrared Consumer Infrared Transceiver 7 Sub Woofer 1 2 4 5 6 Battery Information Always completely discharge then fully charge a new battery before using it Complet...

Страница 38: ...licking the Start menu and selecting Properties from the menu In many instances throughout this manual you will see an instruction to open the Control Panel The Control Panel is accessed from the Star...

Страница 39: ...gs 3 Move the slider to the preferred setting in Resolution Figure 1 11 on page 1 18 4 Click the arrow and scroll to the preferred setting In Colors Figure 1 11 on page 1 18 5 Click Advanced Settings...

Страница 40: ...onnected to the DVI Out port HDMI Out port as your display device Figure 1 11 Display Settings NVIDIA Control Panel Table 1 5 Display Modes Available NVIDIA Display Mode Description Single One display...

Страница 41: ...sed display and sleep mode from the left menu Note that the Power saver plan may have an affect on computer performance Click to select one of the existing plans or click Create a power plan in the le...

Страница 42: ...Quick Start Guide 1 20 1...

Страница 43: ...rage Devices Mouse Audio Printer Overview Read this chapter to learn more about the following main features and components of the computer Hard Disk Drive Optical Device 7 in 1 Card Reader ExpressCard...

Страница 44: ...he bottom of your computer as seen below Further details on removing and inserting the hard disk are available in Up grading the Hard Disk Drive on page 6 4 Power Safety Before attempting to ac cess a...

Страница 45: ...ing up use just enough force for the disc to click onto the tray s spindle Gently push the CD DVD tray in until its lock clicks and you are ready to start The busy indicator will light up while data i...

Страница 46: ...or other materials to the surface of the disc Do not store or place the CD or DVD in high temperature areas Do not use benzene thinner or other cleaners to clean the CD or DVD Do not bend the CD or DV...

Страница 47: ...page 1 14 DVD Regional Coding Region Geographical Location 1 USA Canada 2 Western Europe Japan South Africa Middle East Egypt 3 South East Asia Taiwan South Korea The Philippines Indonesia Hong Kong...

Страница 48: ...ou install the Card Reader driver see Card Reader ExpressCard on page 4 6 Note The PC adapters are usually supplied with these cards Card Reader Cover Make sure you keep the cover in the card reader w...

Страница 49: ...or the Ex press Card 54 and 34mm for the ExpressCard 34 Make sure you install the Express Card driver see Card Reader ExpressCard on page 4 6 Inserting and Removing ExpressCards Align the ExpressCard...

Страница 50: ...en double click the TouchPad driver icon in the taskbar to configure the functions You may then configure the TouchPad tapping buttons scrolling pointer motion and sensitivity options to your preferen...

Страница 51: ...nu The vol ume may also be adjusted by means of the Fn F5 F6 key combination Sound Volume Adjustment The sound volume level is set using the volume control within Windows and the volume func tion keys...

Страница 52: ...ick Control Panel and make sure you are in Classic View 2 Click Realtek HD Audio Manager or right click the taskbar icon and select Sound Manager 3 Click Microphone tab in Microphone Effects and then...

Страница 53: ...printer 4 Connect the printer s USB cable to one of the USB ports on the computer 5 Windows will identify the printer and either load one of its own drivers or ask you to supply one Follow the on scr...

Страница 54: ...Storage Devices Mouse Audio Printer 2 12 2...

Страница 55: ...er saving techniques to give the operating system OS direct control over the power and thermal states of devices and processors For example this enables the OS to set devices into low power states bas...

Страница 56: ...o a comfortable viewing angle 4 Press the power button to turn On Battery The battery allows you to use your computer while you are on the road or when an electrical outlet is unavailable Battery life...

Страница 57: ...this feature Shut Down Note that you should al ways shut your comput er down by choosing the Shut Down command from the Lock Button Menu in Windows Vis ta This will help prevent hard disk or system pr...

Страница 58: ...ified time and to send the computer into Sleep after a period of inactivity Click Change plan settings and then click Change advanced power settings to ac cess further configuration options in Advance...

Страница 59: ...ncing any reduced performance especially under DC battery power Choose High performance for maximum performance when the computer is pow ered from an AC power source Choose the Power saver bear in min...

Страница 60: ...ting system it will enter Sleep to save power The PC wakes from Sleep within seconds and will return you to where you last left off what was on your desktop without reopening the application s and fil...

Страница 61: ...put your mobile PC into Hibernate if you will not use the computer for a period of time and will not have the chance to charge the battery Shut Down You should shut down the computer if you plan to in...

Страница 62: ...power saving state Password Protection It is recommended that you enable a password on wake up in order to protect your data However you can dis able this setting from the Power Options menu by click...

Страница 63: ...n F4 Key Combo Hibernate Off battery Press the Power Button Orange AC DC adapter Display Turned Off Green Press a Key or Move the Mouse Touchpad Closing the Lid If you have chosen to send the computer...

Страница 64: ...set actions to be taken e g Shut down Hibernate etc and set critical and low battery levels from power plan Advanced Settings see Figure 3 1 on page 3 4 Click the battery icon in the taskbar to see t...

Страница 65: ...wer when it is not powered by the AC DC adapter Reduce the amount of time before the display is turned off Close wireless Bluetooth modem or communication applications when they are not being used Dis...

Страница 66: ...new battery see Battery FAQ on page 3 14 for instructions on how to do this Recharging the Battery with the AC DC Adapter The battery pack automatically recharges when the AC DC adapter is attached an...

Страница 67: ...manating from the notebook battery shut your computer down immediately and contact your service center If the battery has been dropped we do not recommend using it any further as even if the computer...

Страница 68: ...computer even if a message indicates the battery is critically low just let the computer use up all of the battery power and shut down on its own 1 Save and close all files and applications 2 Create a...

Страница 69: ...tery options 5 Choose the options below click Yes if a warning appears Low battery levels 0 Critical battery Levels 0 Low battery action Do Nothing Critical battery action On battery Shut Down Critica...

Страница 70: ...e the battery When charging the battery don t stop until the LED charging indicator light changes from orange to green How do I maintain the battery Completely discharge and charge the battery at leas...

Страница 71: ...during oper ating system installation Instead you need to manually install some system required drivers and utilities What to Install The Device Drivers Utilities User s Manual disc contains the drive...

Страница 72: ...from Table 4 1 on page 4 3 the drivers must be installed in this order which is the same as that listed in the Drivers Installer menu below 2 Click to select the driver you wish to install after insta...

Страница 73: ...page 4 7 for instructions Driver Windows Vista with Service Pack 1 Page Chipset Page 4 5 Video Page 4 5 Audio Page 4 5 Modem Page 4 5 LAN Page 4 6 Card Reader ExpressCard Page 4 6 TouchPad Page 4 6 H...

Страница 74: ...the driver for you may need to click to expand the selection 4 Click Driver tab and click the Update Driver or Uninstall button and follow the on screen prompts User Account Control Win Vista If a Us...

Страница 75: ...Next Next 3 Click Finish to restart the computer Video 1 Click 2 Install Video Driver Yes 2 Click Next 3 Click Finish to restart the computer Audio 1 Click 3 Install Audio Driver Yes 2 Click Next 3 Cl...

Страница 76: ...Click Finish TouchPad 1 Click 7 Install Touchpad Driver Yes 2 Click Next Finish 3 Click Restart Now to restart the computer Hot Key 1 Click 8 Install Hotkey Utility Yes 2 Click Next Install 3 Click F...

Страница 77: ...et all the latest security up dates etc all updates will include the latest hotfixes from Microsoft To enable Windows Update make sure you are con nected to the internet 1 Click Start and click Contro...

Страница 78: ...iver In stallation on page 7 7 Wireless LAN Module See the appropriate install procedure for your WLAN module in Wireless LAN Module on page 7 14 Fingerprint Reader Module See the install procedure in...

Страница 79: ...s found in Setup Even if you are a beginner keep a record of the set tings you find and any changes you make This information could be useful if your system ever needs servicing There is one general r...

Страница 80: ...rebooting POST Screen 1 BIOS information 2 CPU type 3 Memory status 4 Enter Setup prompt appears only during POST Note The POST screen as pictured right is for guideline purposes only The POST screen...

Страница 81: ...or authorized service center as soon as possible Non Fatal Errors This kind of error still allows you to boot You will get a message identifying the problem make a note of this message followed by the...

Страница 82: ...turn on the computer and press F2 during the POST The prompt Press F2 to Enter Setup seen in Figure 5 1 on page 5 2 is usually present for a few seconds after you turn on the system If you get a Keyb...

Страница 83: ...these tools are confusing press F1 to call up a General Help screen and then use the arrow keys to scroll up or down the page The Item Specific Help on the right side of each screen explains the highl...

Страница 84: ...Menu Main Advanced Security Boot Exit F1 Help Select Item Change Values F9 Setup Defaults Esc Exit Select Menu Enter Select Sub Menu F10 Save and Exit Item Specific Help Tab Shift Tab or Enter select...

Страница 85: ...Use the Auto Type setting to have the items configured automatically for you System Extended Memory Main Menu This item contains information on the system memory and is not user configurable The syste...

Страница 86: ...ta Mode Selection if you have included an Intel Tur bo Memory module in your purchase configuration You should then enable support for Intel Turbo Memory from DFOROM Robson Support see page 5 11 Main...

Страница 87: ...d module in your purchase option The SATA mode should be set to AHCI to support e SATA port hot swapping You will need to install the Intel Matrix Storage driver see Intel Turbo Memory Matrix Storage...

Страница 88: ...ystem activity Power On Boot Beep Advanced Menu Use this menu item to enable disable the beep as the computer starts up Legacy OS Boot Advanced Menu Enable this item to support only system boot from t...

Страница 89: ...SATA Mode Selection AHCI This item will only be available if you have selected AHCI in SATA Mode Selec tion The option should be enabled only if you have included an optional Intel Tur bo Memory Modu...

Страница 90: ...af ter you turn it on These settings do not affect your machine or network passwords which will be set in your software OS Figure 5 4 Security Menu Main Advanced S Se ec cu ur ri it ty y Boot Exit F1...

Страница 91: ...nd Enter again to confirm the password clearance Fixed disk boot sector Security Menu If you choose Write Protect this will protect against viruses being written to the hard disk boot sector this is n...

Страница 92: ...Utility F1 Help Select Item Change Values F9 Setup Defaults Esc Exit Select Menu Enter Select Sub Menu F10 Save and Exit Item Specific Help Keys used to view or configure devices Up and Down arrows s...

Страница 93: ...original state and erase any previous changes you have made in a previous session Figure 5 6 Exit Menu F1 Help Select Item Change Values F9 Setup Defaults Esc Exit Select Menu Enter Select Sub Menu F1...

Страница 94: ...BIOS Utilities 5 16 5...

Страница 95: ...r slotted flathead screwdriver An antistatic wrist strap Before working with the internal components you will need to wear an antistatic wrist strap to ground yourself because static electricity may d...

Страница 96: ...ade your computer by replacing the existing processor with a fast er new one you will need to contact your customer service representative We rec ommend that you do not do this yourself since if it is...

Страница 97: ...ove the battery 1 Turn the computer off turn it over and remove the battery 2 Slide latch towards the unlock symbol and hold it in place and lift the battery up and out of the battery bay Warranty War...

Страница 98: ...p a new hard disk 1 Turn off the computer and turn it over and remove the battery 2 Locate the component bay cover and remove screws HDD System Warning New HDD s are blank Be fore you begin make sure...

Страница 99: ...d Disk Drive 6 5 6 3 Remove the bay cover 4 Remove screws from the hard disk cover 5 Slide the hard disk assembly in the direction of the arrow 12 12 Figure 6 3 Bay Cover Removal Figure 6 4 Hard Disk...

Страница 100: ...Carefully remove the hard disk assembly in the direction of the arrow 7 Remove screws to separate the hard disk from the bracket 8 Reverse the process to install any new hard disk 18 18 18 19 22 20 1...

Страница 101: ...ual In line SO DIMM DDR II DDR2 type memory modules see Memory on page C 3 The total memory size is automatically detected by the POST routine once you turn on your computer 1 Turn off the computer an...

Страница 102: ...e memory socket in the direction indicated by the arrows in Figure 6 9 12 12 13 14 13 14 13 14 Figure 6 8 Bay Cover Removal Contact Warning Be careful not to touch the metal pins on the module s conne...

Страница 103: ...into the socket as it will go DO NOT FORCE the module it should fit without much pressure 9 Press the module in and down towards the mainboard until the socket levers click into place to secure the mo...

Страница 104: ...rn the computer off turn it over and remove the battery 2 Slide the latch towards the unlock symbol and hold it in place 3 Slide latch while still holding latch in place in the direction indicated by...

Страница 105: ...optional which may come with your computer depending on the configuration purchased If you are unsure please contact your service representative The chapter includes information on the following Blue...

Страница 106: ...usu ally prohibited Make sure the module s are OFF if you are using the computer aboard aircraft Use the Fn F12 key com bination to toggle power to the Bluetooth module and check the LED indicator to...

Страница 107: ...ooth Devices control panel Double click the icon to access the Bluetooth Devices control panel Click Start and click Control Panel or point to Settings and click Control Panel and then click Bluetooth...

Страница 108: ...5 Click to select My device is set up and ready to be found and then click Next 6 The Wizard will then search for any available Bluetooth devices within range 7 Click to select the device you want to...

Страница 109: ...Access the Bluetooth Devices control panel 2 Click Options and make sure that Allow Bluetooth devices to find this computer check box Discovery has a tick inside it 3 Make sure that Alert me when a n...

Страница 110: ...ny ac companying insert pages for the latest updated infor mation on the PC Camera driver which may override the information provided here PC Camera Display The PC Camera applica tion software needs t...

Страница 111: ...or from the BisonCam item in the Start Programs All Pro grams menu if the hardware is turned off use the Fn F10 key combina tion to turn it on again 2 0M PC Camera Screen Refresh The 2 0M PC Camera m...

Страница 112: ...efinition Audio and make sure the item is not disabled 5 Double click Microphone or select Properties from the right click menu 6 Click Levels tab and adjust the Microphone and Microphone Boost slider...

Страница 113: ...Modules PC Camera Module 7 9 7 Figure 7 5 Audio Setup for PC Camera Right click...

Страница 114: ...Prior to capturing video files you may select the Set Capture File option in the File menu and set the file name and location before capture this will help avoid ac cidentally overwriting files Set th...

Страница 115: ...D or USB Flash drive Note that the Windows Vista system requires a minimum of 15GB of free space on the C drive system partition In order to prevent system problems it is recommend ed that you save th...

Страница 116: ...n the BisonCap program is flickering you can try to adjust the setting in the Video Capture Filter options 1 Run the BisonCap program 2 Go to Options and scroll down to select Video Capture Filter 3 C...

Страница 117: ...Run the BisonCap program 2 Go to Options and select Take Picture 3 The picture in JPEG format will be placed in the Snapshot folder on the desktop Figure 7 7 Zoom Setting Snapshot Folder The Snapshot...

Страница 118: ...Driver Installation 1 Insert the Device Drivers Utilities User s Manual disc into the CD DVD drive 2 Click Option Drivers button 3 Click 2 Install Wireless Lan Driver Yes 4 Windows will then configur...

Страница 119: ...and then click Connect to a network 2 In the Show list click to choose Wireless from the drop down menu 3 A list of currently available networks will appear Figure 7 8 Taskbar Menus Network and Sharin...

Страница 120: ...t see a network you want to connect to click Set up a connection or network a list of options will appear allowing manual searching and creating a new network 6 Move the cursor over the taskbar icon t...

Страница 121: ...network menu and click Disconnect or right click the icon and then click Disconnect from Security Enabled Networks You should try to make sure that any network you are connecting to is a secure networ...

Страница 122: ...ttery status power plans used and wireless device status etc To access the Windows Mobility Center 1 Click Start and click Control Panel or point to Settings and click Control Panel 2 Double click Win...

Страница 123: ...you to Access or Lock your computer Protect sensitive files Display and file your favorite web pages Fill in frequently used dialogs Run your favorite applications The TPM security chip allows you to...

Страница 124: ...eader Driver Installation 1 Insert the Device Drivers Utilities User s Manual disc into the CD DVD drive 2 Click Option Drivers 3 Click 3 Install FingerPrint Driver Yes 4 Click Software Installation 5...

Страница 125: ...er Enrollment or double click the taskbar icon 2 Click Initialize 3 On the first run of the program you will be asked to click the button to accept the license and then click OK 4 Click Next and selec...

Страница 126: ...to enter your Windows password and click Next 8 Select either to use the fingerprint reader alone for authentication or choose both the fingerprint reader and the Windows password and then click Next...

Страница 127: ...e fingers you wish to enroll see sidebar and then click Next 14 Click Finish 15 Click Help in the Fingerprint Control Center to get more information on any topic 16 You can also run the Tutorial or In...

Страница 128: ...he Help menu etc You can also run the Control Center etc from the Protector Suite QL item in the Programs All Programs menu 18 See Help Manual on page 7 20 for further details 19 If you swipe your fin...

Страница 129: ...indow Once registered the application will launch when you swipe the appropriate finger across the sensor Password Bank The Password Bank stores registrations of user names passwords and other set tin...

Страница 130: ...and therefore requires implementation by a system administrator before users can access security features Prepare the following before setting up the Trusted Platform Module 1 The Microsoft Windows O...

Страница 131: ...pear Figure 7 19 BIOS Security Menu Main Advanced S Se ec cu ur ri it ty y Boot Exit F1 Help Select Item Change Values F9 Setup Defaults Esc Exit Select Menu Enter Select Sub Menu F10 Save and Exit It...

Страница 132: ...When the computer restarts you will be prompted to choose your action press Enter and select Execute and then press F10 to save and restart the computer 13 You will now need to install the Windows Vi...

Страница 133: ...ess Enter 8 When the DISKPART prompt appears type select disk 0 and press Enter 9 Type clean and press Enter to erase the existing partition table 10 Type create partition primary size 1500 and press...

Страница 134: ...k Shut Down or Restart 21 You will now be returned to the Windows Vista O S installation screen 22 Click Install Now and proceed through the installation screens to complete the Windows Vista installa...

Страница 135: ...e run into the Start Search box 3 Type gpedit msc into the Open box and click OK 4 Click the arrows to expand the menu selections on the left of the screen to show Administrative Templates Windows Com...

Страница 136: ...lick Enabled button Click Allow BitLocker without a compatible TPM tickbox Select Require startup key with TPM Configure TPM startup key option Select Disallow startup PIN with TPM Configure TPM start...

Страница 137: ...ll Programs Accessories Run or type run into the Start Search box 9 Type gpupdate into the Open box and click OK 10 The update program will then run and display if the User Policy update has been succ...

Страница 138: ...es to the computer 12 Click Start and click Control Panel or point to Settings and click Control Panel 13 Double click BitLocker Drive Encryption Security 14 Click TPM Administration in the bottom lef...

Страница 139: ...lick Turn On BitLocker and then click Require Startup USB key at every startup 18 You will then be prompted to insert a USB memory device in order to save the Startup Key select the drive and click Sa...

Страница 140: ...ery password 20 It is recommended that you select Save the password on a USB drive click Save 21 Click Next and then click Continue to Encryption the Volume 22 Click Restart Now make sure the USB memo...

Страница 141: ...the Start Search box 25 Type gpedit msc into the Open box and click OK 26 Click the arrows to expand the menu selections on the left of the screen to show Administrative Templates Windows Components...

Страница 142: ...lick Enabled button Click Allow BitLocker without a compatible TPM tickbox Select Disallow startup key with TPM Configure TPM startup key option Select Require startup PIN with TPM Configure TPM start...

Страница 143: ...ll Programs Accessories Run or type run into the Start Search box 31 Type gpupdate into the Open box and click OK 32 The update program will then run and display if the User Policy update has been suc...

Страница 144: ...r point to Settings and click Control Panel 34 Double click BitLocker Drive Encryption Security 35 Click TPM Administration in the bottom left menu 36 Check the TPM is initialized then close the TPM M...

Страница 145: ...Platform Module 7 41 7 37 Click Turn On BitLocker and then click Require PIN at every startup 38 You will then be prompted to type and confirm a PIN number click Set PIN Figure 7 39 Require PIN Figur...

Страница 146: ...40 Click Next and then click Continue to Encryption the Volume 41 Click Restart Now Figure 7 41 Save Password Figure 7 42 Encrypt the Volume Help Information For more information about the BitLocker f...

Страница 147: ...B TV Tuner module The optional TV Tuner allows you to watch TV play music CDs video conference and capture still images and video on your PC The Cable CATV antenna jack will only be enabled when the T...

Страница 148: ...r Setup 3 Choose the language you prefer and click Next Next Next Next 4 Click the button to accept the license agreement and then click Next 5 Click Next Next 6 Click Yes restart my computer now butt...

Страница 149: ...double click the Hybrid DTV shortcut on the desktop or 19 Run Windows Media Center directly from the Start menu Start Pro grams Windows Media Center 20 Windows Help and Support provides information on...

Страница 150: ...If you intend to use the optional TV Tuner to record live TV then go to the Power Options control panel and create a power plan see Power Plans on page 3 4 to prevent the power saving options from adj...

Страница 151: ...ista only it also supports Windows Vista features such as ReadyBoost ReadyDrive and Superfetch Intel Turbo Memory Matrix Storage Setup and Driver Installation 1 Start up the computer and press F2 to e...

Страница 152: ...om CD or DVD 8 The system software will prompt you through the installation procedure see the Microsoft Windows Vista OS documentation for more details 9 Insert the Device Drivers Utilities User s Man...

Страница 153: ...a hard drive caching solution Windows ReadyDrive uses hybrid drives as a hard drive caching solution Intel Turbo Memory Console Note that the Intel Turbo Memory Console DOES NOT appear if you have no...

Страница 154: ...Modules 7 50 7...

Страница 155: ...es make sure you have followed the instructions carefully and observed the safety precautions in the preface If all else fails talk to your service representative You should also make a record of what...

Страница 156: ...gs Make sure that the system is not in Hibernate or Sleep mode by pressing the keys config ured in your Power Options see Configuring the Power Buttons on page 3 8 the Fn F4 key combi nation or power...

Страница 157: ...o grams to run at times when you are not using your computer You can use those that are provided free with your OS or buy the more powerful dedicated programs to do so Write down your passwords and ke...

Страница 158: ...w Viruses are often triggered from within e mail attachments so take care when opening any attached file You can configure most Anti Virus pro grams to check all e mail attachments Note You should als...

Страница 159: ...re caused by the installation of new hardware and or software Always refer to the documentation of any new hardware and or software and pay particular attention to files entitled READ ME or READ ME FI...

Страница 160: ...r has many devices plugged into its ports and a number of programs running then it will be difficult to determine the cause of a problem Try disconnecting all of the devices and restarting the compute...

Страница 161: ...osing battery power too quickly The system is using too much power If your OS has a Power Options scheme see Power Plans on page 3 4 Power Schemes on page D 16 check its settings You may also be using...

Страница 162: ...on page D 19 The screen controls need to be adjusted Toggle the screen control Fn F8 F9 key combinations If you re connected to an external monitor make sure it s plugged in and turned on You should...

Страница 163: ...rrectly placed in the tray Gently try to remove the disc using the eject hole see Loading Discs on page 2 3 The DVD regional codes can no longer be changed The code has been changed the maximum 5 time...

Страница 164: ...h modules are on or off see LED Indicators on page 1 9 If the LED indicator is off then press the appropriate function key combination in order to enable the modules The function key indicators see Fu...

Страница 165: ...connected Bluetooth device The transfer of data between the computer and a Bluetooth enabled device is supported in one direction only simultaneous data transfer is not supported If you are copying a...

Страница 166: ...unction will now be enabled The 3D Mark 2006 application exits or causes a Blue Screen when I attempt to run it This is an known issue acknowledged by 3D Mark see http www futuremark com support 3dmar...

Страница 167: ...or Audio Recording on page 2 10 for more details A Blue Screen appears at startup The BIOS setting has been set for the incorrect operating system Make sure that you have set the correct operating sys...

Страница 168: ...ti Monitor Manager when the notebook lid S3 is closed TMM disconnects the LCD display from the OS and then adds the LCD display back when the lid is opened This may trigger TMM to restore an old displ...

Страница 169: ...reen Resolution Error 8 15 8 3 Double click Task Scheduler Library Microsoft Windows 4 Click MobilePC to open the control panel 5 Right click TMM and select Disable Figure 8 2 TMM Disable 6 Close all...

Страница 170: ...Troubleshooting 8 16 8...

Страница 171: ...face Ports Jacks A 1 A Appendix A Interface Ports Jacks Overview The following chapter will give a quick description of the ports jacks which allow your computer to commu nicate with external devices...

Страница 172: ...Transceiver The consumer infrared transceiver at the front of the computer allows the computer to communicate with the remote control unit supplied with the optional Mini PCI TV Tuner see System Map B...

Страница 173: ...is an audio video connector interface for transmitting uncompressed digital streams This allows you to connect an external monitor TV or Flat Panel Display etc as a display device see Attaching Other...

Страница 174: ...ous peripheral devices e g external disk drives and digital cameras see note below RJ 11 Phone Jack This port connects to the built in modem You may plug the telephone line directly into this RJ 11 te...

Страница 175: ...ased at any computer store USB 2 0 1 1 Ports These USB Universal Serial Bus 2 0 compatible ports USB 2 0 is fully USB 1 1 compliant are for low speed peripherals such as keyboards mice or scanners and...

Страница 176: ...Interface Ports Jacks A 6 A...

Страница 177: ...Insert the Device Drivers Utilities User s Manual disc and click Install Drivers button 2 Click 2 Install Video Driver Yes 3 Click Next 4 Click Finish to restart the computer Resolution Error If you...

Страница 178: ...ick GeForce tab 4 Click Start the NVIDIA Control Panel to make any video adjustments OR 1 Click Start and click Control Panel or point to Settings and click Control Panel 2 Double click NVIDIA Control...

Страница 179: ...o features such as display configuration 3D Settings and Help menus etc Navigating the Control Panel Navigate through the control panels in much the same way as you would a web page Click on the sub h...

Страница 180: ...NVIDIA Video Driver Controls B 4 NVIDIA Control Panel B The Help menus provide index and search features and direct links to the NVIDIA website etc Figure B 3 Help Menus...

Страница 181: ...MI Out port and turn it on 2 If a New Display Detected window does not appear in Windows Vista go to the Windows Mobility Center control panel Mobile PC Adjust commonly used mobility settings and clic...

Страница 182: ...and turn it on 2 Go to NVIDIA Control Panel see NVIDIA Control Panel on page B 2 3 Click Display and then click Set up multiple displays 4 Click to select the nView display mode you wish to use see pa...

Страница 183: ...rol Panel or point to Settings and click Control Panel 2 Click Sound Hardware and Sound 3 Click Playback tab and click to select Realtek Digital Output 4 Click Set Default button 5 Click OK to close t...

Страница 184: ...page B 6 3 Set up your external display TV or LCD for HDMI input see your display device manual 4 You can now play video audio sources through your external display Other Applications If you are using...

Страница 185: ...alview Mode treats both connected displays as separate devices and they act as a virtual desktop resulting in a large workspace When Dualview is enabled you can drag any icons or windows across to the...

Страница 186: ...t on 2 If a New Display Detected window does not appear in Windows Vista go to the Windows Mobility Center control panel Mobile PC Adjust commonly used mobility settings and click Connect display 3 Cl...

Страница 187: ...have checked Extend the desktop onto this monitor and click Apply Display Settings Extended Desktop Use the control panel to drag the monitors to match the physical ar rangement you wish to use You ca...

Страница 188: ...TV will appear as a display option 2 Select the displays you would like to use when attached to the HDMI Out port DVI Out port Apply the settings and then click Yes to save the changes Detect Display...

Страница 189: ...display device click the sub menus under Video Television 2 Click Change the signal or HD format 3 Select the TV signal format the menu allows you to select TV format by country if you are unsure of y...

Страница 190: ...NVIDIA Video Driver Controls B 14 B...

Страница 191: ...rmation The specifications listed in this Appendix are correct at the time of going to press Certain items particularly processor types speeds and CD DVD device types may be changed updated or delayed...

Страница 192: ...On die L2 Cache 1066MHz FSB TDP 25W 2 53GHz Intel Core 2 Duo Processor 478 pin Micro FC PGA Package Socket P T9400 45nm 45 Nanometer Process Technology 6MB On die L2 Cache 1066MHz FSB TDP 35W 2 53GHz...

Страница 193: ...Adapter Options NVIDIA GeForce 9800M GTX PCI E Video Card 512MB DDR3 Video RAM On Board MS DirectX 10 0 compatible Supports HDCP NVIDIA GeForce 9800M GT PCI E Video Card 512MB GDDR3 Video RAM On Board...

Страница 194: ...face Intel High Definition Audio 3D Stereo Enhanced Sound System SRS WOW Surround Sound Technology Inside Sound Blaster PRO Compatible S PDIF Digital Output Built In Microphone 2 Built In Speakers 1 5...

Страница 195: ...Gigabit LAN Jack One DC In Jack One Infrared Transceiver One Cable CATV Antenna Analog Digital Jack Functions with Optional USB TV Tuner Module One Consumer Infrared Transceiver Functions with Optiona...

Страница 196: ...nsions Weight 397mm w 280 5mm d 25 6 45 6mm h Around 4kg 5 with 8 Cell Battery Optional Optical Drive Module Options Combo SATA Drive Module DVD Dual Super Multi SATA Drive Module Blu Ray SATA Drive M...

Страница 197: ...Windows XP Information D 1 D Appendix D Windows XP Information This Appendix contains information including control panel information driver installation etc for users of the Windows XP OS...

Страница 198: ...1 DVD Regions Changing DVD Regional Codes Go to the Control Panel and double click System Hardware tab click Device Manager then click the next to DVD CD ROM drives Double click on the DVD ROM device...

Страница 199: ...menu by right clicking the Start menu and selecting Properties from the menu In many instances throughout this manual you will see an instruction to open the Control Panel The Control Panel is access...

Страница 200: ...e taskbar or click the control panel to bring up the Realtek Audio Configuration menus The volume may also be adjusted by means of the Fn F5 F6 key combination Sound Volume Adjustment How high the sou...

Страница 201: ...skbar Table D 2 Function Hot Key Combo Indicators Keys Function Keys Function Fn Play Pause in Audio Video Programs Fn F8 F9 Brightness Decrease Increase Fn F1 TouchPad Toggle Fn F10 PC Camera Power T...

Страница 202: ...Screen resolution Figure D 4 on page D 7 5 Click the arrow and scroll to the preferred setting in Color quality Figure D 4 on page D 7 6 You can also access Display Properties by right clicking the d...

Страница 203: ...IA Control Panel Figure D 4 Display Properties NVIDIA Control Panel 1 2 3 4 Video Card Options Note that card types specifications and drivers are subject to continual updates and changes Check with y...

Страница 204: ...s by clicking the appropriate menu item Navigating the Control Panel Navigate through the control panels in much the same way as you would a web page Click on the headings menus and highlighted links...

Страница 205: ...Windows XP Information NVIDIA Video Driver Controls D 9 D The Help menus provide index and search features and direct links to the NVIDIA website etc Figure D 6 Help Menus...

Страница 206: ...n page D 14 for instructions on configuring audio when setting up an HDMI display as an external device nView Display Mode Description Single One of the connected displays is used as the display devic...

Страница 207: ...ected to the DVI Out port using an adapter only An external display connected to the DVI Out port only An external display connected to the HDMI Out port only The built in LCD and a CRT connected to t...

Страница 208: ...the NVIDIA Control Panel 3 Click Display and then click Set up multiple displays 4 Choose the nView display mode you wish to use 5 Select the displays you want to use if your display is not shown clic...

Страница 209: ...make sure you have checked Extend my Windows desktop onto this monitor and click Apply Figure D 8 Display Properties Extended Desktop 2 Click the appropriate mon itor icon e g to be able to select th...

Страница 210: ...io Setup for HDMI 1 Connect a device with HDMI support to the HDMI Out port 2 Go to the Start menu and point to Settings or just click Control Panel and click Control Panel then double click the Sound...

Страница 211: ...h the device Other Applications If you are using a third party application to play DVDs etc you will need to consult the ap plication s documenta tion to see the appropriate audio con figuration the a...

Страница 212: ...onserve power through individual components by means of Power Schemes You can also adjust the settings for each scheme to set the monitor to turn off after a specified time and the com puter s hard di...

Страница 213: ...System Power Options You can use the system power options to stop the computer s operation and restart where you left off This sys tem features Stand by and Hibernate sleep mode levels Hibernate mode...

Страница 214: ...nate uses no power and saves all of your information on a part of the HDD before it turns the system off Although it saves the most power it takes the longest time to return to full operation You can...

Страница 215: ...blink green In Hibernate mode the LED will be off battery If you are in a power saving mode set to save power through individual components e g hard disk monitor the LED will remain green Figure D 12...

Страница 216: ...rs including the programs you are running and pe ripheral devices attached Power Options you may set low battery Alarms and actions and check the Power Meter from the Power Options control panel and s...

Страница 217: ...everal hours to fully recharge the battery When the computer is turned off but plugged into an electrical outlet battery charge time is less Refer to LED Indica tors on page 1 9 for information on the...

Страница 218: ...ou notice any physical defects e g the battery is bent out of shape after being dropped or any unusual smells emanating from the notebook battery shut your computer down immediately and contact your s...

Страница 219: ...nclick the tickboxes see page D 20 and Schemes change all the settings to Never see page D 16 As the battery nears the end of its life save and close any critical files How do I fully charge the batte...

Страница 220: ...Drivers Installer Screen 1 1 Check the driver installation order from Table D 4 on page D 25 the drivers must be installed in this order which is the same as that listed in the Drivers Installer menu...

Страница 221: ...allation Click the Browse CD button in the Drivers Installer appli cation and browse to the executable file in the appropriate driver folder Video D 27 Audio D 27 Modem D 27 LAN D 28 Card Reader Expre...

Страница 222: ...on 4 Double click the device you wish to update reinstall the driver for you may need to click 5 Look for the Update Driver button check the Driver tab and follow the on screen prompts Windows XP Serv...

Страница 223: ...1 Install Chipset Driver Yes 2 Click Next Yes Next Next 3 Click Finish to restart the computer Video 1 Click 2 Install Video Driver Yes 2 Click Next 3 Click Yes I want to restart my computer now butt...

Страница 224: ...computer Module Drivers See the following pages for the driver installation pro cedures for any of the optional modules included in your purchase configuration Bluetooth Wireless LAN Modules Wireless...

Страница 225: ...mputer and a Bluetooth enabled device is sup ported in one direction only simultaneous data transfer is not supported Therefore if you are copying a file from your computer to a Bluetooth enabled devi...

Страница 226: ...ent in the Show icon in the notification area when connected box and click OK 4 Close the control panels and the icon for the Bluetooth local area connection will be displayed in the taskbar when conn...

Страница 227: ...Bluetooth Devices control panel Double click the icon to access the Bluetooth Devices control panel Click Start and click Control Panel or point to Settings and click Control Panel and then click Blue...

Страница 228: ...appear 5 Click to select My device is set up and ready to be found and then click Next 6 The Wizard will then search for any available Bluetooth devices within range 7 Click to select the device you w...

Страница 229: ...rvice click Services clear tick the check box next to the service and click OK To Make your Computer Discoverable to Bluetooth Devices 1 Access the Bluetooth Devices control panel 2 Click Options and...

Страница 230: ...icon Click Take a new picture in the Camera Tasks box PC Camera Device and TV Module If you have both an optional PC Camera and an optional TV Tuner module present you will need to select which devic...

Страница 231: ...op or from the BisonCam item in the Start Programs All Pro grams menu if the hardware is turned off use the Fn F10 key combina tion to turn it on again Latest PC Camera Driver Information Check the di...

Страница 232: ...lume tab 3 Click Options and scroll down and click Properties 4 Select Realtek HD Audio input from the Mixer device menu 5 Make sure the Mic Volume check box is checked then click OK 6 Boost the volum...

Страница 233: ...ure File Prior to capturing video files you may select the Set Capture File option in the File menu and set the file name and location before capture this will help avoid acciden tally overwriting fil...

Страница 234: ...e g CD DVD or USB Flash drive Note that the Windows XP system requires a minimum of 1 5GB of free space on the C drive system partition In order to prevent system problems it is recommended that you s...

Страница 235: ...creen in the BisonCap program is flickering you can try to adjust the setting in the Video Capture Filter options 1 Run the BisonCap program 2 Go to Options and scroll down to select Video Capture Fil...

Страница 236: ...BisonCap program 2 Go to Options Capture and select Take Picture Snapshot 3 The picture in JPEG format will be placed in the Snapshot folder on the desktop Figure D 22 Zoom Setting Snapshot Folder Th...

Страница 237: ...installation procedure will be dependent upon which WLAN module is included in your purchase option Download Prerequisite Files Before beginning the driver installation process for Windows XP it is ne...

Страница 238: ...e the file installation 8 Repeat steps 1 to 4 to get to the appropriate download location 9 Click Download button to download the Microsoft MSXML file to the computer s hard disk if you are unsure of...

Страница 239: ...ule D 43 D 16 If you do not see your Wireless Access Point click Refresh button 17 Click Help link to bring up the Help Menu 18 Make sure that the WiFi On button is selected Figure D 23 Intel PROSet W...

Страница 240: ...1 Insert the Device Drivers Utilities User s Manual disc into the CD DVD drive 2 Click Option Drivers button 3 Click 3 Install FingerPrint Driver Yes 4 Click Software Installation 5 Click Next Next Ne...

Страница 241: ...your computer 6 Click Next and you will then be prompted to enter your Windows password and click Next 7 Select either to use the fingerprint reader alone for authentication or choose both the fingerp...

Страница 242: ...information 15 Right click the taskbar icon to bring up the Control Center that allows you to Edit Fingerprints register applications manage Password Bank File Safe and access the Help menu etc You c...

Страница 243: ...cation window Once registered the application will launch when you swipe the appropriate finger across the sensor Password Bank The Password Bank stores registrations of user names passwords and other...

Страница 244: ...the USB TV Tuner module The optional TV Tuner allows you to watch TV play music CDs video conference and capture still images and video on your PC The Cable CATV antenna jack will only be enabled whe...

Страница 245: ...770A Driver V and S W Encoder Setup 3 Choose the language you prefer and click Next Next Next Next 4 Click the button to accept the license agreement and then click Next 5 Click Next Next 6 Click Yes...

Страница 246: ...xt 15 Click Next Next Next 16 Click Yes restart my computer now button and click Next 17 Click Finish to restart the computer 18 Run the Hybrid DTV application from the Start Programs All Programs Hyb...

Отзывы: