


Chapter 8 — Inspection and Maintenance
Part No. 750-184
8-21
T. HEAD INSPECTION AND MAINTENANCE
!
Warning
Disconnect and lock out electrical power and fuel to the
boiler before opening either the front or rear head. Failure to
follow these instructions can result in electrical shock and
serious personal injury or death.
A good seal between the heads and the pressure vessel is necessary to
prevent leakage of combustion gases, loss of heat, and to aid in obtaining
operating efficiency. Leaks can also cause hot spots that can lead to
premature refractory failure and/or damage to the door metal.
When opening the heads, either for routine maintenance or for an annual
inspection, do not do so when the boiler or the door is hot. The refractory
will hold its temperature for some time and exposure to ambient temperature
or rapid cooling may cause refractory cracking and/or harm to the boiler and
head metal.
When opening the front head of a CB-LE, either remove the motor and fan
cassette assembly and swing the assembly away from the head. Or, with the
motor and cassette in place, remove the motor to davit arm connecting bolt
to allow swinging the motor and fan cassette with the head.
After confirming that the electrical power and fuel are locked in the
off
position, disconnect the fuel lines. Disconnect the main gas line coupling,
the pilot line and the sight port air line. If the boiler is oil fired, remove the
supply and return oil lines and the oil pilot line if necessary. Remove the
head bolts and swing the head.
The opened head should be supported by blocking or jacking to eliminate
possible deformation of the head or hinge area.
Front Head
Inspect the second to third pass baffle gasket. If it is brittle, cracked or
broken, replace the gasket.
Inspect the second to third pass baffle for a good seal at the tube sheet and
the vessel.
If necessary, scrape old cement away and clean out and wire brush the
sealing area to assure an effective bond between the high temperature
cement and the steel. Be sure not to obstruct the tubes with excess cement.
Scrape the old gasket material off the vessel to front head sealing area
(vessel to inner door, CB-OS) and the dry oven to front head sealing area (dry
oven to inner door, CB-OS). Using a wire brush clean off any excess gasket
material or rust. Using Spray Tack spray the area to hold the gasket in place
prior to closing the front head. Use new fasteners when replacing the tadpole
gasket.
Inspect the condition of the blanket insulation on the front head (inner door,
CB-OS). Replace the insulation if loose or torn.
CB-OS only: Replace the gasket on the inner door and secure with
new split clips. Close the inner door and bolt securely in place.
Tighten the bolts evenly around the dry oven using a star pattern.
Содержание CB Ohio Special 100 HP
Страница 2: ...ii ...
Страница 8: ...viii ...
Страница 42: ...Chapter 2 Burner Operation and Control 2 22 Part No 750 184 ...
Страница 116: ...Chapter 6 Adjustment Procedures 6 28 Part No 750 184 ...
Страница 126: ...Chapter 8 Inspection and Maintenance 8 6 Part No 750 184 ...
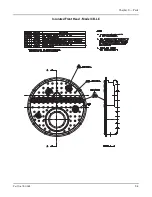
Страница 153: ...Chapter 9 Parts Part No 750 184 9 3 Insulated Front Head Model CB LE ...
Страница 154: ...Chapter 9 Parts 9 4 Part No 750 184 Insulated Front Head Interior Model CB LE ...
Страница 155: ...Chapter 9 Parts Part No 750 184 9 5 Insulated Inner Door Model CB OS ...
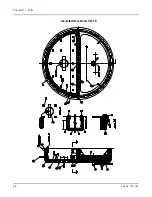
Страница 156: ...Chapter 9 Parts 9 6 Part No 750 184 Insulated Rear Head CB LE ...
Страница 157: ...Chapter 9 Parts Part No 750 184 9 7 Insulated Rear Head CB LE ...
Страница 158: ...Chapter 9 Parts 9 8 Part No 750 184 Insulated Rear Head CB OS ...
Страница 159: ...Chapter 9 Parts Part No 750 184 9 9 Dry Oven Model CB LE ...
Страница 161: ...Chapter 9 Parts Part No 750 184 9 11 Motor Impeller Model CB LE ...
Страница 162: ...Chapter 9 Parts 9 12 Part No 750 184 Front Head Linkage ...
Страница 170: ...Chapter 9 Parts 9 20 Part No 750 184 Control Cabinet Hawk ICS ...
Страница 171: ...Chapter 9 Parts Part No 750 184 9 21 Control Panel Standard ...
Страница 172: ...Chapter 9 Parts 9 22 Part No 750 184 Entrance Box ...
Страница 173: ...Chapter 9 Parts Part No 750 184 9 23 Front Head Electrical CB LE ...
Страница 174: ...Chapter 9 Parts 9 24 Part No 750 184 Front Head Electrical CB LE ...
Страница 175: ...Chapter 9 Parts Part No 750 184 9 25 Front Head Electrical CB OS ...
Страница 176: ...Chapter 9 Parts 9 26 Part No 750 184 Front Head Electrical CB OS ...
Страница 179: ...Chapter 9 Parts Part No 750 184 9 29 Heavy Oil Piping 60 Steam CB LE ...
Страница 180: ...Chapter 9 Parts 9 30 Part No 750 184 Heavy Oil Piping 60 Steam CB LE SEE TABLE NEXT PAGE ...
Страница 181: ...Chapter 9 Parts Part No 750 184 9 31 Common Oil Parts Heavy Oil ...
Страница 182: ...Chapter 9 Parts 9 32 Part No 750 184 Side Mounted Air Compressor Piping ...
Страница 183: ...Chapter 9 Parts Part No 750 184 9 33 Air Compressor Piping CB OS ...
Страница 185: ...Chapter 9 Parts Part No 750 184 9 35 Light Oil Piping ...
Страница 186: ...Chapter 9 Parts 9 36 Part No 750 184 Light Oil Air Piping Front Head ...
Страница 187: ...Chapter 9 Parts Part No 750 184 9 37 Light Oil Air Piping Front Head PAGE 9 31 ...
Страница 191: ...Chapter 9 Parts Part No 750 184 9 41 Gas Train 125 150 HP ...
Страница 193: ...Chapter 9 Parts Part No 750 184 9 43 Gas Train 200 HP ...
Страница 195: ...Chapter 9 Parts Part No 750 184 9 45 Steam Pressure Controls ...
Страница 196: ...Chapter 9 Parts 9 46 Part No 750 184 Hot Water Temperature Controls ...
Страница 197: ...Chapter 9 Parts Part No 750 184 9 47 Water Column ...
Страница 198: ...Chapter 9 Parts 9 48 Part No 750 184 Water Column ...
Страница 199: ...Chapter 9 Parts Part No 750 184 9 49 Fireside Gaskets CB LE ...
Страница 200: ...Chapter 9 Parts 9 50 Part No 750 184 Fireside Gaskets CB OS ...