14 July 2021
PN: PUB-00018 Rev C
The Arcadia™ Central Station supports the full range of FreeSpeak™ products, including FreeSpeak Edge
®
and
FreeSpeak II
®
.
•
Audio routing to and from beltpacks and other audio devices.
•
A Core Configuration Manager (CCM) to quickly operate and configure your Arcadia Central system.
•
Up to 16 IP-based transceivers and up to 10 E1 transceivers provide coverage zones for beltpacks.
•
Up to 32 wireless beltpacks (FSE-BP50, FSII-BP-19, FSII-BP-24).
•
Up to two optional E1 transceiver splitters (FSII-SPL) that run up to five separate transceivers each.
•
Up to 64 Dante ports.
•
Suitable headsets such as the Clear-Com CC-300-X4 that can be connected to the front panel to allow
communication to the Central Station.
Accessing the CCM
1. Power the Arcadia Central Station and connect it to a network using the LAN1 port.
2. Use the Rotary controllers to navigate to:
Menu>Networking>Management>IP Address.
3. In a web browser address field, enter the IP address from step 2.
4.
Use the Rotary controllers to navigate through the menu system:
Menu>Administration>CCM
Access>Default Password.
5. In Login screen, enter your username (admin) and the default password from step 4.
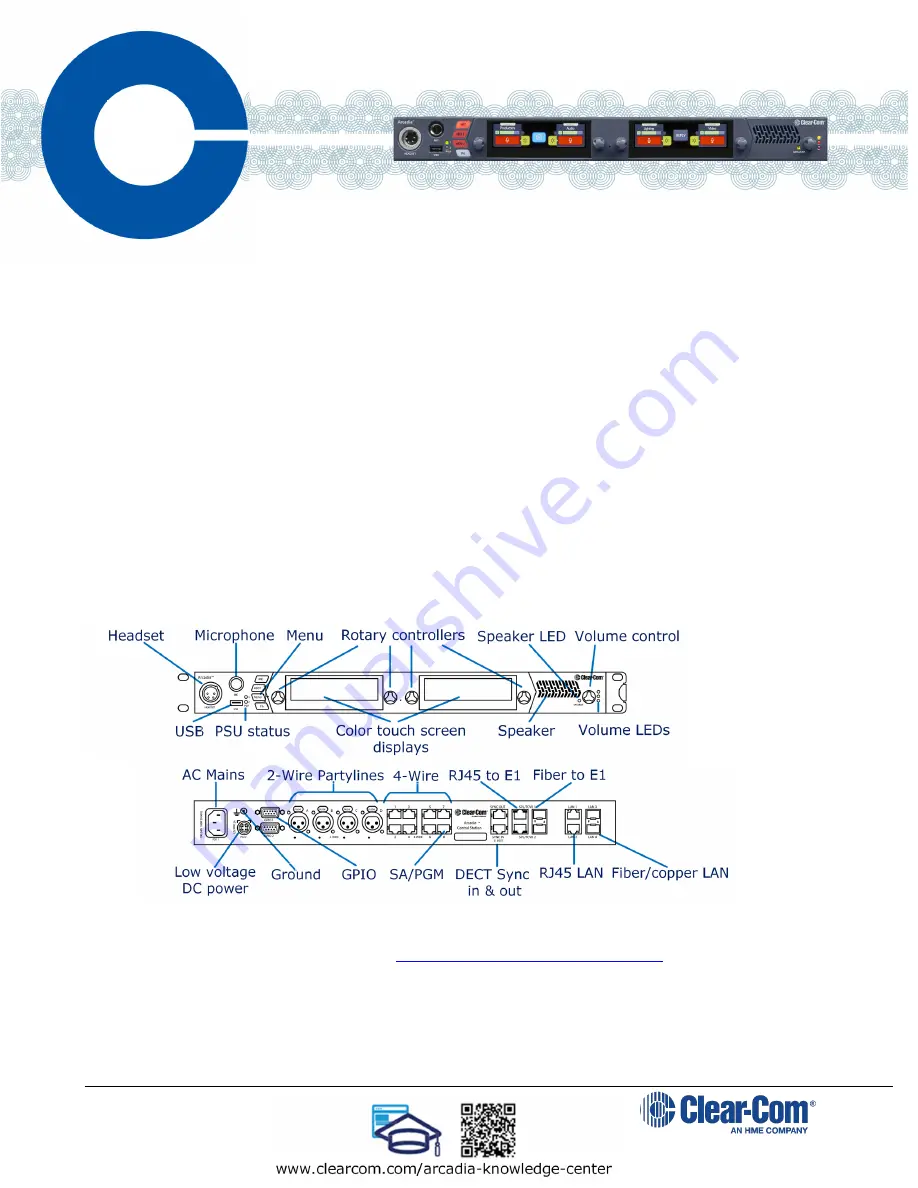
Connectors, controls and indicators
Connecting transceivers
You can connect up to 10 E1 transceivers using a splitter to the RJ45 E1 ports and 16 IPTs via one of the LAN ports.
For cable lengths, and more information, see the
Arcadia Central Station Knowledge Center
1. Connect your E1 transceivers to the Arcadia Central Station using the RJ45 or Fiber E1 connectors.
2. Connect your IP transceivers to the RJ45 or Fiber LAN connectors.
3.
From the CCM, navigate to
Hardware>Resources
and select
Add Resource
.
4.
Select
IP Transceivers
.
5. Select the transceiver to register from the left-hand area of the screen and click the right-hand arrow.
Arcadia Central Station
Quick
Start
Guide


