14
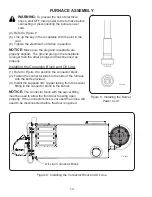
Installing the Connector Block and Oil Line:
(1) Refer to Figure 9 to position the connector block.
(2) Fasten the connector block to the side of the furnace
with the bolts provided.
(3) Install the supplied 3/8” copper tubing from the swivel
fitting in the connector block to the burner.
NOTICE:
The connector block with the swivel fitting
must be used to allow the front door to swing open
properly. If the connector block is not used the oil line will
need to be disconnected before the door is opened.
Figure 9: Installing the Connector Block and Oil Line
Figure 8: Installing the Burner
Power Cord
(4) Refer to Figure 8
(5) Line up the key in the receptacle with the slot in the
cord.
(6) Tighten the electrical cord when in position.
NOTICE:
Make sure the plug and receptacle are
properly aligned. The ground prong in the receptacle
is longer than the other prongs and must be lined up
properly.
FURNACE ASSEMBLY
WARNING:
To prevent the risk of electrical
shock, shut OFF main power to the furnace before
connecting or disconnecting the burner power
cord.
CE70163
Oil Line Connector Block
CE70013
Содержание CE-140
Страница 50: ...50 NOZZLE ADAPTER HEATER BLOCK ASSEMBLY 2 3 19 5 7 8 15 9 17 14 18 16 13 1 4 6 10 11 12 ...
Страница 52: ...52 MANIFOLD BLOCK ASSEMBLY 8 6 2 1 4 17 3 9 5 7 12 13 14 15 16 18 19 11 10 ...
Страница 58: ...58 3 4 6 1 2 5 CE 140 180 BLOWER ...
Страница 62: ...62 2 3 4 5 6 1 CE 250 BLOWER ...
Страница 66: ...66 CE 330 BLOWER 12 8 7 4 13 1 2 3 5 6 9 10 11 ...
Страница 70: ...70 CE 440 BLOWER 12 8 7 4 13 1 2 3 5 6 9 10 11 ...
Страница 72: ...72 METERING PUMP ASSEMBLY WITH A2RA 7720 PUMP HEAD 3 1 2 4 6 7 8 9 10 11 12 13 14 15 16 17 18 19 20 22 23 5 21 ...


