background image

21

Charging the Battery

1.  Connect the cable of the charger to the charging socket (3).

2.  Observe the mains voltage! Check whether the voltage of 

the charger as indicated on the rating label is suitable for 

the mains voltage. 

3.  Connect the mains adapter to an approved wall socket.

4.  The lamp (4) lights up red.

 NOTE:

•  Charge the battery regularly after use.

•  Protect the battery from damage and overload.

•  Charging takes approx. 14-16 hours.

•  The lamp lights up green when the battery is fully 

charged.

5.  Then unplug the charger from the wall socket and discon-

nect the cable from the charging socket (3).

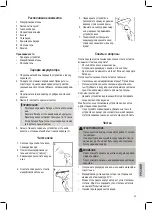
Cleaning windows

1.  Fill the spray bottle with tap water.

2.  Attach the micro fleece cloth to the 

Velcro strip.

3.  Evenly spray the window with 

water.

4.  Clean the glass surface with the 

micro fleece cloth.

5.  Turn the device around and 

position the lip in one upper corner 

of the window frame.

6.  Press the button and pull down 

the device with a steady and slow 

movement.

7.  Dry the complete window surface 

that way, while observing the water 

level in the tank!

Tips and questions

The windowpane is still wet after sucking one time. What can I 

do?

•  Spray the pane with less water.

•  Empty the water tank if full.

•  Is the motor power strong enough? If not, charge the bat-

tery.

The windowpane is still dirty after cleaning?

•  Is the micro fleece cloth dirty? Wash it.

•  Are the windowpanes heavily soiled with grease or soot? 

Add a mild cleaning agent, such as dishwasher liquid, to 

the water in the spray bottle.

Water leaks from the lip?

•  Hold the device vertically. Always rub the windowpane from 

the top to the bottom.

I would like to use the device to clean other smooth surfaces.

•  Avoid any damage and make sure the device is suitable for 

the respective surface! Clean a hidden area first to check.

Cleaning

 WARNING: 

•  Always disconnect the appliance from the mains adapter 

before cleaning!

•  Under no circumstances should you immerse the motor 

housing in water in order to clean it. Otherwise this might 

result in an electric shock or fire.

 CAUTION:

•  Do not use a wire brush or any abrasive items.

•  Do not use any acidic or abrasive detergents.

•  Empty the water tank and remove the micro fleece cloth.

•  The micro fleece cloth can be machine-washed at 40°C.

•  You can disconnect the motor housing from the wiper 

assembly. In order to do so, turn the wiper assembly to the 

“lock open” symbol.

•  Rinse the water tank with clear water.

•  Wipe all other surfaces with a damp cloth and mild cleaning 

agent.

•  Wait until all parts have dried completely and only then 

reassemble the device!

Noise development

The sound pressure level in the ear of an operator (LpA) was 

measured according to DIN EN ISO 3744.
Sound pressure level detected: 73 dB(A) (no limit)

Technical Data

Model: ............................................................................ WC 3528

Net weight: .............................................................. approx. 600 g
Mains adapter

Protection class: ..........................................................................II

Input: ........................................................AC 220 – 240 V, 50 Hz

Output: ...........................................................DC 5.0 V, 170 mAh

Polarity: ...........................................................................


Battery: ........................................................3 x 1.2 V, 1500 mAh

Operating time: ............................................................40 minutes

Charging time: .................................................................16 hours

Содержание WC 3528

Страница 1: ...mploi Instrucciones de servicio Istruzioni per l uso Instruction Manual Instrukcja obs ugi Gwarancja Haszn lati utas t s WC 3528 Fensterreiniger Ramenreiniger Lave Vitres Limpiador de Ventanas Lavavet...

Страница 2: ...enti di comando pagina 3 Istruzioni per l uso pagina 17 Dati tecnici pagina 18 Smaltimento pagina 19 2 ENGLISH Contents Location of Controls page 3 Instruction Manual page 20 Technical Data page 21 Di...

Страница 3: ...er Bedienelemente Locatie van bedieningselementen Situation des commandes Indicaci n de los elementos de manejo Elementi di comando Location of Controls Przegl d element w obs ugi Akezel szervek elhel...

Страница 4: ...die daraus resultie renden Gefahren verstanden haben Kinder d rfen nicht mit dem Ger t spielen Reinigung und Benutzer Wartung d rfen nicht durch Kinder ohne Beaufsichtigung durchgef hrt werden Benutz...

Страница 5: ...ch feucht wenn ich einmal gesaugt habe Was kann ich tun Spr hen Sie die Scheibe weniger stark ein Leeren Sie den Wassertank wenn er voll ist L uft der Motor noch stark genug Sonst laden Sie den Akku T...

Страница 6: ...en soll ob durch Reparatur oder durchAustausch eines gleichwerti gen Ger ts 4 Garantieleistungen werden nicht f r M ngel erbracht die auf der Nichtbeachtung der Gebrauchsanweisung unsachgem er Behandl...

Страница 7: ...lichtet gebrauchte Batterien Akkus zur ckzugeben Warnung Trennen Sie das Ger t vom Stromnetz bevor Sie die Akkus ausbauen Entnehmen Sie dieAkkus nur im entladenen Zustand Benutzen Sie einen kleinen Kr...

Страница 8: ...or kinderen wor den uitgevoerd zonder begeleiding Gebruik het apparaat uitsluitend priv en uitsluitend voor de voorgeschreven toepassing Dit apparaat is niet geschikt voor commercieel gebruik De voedi...

Страница 9: ...inigd zijn met vet of roet Voeg een mild reinigingsmiddel zoals vaatwasserzeep toe aan het water in de spoeierfles Water lekt van de lip Houd het toestel verticaal Het raam altijd van boven naar bened...

Страница 10: ...een schaar om de draden van de batterij door te knippen Verwijder de batterijen U kunt de batterijen inleveren in een speciaal daarvoor aangewezen recyclecentrum Raadpleeg uw plaatselijke overheid vo...

Страница 11: ...e par les personnes sans exp rience ou connaissances tant qu elles sont supervis es et instruites l utili sation de l appareil en s curit et tant qu elles en comprennent les risques Les enfants ne doi...

Страница 12: ...e votre reste mouill apr s un passage Que puis je faire Pulv risez le panneau avec moins d eau Videz le r servoir d eau s il est plein Le moteur est il suffisamment puissant Si non chargez la batterie...

Страница 13: ...de batteries usag e s AVERTISSEMENT D branchez l appareil avant de retirer les batteries Ne retirez que les batteries usag es D vissez la vis du carter gr ce un petit tournevis pointe cruciforme Util...

Страница 14: ...sin experien cia ni conocimientos siempre que se les someta a supervisi n o se les instruya respecto a su uso de forma segura y de manera que entiendan los peligros existentes Los ni os no deben jugar...

Страница 15: ...nsejos y preguntas El cristal est todav a h medo despu s de absorber una vez Qu puedo hacer Pulverizar el cristal con menos cantidad de agua Vaciar completamente el dep sito de agua si est lleno Es su...

Страница 16: ...necte el aparato de la toma de corriente antes de quitar las pilas Solamente quite las pilas cuando se gasten Utilice un destornillador Phillips para extraer el tornillo de la carcasa Utilice unas tij...

Страница 17: ...one Utilizzare l apparecchio esclusivamente per scopi privati e conformemente al tipo di applicazione previsto Questo prodotto non stato concepito ai fini di un impiego in ambito industriale L adattat...

Страница 18: ...le Strofina sempre il vetro della finestra dall alto verso il basso Vorrei usare il dispositivo per pulire altre superfici morbide Evita qualsiasi danno e assicurati che il dispositivo sia adatto alla...

Страница 19: ...i batterie usate o rifiuti speciali Chiedere alle autorit locali per ulteriori informazioni Smaltimento Significato del simbolo Eliminazione Salvaguardare l ambiente gli elettrodomestici non vanno eli...

Страница 20: ...play with the appliance Cleaning and user maintenance shall not be made by children without supervision The appliance is designed exclusively for private use and for the envisaged purpose This applia...

Страница 21: ...s heavily soiled with grease or soot Add a mild cleaning agent such as dishwasher liquid to the water in the spray bottle Water leaks from the lip Hold the device vertically Always rub the windowpane...

Страница 22: ...teries Only remove the batteries if spent Use a small Phillips screwdriver to remove the screw from the housing Use scissors to cut the wires on the batteries Remove the batteries You may dispose of t...

Страница 23: ...i gdy zdaj sobie spraw z istniej cych niebezpiecze stw Dzieci nie powinny bawi si tym urz dzeniem Czyszczenie i konserwacja nie powinny by wykonywane przez dzieci bez nadzoru Prosz wykorzystywa urz dz...

Страница 24: ...erwuj c poziom wody w zbior niczku Pytania i wskaz wki Szyba okienna jest jeszcze mokra po jednokrotnym ruchu urz dzeniem Co mo na zrobi Szyb spryskiwa mniejsz ilo ci wody Opr ni pojemnik na wod w urz...

Страница 25: ...akcesoriami instrukcj obs ugi i w oryginalnym opakowaniu wraz z dowodem zakupu i prawid owo wype nion kart gwarancyjn piecz tka sklepu data sprzeda y urz dze nia Gwarancja oraz zawarte w niej warunki...

Страница 26: ...k az rintett vesz lyeket Agyerekek nem j tszhatnak a k sz l kkel Atiszt t st s karbantart st gyerekek fel gyelet n lk l nem v gez hetik Kiz r lag szem lyi c lra haszn lja a k sz l ket s csup n arra a...

Страница 27: ...fel az akkumul tort Az ablak veg a tiszt t s ut n m g mindig koszos Koszos a mikrosz las kend Mossa ki Az ablak vegek er sen szennyezettek zs rral vagy korommal Adjon enyhe tiszt t szert pl mosogat s...

Страница 28: ...l t vol tsa el a csavart a k sz l kh zb l Oll val v gja el az akkumul torok vezet keit T vol tsa el az akkumul torokat Egy kijel lt gy jt ponton speci lis hullad kk nt leadhatja a kimer lt akkumul tor...

Страница 29: ...29 8...

Страница 30: ...30 1 2 3 4 5 6 7 8 9 1 3 2 3 4 4 14 16 5 3 1 2 3 4 5 6 7 40 C...

Страница 31: ...31 Model WC 3528 600 II 220 240 50 5 0 170 3 x 1 2 1500 mAh 40 16...

Страница 32: ...32 8...

Страница 33: ...33 1 2 3 4 5 6 7 8 9 1 3 2 3 4 4 14 16 5 3 1 2 3 4 5 6 7 40 C...

Страница 34: ...34 WC 3528 600 II AC 220 240 50 DC 5 0 170 3 x 1 2 1500 40 16...

Страница 35: ...35 1 2 3 4 5 6 7 40 WC 3528 600 II 50 240 220 170 5 0 1500 3x1 2 40 16 CE...

Страница 36: ...36 8 1 2 3 4 5 6 7 8 9 3 1 2 3 4 4 16 14 5 3...

Страница 37: ......

Страница 38: ...Stand 02 14 WC 3528...

Отзывы: