


English
GREAT BRITAIN •
customer service
tel:
0845 300 9799
e-mail:
internet:
www.clasohlson.com/uk
1
2
3
4
5
6
7
8
9
Ver
. 20140519
Ladyshave
Art.no 44-1151
Please read the entire instruction manual before using the product
and then save it for future reference. We reserve the right for any
errors in text or images and any necessary changes made to
technical data. In the event of technical problems or other queries,
please contact our Customer Services.
Safety
• Never immerse the shaver in water or any other type of liquid.
• Never try to open the housing or modify the shaver in any way.
• Make sure that the cutting head is correctly mounted before
turning the shaver on.
• The shaver is only intended for use by adults for the purpose
of shaving and only in the manner described in this instruction
manual. Do not use the shaver for any other purposes.
• The shaver is designed exclusively for normal domestic use.
• Do not use other shaving products, such as shaving cream
together with this product.
• Do not use the shaver on sensitive, irritated or damaged skin.
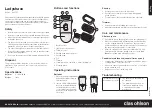
Buttons and functions
1. Battery holder
2. [ 0/1 ] Power switch on/off
3. Trimmer control
4. Cutting head release buttons
5. Cutting head
6. Foil
7. Trimmer
8. Trimmer distance combs 0, 2, 4 mm (for trimmer)
9. Cleaning brush
Operating instructions
Batteries
1. Open the battery compartment
by pulling it straight out away
from the shaver.
2. Insert 2 × AAA/LR03 batteries.
Note the polarity markings in
the battery holder to ensure
correct battery insertion and
gently insert the batteries into
the holder.
Shaving
1. Set the power switch (2) to the
1
position.
2. Pass the shaver slowly over your skin while applying
gentle pressure.
3. For best results, shave against the direction of growth.
Trimmer
1. Extend the trimmer by sliding the control (3).
2. Attach the appropriate comb (8) for the desired length of hair.
Care and maintenance
After every use
1. Press in both release buttons (4) and remove the cutting head (5).
2. Rinse the cutting head in still lukewarm water. Alternatively,
use the cleaning brush (9). You may also rinse the shaver
under running water, however be careful never to submerge
the shaver entirely into water or other liquid.
3. Allow the cutting head to dry before reattaching it. A click
should be heard when the cutting head is correctly fitted.
Note:
The cutting head will only fit one way.
Periodical maintenance (several times a year)
1. Lubricate the metal parts of the trimmer head with a drop of
sewing machine oil (or other fine oil).
2. Switch the shaver on and allow it to run it for 1 or 2 minutes
before switching it off.
3. Wipe off any excess oil with a dry cloth.
Troubleshooting
The trimmer does not
work properly or at all.
• The batteries are flat and must
be changed.
• The trimmer head needs to be
cleaned and lubricated using
a small amount of sewing
machine oil.
Disposal
This product should be disposed of in accordance with local
regulations. If you are unsure how to proceed, contact your
local council.
Specifications
Batteries
2 × AAA/LR03
Weight
105 g