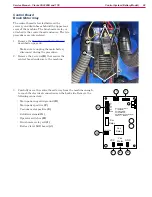
Control System (Battery Model)
32
Service Manual – Clarke CA30 20B and 17E
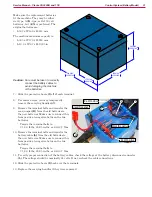
Because the machine is frequently tilted, it is
important that the batteries fit properly front-to-rear
to prevent them from moving during machine use.
For batteries that are less than the maximum size,
24 mm spacers are used to fill the space in front of
the battery.
•
For batteries less than 310 mm (12.25 in) long, use
1-24mm spacer
•
For batteries less than 285 mm (11.25 in) long, use
2-24mm spacers
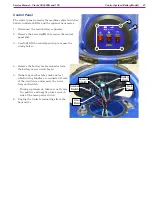
14. As needed, place 0, 1, or 2 spacer bars
(M)
against the forward wall of the battery bay
(N)
.
15. Slide the batteries into the battery bay until
they are pressing against the forward wall
(N)
or
spacer
(M)
.
16. Reinstall the battery retaining bracket
(E)
.
17. If the battery type has not changed, finish the
reassembly. Otherwise complete the procedure
below to set the battery type.
Setting AGM/Wet Battery Type
The battery charger uses different charging curves, depending on the battery type. This is controlled by a
dip-switch setting in the charger. Additionally, the battery level LEDs on the control panel will function
differently for the different battery types. This is controlled by a dip-switch setting on the control board.
1. Complete the procedure to remove the
Battery Charger
described on page 33. The end of the procedure
contains the settings for the charger’s dip-switch settings.
•
It is not necessary to disconnect any wires from the charger. Just free the charger from the rear cover
to access the dip-switches.
2. Remove the control board enclosure as described on
page 28
, but it is not necessary to unplug any
wires.
3. The dip-switches are located at the bottom-left corner of the control board. Move both switches to either
“Wet” or “GEL”, as necessary. (Use “GEL” for AGM batteries.)
M
N


