background image

5-9

Cisco PIX Security Appliance Hardware Installation Guide

78-15170-03

Chapter 5      PIX 520

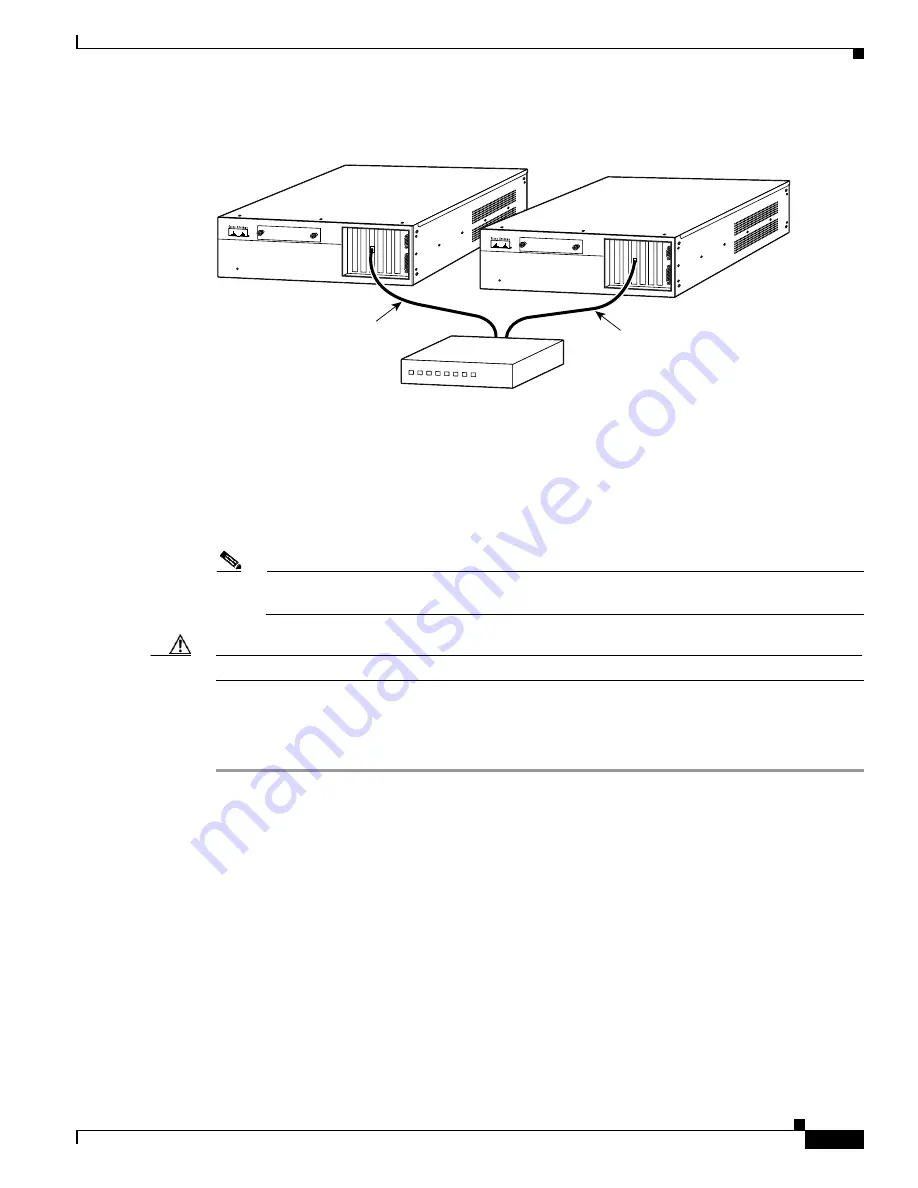
Installing LAN-Based Failover

Figure 5-10 LAN-Based Failover Connections

Step 5

If you are using Stateful Failover, use one of the following types of connections, that is appropriate for 
your system, between the dedicated interfaces on the PIX security appliances:

Category 5 crossover cable directly connecting the primary unit to the secondary unit.

100BaseTX full duplex on a dedicated switch or dedicated VLAN of a switch.

1000BaseTX full duplex on a dedicated switch or dedicated VLAN of a switch.

Note

For Stateful Failover on the PIX 520, if you have Gigabit Ethernet (GE) interfaces, 
then the failover link must be GE.

Caution

Do not turn the power on until the units are connected and the primary unit is configured completely. 

Step 6

Power the primary unit on first, 

then

 power on the secondary unit. Within a few seconds, the active unit 

automatically downloads its configuration to the standby unit.

If the primary unit fails, the secondary unit automatically becomes active.

PIX Firewall

SERIES

RESET

PIX Firewall

SERIES

RESET

87366

Dedicated Ethernet

interface

Hub/switch

Dedicated Ethernet
interface

PIX 520

PIX 520

Содержание PIX 501

Страница 1: ...s Other 7 I prefer this access method Cisco com CD ROM Printed manuals Other 8 I use the following three product features the most Document Information Document Title Cisco PIX Security Appliance Hardware Installation Guide Part Number 78 15170 03 S W Release if applicable On a scale of 1 5 5 being the best please let us know how we rate in the following areas The document is complete The informat...

Страница 2: ... L A S S M A I L P E R M I T N O 4 6 3 1 S A N J O S E C A POSTAGE WILL BE PAID BY ADDRESSEE NO POSTAGE NECESSARY IF MAILED IN THE UNITED STATES DOCUMENT RESOURCE CONNECTION CISCO SYSTEMS INC 170 WEST TASMAN DR SAN JOSE CA 95134 9916 ...

Страница 3: ...c 170 West Tasman Drive San Jose CA 95134 1706 USA http www cisco com Tel 408 526 4000 800 553 NETS 6387 Fax 408 526 4100 Cisco PIX Security Appliance Hardware Installation Guide Customer Order Number DOC 7815170 Text Part Number 78 15170 03 ...

Страница 4: ...owing measures Turn the television or radio antenna until the interference stops Move the equipment to one side or the other of the television or radio Move the equipment farther away from the television or radio Plug the equipment into an outlet that is on a different circuit from the television or radio That is make certain the equipment and the television or radio are on circuits controlled by ...

Страница 5: ...Service Request xvi Definitions of Service Request Severity xvi Obtaining Additional Publications and Information xvii C H A P T E R 1 Preparing for Installation 1 1 Installation Overview 1 1 Safety Recommendations 1 2 Maintaining Safety with Electricity 1 2 Preventing Electrostatic Discharge Damage 1 3 General Site Requirements 1 4 Site Environment 1 4 Preventive Site Configuration 1 4 Power Supp...

Страница 6: ...4 PIX 515 515E 4 1 PIX 515 515E Product Overview 4 1 Installing the PIX 515 515E 4 3 Surface Mounting the PIX 515 515E 4 4 Rack Mounting the PIX 515 515E 4 5 Vertical Mounting the PIX 515 515E 4 5 Installing the PIX 515 515E 4 6 PIX 515 515E Feature Licenses 4 8 VPN Accelerator Card 4 9 VPN Accelerator Card 4 9 Installing Failover 4 9 Installing LAN Based Failover 4 12 Removing and Replacing the P...

Страница 7: ...B Flash Circuit Board 5 18 VPN Accelerator Circuit Board 5 19 Gigabit Ethernet Circuit Board 5 20 Installing the PIX 520 DC Model 5 21 C H A P T E R 6 PIX 525 6 1 PIX 525 Product Overview 6 1 Installing the PIX 525 6 3 PIX 525 Feature Licenses 6 5 VPN Accelerator Card 6 6 VPN Accelerator Card 6 6 Installing Failover 6 6 Installing LAN Based Failover 6 8 Removing and Replacing the PIX 525 Chassis C...

Страница 8: ...Card 7 7 VPN Accelerator Card 7 7 Installing Failover 7 8 Installing LAN Based Failover 7 9 Replacing a Lithium Battery 7 10 Installing a Memory Upgrade 7 11 Installing a Circuit Board in the PIX 535 7 14 PIX 535 Circuit Board Options 7 14 Circuit Board Slot Description 7 16 Installing a Circuit Board 7 17 16 MB Flash Circuit Board 7 18 VPN Accelerator Circuit Board 7 20 Gigabit Ethernet Circuit B...

Страница 9: ...ion page xiv Documentation Feedback page xv Obtaining Technical Assistance page xv Obtaining Additional Publications and Information page xvii Document Objectives This guide describes how to install the Cisco PIX security appliance hardware components Audience This guide is for network administrators who perform any of the following tasks Managing network security Installing and configuring firewa...

Страница 10: ... cover This chapter also includes the procedure for installation of the DC model Chapter 6 PIX 525 provides a product overview installation instructions as well as the procedure to remove and replace the chassis cover This chapter also includes installation procedures for the circuit board and installation of the DC model Chapter 7 PIX 535 provides a product overview installation instructions as w...

Страница 11: ...that accompanied this device SAVE THESE INSTRUCTIONS Waarschuwing BELANGRIJKE VEILIGHEIDSINSTRUCTIES Dit waarschuwingssymbool betekent gevaar U verkeert in een situatie die lichamelijk letsel kan veroorzaken Voordat u aan enige apparatuur gaat werken dient u zich bewust te zijn van de bij elektrische schakelingen betrokken risico s en dient u op de hoogte te zijn van de standaard praktijken om ong...

Страница 12: ...LLA SICUREZZA Questo simbolo di avvertenza indica un pericolo La situazione potrebbe causare infortuni alle persone Prima di intervenire su qualsiasi apparecchiatura occorre essere al corrente dei pericoli relativi ai circuiti elettrici e conoscere le procedure standard per la prevenzione di incidenti Utilizzare il numero di istruzione presente alla fine di ciascuna avvertenza per individuare le t...

Страница 13: ...encia encontrará el número que le ayudará a encontrar el texto traducido en el apartado de traducciones que acompaña a este dispositivo GUARDE ESTAS INSTRUCCIONES Varning VIKTIGA SÄKERHETSANVISNINGAR Denna varningssignal signalerar fara Du befinner dig i en situation som kan leda till personskada Innan du utför arbete på någon utrustning måste du vara medveten om farorna med elkretsar och känna ti...

Страница 14: ...AC Power Disconnection Warning page xiii TN Power Warning page xiii 48 VDC Power System page xiii More Than One Power Cord page xiii Circuit Breaker 15A Warning page xiv Grounded Equipment Warning page xiv Safety Cover Requirement page xiv Faceplates and Cover Panel Requirement page xiv Wrist Strap Warning page xiv DC Power Connection Warning Caution After wiring the DC power supply remove the tap...

Страница 15: ...cuit breaker on DC units Jewelry Removal Warning Caution Before working on equipment that is connected to power lines remove jewelry including rings necklaces and watches Metal objects will heat up when connected to power and ground and can cause serious burns or weld the metal object to the terminals AC Power Disconnection Warning Caution Before working on a chassis or working near power supplies...

Страница 16: ...and pose a risk of fire and electrical hazards Faceplates and Cover Panel Requirement Caution Blank faceplates and cover panels serve three important functions they prevent exposure to hazardous voltages and currents inside the chassis they contain electromagnetic interference EMI that might disrupt other equipment and they direct the flow of cooling air through the chassis Do not operate the syst...

Страница 17: ...mentation through a local account representative by calling Cisco Systems Corporate Headquarters California USA at 408 526 7208 or elsewhere in North America by calling 1 800 553 NETS 6387 Documentation Feedback You can send comments about technical documentation to bug doc cisco com You can submit comments by using the response card if present behind the front cover of your document or by writing...

Страница 18: ...abel on your product and record the information before placing a service call Submitting a Service Request Using the online TAC Service Request Tool is the fastest way to open S3 and S4 service requests S3 and S4 service requests are those in which your network is minimally impaired or for which you require product information After you describe your situation the TAC Service Request Tool provides...

Страница 19: ...eneral networking training and certification titles Both new and experienced users will benefit from these publications For current Cisco Press titles and other information go to Cisco Press at this URL http www ciscopress com Packet magazine is the Cisco Systems technical user magazine for maximizing Internet and networking investments Each quarter Packet delivers coverage of the latest industry ...

Страница 20: ...xviii Cisco PIX Security Appliance Hardware Installation Guide 78 15170 03 About This Guide Obtaining Additional Publications and Information ...

Страница 21: ...s page 1 2 General Site Requirements page 1 4 Installation Overview To prepare for the installation of the PIX security appliance perform the following steps Note If your PIX security appliance model supports a failover configuration perform the steps that follow only on the primary active unit Not applicable to the PIX 501 or the PIX 506 506E Step 1 Review the safety precautions outlined in the R...

Страница 22: ...that might be hazardous to your eyes Do not perform any action that creates a potential hazard to people or makes the equipment unsafe Never attempt to lift an object that is too heavy for one person to handle This section includes the following topics Maintaining Safety with Electricity page 1 2 Preventing Electrostatic Discharge Damage page 1 3 Maintaining Safety with Electricity Warning Before ...

Страница 23: ...s A 15 amp circuit breaker is required at the 48 VDC facility power source An easily accessible disconnect device should be incorporated into the facility wiring Be sure to connect the grounding wire conduit to a solid earth ground We recommend that you use a closed loop ring to terminate the ground conductor at the ground stud Other DC power guidelines are listed in the Regulatory Compliance and ...

Страница 24: ...d equipment failures and reduce the possibility of environmentally caused shutdowns If you are currently experiencing shutdowns or unusually high errors with your existing equipment these precautions may help you isolate the cause of failures and prevent future problems Preventive Site Configuration The following precautions helps you plan an acceptable operating environment for your PIX security ...

Страница 25: ...ng facilities to guard against damage from lightning or power surges In a unit equipped with DC input power supplies use the following guidelines Each DC input power supply requires dedicated 15 amp service For DC power cables we recommend that you use a minimum of 18 AWG wire cable Configuring Equipment Racks Follow these tips to help plan for configuration of an equipment rack PIX 515 515E PIX 5...

Страница 26: ...1 6 Cisco PIX Security Appliance Hardware Installation Guide 78 15170 03 Chapter 1 Preparing for Installation General Site Requirements ...

Страница 27: ...g a Power Supply Module to the PIX 501 page 2 3 Removing and Replacing the PIX 501 Chassis Cover page 2 4 Replacing a Lithium Battery page 2 6 Note The PIX 501 is not supported in software Version 7 0 1 PIX 501 Product Overview This section describes the PIX 501 front and rear panels and the panel LEDs Figure 2 1 shows the front view of the PIX 501 Figure 2 1 PIX 501 Front Panel 67848 POWER VPN TU...

Страница 28: ... Network activity such as Internet access is present On The correct cable is in use and the connected equipment has power and is operational Off No link is established Tip If the LINK ACT LED does not light up you might be using the wrong type of cable Try replacing the yellow straight through Ethernet cable with the orange crossover Ethernet cable VPN TUNNEL Green On One or more IKE IPSec VPN tun...

Страница 29: ...one of the four switched inside ports numbered 1 through 4 Connecting a Power Supply Module to the PIX 501 This section describes how to connect the power supply module to a PIX 501 Use this information in conjunction with the Regulatory Compliance and Safety Information document To connect the power supply module to the PIX 501 perform the following steps Step 1 Connect the small round connector ...

Страница 30: ...ng the PIX 501 Removing and Replacing the PIX 501 Chassis Cover This section describes how to remove and replace the chassis cover from the PIX 501 This section includes the following topics Removing the Chassis Cover page 2 4 Replacing the Chassis Cover page 2 5 Removing the Chassis Cover To remove the chassis cover perform the following steps Note Removing the chassis cover does not affect your ...

Страница 31: ...r Off the Chassis Step 7 With the front panel facing you slide the top section toward you and then lift it up and off the bottom section see Figure 2 7 Replacing the Chassis Cover Caution Do not operate PIX security appliances without the chassis cover installed The chassis cover protects the internal components prevents electrical shorts and provides proper air flow for cooling the electronic com...

Страница 32: ...ace The PIX 501 is not rack mountable Step 8 Reconnect the power cord to the power outlet to power on the security appliance Replacing a Lithium Battery The PIX 501 has a lithium battery on the main circuit board see Figure 2 8 This battery has an operating life of about ten years When the battery loses its charge the PIX security appliance cannot function The lithium battery is a field replaceabl...

Страница 33: ...ng the Chassis Cover section on page 2 4 Step 2 Use a flathead screwdriver to slide the battery out of the metal clip on the circuit board see Figure 2 8 Step 3 Place the used battery aside and replace it with a new battery Install the new battery writing side up Step 4 The battery snaps into place as you slide it into the battery slot Step 5 Replace the chassis cover as described in the Replacing...

Страница 34: ...2 8 Cisco PIX Security Appliance Hardware Installation Guide 78 15170 03 Chapter 2 PIX 501 Replacing a Lithium Battery ...

Страница 35: ...g and Replacing the PIX 506 506E Chassis Cover page 3 6 Replacing a Lithium Battery page 3 7 Note The PIX 506 and the PIX 506E are the same except the PIX 506E has a faster processor and a different power supply The PIX 506 and the PIX 506E are not supported in software Version 7 0 1 PIX 506 506E Product Overview This section describes the PIX 506 506E front and rear panels and the panel LEDs Figu...

Страница 36: ...IX 506 506E Front Panel LEDs Table 3 1 lists the states of the PIX 506 506E front panel LEDs 67947 CONSOLE ETHERNET 0 ACT LINK LINK DC POWER INPUT ACT USB ETHERNET 1 POWER ACT NETWORK 25735 Table 3 1 PIX 506 506E Front Panel LEDs LED Color State Description POWER Green On The unit has power ACT Green Flashing Active indicator On when the software image has been loaded on the security appliance NET...

Страница 37: ... or DB 25 connector on one end as required by the serial port for your computer and the other end is the RJ 45 connector Note Use the RJ 45 Console port to connect a computer to enter configuration commands Locate the serial cable from the accessory kit The serial cable assembly consists of a null modem cable with RJ 45 connectors and one DB 9 connector and one DB 25 connector CONSOLE ETHERNET 0 A...

Страница 38: ...n the PIX 506 506E Step 4 Connect the outside network cable to the remaining Ethernet port Connecting a Power Supply Module to the PIX 506 506E This section describes how to connect the power supply module to the PIX 506 506E Use this information in conjunction with the Regulatory Compliance and Safety Information document The PIX 506 506E uses an external AC to DC power supply Power is supplied t...

Страница 39: ...d connector at the opposite end of the power supply Figure 3 7 Connecting the Power Supply Module to the PIX 506E 8 Pin Connector To connect the power supply module perform the following steps Step 1 Place the PIX 506 506E on a flat stable surface The PIX 506 506E is not rack mountable Step 2 Connect the power supply to the back of the PIX 506 506E See Figure 3 6 for the PIX 506 and Figure 3 7 for...

Страница 40: ...o warranty Upgrading the PIX security appliance does not require any special tools and does not create any radio frequency leaks Step 1 Read the Regulatory Compliance and Safety Information document Step 2 Power off the security appliance and unplug the power cord Warning Before working on a system that has an On Off switch turn OFF the power and unplug the power cord Step 3 Disconnect the network...

Страница 41: ...is making sure that the side tabs of the cover fit under the side panels of the chassis Step 4 Slide the chassis cover toward the front making sure that the cover tabs fit under the back panel and the back panel tabs fit under the chassis cover Step 5 Secure the chassis cover with the screws you set aside earlier Step 6 Reconnect the network interface cables Step 7 Place the PIX 506 506E on a flat...

Страница 42: ... the chassis cover as described in the Removing the Chassis Cover section on page 3 6 Step 2 Use a flathead screwdriver to slide the battery out of the metal clip on the circuit board see Figure 3 9 Step 3 Place the used battery aside and replace it with a new battery Install the new battery writing side up Step 4 The battery snaps into place as you slide it into the battery slot Step 5 Replace th...

Страница 43: ...ge 4 12 Removing and Replacing the PIX 515 515E Chassis Cover page 4 13 Replacing a Lithium Battery page 4 15 Installing a Memory Upgrade page 4 16 Installing a Circuit Board in the PIX 515 515E page 4 19 Installing the PIX 515 515E DC Model page 4 23 Note The PIX 515 and the PIX 515E are the same except that the PIX 515E has a faster processor PIX 515 515E Product Overview This section describes ...

Страница 44: ...ERFACE CARDS WITH POWER APPLIED CONSOLE 10 100 ETHERNET 0 0 Link FDX FDX 100 Mbps Link 100 Mbps FAILOVER 10 100 ETHERNET 0 0 PIX 515 POWER ACT NETWORK 25735 Table 4 1 PIX 515 515E Front Panel LEDs LED Color State Description POWER Green On On when the unit has power ACT Green On On when the unit is the active failover unit If failover is present the light is on when the unit is the active unit Off...

Страница 45: ...he PIX 515 515E page 4 4 Removing and Replacing the PIX 515 515E Chassis Cover page 4 13 Vertical Mounting the PIX 515 515E page 4 5 Installing a Circuit Board in the PIX 515 515E page 4 19 96905 DO NOT INSTALL INTERFACE CARDS WITH POWER APPLIED CONSOLE 10 100 ETHERNET 0 ACT LINK LINK 100 Mbps ACT 100 Mbps FAILOVER USB 10 100 ETHERNET 1 PIX 515 10 100BaseTX ETHERNET 0 RJ 45 10 100BaseTX ETHERNET 1...

Страница 46: ...hesive strip and place them adhesive side down onto the five round recessed areas on the bottom of the chassis as shown in Figure 4 5 Step 4 Place the security appliance right side up on a flat smooth secure surface Note The fan is not blocked by the device below if you surface mount the chassis on top of each other the air is sucked in from the back and side vents and exhausted out with the help ...

Страница 47: ...nstalling a Memory Upgrade section on page 4 16 Note The fan is not blocked by the device below if you mount the chassis on top of each other the air is sucked in from the back and side vents and exhausted out with the help of the fan through the bottom of the chassis and then directed out the side of the channel by the channel feature on the bottom of the chassis To install the chassis in a rack ...

Страница 48: ...ector and a DB 25 connector Step 2 Connect the RJ 45 connector to the PIX 515 515E Console port and connect the other end to the serial port connector on your computer Figure 4 7 PIX 515 515E Serial Console Cable Note If your unit has a four port Ethernet circuit board already installed refer to Figure 4 8 The four port Ethernet circuit board requires the PIX 515 515E UR license to be accessed If ...

Страница 49: ...rds are numbered top to bottom so that the top circuit board is Ethernet 2 and the bottom circuit board is Ethernet 3 Additional Ethernet circuit boards require the PIX 515 PIX 515E UR license to be accessed If you have a second PIX security appliance to use as a failover unit install the failover feature and cable as described in the Installing Failover section on page 4 9 Note Do not power on th...

Страница 50: ...portant to remove the chassis cover before installing circuit boards in the PIX 515 515E Even though it appears possible to add or remove circuit boards from the back panel removing the chassis cover greatly simplifies the process If you need to install additional memory refer to the Installing a Memory Upgrade section on page 4 16 Note If for any reason you choose to downgrade to any software ver...

Страница 51: ...n other 66 MHz cards are installed We strongly recommend that you install the VAC in a 64bit 66 MHz slot Performance is degraded if this recommendation is not followed The VAC driver supports the following 3DES DES AES SHA1 MD5 for IPSec ESP protocol For AES only the CBC mode and key sizes of 128 192 and 256 bits are supported SHA1 MD5 for the IPSec AH protocol Load sharing ESP and AH activity bet...

Страница 52: ...failover cable to the standby unit Step 5 Connect a power cord to the power connector on the rear panel of each unit and the other end of each power cord to preferably separate power outlets Step 6 If you are using Stateful Failover use one of the following types of connections that is appropriate for your system between the dedicated interfaces on the PIX security appliance Category 5 crossover c...

Страница 53: ...nfigured completely Step 7 Use the power switch at the back of the units to power on the primary unit and then power on the standby unit Within a few seconds the active unit automatically downloads its configuration to the standby unit If the primary unit fails the secondary unit automatically becomes active Inside network Internet DO NOT INSTALL INTERFACE CARDS WITH POWER APPLIED CONSOLE 10 100 E...

Страница 54: ...t it Step 2 Configure the PIX security appliances for LAN based failover Refer to the chapter on configuring LAN based failover in the configuration guide online at http www cisco com en US products sw secursw ps2120 prod_configuration_guides_list html Step 3 Power off both units Step 4 Connect the LAN failover interfaces to the dedicated switch hub as shown in Figure 4 12 Note A dedicated LAN int...

Страница 55: ...standby unit If the primary unit fails the secondary unit automatically becomes active Removing and Replacing the PIX 515 515E Chassis Cover This section describes how to remove and replace the chassis cover from the PIX 515 515E This section includes the following topics Removing the Chassis Cover page 4 13 Replacing the Chassis Cover page 4 15 Removing the Chassis Cover To remove the chassis cov...

Страница 56: ...facing you push the chassis cover back by about one inch as shown in Figure 4 14 Figure 4 14 Pushing Back the Chassis Cover Step 5 Pull the chassis cover up as shown in Figure 4 15 Put the chassis cover in a safe place Figure 4 15 Pull the Chassis Cover up to Remove 24305 DO NOT INSTALL INTERFACE CARDS WITH POWER APPLIED CONSOLE 10 100 ETHERNET 0 0 Link FDX FDX 100 Mbps Link 100 Mbps FAILOVER 10 1...

Страница 57: ...4 Slide the chassis cover toward the front making sure that the chassis cover tabs fit under the chassis back panel and the back panel tabs fit under the chassis cover Step 5 Fasten the chassis cover with the screws you set aside earlier Step 6 Reinstall the chassis on a rack wall desktop or table Step 7 Reinstall network interface cables Replacing a Lithium Battery The PIX security appliance has ...

Страница 58: ...ture license installed on the PIX 515 515E security appliance you might need to upgrade the system memory to run newer software versions or more robust software features PIX software Version 6 3 and previous software releases require a minimum of 32 MB of memory with the Restricted license and 64 MB of memory with the Unrestricted and Failover licenses PIX software Version 7 0 requires a minimum o...

Страница 59: ...nnect the network interface cables and power cord from the PIX 515 515E security appliance Step 3 Unpack the items in the memory upgrade kit Step 4 Remove the chassis cover Remove all screws holding the assembly in place Refer to the Removing and Replacing the PIX 515 515E Chassis Cover section on page 4 13 for information on how to remove and replace the chassis cover Step 5 Determine the locatio...

Страница 60: ... for a new total of 128 MB of memory 64 MB to 128 MB of memory If two 32 MB memory modules are installed remove them Open the two plastic wing connectors on the sides of the memory socket and pull the old memory module up and out of the socket Repeat for the second memory module Discard the old 32 MB memory modules Then install the two new 64 MB memory modules for a new total of 128 MB of memory I...

Страница 61: ...stalling new memory replace the chassis cover Reattach the screws If desired rack mount the chassis and attach all cables and cords as discussed in previous sections After the chassis is installed you can view the amount of memory in the system startup messages or with the show version command Installing a Circuit Board in the PIX 515 515E This section includes the following topics Fast Ethernet C...

Страница 62: ... Slot 1 of the primary unit you must also install the PIX 4FE 66 in Slot 1 of the secondary unit The new card has the following characteristics Includes an Intel 21154BE bridge and 4 Intel 82559 Ethernet MAC PHY devices Supports 10 100mbps full half duplex operation on each port Retains bus performance when installed with other 66 MHz devices Does not support auto MDI MDIX operation To install a c...

Страница 63: ...the slot the end of the circuit board connector extends past the end of the slot This does not affect the use or operation of the circuit board Step 4 Attach the back cover plate making sure that the connecting flange on the circuit board goes through the slot on the back cover plate as shown in Figure 4 22 Figure 4 22 Attaching PIX 515 515E Back Cover Plate Step 5 Attach the screw to hold the cir...

Страница 64: ...23 VPN Accelerator Circuit Board The VPN Accelerator PIX VPN ACCEL is an encryption and accelerator circuit board The VPN Accelerator uses a PCI interface and therefore can only be installed in PIX security appliance platforms with PCI slots The VPN Accelerator begins to function immediately after installation without the need of special installation configurations Note The new VPN Accelerator can...

Страница 65: ...circuit To ensure that all power is OFF locate the circuit breaker on the panel board that services the DC circuit switch the circuit breaker to the OFF position and tape the switch handle of the circuit breaker in the OFF position Step 4 As shown in Figure 4 24 the PIX 515 515E is equipped with two grounding holes at the back of the unit which you can use to connect a two hole grounding lug to th...

Страница 66: ...ction to this system is to remain isolated from the system frame and chassis DC I Step 7 After wiring the DC power supply remove the tape from the circuit breaker switch handle and reinstate power by moving the handle of the circuit breaker to the ON position Step 8 Install any remaining interface boards as described in the Installing a Circuit Board in the PIX 515 515E section on page 4 19 Step 9...

Страница 67: ...lling LAN Based Failover page 5 8 Removing and Replacing the PIX 520 Chassis Cover page 5 10 Replacing a Lithium Battery page 5 12 Installing a Memory Upgrade page 5 12 Installing a Circuit Board in the PIX 520 page 5 15 Installing the PIX 520 DC Model page 5 21 Note The PIX 520 is not supported in software Version 7 0 1 PIX 520 Product Overview This section describes the PIX 520 front and rear pa...

Страница 68: ...ernet circuit board are numbered top to bottom sequentially however the actual device number depends on the slot in which the four port Ethernet circuit board is installed Table 5 1 describes how the top connector is numbered With the four port Ethernet circuit board having a circuit board in slot 3 makes the number of interfaces greater than six while the circuit board in slot 3 cannot be accesse...

Страница 69: ... Figure 5 4 Single Port Ethernet Circuit Board Installed in Slot 0 and Four Port Ethernet Circuit Board Installed in Slot 1 Figure 5 5 shows how the slots are numbered if single port Ethernet circuit boards are installed in slot 0 and in slot 1 and a four port Ethernet circuit board is inserted in slot 2 Figure 5 5 Single Port Ethernet Circuit Board Installed in Slot 0 and 1 and Four Port Ethernet...

Страница 70: ...the front of the unit PIX FirewallSERIES RESET Auto Range Selection L 90 135V H 180 270V Power connector DC power connector Slots for network interfaces Front Rear Power switch Power switch Ground lugs Diskette compartment Right side Left side Fan duct Holes to connect rackmount slide rails must be purchased separately from outside vendor AC DC Failover connector Console connector Insert PIX secur...

Страница 71: ...nnector as shown in Figure 5 8 Step 2 Install the serial cable between the PIX security appliance and your console computer Figure 5 8 PIX Security Appliance Serial Cable Assembly Step 3 Connect one of the DB 9 serial connectors to the console connector on the front panel of the PIX security appliance Step 4 Connect one end of the RJ 45 null modem cable to the DB 9 connector Step 5 If you are inst...

Страница 72: ...nfiguration guide online at http www cisco com en US products sw secursw ps2120 prod_configuration_guides_list html Always check the release notes first before configuring the PIX security appliance for the latest release details You can find the latest versions of release notes online at http www cisco com en US products sw secursw ps2120 prod_release_notes_list html PIX 520 Feature Licenses If y...

Страница 73: ...the one you have already configured Step 4 Connect the Secondary end of the Failover cable to the standby unit Step 5 Connect a power cord to the power connector on the rear panel of each unit and the other end of each power cord to preferably separate power outlets Step 6 If you are using Stateful Failover use one of the following types of connections that is appropriate for your system between t...

Страница 74: ...uide online at http www cisco com en US products sw secursw ps2120 prod_configuration_guides_list html Note Both chassis must be the same model number have the same amount of RAM Flash memory number and type of interfaces and be running the same software version To set up a LAN based failover connection perform the following steps Step 1 Disconnect both the PIX security appliances so that there is...

Страница 75: ... of a switch 1000BaseTX full duplex on a dedicated switch or dedicated VLAN of a switch Note For Stateful Failover on the PIX 520 if you have Gigabit Ethernet GE interfaces then the failover link must be GE Caution Do not turn the power on until the units are connected and the primary unit is configured completely Step 6 Power the primary unit on first then power on the secondary unit Within a few...

Страница 76: ...y appliance case does not affect your Cisco warranty Upgrading the PIX security appliance does not require any special tools and does not create any radio frequency leaks Step 1 Read the Regulatory Compliance and Safety Information document Step 2 Ensure that the PIX security appliance is powered off Unplug the power cord from the power outlet Once the upgrade is complete you can safely reconnect ...

Страница 77: ...ts without the chassis cover installed The chassis cover protects the internal components prevents electrical shorts and provides proper air flow for cooling the electronic components To replace the chassis cover perform the following steps Step 1 Replace the chassis cover as shown in Figure 5 13 Step 2 Secure the three screws Step 3 Reinstall all interface cables Figure 5 13 Replacing the Chassis...

Страница 78: ...dditional PIX security appliance system memory The following statement applies to DC models Warning Before performing any of the following procedures ensure that power is removed from the DC circuit To ensure that all power is OFF locate the circuit breaker on the panel board that services the DC circuit switch the circuit breaker to the OFF position and tape the switch handle of the circuit break...

Страница 79: ... 4 Use the markings on the motherboard to determine the socket numbers Always install the first memory strip into the lowest socket number Progressively add memory boards into higher numbered sockets Figure 5 14 PIX 520 System Memory Location Step 5 Locate the wrist grounding strap in the accessory kit and connect one end to the unit as shown in Figure 5 17 or to the PIX security appliance chassis...

Страница 80: ...cover on the chassis Reattach the screws If desired rack mount the PIX security appliance and attach all cables and cords as discussed in previous sections After the PIX security appliance is installed you can view the amount of RAM memory in the system startup messages or with the show version command in the command reference online at http cisco com en US products sw secursw ps2120 prod_command_...

Страница 81: ... MHz devices Does not support auto MDI MDIX operation This section includes the following topics 16 MB Flash Circuit Board page 5 18 VPN Accelerator Circuit Board page 5 19 Gigabit Ethernet Circuit Board page 5 20 Installing the PIX 520 DC Model page 5 21 To install a circuit board in the PIX 520 perform the following steps Step 1 Locate the grounding strap from the accessory kit Fasten the ground...

Страница 82: ...ccording to their position If you have Version 4 4 and a four port Ethernet circuit board refer to the PIX 520 Product Overview section on page 5 1 Note When adding a network interface or encryption circuit board install the new circuit board in the first empty slot to the right of the existing network interface circuit board Figure 5 19 PIX Security Appliance Network Circuit Boards 12273 44305 In...

Страница 83: ...ling a Circuit Board in the PIX 520 Step 4 If you are installing a 4 port circuit board note that the circuit board will overlap the slot connector on the motherboard This does not affect the use or operation of the circuit board See Figure 5 20 Figure 5 20 4 Port Circuit Board Overlap 27884 Overlap ...

Страница 84: ...sh Circuit Board Use the following information to install a 16 MB Flash circuit board The PIX security appliance must have a minimum of 32 MB of RAM memory You must obtain a new activation key if you will be using 3DES The PIX security appliance should not be downgraded to a software revision lower than 5 0 3 after the new software from the 16 MB circuit board is installed If you downgrade from so...

Страница 85: ...stalled Flash memory circuit boards from the unit Caution Do not remove or reposition the 16 MB Flash circuit board The PIX security appliance will not work if this jumper is moved Step 6 Install the 16 MB Flash circuit board into an available ISA slot in the PIX security appliance chassis VPN Accelerator Circuit Board The VPN Accelerator PIX VPN ACCEL is an encryption and accelerator circuit boar...

Страница 86: ...wn in Figure 5 22 Figure 5 22 VPN Accelerator Circuit Board Gigabit Ethernet Circuit Board PIX security appliance supports 1000 Mbps Gigabit Ethernet The Gigabit Ethernet circuit board uses only has one hardware speed and the following duplex options 1000SXfull Forces full duplex operation 1000BaseSX Forces half duplex operation 1000auto Auto negotiates full or half duplex 61921 ...

Страница 87: ...moved from the DC circuit To ensure that all power is OFF locate the circuit breaker on the panel board that services the DC circuit switch the circuit breaker to the OFF position and tape the switch handle of the circuit breaker in the OFF position To install the PIX 520 DC power model perform the following steps Step 1 Read the Regulatory Compliance and Safety Information document Step 2 Termina...

Страница 88: ...rity Appliance Step 5 Ensure that power is removed from the DC circuit To ensure that all power is OFF locate the circuit breaker on the panel board that services the DC circuit switch the circuit breaker to the OFF position and tape the switch handle of the circuit breaker in the OFF position Step 6 Strip the ends of the wires for insertion into the power connect lugs on the PIX 520 Step 7 Insert...

Страница 89: ...ving the handle of the circuit breaker to the ON position Step 9 Insert the PIX 520 system diskette in the drive at the front of the unit Step 10 If needed install the interface boards as described in the Installing a Circuit Board in the PIX 520 section on page 5 15 Step 11 Power on the unit from the switch at the rear of the unit Note If you need to power cycle the DC PIX security appliance wait...

Страница 90: ...5 24 Cisco PIX Security Appliance Hardware Installation Guide 78 15170 03 Chapter 5 PIX 520 Installing the PIX 520 DC Model ...

Страница 91: ...e Licenses page 6 5 Installing Failover page 6 6 Installing LAN Based Failover page 6 8 Removing and Replacing the PIX 525 Chassis Cover page 6 9 Replacing a Lithium Battery page 6 12 Installing a Memory Upgrade page 6 12 Installing a Circuit Board in the PIX 525 page 6 15 Installing a DC Power Supply page 6 19 PIX 525 Product Overview Figure 6 1 show the front view of the PIX 525 Figure 6 1 PIX 5...

Страница 92: ... 6 1 lists the state of the PIX 525 front panel LEDs There are three LEDs for the each RJ 45 interface port and three types of fixed interface connectors on the back of the PIX 525 61907 F A I L O V E R 100Mbps ACT 100Mbps ACT LINK LINK 10 100 ETHERNET 1 10 100 ETHERNET 0 USB CONSOLE PIX 525 61913 Table 6 1 PIX 525 Front Panel LEDs LED Color State Description POWER Green On On when the unit has po...

Страница 93: ... unit is going to be installed into an equipment rack a Attach the brackets to the holes near the front of the unit on each side of the PIX 525 using the supplied screws b Attach the unit to the equipment rack F A I L O V E R 100Mbps ACT 100Mbps ACT LINK LINK PIX 525 10 100 ETHERNET 1 10 100 ETHERNET 0 USB CONSOLE 61912 10 100 BaseTX Ethernet 0 RJ 45 10 100 BaseTX Ethernet 1 RJ 45 Console port RJ ...

Страница 94: ...outside network cable to the remaining Ethernet port Refer to the PIX 525 Feature Licenses section on page 6 5 for information on how to configure the ports Note The inside or outside network connections can be made to any available interface port on the PIX 525 If you are only using the ETHERNET 0 and ETHERNET 1 ports connect the inside network cable to the interface connector marked ETHERNET 0 o...

Страница 95: ...525 power on the unit from the switch at the rear of the unit PIX 525 Feature Licenses If you have the PIX 525 UR unrestricted feature license the following options are available If you have a second PIX 525 to use as a failover unit install the failover feature and cable as described in the Installing Failover section on page 6 6 If needed install the PIX security appliance syslog server as descr...

Страница 96: ...ther 66 MHz cards are installed We strongly recommend that you install the VAC in a 64bit 66 MHz slot Performance will be degraded if this recommendation is not followed The VAC driver supports the following 3DES DES AES SHA1 MD5 for IPSec ESP protocol For AES only the CBC mode and key sizes of 128 192 and 256 bits are supported SHA1 MD5 for the IPSec AH protocol Load sharing ESP and AH activity b...

Страница 97: ... that is appropriate for your system between the dedicated interfaces on the PIX security appliance Category 5 crossover cable directly connecting the primary unit to the secondary unit 100BaseTX half duplex hub using Straight through Category 5 cables 100BaseTX full duplex on a dedicated switch or dedicated VLAN of a switch Note All enabled interfaces must be connected between the active and stan...

Страница 98: ...cted to the PIX security appliance disconnect it Step 2 Configure the PIX security appliance for LAN based failover Refer to the chapter on configuring LAN based failover in the configuration guide online at http www cisco com en US products sw secursw ps2120 prod_configuration_guides_list html Step 3 Power off both units Step 4 Connect the LAN failover interfaces to the dedicated switch hub as sh...

Страница 99: ...it fails the secondary unit automatically becomes active Removing and Replacing the PIX 525 Chassis Cover This section describes how to remove and replace the chassis cover from PIX 525 This section includes the following topics Removing the Chassis Cover page 6 9 Replacing the Chassis Cover page 6 11 Removing the Chassis Cover Note Removing the PIX security appliance chassis cover does not affect...

Страница 100: ...moving the Chassis Cover Screws Step 5 Lift the chassis cover upward and pull it away from the tabs on the rear of the chassis See Figure 6 9 Figure 6 9 Removing the Chassis Cover 55324 CISCO SECURITY PIX 525 SE RIES F I R E W A L L PO WER AC TIVE Chassis bottom Front panel Chassis cover 55325 CISCO SECURITY PIX 525 SE RIES F I R E W A L L PO WER AC TIVE ...

Страница 101: ...owing The chassis cover tabs fit under the edge of the chassis rear panel so that they are not exposed The chassis tabs fit under the chassis cover so that they are not exposed The chassis cover side tabs on both sides fit inside the chassis side panels so that they are not exposed When the chassis cover is properly assembled no tabs are visible Step 4 Secure the chassis cover with the four screws...

Страница 102: ...ling a Memory Upgrade Observe the following warnings cautions and notes when installing additional PIX security appliance system memory The following statement applies to DC models Warning Before performing any of the following procedures ensure that power is removed from the DC circuit To ensure that all power is OFF locate the circuit breaker on the panel board that services the DC circuit switc...

Страница 103: ...stem memory sockets see Figure 6 11 Step 5 Use the markings on the motherboard to determine the socket numbers Always install the first memory strip into the lowest socket number Progressively add memory strips into higher numbered sockets Figure 6 11 System Memory Location on the PIX 525 Component Tray Step 6 Locate the wrist grounding strap in the accessory kit and connect one end to the unit or...

Страница 104: ...When you finish inserting new RAM memory reinstall the tray on the PIX 525 Reattach the screws If desired rack mount the PIX security appliance and attach all cables and cords as discussed in previous sections After the PIX security appliance is installed you can view the amount of RAM memory in the system startup messages or with the show version command 17997 DIMM B a n k 0 B a n k 2 B a n k 1 1...

Страница 105: ... circuit board in the PIX 525 perform the following steps Step 1 Locate the grounding strap from the accessory kit Fasten the grounding strap to your wrist so that it contacts your bare skin Attach the other end to bare metal on the PIX 525 chassis Step 2 Remove the screws from the rear panel of the component tray and slide the tray out see Figure 6 14 Table 6 3 PIX 525 Interface Options Restricte...

Страница 106: ...omponent tray Step 5 Attach the screw to hold the circuit board connecting flange to the rear cover plate on the component tray Figure 6 15 Inserting an Expansion Board into a PCI Slot on the PIX 525 Component Tray Step 6 Figure 6 16 shows circuit boards in PCI slots on the component tray Figure 6 16 Expansion Boards in PCI Slots on the PIX 525 Component Tray Step 7 Reinstall the component tray in...

Страница 107: ...the secondary unit as long as you install them in the same slot number of each chassis For example if you install a PIX 4FE in Slot 1 of the primary unit you must also install a PIX 4FE 66 in Slot 1 of the secondary unit The new card has the following characteristics Includes an Intel 21154BE bridge and four Intel 82559 Ethernet MAC PHY devices Supports 10 100 mbps full half duplex operation on ea...

Страница 108: ...nnot be used with the former PIX security appliance IPSec accelerator in the same chassis The PIX security appliance IPSec accelerator was also known as the Private Link card An illustration of the VPN Accelerator is shown in Figure 6 18 Figure 6 18 PIX Security Appliance VPN Accelerator Circuit Board Gigabit Ethernet Circuit Board PIX security appliance supports 1000 Mbps Gigabit Ethernet The Gig...

Страница 109: ...forming any of the following procedures ensure that power is removed from the DC circuit To ensure that all power is OFF locate the circuit breaker on the panel board that services the DC circuit switch the circuit breaker to the OFF position and tape the switch handle of the circuit breaker in the OFF position To install the DC power supply perform the following steps Step 1 Place the power suppl...

Страница 110: ...he six pin connector to the motherboard Step 4 Route the fan cables on top of fans exactly as shown in Figure 6 21 Note that the two longest cables are connected to the two installed fans on the right The connectors to these two fans will fit into the space between the second and third fans Step 5 Reconnect the power connector 55329 Chassis bottom Power supply Chassis hook Power supply slot ...

Страница 111: ...21 Routing the Fan Cables Step 6 Insert the second fan as shown in Figure 6 21 making sure that the fan cable feeds to your left Position the cables to the two installed fans so that they will fit over the first and second fans Press the fan into place between the four sheet metal tabs 31109 Front panel Sheet metal tabs Base tabs ...

Страница 112: ...re Installation Guide 78 15170 03 Chapter 6 PIX 525 Installing a DC Power Supply Step 7 Reconnect the two pin fan cables to the remaining fan as shown in Figure 6 22 Figure 6 22 Reconnecting the Fan Cables 31910 Fan Fan connector Front panel ...

Страница 113: ... cables feed to the right toward the second fan Route the cable over the fan before you reconnect it When correctly assembled the cables appear as shown in Figure 6 23 Step 9 Starting with the fan farthest away from the power supply bend the cable clamps over wires and into the gap between chassis and fan housing Figure 6 23 Correct Fan Cable Routing 31109 Front panel Sheet metal tabs Base tabs ...

Страница 114: ...e the fan wiring This will make future power supply replacement easier To reroute the fan wiring perform the following steps Step 1 Pull the fan closest to the power supply away from the sheet metal tabs See Figure 6 25 Note To help with reconnecting the cables write down which colored cable connects to which fan See Table 6 4 for a list of the wire colors There are three different lengths of two ...

Страница 115: ...6 PIX 525 Installing a DC Power Supply Figure 6 25 Pulling the Fan Away from the Tabs Step 2 Lift the fan out of the chassis as shown in Figure 6 26 Figure 6 26 Removing the Fan Step 3 Depress the tab as shown in Figure 6 27 55326 Chassis bottom Fan Fan tabs 55327 Chassis bottom Fan ...

Страница 116: ...xt fan and disconnect its cable Step 6 Remove the cables for the two remaining fans Remove the last two fans Step 7 Replace the fans starting with the fan farthest away from the power supply If the bezel is removed make sure the fan farthest away from the power supply does not cover the bezel holes Note Make sure that the label on the fan faces the chassis wall to ensure proper airflow direction S...

Страница 117: ...supplying at least 15 amps A 15 amp circuit breaker is required at the 48 VDC facility power source An easily accessible disconnect device should be incorporated into the facility wiring Step 13 Be sure the PIX 525 power is off by checking the power switch at the rear of the unit Step 14 As shown in Figure 6 29 the PIX 525 is equipped with two grounding studs at the back of the unit which you can ...

Страница 118: ...FF position and tape the switch handle of the circuit breaker in the OFF position Step 16 Strip the ends of the wires for insertion into the power connect lugs on the PIX 525 Step 17 Refer to Figure 6 30 and insert the ground wire into the connector for the earth ground and tighten the screw on the connector Using the same method as for the ground wire connect the negative wire and then the positi...

Страница 119: ...ape from the circuit breaker switch handle and reinstate power by moving the handle of the circuit breaker to the ON position Step 19 Insert the PIX 525 system diskette in the drive at the front of the unit Step 20 Power on the unit from the switch at the rear of the unit If you need to power cycle the DC PIX security appliance wait at least 5 seconds between powering off the unit and powering it ...

Страница 120: ...6 30 Cisco PIX Security Appliance Hardware Installation Guide 78 15170 03 Chapter 6 PIX 525 Installing a DC Power Supply ...

Страница 121: ...ver page 7 9 Replacing a Lithium Battery page 7 10 Installing a Memory Upgrade page 7 11 Installing a Circuit Board in the PIX 535 page 7 14 Installing the PIX 535 DC Model page 7 21 PIX 535 Product Overview Note The PIX 535 chassis cover should not be removed The user serviceable components are accessed by a removable tray at the back panel of each model If you need to remove the PIX 535 chassis ...

Страница 122: ...iew of the PIX 535 Figure 7 2 PIX 535 Rear Panel The PIX 535 has a fixed RJ 45 Console connector and a DB 15 Failover cable connector the USB port is not used at the present time Figure 7 3 shows the PIX 535 front panel LEDs Figure 7 3 PIX 535 Front Panel LEDs 61915 CISCO SECURITY PIX 535 SERIES F I R E W A L L POWER ACTIVE 61916 STATUS STATUS 61918 CISCO SECURITY PIX 535 SERIES F I R E W A L L PO...

Страница 123: ...ht is on when the unit is the active unit Off Off when the unit is in standby mode 61919 Slot 1 Slot 0 Slot 6 Slot 8 Slot 7 Console RJ 45 DB 15 failover USB port Slot 4 Slot 5 Slot 2 Slot 3 Table 7 2 PIX 535 Rear Panel LEDs LEDs State Description 100 Mbps On 100 megabits per second 100BaseTX communication Off If the light is off during network activity that port is using 10 megabits per second dat...

Страница 124: ...256 byte block depletion can occur The PIX 1FE circuit board 33 MHz can be installed in any bus or slot 32 bit 33 MHz or 64 bit 66 MHz Up to nine PIX 1FE circuit boards or up to two PIX 4FE circuit boards can be installed The PIX 1FE circuit boards should be installed in the 32 bit 33 MHz card slots first The PIX 4FE card can only be installed in a 32 bit 33 MHz card slot and must never be install...

Страница 125: ...eview the safety precautions outlined in the Regulatory Compliance and Safety Information document Place the PIX security appliance on a stable work surface Mounting the PIX 535 To mount the PIX 535 on a rack perform the following steps Step 1 Attach the mounting brackets to the unit using the supplied screws Step 2 Attach the brackets to the holes near the front on both sides of the unit Step 3 A...

Страница 126: ...nectors are Ethernet 0 Ethernet 1 Ethernet 2 and so forth The maximum number of allowed interfaces is 8 The inside or outside network connections can be made to any available interface port on the PIX 535 Note If you have a second PIX security appliance to use as a failover unit install the failover feature and cable as described in the Installing Failover section on page 7 8 Caution Do not power ...

Страница 127: ... 66 MHz PCI card that provides faster tunneling and encryption services for Virtual Private Network VPN remote access and site to site intranet and extranet applications than the VAC Each VAC occupies a single PCI slot in the system The VAC is supported on any chassis that runs Version 6 3 software has an appropriate license to run VPN software and at least one PCI slot available While the VAC con...

Страница 128: ... on one end and Secondary on the other Install the cable for the PIX 535 as shown in Figure 7 5 Figure 7 5 PIX 535 Failover Cable Connection Step 3 Connect the Primary end of the failover cable to the first PIX security appliance that is the one you have already configured Step 4 Connect the Secondary end of the failover cable to the standby unit Step 5 Connect a power cord to the power connector ...

Страница 129: ...ial failover cable and overcomes the distance limitations imposed by the failover cable Note Both PIX security appliances must be the same model number have the same amount of RAM Flash memory number and type of interfaces and be running the same software version To set up a LAN based failover connection perform the following steps Step 1 Disconnect both PIX security appliance so that there is no ...

Страница 130: ...first then power on the secondary unit Within a few seconds the active unit automatically downloads its configuration to the standby unit If the primary unit fails the secondary unit automatically becomes active Replacing a Lithium Battery The PIX security appliance has a lithium battery on its main circuit board This battery has an operating life of about ten years When the battery loses its char...

Страница 131: ...ssis cover causes the system to overheat and damages the electrical components If you remove the chassis cover to perform a maintenance procedure like installing additional memory be sure to replace the cover after you have finished the procedure To install additional system memory perform the following steps Step 1 Power off the security appliance Step 2 Remove all cables connected to the securit...

Страница 132: ... security appliance comes with 512 MB of RAM installed by default so Bank 0 J40 and J43 should be populated already Install the additional 512 MB of RAM in Bank 1 J41 and J44 The memory DIMM pair that comprises a memory bank must be identical Make sure that memory from the same vendor is placed together in the each memory bank J40 and J43 in Bank 0 or J41 and J44 in Bank 1 Figure 7 7 System Memory...

Страница 133: ... being installed incorrectly So do not force installation b Open the two plastic wing connectors at the sides of the memory socket insert the DIMM strip and close the wing connectors to secure it in place Figure 7 8 Inserting a DIMM Memory Strip in the PIX 535 Figure 7 9 Securing a DIMM Memory Strip in the PIX 535 Step 9 Reinstall the component tray and the screws that hold the assembly in place S...

Страница 134: ...each chassis For example if you install a PIX 4FE in Slot 1 of the primary unit you must also install the PIX 4FE 66 in Slot 1 of the secondary unit The new card has the following characteristics Includes an Intel 21154BE bridge and four Intel 82559 Ethernet MAC PHY devices Supports 10 100 mbps full half duplex operation on each port Retains bus performance when installed with other 66 MHz devices...

Страница 135: ... 1 VPN Accelerator 4 GE 5 FE 2 GE 6 FE 4 GE 4 FE 1 VPN Accelerator 2 GE 6 FE 1 VPN Accelerator 4 GE 2 FE 1 4 port FE 2 GE 2FE 1 4 port FE 4 GE 2 FE 1 4 port FE 1 VPN Accelerator 2 GE 2FE 1 4 port FE 1 VPN Accelerator 3 GE 6 FE 1 GE 3 FE 1 4 port FE 3 GE 5 FE 1 VPN Accelerator 1 GE 3 FE 1 4 port FE 1 VPN Accelerator 3 GE 1 4 port FE 3 FE 8 FE 3 GE 5 FE 1 VPN Accelerator 8 FE 1 VPN Accelerator 3 GE ...

Страница 136: ...an be installed in any slot but should be installed in the 64 bit 66 MHz Bus first Up to eight PIX 1GE 66 circuit boards can be installed The FE circuit board 33 MHz can be installed in any bus or slot 32 bit 33 MHz or 64 bit 66 MHz Up to eight single port FE circuit boards or up to two four port FE circuit boards can be installed The four port FE circuit board should only be installed in the 32 b...

Страница 137: ...wrist so that it contacts your bare skin Attach the other end to bare metal on the PIX 535 chassis Figure 7 11 The Component Tray at the Back of the PIX 535 Step 2 Loosen the attachment screws from the rear panel of the component tray and slide the tray out Step 3 Select a slot for the circuit board and remove the screw and slot cover plate from the back panel on the component tray Step 4 Install ...

Страница 138: ...he slot connector on the motherboard This does not affect the use or operation of the circuit board Figure 7 12 illustrates how this appears 16 MB Flash Circuit Board Along with upgrading your Flash memory to 16 MB the PIX security appliance 16 MB Flash circuit board includes pre installed PIX security appliance software and a UR unrestricted 56 bit DES encryption license The 16 MB Flash circuit b...

Страница 139: ...on 5 3 to 5 2 or lower you will lose private data keys certifications and CRLs that are stored in Flash memory You need to use the clear flashfs command downgrade 5 0 5 1 5 2 options if your PIX security appliance has 16 MB Flash memory private data stored in the Flash memory and you used the ca save all command to save these items in Flash memory To install the 16 MB Flash circuit board perform t...

Страница 140: ...erefore can only be installed in PIX security appliance platforms with PCI slots The VPN Accelerator begins to function immediately after installation without the need of special installation configurations Note The new VPN Accelerator cannot be used with the former PIX security appliance IPSec accelerator in the same chassis The PIX security appliance IPSec accelerator was also known as the Priva...

Страница 141: ... has established a network connection Installing the PIX 535 DC Model Warning Before performing any of the following procedures ensure that power is removed from the DC circuit To ensure that all power is OFF locate the circuit breaker on the panel board that services the DC circuit switch the circuit breaker to the OFF position and tape the switch handle of the circuit breaker in the OFF position...

Страница 142: ...quires a grounding lug where the distance between the center of each hole is 0 56 inches A grounding lug is not supplied with the PIX 535 Figure 7 16 Attaching a Grounding Lug to the PIX 535 DC Step 6 Ensure that power is removed from the DC circuit To ensure that all power is OFF locate the circuit breaker on the panel board that services the DC circuit switch the circuit breaker to the OFF posit...

Страница 143: ...aker to the ON position Step 10 If needed install the interface boards as described in the Installing a Circuit Board in the PIX 535 section on page 7 14 Step 11 Power on the unit from the switch at the rear of the unit Note If you need to power cycle the DC PIX 535 wait at least 5 seconds between powering off the unit and powering it back on Your unit is now ready to configure Refer to the config...

Страница 144: ...7 24 Cisco PIX Security Appliance Hardware Installation Guide 78 15170 03 Chapter 7 PIX 535 Installing the PIX 535 DC Model ...

Страница 145: ...Failover Cable Pinouts page A 4 10BaseT and 100BaseTX Connectors The 10BaseT and 100BaseTX ports use standard RJ 45 connectors The 10BaseT and 100BaseTX ports have their transmit TD and receive RD pairs internally crossed Figure A 1 shows the 10BaseT and the 100BaseTX connector RJ 45 Figure A 1 RJ 45 10BaseT and 100BaseTX Connector Table A 1 shows the connector pinout H7316 Table A 1 10BaseT and 1...

Страница 146: ...aight through Crossover Rolled Note Cisco does not provide these cables they are widely available from other sources Figure A 2 shows the RJ 45 cable Figure A 2 RJ 45 Cable To identify the RJ 45 cable type hold the two ends of the cable next to each other so you can see the colored wires inside the ends as shown in Figure A 3 Figure A 3 RJ 45 Cable Identification H2936 87654321 RJ 45 connector H56...

Страница 147: ...e cable is the third colored wire at the other end of the cable see Table A 3 Rolled The colored wires at one end of the cable are in the reverse sequence of the colored wires at the other end of the cable see Table A 4 Table A 2 RJ 45 Straight Through Ethernet Cable Pinouts Signal Pin Pin Pin TX 1 1 TX TX 2 2 TX RX 3 3 RX 4 4 5 5 RX 6 6 RX 7 7 8 8 Table A 3 RJ 45 Crossover Ethernet Cable Pinouts ...

Страница 148: ... crossover cable should you use this with the Stateful Failover dedicated interface Figure A 4 Stateful Failover Dedicated Interface Crossover Cable Pinouts 7 2 8 1 Table A 4 RJ 45 Rolled Console Cable Pinouts continued Signal Pin Pin Pin Table A 5 Cable Pinouts for RJ 45 to DB 9 or DB 25 Signal RJ 45 Pin DB 9 Pin DB 25 Pin RTS 8 8 5 DTR 7 6 6 TxD 6 2 3 GND 5 5 7 GND 4 5 7 RxD 3 3 2 DSR 2 4 20 CTS...

Страница 149: ... you received the pinouts are shown in Figure A 5 Figure A 5 Failover Serial Cable Pinouts Primary Side Secondary Side Power Detect 1 10 Foreign Plug Detect 9 14 Rx Data 2 3 Loopback Power Source 10 1 Inside Tx Data 3 2 Chassis Local Plug Detect 11 Plug Driver 4 6 Primary Select 12 12 Secondary Select Ground 5 5 Loopback 6 4 Inside 11 Chassis 14 9 12069 ...

Страница 150: ...A 6 Cisco PIX Security Appliance Hardware Installation Guide 78 15170 03 Appendix A Cable Pinouts Failover Cable Pinouts ...

Страница 151: ...ting PIX 506 506E 3 5 PIX 515 515E 4 16 PIX 520 5 5 PIX 525 6 12 AC power supply 7 11 ACT LEDs PIX 506 506E 3 2 PIX 515 515E 4 2 PIX 525 6 2 PIX 535 7 3 air separator replacing 6 24 amps required PIX 515 515E 4 23 PIX 520 5 21 PIX 525 6 27 PIX 535 7 22 B back cover plate see chassis covers batteries replacing PIX 501 2 6 PIX 506 506E 3 7 PIX 515 515E 4 15 PIX 520 5 12 PIX 525 6 12 PIX 535 7 10 boa...

Страница 152: ... PIX 515 515E 4 3 PIX 520 5 5 PIX 525 6 4 PIX 535 7 2 copper standard barrel grounding lug 6 27 D DB 15 failover connector 6 3 DB 9 connector and DB 25 connector PIX 506 506E 3 3 PIX 515 515E 4 6 PIX 525 6 4 PIX 535 7 6 DC circuit 6 19 6 28 see aslo power supplies DC PIX 515 515E 4 23 DC PIX 520 5 21 DC PIX 525 6 19 DC PIX 535 7 21 depress tab 6 25 DIMM 5 13 installing PIX 520 5 13 PIX 525 6 13 DI...

Страница 153: ...t ethernet circuit boards duplex options PIX 520 5 20 PIX 525 6 18 PIX 535 7 20 LEDs PIX 520 5 21 PIX 525 6 19 PIX 535 7 21 grounding lug 7 22 attaching PIX 515 515E 4 23 PIX 520 5 22 PIX 525 6 27 PIX 535 7 22 grounding strap 7 11 grounding straps attaching PIX 515 515E 4 18 PIX 520 5 13 PIX 525 6 13 I indicator lights see LEDs inside interfaces PIX 506 506E 3 4 PIX 515 515E 4 3 PIX 520 5 2 PIX 52...

Страница 154: ... 6 installing failover connections 4 9 LEDs 4 2 mounting vertical mounting 4 5 product overview 4 1 rear panels figure 4 3 unrestricted license 4 6 PIX 520 attaching DC input power supplies 5 22 connectors 5 2 DC unit installing 5 21 installing 5 4 installing interface cables 5 5 memory location 7 11 memory location installing DIMMs 5 13 product overview 5 1 PIX 525 circuit boards options 6 15 fea...

Страница 155: ...on commands PIX 515 515E 4 19 PIX 520 5 14 PIX 525 6 14 PIX 535 7 14 SIMM strip 7 13 site environment 1 4 Stateful Failover connecting dedicate interfaces PIX 515 515E 4 10 PIX 520 5 7 PIX 525 6 7 PIX 535 7 8 U USB ports PIX 506 506E 3 3 PIX 515 515E 4 3 PIX 525 6 3 PIX 535 7 2 V VDC power source requirements 6 27 ventilation fans 1 5 VPN Accelerator circuit board PIX 515 515E 4 22 PIX 520 5 19 PI...

Страница 156: ...Index IN 6 Cisco PIX Security Appliance Hardware Installation Guide 78 15170 03 ...

Отзывы: