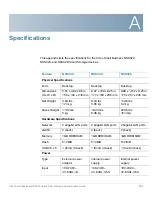
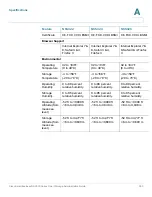
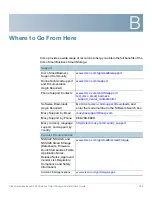
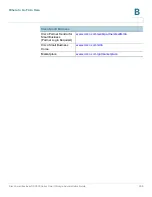
background image

Using the LCD Display

Viewing System Information Using the LCD Display

Cisco Small Business NSS300 Series Smart Storage Administration Guide

259

7


System

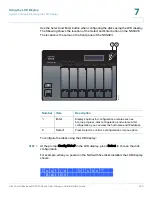
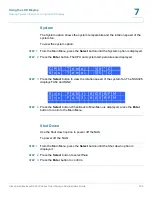
The System option shows the system temperature and the rotation speed of the 
system fan.

To view the system option:

STEP 1

From the Main Menu, press the 

Select

 button until the System option is displayed.

STEP  2

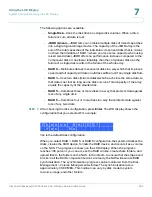
Press the 

Enter

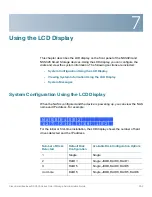
 button. The CPU and system temperatures are displayed.

STEP  3

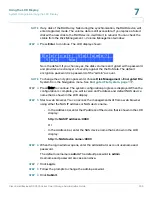
Press the 

Select

 button to view the rotation speed of the system fan. The NSS326 

displays FAN1 and FAN2.

STEP  4

Press the 

Select

 button. When Back to Main Menu is displayed, press the 

Enter


button to return to the Main Menu.

Shut Down

Use the Shut down option to power off the NAS.  

To power off the NAS:

STEP 1

From the Main Menu, press the 

Select

 button until the Shut down option is 

displayed.

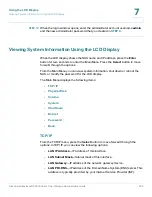
STEP  2

Press the 

Select

 button to select 

Yes

.  

STEP  3

Press the 

Enter

 button to confirm.

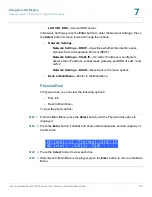
C P U

T e m p :

5 0

°

C

S y s

T e m p :

5 5

°

C

S y s

F A N 1 : 8 6 5 R P M

S y s

F A N 2 : 8 6 5 R P M

Содержание NSS 300 Series

Страница 1: ...Cisco Small Business NSS300 Series Smart Storage ADMINISTRATION GUIDE ...

Страница 2: ... CCDP CCIE CCIP CCNA CCNP CCSP CCVP Cisco the Cisco Certified Internetwork Expert logo Cisco IOS Cisco Lumin Cisco Nexus Cisco Press Cisco Systems Cisco Systems Capital the Cisco Systems logo Cisco Unity Collaboration Without Limitation Continuum EtherFast EtherSwitch Event Center Explorer Follow Me Browsing GainMaker iLYNX IOS iPhone IronPort the IronPort logo Laser Link LightStream Linksys Meeti...

Страница 3: ...sk Drives 19 Locking and Unlocking the Disk Trays 22 Connecting the Equipment 23 Verifying the Hardware Installation 24 Starting NAS Configuration 24 Windows Operating System 25 Mac OS X or Linux Operating System 25 System Configuration Using the Windows Setup Wizard 25 System Configuration Using the LCD Display 30 System Configuration Using Mac OS X or Linux 32 Mapping a Network Drive 33 Mapping ...

Страница 4: ...h Module 40 Chapter 3 Managing the System 42 Status 42 System Information 43 System Service 44 Resource Monitor 47 View Logs 48 Administration 51 General Settings 51 Network 58 Hardware 67 Security 69 Notification 74 Power Management 79 Network Recycle Bin 81 Backup Restore Settings 83 System Logs Settings 84 Firmware Upgrade 92 Restore to Factory Default 93 Network Service Discovery 94 Users 97 U...

Страница 5: ...ng 145 NFS Service 146 FTP Service 148 Telnet SSH 150 SNMP Settings 151 Web Server 152 Remote Access 156 Applications 164 Web File Manager 164 Accessing the Web File Manager 166 Using the Web File Manager 167 Multimedia Station 172 Download Station 186 Accessing the Download Station 187 Using the Download Station 187 iTunes Server 190 UPnP Media Server 191 MySQL Server 192 PKG Plugins 193 Syslog S...

Страница 6: ...uring DNS Settings 236 Configuring Microsoft Networking 237 Chapter 5 NAS Maintenance 241 Restart or Shut Down the NAS 242 Hardware System Reset 242 Basic System Reset 3 seconds 244 Advanced System Reset 10 seconds 245 Disk Failure or Malfunction 245 Power Outage or Abnormal Shutdown 247 System Software Abnormal Operation 247 System Temperature Protection 247 Product Battery Replacement 248 Chapte...

Страница 7: ...ystem Configuration Using the LCD Display 252 Viewing System Information Using the LCD Display 256 TCP IP 256 Physical Disk 257 Volume 258 System 259 Shut Down 259 Reboot 260 Password 260 Back 261 System Messages 261 Appendix A Specifications 262 Appendix B Where to Go From Here 264 ...

Страница 8: ...high performance network storage device that targets the needs of small business There are three models of the NAS based on the number of disks that they can support internally 2 Bay Desktop Network Storage System NSS322 4 Bay Desktop Network Storage System NSS324 6 Bay Desktop Network Storage System NSS326 Each NAS model provides the following benefits Next generation protocol Internet Protocol v...

Страница 9: ...determine the IP address from the device that issued the IP address to the NAS To log in to your NAS STEP 1 Start a web browser In the Address bar enter the IP address of the device on port 8080 for example http 192 168 0 100 8080 STEP 2 When the login window opens enter the administrator account username and password The default username is admin The default password is admin Username and passwor...

Страница 10: ...ides online help information for that specific feature STEP 3 After reading online help you can close the help window Approved Vendor List for Drives and UPS Compatibility The Cisco Small Business Smart Storage Approved Disk Drive List provides recommendations for compatible hard drives UPS and external enclosure for use in the NSS322 NSS324 and NSS326 Series of Network Attached Storage NAS produc...

Страница 11: ...figuration Mapping a Network Drive Installing the Client Utility for Windows Installing the Client Utility for Mac Before You Begin Before you begin the installation make sure that you have the following equipment and services Internet connectivity optional Small Phillips screwdriver Ethernet switch or router 1 6 SATA 2 5 inch disk drives or 3 5 inch disk drives not included with some models It is...

Страница 12: ...ettings page 231 to configure the NAS to communicate with the UPS Properly grounded anti static wrist strap recommended Getting to Know the NSS300 Series Smart Storage The following sections describe the physical features of the NSS322 NSS324 and NSS326 Smart Storage devices NSS322 The following section describes the front and back panels of the NSS322 Smart Storage Front Panel 277555 LAN HDD2 HDD...

Страница 13: ...he network eSATA Orange Flashes orange when an eSATA device is being accessed 2 Power Off Disk drives are in standby mode or the device is powered off Solid Green The NAS is ready Flashing Green One or more of the following conditions apply The NAS is starting up The NAS is not configured Disk drive is not formatted Flashing Red The NAS is in degraded mode One of the disk drives failed in RAID 1 c...

Страница 14: ...ift the silver tab up to lock the disk tray Press the silver tab down to unlock the disk tray See Locking and Unlocking the Disk Trays page 22 NSS322 Back Panel Number Item Description 1 VGA Console output to VGA monitor Used for device recovery 2 Reset Restores the network settings and password to the factory See Reset Network Settings and Password page 39 NSS322 Front Panel Buttons Number Item D...

Страница 15: ...rnet Port 2 Dual Ethernet ports The top LAN port is LAN1 and the bottom LAN port is LAN2 4 eSATA 2 eSATA ports for accessing external eSATA attached storage Use eSATA connector 5 Power Connector Connects the device to the external power adapter which connects to a standard power outlet 6 USB 2 0 4 USB port for accessing USB attached storage and UPS status 7 Kensington Lock Slot Attach a Kensington...

Страница 16: ...ue USB device is detected 4 Status Red Flashes red when the device is initialized and the disk drives are being formatted Green Flashes green when the disk drives are not initialized Solid green when the NAS is powered up and finished booting LAN Orange Flashes when there is network traffic to or from the NAS Solid orange when the NAS is connected to the network ENTER SELECT 277509 STATUS LAN USB ...

Страница 17: ...ss One Touch Copy to copy files to or from an external USB drive 2 USB 2 0 USB port for accessing external USB attached storage 3 Power Press Power to power on or shutdown the device 5 Enter Displays options for configuration or status such as bootup progress disk configuration and volume After configuration you can view the hostname and IP address 6 Select Press Select to confirm a configuration ...

Страница 18: ...ATA 2 eSATA ports for accessing external eSATA attached storage Use eSATA connector 3 USB 2 0 4 USB port for accessing USB attached storage and UPS status 4 VGA Console output to VGA monitor Used for device recovery 5 Reset Restores the network settings and password to the factory default See Reset Network Settings and Password page 39 6 Kensington Lock Slot Attach a Kensington lock to protect the...

Страница 19: ...evice is level and stable to avoid any hazardous conditions Do not place any other devices on top of the NAS Vibration Impacts Be sure that the device is installed in a location where it will not be subject to vibration or impact because this can cause a mechanical shock and premature drive failures Installing the Disk Drives CAUTION When storing unused disk drives do not stack multiple disk drive...

Страница 20: ...ontinue to the next section Connecting the Equipment page 23 STEP 4 Position the disk drive into a disk tray The electrical connectors of the disk drive must face toward the back of the drive tray STEP 5 Attach the disk drive to the tray by inserting the disk drive screws into the four holes at the bottom of the tray and tightening them with a Phillips screwdriver NOTE Use the screws provided in t...

Страница 21: ...uence into the empty bay of the chassis NOTE Drive trays should not be swapped from slot to slot There is also an HDD sequence label included in the package contents that can be placed on the top of the chassis showing the disk drive sequence For example 1 2 for the NSS322 1 4 for the NSS324 and 1 6 for the NSS326 277517 2 5 inch 3 5 inch 1 2 3 4 5 6 HDD Sequence ...

Страница 22: ...insert the tray slowly and fully into position in the chassis STEP 8 The disk tray lever should be in the open position STEP 9 Gently push the disk tray lever down STEP 10 Repeat steps 3 through 9 to install disk drives from slot 2 to slot 4 for the NSS324 and slot 2 to slot 6 for the NSS326 Locking and Unlocking the Disk Trays An icon is located on the silver tab indicating When the silver tab is...

Страница 23: ...ray STEP 1 On the disk tray press the silver tab down to unlock the tray STEP 2 Press the button below the silver tab to release the disk tray lever STEP 3 Using the disk tray lever gently pull the disk tray out from the chassis Connecting the Equipment To connect the NAS device to the network STEP 1 Connect the supplied Ethernet cable to one of the Ethernet ports on the back of the chassis STEP 2...

Страница 24: ... connections Check the LED states as described in Getting to Know the NSS300 Series Smart Storage page12 If you encounter problems consider the following tips If the NAS does not recognize the disk drives possible causes and solutions are Confirm the disk drive is supported by Cisco See the Cisco approved vendor list at www cisco com go smallbizsmartstorage Disk tray is installed incorrectly Try r...

Страница 25: ...ections System Configuration Using the Windows Setup Wizard For more advanced users the Setup Wizard guides you through the initial configuration settings System Configuration Using the LCD Display Easier and quicker installation that uses more default settings System configuration using the LCD display is supported on the NSS324 and NSS326 Mac OS X or Linux Operating System If you are using a Mac...

Страница 26: ... Next and follow the prompts to check the package contents install the disk drives and connect the equipment NOTE If you have already installed the disk drives and connected the equipment click Skip until you reach the System Configuration window STEP 6 From the System Configuration window click Next to go to NAS configuration The NAS Configuration window opens STEP 7 Click Next The Discovering th...

Страница 27: ... this server The options are Time Zone Select a time zone from the drop down menu Date Time Select the current date and time from the drop down menus Synchronize with an Internet time server automatically To obtain time automatically from an NTP server click this check box Server From the drop down list select the NTP server name and click TEST to verify status For example time a timefreq bldrdoc ...

Страница 28: ...led These services can also be enabled or disabled at a later time The options are Network services Click the check box to enable Microsoft Networking Apple Networking or Unix Linux NFS File services Click the check box to enable Web File Manager FTP Service or Download Station Multimedia services Click the check box to enable Multimedia Station UPnP multimedia server or iTunes service Web server ...

Страница 29: ...s in a way that improves speed and full capacity All data on all disks will be lost if any single disk fails RAID 1 Uses two disks mirrored disks each of which store the same data so that data is not lost as long as one disk survives Total capacity of the array equals the capacity of the smaller disk RAID 5 Combines three or more disks in a way that protects data against loss of any single disk RA...

Страница 30: ...initializing and the configuration progress is displayed When the configuration is complete you are returned to the Configuring the NAS window in the Setup Wizard STEP 25 From the Configuring the NAS window click Next to continue to Map a Network Drive The Map Network Drive window opens Continue to Mapping a Network Drive page 33 System Configuration Using the LCD Display After connecting the equi...

Страница 31: ...en using mixed sized disks JBOD offers no performance increase compared to the component disks It has lower reliability than the component disks as the failure of a single disk results in the failure of the whole array RAID 0 Distributes data across several disks in a way which that improves speed and full capacity All data on all disks will be lost if any single disk fails RAID 1 Uses two disks m...

Страница 32: ...ogin window opens enter the administrator account username and password The default username is admin The default password is admin Username and password are case sensitive STEP 7 Click Login STEP 8 Follow the prompts to change the admin password STEP 9 Click Submit STEP 10 When the login window opens enter the administrator account username admin and the new administrator password Continue to Map...

Страница 33: ...prompts to complete the configuration Continue to Suggested Next Steps page 38 Mapping a Network Drive You can map a network drive either by using the Setup Wizard or from Windows Mapping a Network Drive from the Setup Wizard NOTE Skip steps 1 5 if you are already on the Map Network Drive window in the Setup Wizard To map a network drive from the Setup Wizard STEP 1 Insert the product CD and from ...

Страница 34: ... default Usb Network share for data copy function using the USB ports Web Network share for Web server Download Network share for Download Station Multimedia Network share for Multimedia Station Network Recycle Bin 1 Network share recycle bin STEP 11 From the authentication login window enter the administrator account username and password STEP 12 Click Next The Mapping Success window opens STEP 1...

Страница 35: ...ork share as a local drive Installing the Client Utility for Windows Installing the Client Utility or NSS Discovery Tool is optional The NSS Discovery Tool provides functions for you to search configure and manage your NAS devices NOTE If you receive Windows firewall warnings during this process you may need to allow the NSS Discovery Tool to unblock the firewall settings From the NSS Discovery To...

Страница 36: ...oose Install Location window opens STEP 5 Click Install to install to the default folder or click Browse to install to another folder STEP 6 When the Completing the NSS Discovery Tool Setup Wizard window opens click Finish Run the Tool From the CD To run the NSS Discovery Tool from the CD STEP 1 Insert the product CD and from the Welcome window click NSS322 NSS324 or NSS326 depending on which NAS ...

Страница 37: ...ility for Mac Installing the Client Utility or NSS Discovery Tool is optional The NSS Discovery Tool provides functions for you to search configure and manage your NAS devices To install the NSS Discovery Tool for Mac STEP 1 Insert the product CD STEP 2 Double click the CD icon on the desktop to view the contents in Finder STEP 3 From the MAC NSSDiscoveryTool folder click the Setup dmg file to lau...

Страница 38: ...g some of the following steps Set Up Services If you set up any services such as network file multimedia or web server you need to configure the detailed settings for the services from the corresponding administration windows For example from the Applications menu you can configure the following Web File Manager When enabled you can access files on the NAS device using a web browser Multimedia Sta...

Страница 39: ...rk Shares From the Network Shares menu you can configure the following Share Folders Create share folders on the NAS and edit the access rights of the users and user groups to these share folders Quota Enable the quota settings for all the users and specify the quota size they are allowed to use on each disk volume of the NAS For more information see Network Shares page133 Reset Network Settings a...

Страница 40: ...ed in compliance with the requirements of the European Union Commission Regulation No 1275 2008 The device is also fully functional without the switch module by plugging the power cord directly into the device However the switch module must be used to comply with the European Union regulations To use the inline switch module to power off the NAS you should first press the front panel Power button ...

Страница 41: ...Getting Started Inline Power Switch Module Cisco Small Business NSS300 Series Smart Storage Administration Guide 41 2 The following shows the DC inline switch module for the NSS322 ...

Страница 42: ...ur system Cisco Small Business Smart Storage The following sections are included Status Administration Disk Management Network Shares Network Services Applications Backup External Device Status This section describes how to check the status of the system and includes the following topics System Information System Service Resource Monitor View Logs ...

Страница 43: ...nformation Server Name Name of the NAS Firmware Version Firmware version of the NAS Firmware MD5 Checksum MD5 checksum of the current firmware This number is useful to verify the integrity of the firmware System Up Time Time that the NAS has been in continuous operation in days hours and minutes Object ID Object ID of the NAS used in SNMP applications PID VID Product identifier PID and Version ide...

Страница 44: ...nt Number of packets sent by the Ethernet port Error Packets Number of packets detected with errors Hardware Information CPU Usage Percentage of load on the CPU in the NAS Total Memory Total RAM memory in the NAS Free Memory Amount of free RAM memory in the NAS CPU Temperature Temperature of the CPU in the NAS System Temperature Internal system temperature of the NAS HDD Temperature Temperature of...

Страница 45: ...h the NAS belongs Enable WINS Server Status of WINS server Enable Local Master Browser Status of the Local Master Browser Apple Networking This service is configured from the Network Services Apple Networking window Enabled Status of the Apple Networking protocol Apple Zone Name Name of the Apple zone Unix Linux NFS This service is configured from the Network Services NFS Service window Enabled St...

Страница 46: ...igured from the Applications UPnP Media Server window Download Station This service is configured from the Applications Download Station window Enabled Status of the Download Station service Web Server This service is configured from the Network Services Web Server window Enabled Status of the Web Server service Port Port number for Web Server service DDNS Service This service is configured from t...

Страница 47: ...mic graph Disk Usage Shows the amount of free and used space on the NAS The disk space usage of each disk volume and its share folders are shown NOTE If a default share is less than 3 percent of the total space of a RAID array the disk usage will not display that share in the Disk Usage image The percentage will display in the image if the disk usage of a default share is over 3 percent Bandwidth ...

Страница 48: ...ow displays the event logs including warning error and information messages In the event of system malfunction you can retrieve the event logs to analyze system problems Type Type of log Possible log types are Informational Error and Warning messages Date Date that the log occurred Time Time that the log occurred Users User or system that generated the log entry Source IP IP address of the user Co...

Страница 49: ...ages Date Date that the log occurred Time Time that the log occurred Users User or system that generated the log entry Source IP IP address of the user Computer Name Name of the computer if applicable or local host that generated the log entry Connection Type Type of connection For example HTTP FTP Telnet SSH AFP SAMBA RADIUS or iSCSI Accessed Resources Type of resource accessed For example admini...

Страница 50: ...history Type Real time status for on line users Login Date Date that the user logged in Login Time Time that the user logged in Users Name of administrator or users account Source IP IP address of the user Computer Name Name of the computer if applicable or remote host IP address that generated the log entry Connection Type Type of connection For example HTTP FTP Telnet SSH AFP SAMBA RADIUS or iSC...

Страница 51: ...ters General Settings Network Hardware Security Notification Power Management Network Recycle Bin Backup Restore Settings System Logs Settings Firmware Upgrade Restore to Factory Default Network Service Discovery Users User Groups General Settings This section describes how to configure the general settings for the NAS System Administration Date and Time Daylight Savings Time Language Password Str...

Страница 52: ... name can be up to 14 characters long and may contain alphabet characters numbers and hyphen The server does not accept names with spaces periods or names composed of numbers only System Port Port for the system management The default port is 8080 The services which use this port include System Management Web File Manager Multimedia Station and Download Station Enable Secure Connection SSL Click t...

Страница 53: ...inistration settings are updated to the NAS Date and Time From the Administration General Settings Date and Time window you can set the date time and time zone according to your location You can also choose whether or not to synchronze the NAS time with a Network Time Protocol NTP server or with the time of your computer If the settings are incorrect the following problems may occur When using a w...

Страница 54: ...ate Now to set the time of the NAS to the same time as your computer Synchronize with an Internet time server automatically To obtain time automatically from an NTP server click the check box The first time you enable the NTP server it may take several minutes for time synchronization before the time is correctly adjusted Server From the drop down list choose the NTP server name and click Update N...

Страница 55: ... see Date and Time page 53 Recent daylight saving time Range of time set by the current Daylight Saving Time settings Offset Current time offset by daylight savings time STEP 2 If needed set the following parameters Adjust system clock automatically for daylight saving time Click the check box to enable the NAS to automatically adjusts its time settings to accommodate daylight savings time Enable ...

Страница 56: ...he default filename encoding system and will work with operating systems OS that support Unicode such as Windows XP Vista and MAC OS X If you are using an OS that does not support Unicode such as Windows 95 98 ME select the same language as your OS for filename encoding Since most FTP software clients do not support Unicode you will need to select the language that your FTP client supports in orde...

Страница 57: ...lename encoding NOTE If you are using an OS that does not support Unicode such as Windows 95 98 ME please select the same language as your OS for filename encoding STEP 3 Click Apply The language filename encoding is set and the NAS is updated Password Strength From the Administration General Settings Password Strength window you can apply the password rules You can enable one or more of the Passw...

Страница 58: ... characters such as and No character in the new password may be repeated more than three times consecutively This option specifies that no character in the new password can be entered consecutively three times in a row such as 123ZZZabc The new password must not be the same as the associated username or the username reversed This option specifies that the password cannot contain a variation of the...

Страница 59: ...ault gateway port trunking DNS server and Jumbo Frame Setting MTU To configure TCP IP settings STEP 1 Choose Administration Network TCP IP from the Navigation menu The TCP IP window opens STEP 2 Configure or view the TCP IP settings IP Address Interface Physical NAS network interface DHCP Specifies whether this interface uses Dynamic Host Configuration Protocol DHCP IP Address IP address of this i...

Страница 60: ...roperty window opens and the following options are available Network Speed From the drop down list select from the following options Auto negotiation Allows the server to adjust transfer rates automatically 1000 Mbps full duplex Sets this transfer rate 100 Mbps full duplex Sets this transfer rate Obtain IP address settings automatically via DHCP Select to enable the NAS to acquire the IP address f...

Страница 61: ...ome trunking and redundancy options require a switch that also supports these features Note that incompatible mode settings may cause the network interface to hang or affect overall network performance Enable Network Port Trunking Enable or disable port trunking When enabled the following options are available from the drop down list Balance rr Round Robin Round Robin mode is good for general purp...

Страница 62: ...ailed receiving slave Balance tlb mode provides load balancing and fault tolerance Balance alb Adaptive Load Balancing Balance alb is similar to balance tlb but also attempts to redistribute incoming receive load balancing for IPV4 traffic This setup does not require any special switch support or configuration The receive load balancing is achieved by ARP negotiation sent by the local system on th...

Страница 63: ...k environment only Also all network appliances connected must enable Jumbo Frame and use the same MTU value Select Jumbo Frame Setting From the drop down list select the MTU value for your network The NAS supports 4074 7418 and 9000 bytes for MTU STEP 3 Click Apply to save the settings NOTE If the NAS administration interface cannot be accessed due to an improperly configured Jumbo Frame setting o...

Страница 64: ...is option to enable a DDNS service DDNS is useful when you are hosting your own website FTP server or other server behind the NAS If DDNS is enabled you can select a fixed host and domain name to a dynamic Internet IP address Before you can use this feature you need to sign up for a DDNS service Select DDNS Server From the drop down list select a DDNS server The NAS supports the following DDNS ser...

Страница 65: ...tion IP Last Checked WAN IP address last checked Next Check for Connection IP Time schedule that WAN IP address will next be checked Can also show as a blank field Last DDNS Update Time Time that the DDNS was last updated Update Server Response OK or Failed response STEP 3 Click Apply to save the DDNS Service settings IPv6 From the Administration Network IPv6 window you can configure IPv6 The syst...

Страница 66: ...the system restarts the settings for the IPv6 interface will display in the IPv6 window Edit Allows you to edit the IPv6 settings When you click Edit the IPv6 Property window opens and the following options are available IPv6 Auto Configuration If you have an IPv6 enabled router on the network click this option to allow the NAS to acquire the IPv6 address and the configurations automatically Use s...

Страница 67: ...ter the prefix and prefix length STEP 3 Enter the name of the primary DNS server in the first field and the name of the secondary DNS server in the second field Contact your ISP or network administrator for the DNS server information NOTE If you selected IPv6 auto configuration in the previous steps leave the double colons in both fields STEP 4 Click Apply to save the IPv6 settings Hardware From t...

Страница 68: ...than the value The Status LED indicator flashes red and green when this function is enabled and the free space of the SATA disk is less than the value The recommended range for this value is 1 51200 MB Enable write cache for EXT4 Enable to allow the system to use internal cache when the filesystem is configured for EXT4 Buzzer Control Enable alarm buzzer System operations startup shutdown and firm...

Страница 69: ...curity Level From the Administration Security Security Level window you can configure the security level for the NAS as high medium or low To configure the security level STEP 1 Choose Administration Security Security Level from the Navigation menu The Security Level window opens STEP 2 Select the security level for the NAS High Only allow connections that are on the list This is commonly referred...

Страница 70: ...ess from which the connections to this NAS are denied Specify IP addresses of certain network by setting IP address and netmask Enter the IP address and netmask of the network from which the connections to this NAS are rejected IP Range Enter the IP address range from which the connections to this NAS are rejected Low Allow all connections regardless of connections in the list STEP 3 Click Apply t...

Страница 71: ...ndow opens STEP 2 Click Enable network access protection to enable network access protection STEP 3 Select the different services or protocols and from the drop down lists select the time intervals to define the rules For example In 10 minutes after unsucessful attempts for 10 times block the IP for 5 minutes You can select the following services or protocols SSH Telnet HTTP S FTP SAMBA AFP STEP 4...

Страница 72: ... users to receive an unknown certificate pop up message from their web browser You can generate a certificate get it signed by a Certificate Authority and import it into the NAS using the steps described in the procedure below From the Administration Security SSL Certificate and Private Key window you can use the system default certificate or upload a secure certificate issued by a trusted provide...

Страница 73: ...d to upload the certificate and private key or click Clear to remove any information from the certificate and private key fields Another example of a client device accessing the network using the RADIUS server for authorization and authentication is if your network is set up with secure access that requires you to use a certificate and or private key that is imported into the client device such as...

Страница 74: ...that your client access supports STEP 3 Click Download private key to download the file The window popup asks you to save to a local drive on your PC The file is saved by default as SSLprivatekey key You need to save this file with a pem extension or to an extension that your client access supports Notification This section describes configuring the NAS system notifications settings such as Config...

Страница 75: ...ber Enter the port number used by the SMTP server The default port number is 25 Sender Enter the email address that you want to appear in the from field of the email header of each email alert Enable SMTP Authentication Enables SMTP authentication If enabled the system will request authentication of the mail server before the message is sent A user name and password must be specified User Name Ent...

Страница 76: ...ckatell You can also add your own SMS service provider To configure the SMSC server STEP 1 Choose Administration Notification Configure SMSC Server from the Navigation menu The Configure SMSC Server window opens STEP 2 From the SMS Service Provider drop down list select one of the following Clickatell This is the default SMS service provider Add SMS service provider Select to add your SMS service ...

Страница 77: ...he service provider list In this case it will be Cisco This ID is different from the Client ID that the user receives when product is registered Add SMS service provider SMS Service Provider Enter the name of the SMS service provider URL Template Text Enter the text as specified in the URL Template Replaceable Parameters table NOTE You will not be able to receive the SMS properly if the URL templa...

Страница 78: ...the drop down list select how you want the system error alert sent The options are No alert Select if you do not want system error alerts sent Email Select to receive system error alerts via email SMS Select to receive system error alerts via SMS Email SMS Select to receive system error alerts via email and SMS Send system warning alert by From the drop down list select how you want the system war...

Страница 79: ...wn list select the country code where the cell phone number is located Cell Phone No 1 Enter the cell phone number to receive the SMS notification Cell Phone No 2 Enter a second cell phone number to receive the SMS notification Send A Test SMS message Click to send a test SMS message to the cell phone numbers specified in the SMS notification settings NOTE The SMSC server must be configured to sen...

Страница 80: ...e NAS remotely by Wake on LAN If enabled this feature allows the NAS to be powered on remotely from the LAN by the NSS Discovery Tool included on the Setup Wizard CD NOTE If the power connection is physically removed when the NAS is turned off Wake on LAN will not function whether or not the power supply is reconnected afterwards Enable Click to enable Wake on LAN Disable Click to disable Wake on ...

Страница 81: ...m will ignore the running replication job and execute scheduled system restart or shutdown STEP 3 Click Apply to save the power management settings Network Recycle Bin From the Administration Network Recycle Bin window you can enable a network recycle bin or empty the network recycle bin When enabled there is a corresponding network recycle bin for each disk disk volume The network recycle bin num...

Страница 82: ...e the network recycle bin The system will keep all files deleted from any of the network share folders in the Network Recycle Bin The files will be kept accordingly with the Network Recycle Bin number respective to the order of the disk volume when it was created Empty Network Recycle Bin To the clear network recycle bin click EMPTY NETWORK RECYCLE BIN CAUTION All files in the network recycle bins...

Страница 83: ...ou can save the backup config files either in uniquely named folders for example backup041310 or rename the config file for example default name is backupdata bin rename to backup041310 bin To configure the system backup and restore settings STEP 1 Choose Administration Backup Restore Settings from the Navigation menu The Backup Restore Settings window opens STEP 2 Enter the parameters Backup Syst...

Страница 84: ...automatically retrieve the system configuration from a Trivial File Transfer Protocol TFTP server which is provided by the DHCP server when the NAS boots up Backup TFTP Server Enter the name of the backup TFTP server If the TFTP server provided by the DHCP server cannot be accessed the NAS will acquire the backup configuration file from the backup TFTP server Backup Configuration File Enter the na...

Страница 85: ...n error indicator light on the front panel the event logs can be retrieved to help diagnose the system problem To view the system event logs STEP 1 Choose Administration System Log Settings System Event Logs from the Navigation menu The System Event Logs window opens and displays the following information Type Type of log Log types are Informational Error and Warning messages Date Date that the lo...

Страница 86: ...on menu The System Event Logs window opens STEP 2 Right click a single log and delete the record Or click Clear to delete all of the system event logs To save the system event logs STEP 1 Choose Administration System Log Settings System Event Logs from the Navigation menu The System Event Logs window opens and displays the following information STEP 2 Click Save and save the csv file generated by ...

Страница 87: ...occurred Users User or system that generated the log entry Source IP IP address of the user Computer Name Name of the computer if applicable or local host that generated the log entry Connection Type Type of connection For example HTTP FTP Telnet SSH AFP SAMBA RADIUS or iSCSI Accessed Resources Type of resource accessed For example administrative activity folder path and name of files that have be...

Страница 88: ...e logged The system supports logging the HTTP FTP Telnet SSH AFP SAMBA RADIUS and iSCSI connections When the number of logs reaches 10 000 archive the connection logs and save the file in the folder Click to automatically save the log files in one of the created network share folders when the logs reach 10 000 events From the drop down list select the network share folder location to save the logs...

Страница 89: ...on Logs from the Navigation menu The System Connection Logs window opens STEP 2 Right click a log and select from the following options Disconnect this connection Select to disconnect the selected IP address Add to the block list Select to block the selected IP address From the drop down list select the time frame that you want the IP address to be blocked Disconnect this connection and block the ...

Страница 90: ...r example HTTP FTP Telnet SSH AFP SAMBA RADIUS or iSCSI Accessed Resources Type of resource accessed For example administrative activity or network share folder From the Administration System Log Settings On Line Users window you can disconnect the IP address connection or add the IP address to the block list To disconnect the IP address connection or add the IP address to the block list STEP 1 Ch...

Страница 91: ...he settings or click Cancel to exit Syslog From the Administration System Log Settings Syslog window you can enable syslog to save the event logs and connection logs to a remote syslog server Syslog is a standard for forwarding log messages in an IP network The NAS has a built in syslog server For more information see Syslog Server page194 To configure the syslog settings STEP 1 Choose Administrat...

Страница 92: ...Enable to record the system connection logs You must enable and configure the syslog server from Applications Syslog Server in order to use this feature STEP 6 Click Apply to save the syslog settings Firmware Upgrade From the Administration Firmware Upgrade window you can view the current firmware version and update the firmware on the NAS The current NAS settings will not change while performing ...

Страница 93: ...ystem Within 15 seconds a MD5 checksum result window will display to confirm the integrity of the system After the successful integrity check of the NAS click OK for the new firmware file to upload to the NAS After this has completed a message displays and asks you to reboot the system Please wait patiently A system log in window will automatically display after the successful update to the new fi...

Страница 94: ...2 Click Reset to reset all settings to factory default CAUTION When you restore to the factory default settings all of the drive data user accounts network shares and system settings are cleared and restored to default Please back up all important data and system settings before resetting the NAS STEP 3 Click OK to continue or Cancel to exit Network Service Discovery This section describes the fol...

Страница 95: ...covered by any operating systems that support UPnP To enable UPnP discovery service STEP 1 Choose Administration Network Service Discovery UPnP Discovery Service from the Navigation menu The UPnP Discovery Service window opens STEP 2 Click Enable UPnP Service STEP 3 Click Apply to save the setting Bonjour From the Administraton Network Service Discovery Bonjour window you can broadcast the network...

Страница 96: ...twork service such as FTP in order to allow the NAS to advertise the service with Bonjour To broadcast network services using Bonjour STEP 1 Choose Administration Network Service Discovery Bonjour from the Navigation menu The Bonjour window opens STEP 2 Select the network services that you want to broadcast with Bonjour The following network services are listed Web Administration Web administratio...

Страница 97: ... and delete users The system creates the following users by default admin By default the administrator admin has access to system administration and cannot be deleted guest This user is not displayed on this window A guest does not belong to any user group The login password for guest is guest anonymous This user is not displayed on this window When connecting to the server using FTP service you c...

Страница 98: ...name in the search field to search for a specific user STEP 4 From the drop down list Displays entries per page select the number of entries to display STEP 5 Click the arrows in the lower right to navigate forward and back on the User window To create a user STEP 1 Choose Administration Users from the Navigation menu The Users window opens STEP 2 Click Create a New User The Add a New User wizard ...

Страница 99: ...ee Administration Users and click Edit Account to specify the quota limit STEP 6 Click Next to continue to Group Name STEP 7 Select a group from the following options administrators All members in this group have administration rights You cannot delete this group everyone All users by default belong to the everyone group You cannot delete this group STEP 8 Click Next to continue to Personal Share ...

Страница 100: ...e description of the personal share folder STEP 10 Click Next to continue to the Share Folders window STEP 11 From the Share Folders window you can select the user access privilege for the listed share folders The options are Read only Allow read only access to share folder Read Write Allow read write access to share folder Deny Access Deny access to share folder STEP 12 Click Next to confirm the ...

Страница 101: ...cluding administrator accounts when accessed from a Windows Unix or Mac platform Only an user account assigned to this personal folder can see it Later if you want to change this folder for others to see go to that share and edit the account Lock file oplocks Yes is the default Click No to unlock the file By default the folder is protected so that another user cannot delete files from this folder ...

Страница 102: ...groups simplify group access to a share A common example is adding new employees to a department Rather than setting individual share folder permissions for each employee simply add a new user to the group and that user will have all the share folder privileges of the group The NAS has created the following user groups by default administrators All members in this group have administration right Y...

Страница 103: ... perform for this user group Options are Details Edit Group Users and Private Network Share STEP 2 From the drop down list you can select to view Local Groups Select to view the local groups assigned to this NAS Domain Groups Select to view the domain groups assigned to this NAS STEP 3 Type a user group name in the search field to search for a specific group STEP 4 From the drop down list Displays...

Страница 104: ...STEP 3 Click Next to continue to the Assign Users window Yes Click to assign users to the user group Continue to Step 4 No Click to exit the wizard and add users to the user group at a later time STEP 4 Click Next to continue to the user name list STEP 5 Click the check box next to the user name that you want to add to the group STEP 6 Click Next to continue and Finish to complete the process of c...

Страница 105: ...Management that let you configure the disks and view disk status The following topics are included Volume Management RAID Management HDD SMART Encrypted File System iSCSI Virtual Disk Volume Management The Disk Management Volume Management window shows the model size and current status of the disks in the NAS You can format volumes check disks and scan bad blocks on the disk ...

Страница 106: ...Managing the System Disk Management Cisco Small Business NSS300 Series Smart Storage Administration Guide 106 3 ...

Страница 107: ...e for personal or corporate use to store important data RAID 0 Striping Disk Volume RAID 0 striping disk combines 2 or more drives into one larger disk It offers the fastest disk access but it does not have any protection of your data if the striped array fails The disk capacity equals the number of drives in the array times the size of the smallest drive Striping disk is usually used to maximize ...

Страница 108: ...mplement RAID 5 data disks and the fourth drive can be used as a spare disk When a physical disk failure occurs the system will automatically rebuild the data with the spare disk RAID 5 can survive 1 disk failure and the system can still operate properly When a disk fails in RAID 5 the disk volume will be in degraded mode There is no more data protection at this stage If one more disk fails all da...

Страница 109: ...sk volume equals the size of the smallest capacity disk in the array x number of hard disks 2 It is recommended that you use same brand and same capacity hard drive to establish the most efficient hard drive capacity RAID 6 can survive 2 drives failure and system can still operate properly NOTE To install a disk when the server is on make sure the disk volume is in degraded mode Or wait for two lo...

Страница 110: ...olume Management window opens CAUTION Formatting a volume will remove all data from it STEP 2 Click Format Now on the volume that you want to format STEP 3 Choose a file system type and click OK When the disk is formatted the NAS will create the following default share folders Public Network share for file sharing Download Network share for Download Station Multimedia Network share for Multimedia ...

Страница 111: ...on migration or spare drive configuration while preserving the original drive data The following actions are available in the Disk Management RAID Management window Action Description Expand capacity This action enables drive capacity expansion by replacing the drives in an array one by one Expand capacity is supported for the following drive configurations RAID 1 expansion RAID 5 expansion RAID 6...

Страница 112: ... a RAID 5 spare drive Bitmap Bitmap improves the time for rebuilding after a crash or removing re adding a device It does not improve normal read write performance and might even cause a small degradation in performance However if an array has a bitmap a device can be removed and re added and only blocks changes need to be made since the removal as recorded in the bitmap can be resynced Bitmap sup...

Страница 113: ...te Online RAID Capacity Expansion STEP 9 Click Expand Capacity in the RAID Management Expand capacity window to proceed STEP 10 Click OK to continue The NAS will beep and start to expand the capacity CAUTION This process may take as little as a few hours or more than 24 hours to complete depending on the number and size of the drives being replaced Please wait patiently for the process to finish D...

Страница 114: ...window opens STEP 3 Select an available drive and click Migrate STEP 4 Select one or more available drives The drive capacity after migration is displayed Click Migrate When migration is in process the required time and total drive capacity after migration are displayed in the Description field After migration completes the new drive configuration is displayed and the status is Ready You can use t...

Страница 115: ...or hard drive health temperature and usage status by the hard disk S M A R T mechanism Tab Description Summary Shows the hard disk SMART summary and the latest test results Hard disk information Shows hard disk model number serial number disk capacity firmware and ATA information SMART information Shows value and status for items such as spin up time power on hours and cycles temperataure and erro...

Страница 116: ...on window opens STEP 2 Select the hard disk that you want to view SMART information The window display SMART information on the selected drive To test a hard disk STEP 1 Choose Disk Management HDD SMART Test from the Navigation menu The Test window opens STEP 2 Select the hard disk that you want to test STEP 3 Choose either Rapid Test or Complete Test to test the hard disk The Complete Test is mor...

Страница 117: ...indow you can manage the encrypted disk volumes on the NAS Each encrypted disk volume is locked by a particular key The encrypted volume can be unlocked by the following methods Encryption Password Enter the encryption password to unlock the disk volume The default password is admin Encryption Key File You can download the encryption key file to the server to unlock the disk volume The key can be ...

Страница 118: ...the iSCSI Targets with Xtend SAN iSCSI Initiator on Mac OS Connect to the iSCSI Targets with Open iSCSI Initiator on Linux iSCSI Initiator Installation If you are using Windows Vista Windows 7 or Windows Server 2008 Microsoft iSCSI software initiator is included On these platforms no installation is required For other Windows platforms some basic steps of iSCSI initiator installation are 1 When in...

Страница 119: ...alled an initiator because it initiates the connection to the storage device which is called a target NOTE It is suggested not to connect to the same iSCSI target with two different clients iSCSI initiators at the same time because this could cause data or disk damage Maximum iSCSI Targets and LUNs A maximum of 256 iSCSI targets and LUNs Logical Unit Number can be created For example if you create...

Страница 120: ...NS to enable Internet Storage Name Service iSNS and enter the iSNS Server IP address STEP 4 Click Apply to save the settings STEP 5 Click the Target Management tab to create iSCSI targets on the NAS If you have not created any iSCSI targets the Quick Configuration Wizard appears STEP 6 Click OK to launch the wizard STEP 7 From the iSCSI Quick Configuration Wizard window options click iSCSI Target ...

Страница 121: ...name and password setting here to access the target User Name Enter the user name for CHAP authentication Maximum length is 256 characters Password Enter the password Maximum length is 12 16 characters Re enter Password Re enter the password for verification Mutual CHAP Click to use the CHAP two way authentication protocol between the iSCSI target and initiator The target authenticates the initiat...

Страница 122: ...e capacity for the LUN Move the slider to increase or decrease the capacity STEP 14 Click Next to confirm the settings STEP 15 From the Confirm Settings window click Next to continue STEP 16 When the target and the LUN have been created successfully you will see a message on the iSCSI Quick Configuration Wizard window Click Finish You can view the target and LUN from the Target Management tab STEP...

Страница 123: ... LUN window enter the following parameters LUN Allocation Select one of the following modes to allocate the disk space to the LUN Thin Provisioning Select this option to allocate the disk space in a flexible manner You can allocate the disk space to the target anytime regardless of the current storage capacity available on the NAS Over allocation is allowed since the storage capacity of the NAS ca...

Страница 124: ...et Target Alias Taget IQN Select the target to map the LUN to STEP 8 Click Next to confirm the settings then click Next again to continue STEP 9 When the LUN has been created successfully you will see a message on the iSCSI Quick Configuration Wizard window Click Finish You can view the target list and unmapped LUN list from the Target Management tab In the Target Management window the status is d...

Страница 125: ... offline target Modify Click this icon to modify the target settings such as target alias CHAP information and checksum settings Click this icon to modify the LUN settings such as LUN allocation name and disk volume directory Delete Click this icon to delete an iSCSI target All the connections will be removed Disable Click this icon to disable a LUN All the connections will be removed Enable Click...

Страница 126: ...Unmap icon to unmap the LUN The LUN will appear in the Un Mapped iSCSI LUN List STEP 4 Click the Map icon to map the LUN to another target STEP 5 Select the target to map the LUN to and click Apply The LUN is mapped to the target After creating the iSCSI targets and LUN on the NAS you can use the iSCSI initiator installed on your computer Windows PC Mac or Linux to connect to the iSCSI targets and...

Страница 127: ...nd click the General tab The initiator IQN is listed in the Initiator Node Name field Name Displays LUN name Read Only The connected initiator can only read the data from the LUN Read Write The connected initiator has read and write access to the LUN Deny Access The LUN is invisible to the connected initiator If no LUN masking policy is specified for a connected iSCSI initiator the default policy ...

Страница 128: ...r Portal The Discover Target Portal window opens STEP 3 Enter the NAS IP address and the port number for the iSCSI service STEP 4 Click OK STEP 5 From the iSCSI Initiator Properties window click the Targets tab The available iSCSI targets and their status are shown STEP 6 Select the target you want to connect and click Connect The Connect To Target window opens STEP 7 Check the check box to add th...

Страница 129: ...mation see http www attotech com products product php sku INIT MAC0 001 For the Xtend SAN iSCSI Initiator download there might be a charge for this software For freeware you can check the global SAN iSCSI initiator released by Studio Network Solutions SNS NOTE After installing Xtend SAN iSCSI initiator you can locate it in Places Applications To use Xtend SAN iSCSI initiator on Mac STEP 1 In your ...

Страница 130: ...elect the target to connect Then click Login to proceed The first time you login to the iSCSI target a window displays automatically to remind you the disk is not initialized STEP 8 Click Initialize to format the disk You can also perform the initialization from the Disk Utilities application You can now use the iSCSI target as an external drive on your Mac Connect to the iSCSI Targets with Open i...

Страница 131: ...llowing command etc init d open iscsi restart STEP 3 Discover the iSCSI targets on a specific host the NAS in this example For example IP address is 10 8 12 31 and a default port number 3260 iscsiadm m discovery t sendtargets p 10 8 12 31 3260 STEP 4 Check the available iSCSI node s to connect iscsiadm m node You can delete the node s you don t want to connect to when the service is on with the fo...

Страница 132: ...ogin to a target iscsiadm m node targetname THE_TARGET_IQN login Logout a target iscsiadm m node targetname THE_TARGET_IQN logout Delete a target iscsiadm m node op delete targetname THE_TARGET_IQN Virtual Disk The Virtual Disk VD is based on iSCSI technology which makes it become the stack master and can connect to the other stack targets With the VD you can expand the capacity of your NAS and us...

Страница 133: ...disk is Ready you can start to use the virtual disk as a disk volume of the NAS The NAS supports a maximum of eight virtual disks Network Shares This section describes creating network share folders and editing the access rights of users and user groups The following topics are included Share Folders Quota Share Folders The primary purpose of a network share is for sharing files over a network Und...

Страница 134: ... this icon to edit the access right of the users and user groups to the share folder NFS Access Control Click this icon to edit the NFS access right of the share folder See NFS Access Control page 135 WebDAV Access Control Click this icon to edit the WebDAV Web based Distributed Authoring and Versioning access control of the share folder You can edit the WebDAV access right of the local users and ...

Страница 135: ... is a b c d x where a b c d refers to the network and x refers to number of bits of the network mask For example the IP configuration can be specified as 192 168 0 0 24 The second valid format is a b c d network mask In this case a b c d refers to the network and the following value refers to the network mask setting For example the same IP configuration can be specified as192 168 100 8 255 255 25...

Страница 136: ...settings Creating New Share Folders or Restoring Default Network Shares From the Network Shares Share Folders window you can create new share folders and also restore default network shares To create a new share folder STEP 1 Choose Network Shares Share Folders from the Navigation menu The Share Folders window opens STEP 2 Click New Share Folder The Create a Share Folder Wizard opens Click Next to...

Страница 137: ... STEP 2 Click Restore Default Network Shares A dialog asks if you are sure that you want to restore default network shares Click OK to continue ISO Share Folders From the Network Shares Share Folders ISO Share Folders window you can mount the ISO image files on the NAS as ISO share folders and access the contents without disc burning The NAS supports mounting up to 256 ISO share folders To mount a...

Страница 138: ...tors only By User Access rights to share folder by user By User Group Access rights to share folder by user group STEP 8 Configure the Guest Access Right Deny Access Deny guest access Read only Allow read only access for guests STEP 9 Click Next STEP 10 Confirm the settings and click Next STEP 11 The new share folder is created successfully Click Finish After mounting the image file you can specif...

Страница 139: ...rs STEP 3 Enter a quota size in MB Field Description Enable Quota for all users The Quota function is disabled by default You can activate this function to manage or allocate disk space for each user Quota size on the disk Set quota size for each user s access authorization to the disk A user is denied the right to create new files or directories once the quota size is exceeded This integer number...

Страница 140: ...n Administration Users Edit Account Profile Network Services This section describes the following network services that are supported on the NAS Microsoft Networking Apple Networking NFS Service FTP Service Telnet SSH SNMP Settings Web Server Remote Access Microsoft Networking The NAS device supports Microsoft networking protocols used with home and business LANs Microsoft Windows users must enabl...

Страница 141: ...ork AD Server can offer other computers and network devices within the same domain correct account information so that the information system of the organization can be safer and more convenient To enable Microsoft networking STEP 1 Choose Network Services Microsoft Networking from the Navigation menu The Microsoft Networking window opens STEP 2 Click Enable file service for Microsoft networking t...

Страница 142: ...cation of the server Domain NetBIOS Name Enter the NetBIOS domain name from the AD Domain server To identify the name from the AD server open a window from Control Panel System Properties The name that displays in the Domain field is the domain name The NetBIOS domain name is the first occurrence of the domain name For example if the domain name is Cisco com the NetBIOS domain name is Cisco withou...

Страница 143: ...ndow from Control Panel System Properties The name that displays in the Domain field is the domain name Organization Unit Optional Organization Unit provides a unique way to classify users groups of users or computers located in the AD domain directories The purpose of Organization Unit is to differentiate between objects users groups of users or computers with the same name primarily to parcel ou...

Страница 144: ...ver IP address on the NAS Click the check box Use the specified WINS server to enable the specified WINS server and enter the WINS server IP address STEP 4 Click Local Master Browser to make the NAS responsible for keeping track of computers available on the network or the computers that have announced themselves as master browser for offering services NOTE Do not set this NAS to be the domain mas...

Страница 145: ...his will create a DNS host entry for the NAS in the DNS server If the NAS IP address is changed the NAS will automatically update the new IP address in the DNS server STEP 9 Click Enable Trusted Domains to enable trusted domains STEP 10 Click Apply Your advanced option settings are updated to the NAS Apple Networking From the Network Services Apple Networking window Apple Macintosh users can enabl...

Страница 146: ...rk Services Apple Networking from the Navigation menu The Apple Networking window opens STEP 2 Click Enable Apple Filing Protocol to enable Apple networking STEP 3 Click Apply Your Apple networking settings are updated to the NAS NFS Service From the Network Services NFS Service window Linux users can enable NFS Service to support file access by Linux servers ...

Страница 147: ...k Services NFS Service from the Navigation menu The NFS Service window opens STEP 2 Click Enable NFS Service to enable NFS service NOTE For virtualization environment it is recommended that you disable the write cache function in the Administration Hardware dialog box Default is disabled STEP 3 Click Apply Your NFS service settings are updated to the NAS ...

Страница 148: ...tion menu The FTP Service window opens STEP 2 Click Enable FTP Service to enable FTP service STEP 3 Select at least one FTP transfer protocol type FTP standard Use general FTP protocol FTP with SSL TLS Explicit Use SSL or TLS Explicit encryption protocol STEP 4 Enter a port number for FTP service The default is 21 STEP 5 You can enable or disable Unicode Support by clicking Yes enabled or No disab...

Страница 149: ...ctions for a single account The upper limit is 256 Enable FTP transfer limitation Click to set the values for FTP transfer limitation Maximum upload rate KB s Enter the maximum upload value Maximum download rate KB s Enter the maximum download value STEP 8 Enter Advanced FTP parameters Passive FTP Port Range You can use the default port range 55536 56559 or define a port range higher than 1024 Res...

Страница 150: ...ble Telnet SSH remote login STEP 1 Choose Network Services Telnet SSH from the Navigation menu The Telnet SSH window opens STEP 2 Click Allow Telnet connection to enable Telnet SSH remote login STEP 3 Enter a Port Number for Telnet The default port is 23 STEP 4 Click Allow SSH connection to enable SSH connection STEP 5 Enter a Port Number for SSH connection The default value is 22 STEP 6 Click Ena...

Страница 151: ...addresses In addition you can also select the system event log level in SNMP To enable SNMP service STEP 1 Choose Network Services SNMP Settings from the Navigation menu The SNMP Settings window opens STEP 2 Click Enable SNMP Service to enable SNMP service STEP 3 Enter a Port Number for SNMP service The default value is 161 STEP 4 Click SNMP Trap Level types You can choose from Information Warning...

Страница 152: ... format that is used to manage the NAS in the SNMP network The SNMP manager uses the MIB to determine the values or understand the messages sent from the agent NAS within the network You can download the MIB and view it with any word processor or text editor Web Server From the Network Services Web Server window you can enable Web Server and create a web page that is viewable either locally or on ...

Страница 153: ...he HTTP with the SSL TLS to create a secure channel over the network STEP 6 Enable WebDAV Web based Distributed Authoring and Versioning if needed by clicking Enable WebDAV WebDAV is a set of extensions to HTTP that allows users to edit and manage files collaboratively on remote World Wide Web servers After enabling this function you can access shared folders remotely through a client application ...

Страница 154: ...ding If the web server listens on port 80 you need to configure port forwarding on your router to allow inbound traffic from port 80 to the LAN IP 10 8 12 45 of your NAS SSL Certificate Import If you are going to enable SSL connection for the website and intend to use your own trusted SSL certificates you can import the certificate from the administration backend in Administration Security SSL Sec...

Страница 155: ...ck to specify HTTP protocol for the connection HTTPS Click to specify HTTPS protocol for the connection If you select HTTPS verify that the option Enable Secure Connection SSL is enabled in Network Services Web Server Port Enter the port number for the connection Action Click the Property icon to open the Modify Virtual Host window and reconfigure the current settings STEP 6 Click Apply STEP 7 Con...

Страница 156: ...ow Cisco Access Now is the secure easy to use way to access and manage your Smart Storage NAS devices from anywhere The process for activating and managing NAS using Cisco Access Now is Create an account Setup a Cisco Access Now account Register your device Associate Smart Storage to your Cisco Access Now account Access from anywhere Visit www ciscoaccessnow com from a web browser to securely acce...

Страница 157: ...e remote access network service you need to create a Cisco Access Now account and register your NAS device s to the account NOTE The Cisco Access Now account is different than a Cisco com account If you already have a Cisco com account that account will not work for Cisco Access Now Web Browser and Mobile Access Cisco Access Now Web Mobile connections per day 10 Web Mobile connection time per sess...

Страница 158: ...indow enter the following information Email Email address for the person who will be using the Cisco Access Now account Password Enter a password for the Cisco Access Now account Confirm Password Re enter the password for the account Security Question From the drop down list select the security question that you want to use in the event that you forget the password Security Question Answer Enter t...

Страница 159: ...ddress that was used when creating the Cisco Access Now account Password Enter the password for the Cisco Access Now account If you do not remember the password click Retrieve Password Device Name Displays the NAS device name as it will appear on the Cisco Access Now portal STEP 8 Click Register Device to Cisco Access Now then click OK to continue A message displays that the NAS device name has be...

Страница 160: ...f your registered devices and other devices that you are able to access See Previewing or Modifying the Remote Access Settings page162 STEP 10 To troubleshoot network communication between the NAS and Cisco Access Now click Diagnostics Use the diagnostic tool if the device failed to register or is unable to access remotely via the web In the Diagnostics window connectivity information is displayed...

Страница 161: ...aunch the Smart Storage GUI the same as if you were accessing the NAS locally The following operating systems and web browsers are supported Windows XP IE6 IE7 or Firefox 3 5 Windows Vista IE7 IE8 Firefox 3 6 Windows 7 IE8 Chrome Firefox 3 6 Mac OS X 10 5 Firefox 3 5 Safari 4 Mac OS X 10 6 Firefox 3 6 Safari 5 NOTE Accessing your NAS from a mobile or tablet platform is not supported at this time S...

Страница 162: ...s who also have accounts with Cisco Access Now Show mine and friends Display your registered NAS devices and the shared NAS devices with friends who have accounts with Cisco Access Now STEP 3 Click Hide inactive devices to hide any NAS devices that may be powered off offline or deactivated from the Cisco Access Now service STEP 4 Click the NAS device name to launch the NAS GUI the same as if you w...

Страница 163: ...f the NAS device or if you are changing email addresses Click Transfer to confirm Reset Security Click to reset the NAS secure code and restart the NAS Language From the drop down menu select the language for the GUI STEP 8 To modify or view account settings click Account in the lower right corner of the window The following parameters are available from the Account Summary window Registered Email...

Страница 164: ...s section describes the numerous applications available that expand the NAS capabilities Web File Manager Multimedia Station Download Station iTunes Server UPnP Media Server MySQL Server PKG Plugins Syslog Server Web File Manager You have the option of using a web browser to access your files on this NAS If your system is connected to the Internet and uses a public IP address the Web File Manager ...

Страница 165: ...nager settings are updated to the NAS NOTE You must first create a network share before using Web File Manager After the web file manager is enabled it can be accessed from Applications Web File Manager If your NAS is using SSL you can access Web File Manager from the URL https NAS IP address 8080 cgi bin filemanager The default port is 8080 If your NAS is configured with a different port you need...

Страница 166: ... browser go to URL http IP Address 8080 cgi bin filemanager STEP 2 Enter your Username and Password The Web File Manager opens To access the Web File Manager from the NAS login window STEP 1 Enter your Username and Password STEP 2 From the Application drop down list select Web File Manager STEP 3 Click Login The Web File Manager login window opens STEP 4 Enter your Username and Password for the We...

Страница 167: ...e The Directory Tree shows a visual representation of the files and directories of your NAS You can expand and collapse the structure by clicking on the plus and minus icons Details Area The Details area shows information on the selected file or directory such as name size and permissions Actions Area The Actions Area is the largest part of the Web File Manager where you can perform numerous actio...

Страница 168: ...selected file Refresh Click to refresh the contents of the current directory Upload Click to upload a file into the current directory Download Click to download a file or directory from the current directory Create Folder Click to create a new folder in the current directory Rename Click to rename the currently selected file or directory Copy Click to copy the currently selected file or directory ...

Страница 169: ... files are copied to your NAS STEP 4 Click the Refresh icon if you want to see the file in the Actions area To download a file from the NAS STEP 1 Click the Download icon The File Download dialog opens STEP 2 Click Save and specify a location for the file Click Save To create a new folder on the NAS STEP 1 Using the Directory Tree go to the location where you want the new folder STEP 2 Click the C...

Страница 170: ...n STEP 3 Enter a new name for the file or folder and click Ok To move a file or folder on the NAS STEP 1 Select the file or folder that you want to move STEP 2 Click the Move icon The Move to dialog opens NOTE If Skip is chosen for the Mode the file will not be moved if another file exists with the same filename If Overwrite is chosen for the Mode and if there is a file with the same filename then...

Страница 171: ... from the menu STEP 5 Enter the share folder name and click OK STEP 6 Click OK to confirm The ISO share folder appears in the share folder list You can access the contents of the ISO image file You can login the NAS web interface with an administrator account and specify the access rights of the users in Network Shares Share Folders See Share Folders page133 To unmount a share folder STEP 1 Login ...

Страница 172: ...ver on the NAS To use the Multimedia Station STEP 1 Choose Network Services Web Server from the Navigation menu The Web Server window opens STEP 2 Click Enable Web Server and Enable Secure Connection SSL The default port number for the SSL connection is 8081 STEP 3 Click Apply to save your settings STEP 4 Choose Applications Multimedia Station from the Navigation menu The Multimedia Station window...

Страница 173: ...s NOTE The user accounts including admin of Multimedia Station are different from the system user accounts on the NAS For security reasons it is recommended to use a different password for the Multimedia admin account The password can be a maximum of 16 characters Supported characters are A Z az 0 9 _ STEP 12 From the Multimedia Station window click Login in the upper right corner STEP 13 Enter th...

Страница 174: ...es on the NAS using your web browser over LAN or WAN Supported File Formats Action Icons Content Type Supported File Format Audio MP3 Image JPG JPEG GIF PNG Animation will not be shown for animated GIF files Video Playback FLV MPEG 4 Video H 264 AAC Transcode AVI MP4 M4V MPG MPEG RM RMVB WMV Files will be converted into FLV Action Icon Description Home Click to return to the home directory of Mult...

Страница 175: ...ow You can set up the photo frame background music and animation in the slide show mode Publish Click to publish the selected photos maximum 5 photos to popular social networking sites Supported sites are Twitter Facebook MySpace Plurk Windows Live and Blogger Action can be performed by administrators only NOTE The album must be set to public Control Panel Set Folder Public before it can be publis...

Страница 176: ...Click the X in the upper right corner to exit the playback window View Image Files The NAS supports viewing images from your web browser For the supported image formats see Supported File Formats page174 To view image files STEP 1 From Multimedia Station choose Media Center My Photo STEP 2 Click an image file to open it STEP 3 Click EXIF in the upper left corner of the window to view detailed info...

Страница 177: ...ge184 To set the background music of an image file or a folder of image files STEP 1 From Multimedia Station choose Media Center My Photo STEP 2 Open an image file and click the Music Note icon STEP 3 Select the playlist and click Save To remove the background music select No Music Create Album You can create an album folder in Multimedia Station and upload files to the album To create an album ST...

Страница 178: ...con STEP 3 Select Upload Organize STEP 4 Click Next STEP 5 To copy the files from another location in Media Center to the album click the File Copy tab and select the files to copy STEP 6 Click File Copy to start copying the files STEP 7 To upload files to the album click the File Upload tab then Browse to select the files to upload STEP 8 Click File Upload to begin uploading the files STEP 9 Clic...

Страница 179: ...owse and select the album or images that you want to view as a slide show in Media Center STEP 3 Click the Slide Show icon to start the slide show STEP 4 Select the playback speed 3s 6s 9s or 15s STEP 5 From the drop dwon menu select the photo frame for displaying the image file STEP 6 Select the icon to display the images full screen display or 3 dimensional 3D display Publish Image Files You can...

Страница 180: ...iption STEP 5 From Publish to select the social networking website icon to publish the files to and enter the login information for the website Email Image Files Prior to emailing the image files verify the SMTP server settings have been correctly configured on the NAS See Configure SMTP Server page 74 NOTE Action can be performed by administrators only To email image files from Media Center STEP ...

Страница 181: ...AS will begin playing the video If you click a video file in a folder all other supported video files in the folder will also be shown in the playlist and played STEP 3 Click the X in the upper right corner to exit the playback window Transcode Video If the video files are in AVI M4V MPG MPEG RM RMVB WMV formats you need to transcode or convert the file in order to play it on Multimedia Station It...

Страница 182: ...Panel Playlist Editor NOTE Only the administrators can edit the playlists STEP 2 Click My Jukebox to view select and play the playlists The playlists in My Jukebox are shared with all the users of Multimedia Station Control Panel The Control Panel consists of four areas User Management Change Password Playlist Editor Photo Frame Settings Set Folder Public User Management You can create multiple us...

Страница 183: ...r the user account description Is Admin Select to indicate that the user is an administrator and has administrator privileges for Multimedia Station Disabled Select to disable the user account Inaccessible Folder Accessible Folder Specify the folders that the user can or cannot access STEP 4 Click Save to save the settings STEP 5 From the User Management window the users are shown in a list You ca...

Страница 184: ...window select an existing playlist from the drop down menu or click Add to create a playlist STEP 3 Select the music files from the left column folders in Multimedia Station and click to add the files to the playlist STEP 4 Click Save to save your playlist and then click Close to exit the window After creating the playlist you can play it in My Jukebox Photo Frame Settings You can choose from the ...

Страница 185: ...for the photo frame The name of a photo frame can be 1 to 16 characters c Click Browse and select the file you want to upload d Click Upload STEP 2 Click Close to exit the window Set Folder Public To publish the image files to a website you need to allow public access to the folder NOTE Folders with public access can be seen and accessed by anyone without logging into Multimedia Station To set a f...

Страница 186: ...distribution of unauthorized materials may result in severe civil and criminal penalty Users are subject to the restrictions of the copyright laws and should accept all the consequences To enable the Download Station STEP 1 Choose Applications Download Station from the Navigation menu The Download Station window opens STEP 2 Click Enable Download Station to enable Download Station NOTE After the D...

Страница 187: ...name and Password The Download Station opens To access the Download Station from the NAS login window STEP 1 Enter your Username and Password STEP 2 From the Application drop down list select Download Station STEP 3 Click Login The Download Station login window opens STEP 4 Enter your Username and Password for the Download Station The Download Station opens To access the Download Station from the ...

Страница 188: ...rcentage of the task Time Left Estimated download time of the download task To add a new FTP HTTP task STEP 1 Click Add New FTP HTTP Task STEP 2 Enter the FTP or HTTP URL of the download task and select the share folder to save the files STEP 3 Enter the user name and password to access the URL of the download task if necessary STEP 4 Click Ok to start downloading After uploading a download task t...

Страница 189: ...as the time on the next day To pause a running download task STEP 1 Select the task in the View Run List STEP 2 Click Pause Restart Download Task You can view tasks that are paused or finished in the View Pause List and View Finish List respectively STEP 3 To restart a paused task select the task in the View Pause List and click Pause Restart Download Task To delete a running paused or finished ta...

Страница 190: ...nd play all the music files on the NAS using computers that are on the network by using iTunes NOTE To use the iTunes Service iTunes must be installed on your computer and music files must be uploaded to the Multimedia folder of NAS You can download the latest iTunes software from the Apple website at http www apple com To enable the iTunes Service STEP 1 Choose Applications iTunes Service from th...

Страница 191: ...re updated to the NAS UPnP Media Server The NAS offers a DLNA compatible UPnP media server called TwonkyMedia Enable this function and the NAS will share particular music photos or video files to DLNA network You can use DLNA compatible digital media player to play the multimedia files from the NAS to your TV or to any PC with the DLNA application or to an acoustic sound system Universal Plug and ...

Страница 192: ...click the following link to enter UPnP Media Server configuration page You can access the configuration page directly from http NAS IP address 9000 if SSL is enabled j STEP 4 Click Apply Your UPnP Media Server settings are updated to the NAS MySQL Server You can enable this option to configure MySQL Server of the NAS as a database server of another web server in remote site through Internet connec...

Страница 193: ...stall the phpMyAdmin package to manage your MySQL server You can reset the root password by clicking Reset Root Password The password of MySQL root will be reset to admin after executing this function You can re initialize the MySQL database by clicking Re Initialize Database All the data on MySQL database will be cleared after executing this function PKG Plugins From the Applications PKG Plugins ...

Страница 194: ...age to continue installing the package To install a new PKG package STEP 1 Choose Applications PKG Plugins Installation from the Navigation menu The PKG Plugins INSTALLATION window opens STEP 2 Click Browse to locate a PKG file STEP 3 Click Install The PKG Plugin is installed to the NAS To remove a PKG package STEP 1 Choose Applications PKG Plugins PKG Installed from the Navigation menu The PKG Pl...

Страница 195: ...hed its maximum size it will be archived and renamed automatically For example MyLogFile_2010_06_06 The date format follows the user defined date format in Administration General Settings To enable the syslog server STEP 1 Choose Applications Syslog Server from the Navigation menu The Syslog Server Configuration window opens STEP 2 Click Enable Syslog Server to enable the Syslog Server STEP 3 Enab...

Страница 196: ...lick Apply The syslog server settings are updated to the NAS Filter Settings The Applications Syslog Server Filter Settings window displays the filter settings and status From this window you can also add or delete a filter Filter Lists the filters that are currently defined Status Shows the status of each filter Action The type of action Add a New Filter Click to define different filters and the ...

Страница 197: ... Time that the log occurred Facility Program that logged the message Severity Severity level of the log Hostname Name of the host that originated the log Application Name of the application that originated the log P ID Process ID of the log M ID Message ID of the log Message Message content of the log RADIUS Server This section describes how to configure the RADIUS server settings such as Server S...

Страница 198: ... The built in RADIUS Server monitors UDP ports 1645 1812 for RADIUS authentication and 1646 1813 for RADIUS accounting for RADIUS requests From the Applications RADIUS Server Server Settings window you can enable the RADIUS server To enable the RADIUS server STEP 1 Choose Applications RADIUS Server Server Settings from the Navigation menu The Server Settings window opens STEP 2 Click Enable RADIUS...

Страница 199: ...less access point WAP The following parameters are displayed in the RADIUS Clients window Name Lists the names of the existing RADIUS clients IP Address IP address of the RADIUS client Prefix Length Prefix length of the RADIUS client Status RADIUS client status You can enable or disable the RADIUS client from the Action field Action You can enable disable or edit the RADIUS client from the Action ...

Страница 200: ...hat specify its network number IP addresses have two subcomponents a network part and a host part For example a value of 24 entered into the prefix length will have a single network and 254 hosts available in those IP addresses Secret Key Secret key for the new RADIUS client The secret key must be at least six characters Use this same secret key and input at the router switch or WAP administration...

Страница 201: ...he search box to search for a specific user Create a New User Click to create a new RADIUS user such as a PC Name Enter the new username Password Enter the password for the new RADIUS user Verify Password Re enter the password for the new RADIUS user User Name Lists the existing RADIUS users Status Displays the user account status You can enable or disable the user account in the Action field Acti...

Страница 202: ... instant automatic or schedule backup methods and configure the relevant settings Backup Now To back up data to the external storage device immediately Schedule Backup To back up data by schedule You can select the week day and time to execute the backup Auto backup To execute the backup automatically once the storage device is connected to the NAS You can select Copy or Synchronize for the copy o...

Страница 203: ...ailable shares box STEP 3 Click the Right Arrow to move the selected network shares to the Shares to back up box STEP 4 Select an external storage device in Back up to an External Storage Device STEP 5 Select a backup method in Backup Method If you selected Schedule Backup click days and specify a time to backup STEP 6 Select a copy option in Copy options CAUTION If you select Synchronize all data...

Страница 204: ...opy button The following three functions are available Copy from the front USB storage to a specified directory of the internal drive of the NAS Copy to the front USB storage from a specified directory of the internal drive of the NAS Disable the one touch copy button To configure the USB One Touch Copy feature STEP 1 Choose Backup USB One Touch Copy from the Navigation menu The USB One Touch Copy...

Страница 205: ...uch Copy unplug the USB cable from the port and re insert prior to starting the data transfer Remote Replication From the Backup Remote Replication window you can configure the remote replication feature The Remote Replication feature lets you replicate your local files to a remote folder on another server You can perform immediate replication job or schedule a replication job to be executed at a ...

Страница 206: ...backup timeout number of retries and retry intervals b Click Create New Replicating Job to launch the Remote Replication Wizard STEP 4 Enter the parameters in the Remote Replication Wizard Click Next after entering the parameters for each step in the Remote Replication Wizard a Select a server type and enter a Remote Replication Job Name Click Next b Enter the IP address or name of the remote serv...

Страница 207: ... users share the same network share for this function To enable Time Machine support STEP 1 Disable the Time Machine function in the System Preferences on your Apple computer STEP 2 Choose Backup Time Machine from the Navigation menu The Time Machine window opens STEP 3 Enter a Password for the Time Machine destination The User Name is TimeMachine STEP 4 Select a Volume for the Time Machine destin...

Страница 208: ... click Use for Backup STEP 3 Enter the user name and password to login to the NAS Name Enter TimeMachine Password Enter the password you have configured on the NAS from the Backup Time Machine window STEP 4 Click Connect STEP 5 Upon successful connection the Time Machine is switched to ON The available space for backup is shown and the backup will start in 120 seconds The first time backup can tak...

Страница 209: ...disk image which was created by Time Machine Size Size of this Time Machine backup Date Modified Last modified date of this Time Machine backup Delete Delete the selected Time Machine backup Mozy Backup This section describes the Mozy online backup service and includes the following Introduction Mozy Security Overview Activating Mozy Online Backup Service Managing Your Backups Restoring Your Files...

Страница 210: ...ce on Cisco Smart Storage Additional restore options include Ability to restore from Mozy s website Ship a DVD from Mozy s website No separate software running on computers or servers How is Mozy for Smart Storage different from MozyHome and MozyPro Mozy for Smart Storage was created with NAS integration in mind specifically with the Cisco Smart Storage family of devices Built for embedded platfor...

Страница 211: ...r or reseller you might have already received an email with an activation key In this case you should use this option You can also register using this option if you are adding a second NAS Smart Storage device to an existing email address that already has an account with Mozy I need to reactivate my Mozy service Use this option if you are connecting to an existing Mozy account You will use this op...

Страница 212: ...r code here so that they can receive the sales commision If you did not purchase from an affiliate partner leave this field blank Promo Code If you have a promotional discount code enter it here This field is optional STEP 7 Click Continue to proceed to the Select a Plan window STEP 8 From the Select a Plan window mouse over and click the table cells to select a plan that works best for you The se...

Страница 213: ...on Key Enter the activation key received for this account during the registration from the Mozy website Create a new password that will be used with this email address and activation key Password Enter the password for the account This is a new password for the account and different from the one you entered on the Mozy website during registration NOTE The password must have a minimum of eight char...

Страница 214: ... me and now I need to activate my Mozy service STEP 4 Click Next to continue with the registration STEP 5 From the Activation Information window enter the following information Please enter a valid email address and the activation key that was assigned to that address If you are adding a second NAS device to an existing email address that already has an account with Mozy you can enter that account...

Страница 215: ...ckup from the Navigation menu The Mozy setup wizard Welcome window opens to guide you through the registration STEP 3 Select I need to reactivate my Mozy service STEP 4 Click Next to continue with the registration STEP 5 From the Enter Activation Information window enter a valid activation key and the email address that is associated with that key User email Enter the email address used for the ac...

Страница 216: ...u want to backup or restore a check appears in the check box The check has three variations dependent on your selection Black A folder and all of the sub folders or files are selected Gray Single folders or files within a directory are selected The gray check appears in the parent folder check box No Check Blank No files are selected Backup management includes Files to Backup Choosing which files ...

Страница 217: ...older you want to backup the check has three variations dependent on your selection Black indicates a folder and all of the sub folders or files are selected Gray indicates single folders or files within a directory are selected The gray check appears in the parent folder Blank indicates that no files are selected Contents of Selected Directory Dispays the files from the selected directories STEP ...

Страница 218: ...files immediately after changes in order to prevent excessive bandwidth and CPU usage on the NAS File in progress Displays the file currently being backed up Files Pending Displays number of files remaining for backup Click the link i e x files x B to display more information about the pending files Timestamp Time the file was changed Size Size of the listed file Operation Type of backup operation...

Страница 219: ...imit Network Usage Throttle To manage backup services from monopolizing the available bandwidth of your Internet connection you can limit backup services to a specific rate in kilobytes per second This would guarantee a minimum level of bandwidth for backup services and maintain satisfactory response to service other network applications and needs For example a company might connect to the Interne...

Страница 220: ... Restore DVD Go to Mozy com and request that a DVD containing previously backed up files be sent to you 30 Day Versioning of Files The 30 day versioning support allows you to restore deleted or previous versions of files for ultimate data protection If you accidentally delete a file and want to access the original version of a document that has since been changed or edited several times you are ab...

Страница 221: ...nuary 1 2011 If you deleted a file by accident on the 1st day of the month you will have until the 30th of that same month to restore the file If you removed a file from being backed up on the 1st day of the month you will have until the 30th of that same month to restore the file If you run a backup once a day after 30 days you will have 30 different restores you can select from If you changed a ...

Страница 222: ...ing overnight mail Web Restore Click this link to go to Mozy com and request copies of backed up files directly from the Mozy website Request a Restore DVD Click this link to go to Mozy com and request that a DVD containing previously backed up files be sent to you NOTE There is a separate charge for the option of requesting a restore DVD STEP 2 The following options are available to search or sel...

Страница 223: ...ays the files from the selected directories STEP 3 In Restore Status you can view the progress of the restore File in progress Displays the file currently being restored Files Pending Displays number of files and bytes remaining for restore Click the link i e x files x B to display more information about the pending files Source Directory path from where the file was originally backed up Destinati...

Страница 224: ...er to use on the NAS After selecting the folder click Finish If File Exists Rename Select to rename file if it currently exists Overwrite Select to overwrite existing files STEP 5 Click Start Restore The Restore complete progress bar tracks the restore progress and completion Managing Account Services From the Manage Services window you can view the account information summary manage notifications...

Страница 225: ...with Mozy Name of NAS server Mozy Online Space Used Space currently used with the online backup service followed by total space available This NAS s Activation Key Displays the activation key in use Account Status Displays the account status such as Active Last Successful Backup Displays date and time of last completed backup Click the View Log link to view the backup log history Last Unsuccessful...

Страница 226: ...start the online backups to Mozy This would typically be used to troubleshoot issues with the Mozy online backup on Cisco Smart Storage You can also deactivate and activate the Mozy service To suspend or resume backups To stop backups click Suspend Mozy Backups The Current Status field will display status as Suspended and the message Your files are currently not being backed up to Mozy is displaye...

Страница 227: ... Backups The Current Status field will display status as Active NOTE You must click Resume Mozy Backups to complete the activation process and resume the backup service Support for Mozy Issues with Cisco Smart Storage For any Mozy issues with Cisco Smart Storage if your product is under warranty or you have a Cisco service contract contact Cisco support first If it is a Mozy issue you will be redi...

Страница 228: ...s or upgrade your storage plan You can also restore your files from a specific storage device directly from the Mozy website Account Information View or edit the account information change the email address or change the account password Billing and Payment View the payment information plan or billing history You can also change the credit card information Purchase Activation Keys Add Mozy online ...

Страница 229: ...ed storage From the External Device External Storage Device window you can perform numerous functions on these external devices such as formatting the device removing the disk partition and removing the device from the NAS NOTE External devices are accessible to everyone who has network access to the NAS Therefore all users on the NAS can read and write data to these devices CAUTION Do not unplug ...

Страница 230: ...ted format NOTE The NAS can format the external drive for a FAT32 NTFS EXT3 EXT4 or HFS Mac only file system If you are formating your external drive for EXT3 or EXT4 it cannot be recognized if you are using a Windows operating system The NAS will recognize each partition existing on the external drive is one disk If a single drive with multiple partitions is connecting to the NAS port it will app...

Страница 231: ...l Storage Device from the Navigation menu The External Storage Device window opens STEP 2 Select the external storage device from the window STEP 3 Click Remove Device The selected external device is removed from the NAS UPS Settings The NAS supports connection to an Uninterruptible Power Supply UPS to protect your system from abnormal system shutdown caused by a power outage From the External Dev...

Страница 232: ... specified amount of time after power has failed click After the AC power fails for x minute s turn off the server and specify a time in minutes STEP 5 To put the server in standby mode after the power has failed click After the AC power fails for x minute s the server should enter standby mode and specify a time in minutes When power resumes the system resumes to operation status STEP 6 In Protoc...

Страница 233: ...stem External Device Cisco Small Business NSS300 Series Smart Storage Administration Guide 233 3 STEP 7 Enter the IP address of the UPS in the address fields STEP 8 Click Apply Your UPS settings are updated to the NAS ...

Страница 234: ... the following information An Active Directory domain administrator account for authentication The fully Qualified Domain Name FQDN of the Active Directory domain The NetBIOS domain name for the Active Directory domain The hostname or IP address hostname is preferred of the domain controller running the Active Directory domain The domain controller is a Windows Server 2000 or above computer runnin...

Страница 235: ...ngs page 236 Configuring Microsoft Networking page 237 Configuring Date and Time To configure NAS to use an NTP server STEP 1 Start the web based configuration utility of your NAS device To start the web based configuration utility open a web browser and enter the following in the URL field http IP Address 8080 Where IP Address is the IP address of your NAS device STEP 2 Choose Administration Gene...

Страница 236: ...ou cannot join the domain To avoid this possibility we recommend you use the domain controller as the NTP server STEP 6 To save your settings click Apply Configuring DNS Settings To configure DNS settings for your NAS follow these steps STEP 1 From the web based configuration utility of your NAS click Administration Network TCP IP STEP 2 In the Primary DNS Server field enter the IP address of the ...

Страница 237: ...237 4 Configuring Microsoft Networking To configure your NAS to be an Active Directory domain member follow these steps STEP 1 From the web based configuration utility of your NAS device choose Network Services Microsoft Networking STEP 2 Click the AD Domain Member radio button STEP 3 Optional In the Server Description field enter a description of your NAS ...

Страница 238: ... At the command prompt enter the following nbtstat A IP_address_of_domain_controller The output of the command should be similar to the following C Users a_user nbtstat A 192 168 52 250 Local Area Connection 2 Local Area Connection Node IpAddress 192 168 52 39 Scope Id NetBIOS Remote Machine Name Table Name Type Status MY_DC 00 UNIQUE Registered NSS 00 GROUP Registered NSS 1C GROUP Registered MY_D...

Страница 239: ...se Properties c In the Properties window click Computer Name In the Properties window the Full computer name field displays the hostname For example if the full computer name is mydc example com the hostname of the domain controller is mydc You can also follow these steps to find the hostname of your domain controller a Choose Start Run enter CMD in the Run window and click OK b In the command win...

Страница 240: ...p down menu choose Domain Users c Verify that you see the list of all the Active Directory domain users d Choose Administration User Groups e From the drop down menu choose Domain Groups f Verify that you see the list of all the Active Directory domain user groups If your NAS successfully joined the Active Directory domain you can access the NSS shared folders from any computer in the domain To op...

Страница 241: ... NAS system hardware the steps to take to replace a hard disk what to do in the event of a power outage and how your system temperature is protected The following sections are included Restart or Shut Down the NAS Hardware System Reset Disk Failure or Malfunction Power Outage or Abnormal Shutdown System Software Abnormal Operation System Temperature Protection ...

Страница 242: ...start the NAS immediately click RESTART To shutdown the NAS immediately click SHUTDOWN You can also press the power button for 5 seconds to turn off the NAS The NAS beeps once and shuts down immediately Hardware System Reset There are two ways to reset the NAS system hardware basic and advanced NOTE Hardware system reset as described in this chapter is different from the Administration Restore to ...

Страница 243: ...ent the unintentional loss of NAS system settings be sure to read and understand the basic and advanced descriptions of the hardware system reset function before performing a system hardware reset NOTE To reset the system by the reset button the option Enable configuration reset switch in Administration Hardware must be activated ...

Страница 244: ... Basic System Reset 1 beep Advanced System Reset 2 beeps All NAS models Press the reset button for 3 seconds Press the reset button for 10 seconds Feature Function Setting after 3 Second Reset System administration password admin Administration Network TCP IP Obtain IP address settings automatically via DHCP Administration Network TCP IP Disable Jumbo Frame General Settings System Administration S...

Страница 245: ...advanced system reset STEP 1 Press and hold the reset button for 10 seconds you will hear two beeps at the third and the tenth seconds STEP 2 Wait for the NAS to reboot STEP 3 Adjust NAS system settings as necessary Disk Failure or Malfunction If one of your disks fail the status indicator on the NAS will blink red you can verify that a disk failure has occurred by viewing the system logs NOTE Whe...

Страница 246: ...ve and place it into the RAID array This operation may take several minutes or hours depending on the size of the disk and RAID array STEP 8 If you are using a non RAID disk configuration you may need to reformat and reconfigure the new disk You can change disk configuration from Disk Management Volume management NOTE You can view the System Logs to verify that the NAS has returned to normal opera...

Страница 247: ...on is lost configure the system again STEP 2 In the event of abnormal operation of the NAS contact customer service for technical support System Software Abnormal Operation If the system software does not operate properly the NAS automatically restarts to resume normal operation If you find that the system restarts continuously it may fail to resume normal operation In this case contact technical ...

Страница 248: ...battery so for product safety and data integrity reasons such battery should only be removed or replaced professionally by a repair technician or waste management professional Please contact Cisco or an authorized service agent if the product fails to perform due to malfunction of the permanently affixed battery CAUTION There is the danger of explosion if the battery is replaced incorrectly ...

Страница 249: ...red Jumbo Frame setting or an incompatible switch reset the network settings by pressing the reset button on the back panel of the NAS for 3 seconds Before You Begin the Troubleshooting Process CAUTION Before troubleshooting the RAID configuration of your NAS back up the important data on the NAS to avoid any potential data loss CAUTION Insert or remove only one drive from the NAS at a time CAUTIO...

Страница 250: ...Administration System Logs window and search for error messages similar to the following sample message Error occurred while accessing Drive 2 Drive 2 has been removed This message indicates that the hard drive in slot 2 has failed STEP 3 Replace the failed drives with new drives After inserting the new hard drives the RAID rebuilding should start STEP 4 If the rebuilding succeeds the NAS will ret...

Страница 251: ... 251 6 Execute RAID 1 migration a Format one of the new drives as a single drive b Back up the data on the NAS to the new drive using Web File Manager c Unplug the drive with errors and insert a new drive in its place d Execute a RAID 1 migration STEP 7 If the RAID configuration is RAID 5 or 6 back up the data and run system installation and configuration again ...

Страница 252: ...rmation Using the LCD Display System Messages System Configuration Using the LCD Display When the NAS is configured and the device is powering up you can view the NAS name and IP address For example For the initial or first time installation the LCD display shows the number of hard drives detected and the IP address N A S B E 4 5 E 2 1 2 7 2 1 0 1 3 9 1 5 2 Number of Disks Detected Default Disk Co...

Страница 253: ... the disks using the LCD display STEP 1 At the prompt Config Disks in the LCD display press Select to choose the disk configuration For example when you power on the NAS with five disks installed the LCD display shows Number Item Description 1 Enter Displays options for configuration or status such as bootup progress disk configuration and volume After configuration you can view the hostname and I...

Страница 254: ...that data is not lost as long as one disk survives Total capacity of the array equals the capacity of the smaller disk RAID 5 Combines three or more disks in a way that protects data against loss of any single disk RAID 6 Combines four or more disks in a way that protects data against loss of any two disks STEP 2 After choosing the disk configuration press Enter The LCD display shows the configura...

Страница 255: ... Management Encrypted File System from the Navigation menu See Encrypted File System page 117 STEP 4 Press Enter to continue The system configuration progress is displayed When the configuration is complete you will receive an IP address and default NAS device name that is shown in the LCD display STEP 5 Start a web browser You can access the management GUI from a web browser using either the NAS ...

Страница 256: ...ton to move forward through the options From the Main Menu you can view system information shut down or reboot the NAS or modify the password for the LCD display The Main Menu displays the following items TCP IP Physical Disk Volume System Shut Down Reboot Password Back TCP IP From the TCP IP menu press the Select button to move forward through the options In TCP IP you can view the following opti...

Страница 257: ... is configured shows static IP address subnet mask gateway and DNS of LAN 1 and LAN 2 Network Settings BACK Move back in the menu options Back to Main Menu Return to the Main Menu Physical Disk In Physical disk you can view the following options Disk Info Back to Main Menu To view the physical disk STEP 1 From the Main Menu press the Select button until the Physical disk option is displayed STEP 2...

Страница 258: ...nd storage capacity The second line shows the member drive number of the configuration STEP 3 If there is more than one volume press the Select button to view the information STEP 4 When Back to Main Menu is displayed press the Enter button to return to the Main Menu The following table shows the description of the LCD messages for RAID 5 configuration R A I D 5 7 5 0 G B D r i v e 1 2 3 4 LCD Dis...

Страница 259: ...tem temperatures are displayed STEP 3 Press the Select button to view the rotation speed of the system fan The NSS326 displays FAN1 and FAN2 STEP 4 Press the Select button When Back to Main Menu is displayed press the Enter button to return to the Main Menu Shut Down Use the Shut down option to power off the NAS To power off the NAS STEP 1 From the Main Menu press the Select button until the Shut ...

Страница 260: ...default password of the LCD display is blank Enter the Password option to change the password of the LCD display NOTE The LCD password is not the same as the admin account password To change the password of the LCD display STEP 1 From the Main Menu press the Select button until the Password option is displayed The following is shown STEP 2 Select Yes to continue STEP 3 Enter a password with a maxi...

Страница 261: ...t message S y s t e m E r r o r P l s C h e c k L o g s System Message Description Sys Fan Failed System fan failed Sys Overheat System is overheated HDD Overheat Disk overheated CPU Overheat CPU is overheated Network Lost Both LAN 1 and LAN 2 are disconnected in Failover or Load Balancing mode LAN1 Lost LAN 1 is disconnected LAN2 Lost LAN 2 is disconnected HDD Failure Disk has failed HDD Ejected ...

Страница 262: ...80 x 235 mm 6 89 x 10 12 x 9 25 in 175 x 257 x 235 mm Net Weight 3 84 lbs 1 74 kg 8 04 lbs 3 65 kg 11 46 lbs 5 2 kg Gross Weight 11 02 lbs 5 kg 18 43 lbs 8 36 kg 22 35 lbs 10 14 kg Hardware Specifications Network 2 Gigabit LAN ports 2 Gigabit LAN ports 2 Gigabit LAN ports eSATA 2 back 2 back 2 back Memory 1GB DDRII RAM 1GB DDRII RAM 1GB DDRII RAM Flash 512 MB 512 MB 512 MB USB 2 0 x 5 1 front 4 ba...

Страница 263: ...4 to 158 F 20 to 70 C 4 to 158 F 20 to 70 C 4 to 158 F 20 to 70 C Operating Humidity 0 to 80 percent relative humidity 0 to 80 percent relative humidity 0 to 80 percent relative humidity Storage Humidity 0 to 95 percent relative humidity 0 to 95 percent relative humidity 0 to 95 percent relative humidity Operating Altitude from mean sea level 52 ft to 10 000 ft 16 m to 3 048 m 52 ft to 10 000 ft 1...

Страница 264: ..._small_business _support_center_contacts html Software Downloads Login Required Go to tools cisco com support downloads and enter the model number in the Software Search box Mozy Support by Email mozynassupport mozy com Mozy Support by Phone 866 789 6699 Mozy currency language support and support by country http cisco mozy com country_support Product Documentation NSS322 NSS324 and NSS326 Smart St...

Страница 265: ...eries Smart Storage Administration Guide 265 B Cisco Small Business Cisco Partner Central for Small Business Partner Login Required www cisco com web partners sell smb Cisco Small Business Home www cisco com smb Marketplace www cisco com go marketplace ...

Отзывы: