


Managing the System
Disk Management
Cisco Small Business NSS300 Series Smart Storage Administration Guide
122
3
-
Thin-Provisioning
—Select this option to allocate the disk space in a
flexible manner. You can allocate the disk space to the target anytime
regardless of the current storage capacity available on the NAS. Over-
allocation is allowed since the storage capacity of the NAS can be
expanded by online RAID capacity expansion (available in RAID 1, 5, 6).
-
Instant Allocation
—Select this option to allocate the disk space to the
LUN instantly. This option guarantees the disk space assigned to the LUN
but may take more time to create the LUN.
•
LUN Name
—Enter the LUN name.
•
LUN Location
—From the drop-down list, select the LUN location, which is
the disk volume on the NAS.
•
Capacity
—Enter the capacity for the LUN. Move the slider to increase or
decrease the capacity.
STEP 14
Click
Next
to confirm the settings.
STEP 15
From the
Confirm Settings
window, click
Next
to continue.
STEP 16
When the target and the LUN have been created successfully you will see a
message on the
iSCSI Quick Configuration
Wizard
window. Click
Finish
.
You can view the target and LUN from the Target Management tab.
STEP 17
Run the iSCSI initiator (Windows PC, Mac, or Linux) and connect to the iSCSI
target (NAS).
After successful logon, format the iSCSI target (disk volume). You can start to use
the disk volume on the NAS as a virtual drive on your computer.
NOTE
The NAS supports a maximum of eight iSCSI devices.
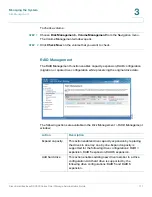
Creating Additional LUNs for an iSCSI Target
From the
Disk Management > iSCSI
> Target Management
window, you can
create multiple LUNs for an iSCSI target. The LUNs created can be mapped to and
unmapped from the iSCSI target anytime. You can also unmap the LUN from a
target and map it to another target.


