background image

Chapter 3

Advanced Configuration

26

Wireless-N Home Router

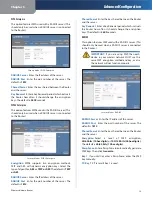
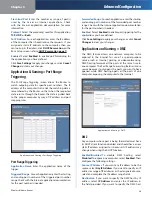
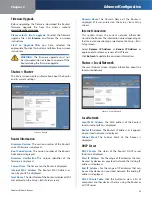
Firmware Upgrade

Before  upgrading  the  firmware,  download  the  Router’s 
firmware  upgrade  file  from  the  Linksys  website,  

www.linksysbycisco.com

.

Please  select  a  file  to  upgrade 

To  select  the  firmware 

upgrade  file,  click 

Browse

  and  follow  the  on-screen 

instructions.

Start  to  Upgrade 

After  you  have  selected  the 

appropriate file, click this button, and follow the on-screen 
instructions.


WARNING:

  The  firmware  upgrade  must  not 

be interrupted; do not reboot or power off the 
Router during the firmware upgrade.

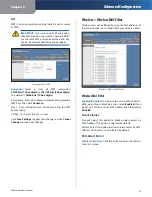
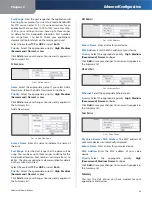
Status > Router

The 

Router

 screen displays information about the Router 

and its current settings.

Status > Router

Router Information

Firmware  Version 

The  version  number  of  the  Router’s 

current firmware is displayed.

Boot Code Version 

The version number of the Router’s 

boot code is displayed.

Firmware  Verification 

The  unique  identifier  of  the 

firmware is displayed.

Current Time 

The time set on the Router is displayed.

Internet  MAC  Address 

The  Router’s  MAC  Address,  as 

seen by your ISP, is displayed.

Host Name 

The Host Name of the Router is displayed (if it 

was entered on the 

Setup > Basic Setup

 screen).

Domain  Name 

The  Domain  Name  of  the  Router  is 

displayed  (if  it  was  entered  on  the 

Setup  >  Basic  Setup


screen).

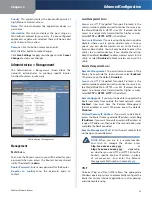
Internet Connection

This  section  shows  the  current  network  information 
stored in the Router. The information varies depending on 
the Internet connection type selected on the 

Setup > Basic 

Setup

 screen.

Select 

Release  IP  Address

  or 

Renew  IP  Address

  as 

appropriate to release or renew a DHCP lease.

Click 

Refresh

 to update the on-screen information.

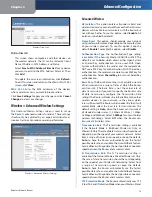
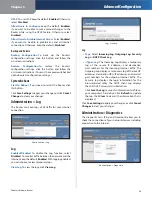
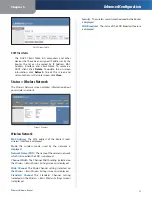
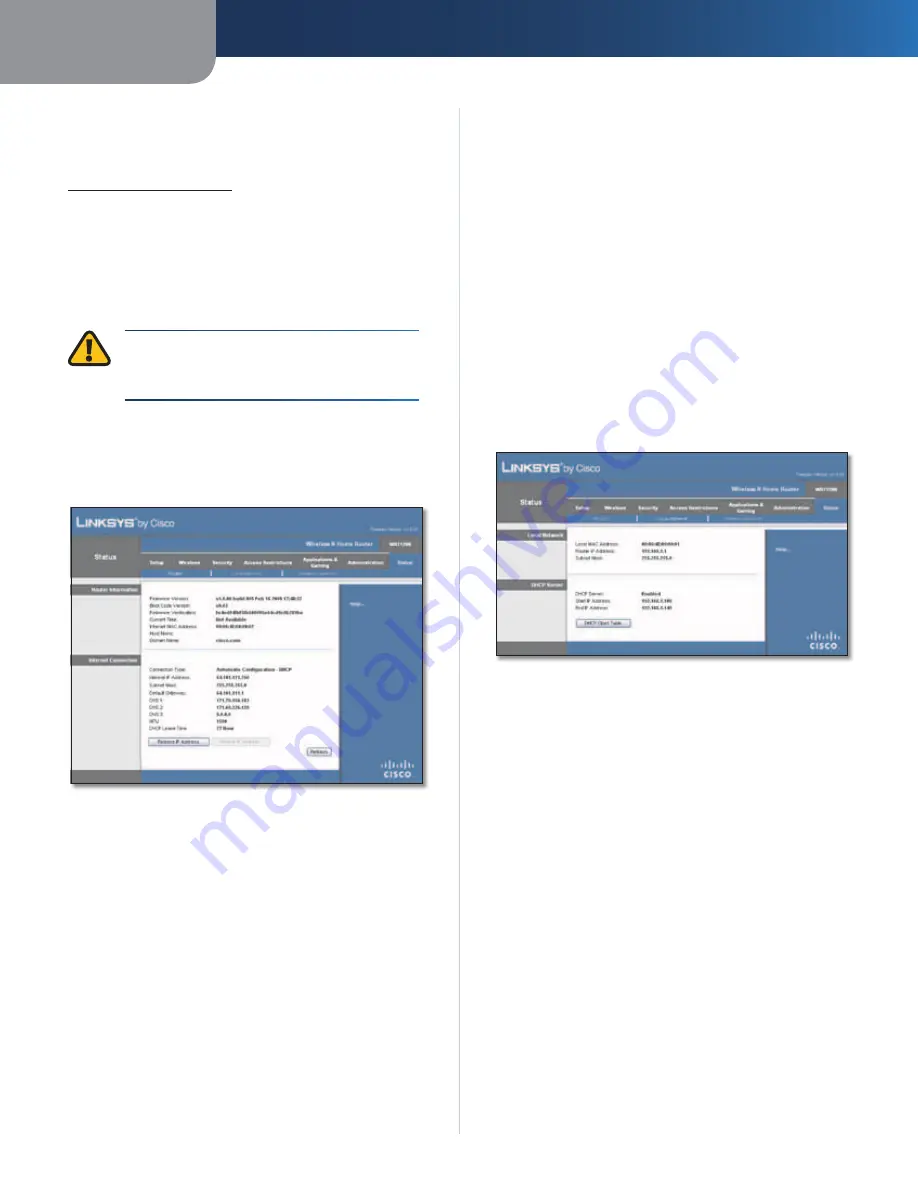
Status > Local Network

The 

Local Network

 screen displays information about the 

local, wired network.

Status > Local Network

Local Network

Local  MAC  Address 

The  MAC  address  of  the  Router’s 

local, wired interface is displayed.

Router IP Address 

The Router’s IP address, as it appears 

on your local network, is displayed.

Subnet  Mask 

The  Subnet  Mask  of  the  Router  is 

displayed.

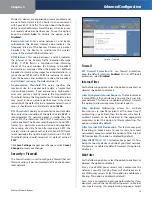
DHCP Server

DHCP  Server 

The  status  of  the  Router’s  DHCP  server 

function is displayed.

Start IP Address 

For the range of IP addresses that can 

be used by devices on your local network, the starting IP 
address is displayed.

End  IP  Address 

For  the  range  of  IP  addresses  that  can 

be used by devices on your local network, the ending IP 
address is displayed.

DHCP  Clients  Table 

Click  this  button  to  view  a  list  of 

computers or other devices that are using the Router as 
a DHCP server.

Содержание Linksys WRT120N

Страница 1: ...USER GUIDE Wireless N Home Router Model WRT120N ...

Страница 2: ...l address Online Resources Website addresses in this document are listed without http in front of the address because most current web browsers do not require it If you use an older web browser you may have to add http in front of the web address Resource Website Linksys www linksysbycisco com Linksys International www linksysbycisco com international Glossary www linksysbycisco com glossary Netwo...

Страница 3: ...eless Settings 15 Security Firewall 16 Security VPN Passthrough 17 Access Restrictions Internet Access 17 Applications and Gaming Single Port Forwarding 19 Applications and Gaming Port Range Forwarding 19 Applications Gaming Port Range Triggering 20 Applications and Gaming DMZ 20 Applications and Gaming QoS 21 Administration Management 23 Administration Log 24 Administration Diagnostics 24 Adminis...

Страница 4: ...ndustry Canada Statement 32 Avis d Industrie Canada 33 Wireless Disclaimer 33 Avis de non responsabilité concernant les appareils sans fil 33 User Information for Consumer Products Covered by EU Directive 2002 96 EC on Waste Electric and Electronic Equipment WEEE 34 Appendix E Software End User License Agreement 38 Cisco Products 38 Software Licenses 38 ...

Страница 5: ...e Wi Fi Protected Setup process Make sure the client device supports Wi Fi Protected Setup WaituntiltheLEDisoff andthentryagain The LED flashes when a Wi Fi Protected Setup session is active The Router supports one session at a time Wait until the LED is solidly lit or off before starting the next Wi Fi Protected Setup session Wireless Blue The Wireless LED lights up when the wireless feature is e...

Страница 6: ...ermine where you want to mount the Router Make sure that the wall you use is smooth flat dry and sturdy Also make sure the location is within reach of an electrical outlet 2 Drill two holes into the wall Make sure the holes are 152 mm 6 inches apart 3 Insert a screw into each hole and leave 3 mm 0 12 inches of its head exposed 4 Maneuver the Router so the wall mount slots line up with the two scre...

Страница 7: ...MAC address filtering Linksys routers give you the ability to enable Media Access Control MAC address filtering The MAC address is a unique series of numbers and letters assigned to every networking device With MAC address filtering enabled wireless network access is provided solely for wireless devices with specific MAC addresses For example you can specify the MAC address of each computer in you...

Страница 8: ...outer s default IP address 192 168 1 1 in the Address field Then press Enter A login screen will appear Non Windows XP users will see a similar screen Leave the User name field blank The first time you open the browser based utility use the default password admin You can set a new password from the Administration Management screen Click OK to continue Login Screen Setup Basic Setup The first scree...

Страница 9: ...he Router to cut the Internet connection after it has been inactive for a specified period of time Max Idle Time If your Internet connection has been terminated due to inactivity Connect on Demand enables the Router to automatically re establish your connection as soon as you attempt to access the Internet again To use this option select Connect on Demand In the Max Idle Time field enter the numbe...

Страница 10: ...nection as soon as you attempt to access the Internet again To use this option select Connect on Demand In the Max Idle Time field enter the number of minutes you want to have elapsed before your Internet connection terminates The default Max Idle Time is 5 minutes Keep Alive Redial Period If you select this option the Router will periodically check your Internet connection If you are disconnected...

Страница 11: ... Router s DHCP server option make sure there is no other DHCP server on your network DHCP Server Setting DHCP Server DHCP is enabled by factory default If you already have a DHCP server on your network or you do not want a DHCP server then select Disabled no other DHCP features will be available DHCP Reservation Click this button if you want to assign a fixed local IP address to a MAC address DHCP...

Страница 12: ... website FTP server or other server behind the Router Before you can use this feature you need to sign up for DDNS service with a DDNS service provider www dyndns org or www TZO com If you do not want to use this feature keep the default Disabled DDNS DDNS Service If your DDNS service is provided by DynDNS org then select DynDNS org from the drop down menu If your DDNS service is provided by TZO t...

Страница 13: ...ck Save Settings to apply your changes or click Cancel Changes to clear your changes Setup Advanced Routing This screen is used to set up the Router s advanced functions Operating Mode allows you to select the type s of advanced functions you use Dynamic Routing automatically adjusts how packets travel on your network Static Routing sets up a fixed route to another network destination Setup Advanc...

Страница 14: ...upport Wi Fi Protected Setup then you can use Wi Fi Protected Setup Configuration View To manually configure your wireless network select Manual Proceed to Basic Wireless Settings Manual page 10 To use Wi Fi Protected Setup select Wi Fi Protected Setup Proceed to Wi Fi Protected Setup page 11 BasicWireless Settings Manual Wireless Basic Wireless Settings Manual Setup Network Mode From this drop do...

Страница 15: ...isabled Click Save Settings to apply your changes or click Cancel Changes to clear your changes Wi Fi Protected Setup There are three methods available Use the method that applies to the client device you are configuring Wireless Basic Wireless Settings Wi Fi Protected Setup Wi Fi Protected Setup Configured NOTE Wi Fi Protected Setup configures one client device at a time Repeat the instructions f...

Страница 16: ... stands for Wired Equivalent Privacy while RADIUS stands for Remote Authentication Dial In User Service These six are briefly discussed here For detailed instructions on configuring wireless security for the Router refer to Chapter 2 Wireless Security Checklist page 3 Wireless Security Security Mode Select the security method for your wireless network If you do not want to use wireless security ke...

Страница 17: ...dress of the server RADIUS Port Enter the port number of the server The default is 1812 Shared Secret Enter the key shared between the Router and the server Key Renewal Enter a Key Renewal period which instructs the Router how often it should change the encryption keys The default is 3600 seconds RADIUS This option features WEP used with a RADIUS server This should only be used when a RADIUS serve...

Страница 18: ...smit Key 1 is used Click Save Settings to apply your changes or click Cancel Changes to clear your changes Wireless Wireless MAC Filter Wireless access can be filtered by using the MAC addresses of the wireless devices transmitting within your network s radius Wireless Wireless MAC Filter Wireless MAC Filter Enabled Disabled To filter wireless users by MAC Address either permitting or blocking acc...

Страница 19: ...d Key authentication the sender and recipient use aWEP key for authentication Select Shared Key to only use Shared Key authentication Basic Rate The Basic Rate setting is not actually one rate of transmission but a series of rates at which the Router can transmit The Basic Rate is not the actual rate of data transmission If you want to specify the Router s rate of data transmission configure the T...

Страница 20: ...fter receiving an RTS the wireless station responds with a Clear to Send CTS frame to acknowledge the right to begin transmission The RTS Threshold value should remain at its default value of 2347 Click Save Settings to apply your changes or click Cancel Changes to clear your changes Security Firewall The Firewall screen is used to configure a firewall that can filter out various types of unwanted...

Страница 21: ...rotocol PPTP allows the Point to Point Protocol PPP to be tunneled through an IP network To allow PPTP tunnels to pass through the Router keep the default Enabled L2TP Passthrough Layer 2 Tunneling Protocol is the method used to enable Point to Point sessions via the Internet on the Layer 2 level To allow L2TP tunnels to pass through the Router keep the default Enabled Click Save Settings to apply...

Страница 22: ...een 6 Decide which days and what times you want this policy to be enforced Select the individual days during which the policy will be in effect or select Everyday Then enter a range of hours and minutes during which the policy will be in effect or select 24 Hours 7 You can block websites with specific URL addresses Enter each URL in a separate Website Blocking by URL Address field 8 You can also b...

Страница 23: ...lication documentation for more information Protocol Select the protocol s used for this application TCP UDP or Both To IP Address For each application enter the IP address of the computer that should receive the requests If you assigned a static IP address to the computer then you can look up its IP address click DHCP Reservation on the Basic Setup screen refer to DHCP Reservation page 7 Enabled ...

Страница 24: ...documentation for the port number s needed ForwardedRange Foreachapplication enterthestarting and ending port numbers of the forwarded port number range Check with the Internet application documentation for the port number s needed Enabled Select Enabled to enable port triggering for the applications you have defined Click Save Settings to apply your changes or click Cancel Changes to clear your c...

Страница 25: ...odisabletheRouter s Acknowledgement feature so the Router will not re send data if an error occurs then select Enabled Otherwise keep the default Disabled Internet Access Priority In this section you can set the bandwidth priority for a variety of applications and devices There are four levels priority High Medium Normal or Low When you set priority donotsetallapplicationstoHigh becausethiswill de...

Страница 26: ...ave up to three ranges to define for this bandwidth allocation Port numbers can range from 1 to 65535 Check your application s documentation for details on the service ports used Select the protocol TCP or UDP or select Both Priority Select the appropriate priority High Medium Recommend Normal or Low Click Add to save your changes Your new entry appears in the Summary list MAC Address QoS MAC Addr...

Страница 27: ...ty You will only be able to access the utility via a wired connection if you disable the setting Keep the default Enabled to allow wireless access to the utility or select Disabled to block wireless access to the utility Remote Management Access Remote Management To permit remote access of the Router from outside the local network select Enabled Otherwise keep the default Disabled Access via HTTP ...

Страница 28: ...Administration Log Log Enabled Disabled To disable the Log function select Disabled To monitor traffic between the network and the Internet keep the default Enabled With logging enabled you can choose to view temporary logs View Log To view the logs click View Log Log View Log Log Type Select Incoming Log Outgoing Log Security Log or DHCP Client Log Type Log The Incoming Log displays a temporary l...

Страница 29: ...route Administration Factory Defaults Restore the Router to its factory default settings Administration Factory Defaults NOTE Donotrestorethefactorydefaultsunless you are having difficulties with the Router and have exhausted all other troubleshooting measures OncetheRouterisreset youwillhave to re enter all of your configuration settings Factory Defaults Restore All Settings To reset the Router s...

Страница 30: ...on the Setup Basic Setup screen Domain Name The Domain Name of the Router is displayed if it was entered on the Setup Basic Setup screen Internet Connection This section shows the current network information stored in the Router The information varies depending on the Internet connection type selected on the Setup Basic Setup screen Select Release IP Address or Renew IP Address as appropriate to r...

Страница 31: ...twork Status Wireless Wireless Network MAC Address The MAC address of the Router s local wireless interface is displayed Mode The wireless mode used by the network is displayed NetworkName SSID The name of the wireless network which is also called the SSID is displayed Channel Width The Channel Width setting selected on the Wireless Basic Wireless Settings screen is displayed Wide Channel The Wide...

Страница 32: ...insert the setup CD into your computer Click Setup and follow the on screen instructions When you double click the web browser you are prompted for a username and password If you want to get rid of the prompt follow these instructions Launch the web browser and perform the following steps these steps are specific to Internet Explorer but are similar for other browsers 1 Select Tools Internet Optio...

Страница 33: ...l 1 Mbps 90 dBm typical 11 Mbps 75 dBm typical 54 Mbps 66 dBm typical 270 Mbps Antenna Gain in dBi 2 0 max UPnP able cert Able Wireless Security Wi Fi Protected Access 2 WPA2 WEP Wireless MAC Filtering Security Key Bits Up to 128 Bit Encryption OS Requirements Windows XP Vista or Vista 64 Bit Edition with Latest Updates for Network Magic and Setup Wizard Mac OS X 10 4 or higher for Setup Wizard En...

Страница 34: ... or software will be uninterrupted or error free Also due to the continual development of new techniques for intruding upon and attacking networks Linksys does not warrant that the product software or any equipment system or network on which the product or software is used will be free of vulnerability to intrusion or attack The product may include or be bundled with third party software or servic...

Страница 35: ...ctive product covered by this limited warranty will be repaired or replaced and returned to you without charge Customers outside of the United States of America and Canada are responsible for all shipping and handling charges custom duties VAT and other associated taxes and charges Repairs or replacements not covered under this limited warranty will be subject to charge at Linksys then current rat...

Отзывы: