background image

26

Setting Up: Advanced

Linksys E-Series

How to manually set up your router

For 

ALL

Although running Cisco Connect is the easiest way to set up and maintain your 

router, advanced users may want to manually configure their router . Be careful 

when changing settings using this method .

To manually set up your router:
1. 

If you have started the Cisco Connect setup, exit Cisco Connect .

2. 

Connect your router’s power adapter to a power outlet .

3. 

Connect an Ethernet cable to the computer and to an available numbered 

Ethernet

 (blue) port on the back of your router .

4. 

Open a web browser on the computer and open the address 

192.168.1.1

 . 

A login window appears . If your router is version 2 (look for 

V2

 on router’s 

bottom label), you can go to 

myrouter.local 

instead .

5. 

Enter the default password (

admin

) . If your router is the E4200 V2 (check 

the version number on the bottom of your router), you must enter 

admin


as the user name . Otherwise, you can leave the user name blank .
The browser-based utility opens to the main menu .

6. 

After you finish changing settings, click 

Save Settings

 at the bottom of 

the screen .

7. 

To exit the browser-based utility, close the web browser window .

TIP

For field descriptions, click 

Help

 in the right side of the screen .

How to manually set up your Internet connection

In most cases, Cisco Connect automatically sets up your Internet connection 

(see “How to start Cisco Connect” on page 14) . For some 

ISPs

 (Internet Service 

Providers),  especially  those  outside  of  the  United  States,  you  may  need  to 

manually configure your router’s Internet connection . Your router supports six 

types of Internet connections .

Basic Internet connection settings

To manually configure your router’s Internet connection:

Setup > Basic Setup

1. 

Log into the browser-based utility (see “How to open the browser-based 

utility” on page 25) . 

2. 

Click the 

Setup 

tab, then click the 

Basic Setup 

page .

3. 

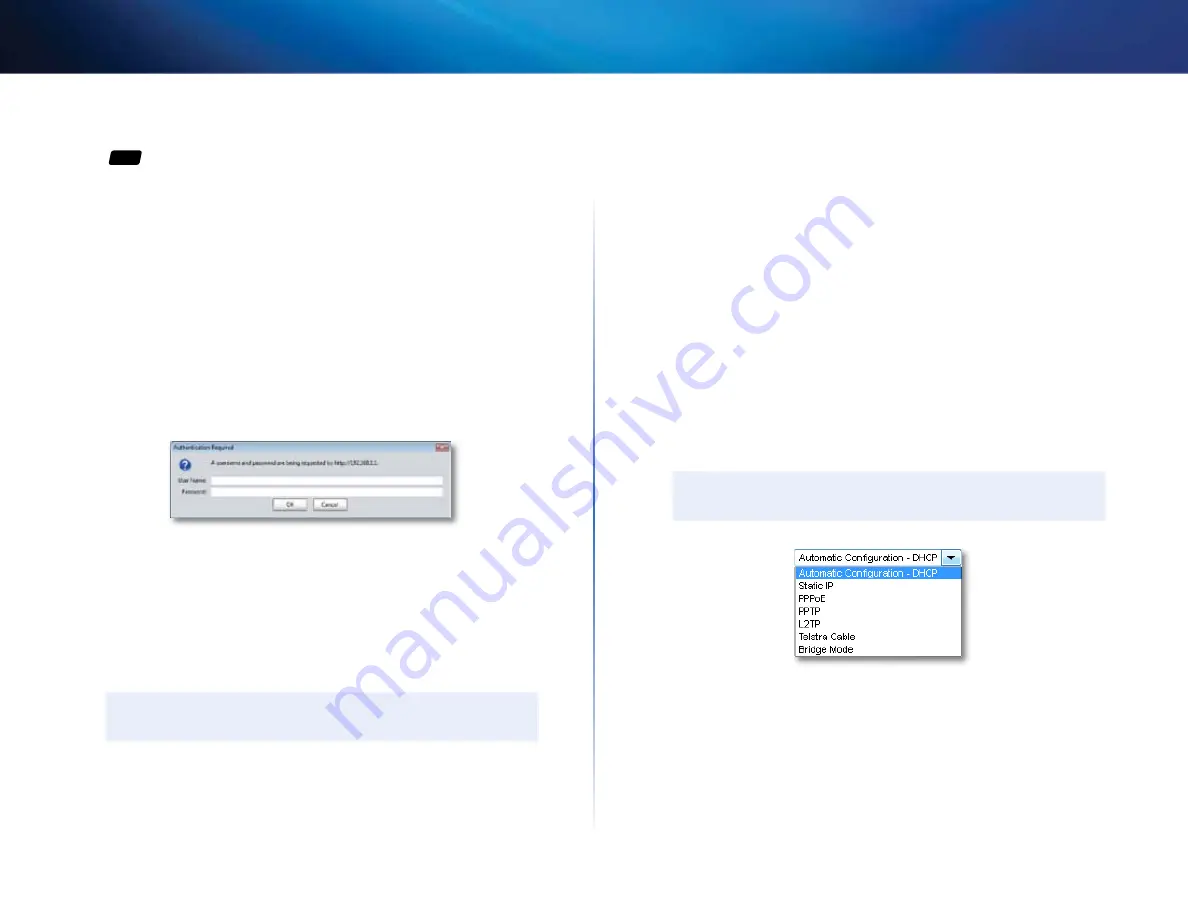
In  the 

Internet  Connection  Type

  drop-down  list,  click  the  type  of 

Internet connection provided by your ISP . (Telstra Cable not available on 

the E4200 .)

TIP

For field descriptions, click 

Help

 on the right side of the screen .


Complete the fields required by your ISP .


Complete the 

Optional Settings

 only if required by your ISP .

4. 

Click 

Save Settings

 at the bottom of the page .

Содержание Linksys E1200

Страница 1: ...User Guide Linksys E Series Routers ...

Страница 2: ...E1200 E900 E1500 E2500 E3200 E4200 Linksys E Series ...

Страница 3: ...password 24 Setting Up Advanced How to open the browser based utility 25 How to manually set up your router 26 How to manually set up your Internet connection 26 How to set up the DHCP server on your router 29 How to set up DHCP reservation 30 How to find your network on the Internet 30 How to clone a MAC address 31 How to connect to your corporate office using a VPN 32 How to optimize your router...

Страница 4: ... the built in firewall 46 Port Forwarding and Port Triggering How to set up port forwarding 57 How to set up port forwarding for a single port 57 How to set up port forwarding for multiple ports 58 How to set up port forwarding for a range of ports 58 How to set up port range triggering for online gaming 59 How to configure your Xbox for online gaming 60 Maintaining and Monitoring How to back up a...

Страница 5: ...name and password 24 Setting Up Advanced How to open the browser based utility 25 How to manually set up your router 26 How to manually set up your Internet connection 26 How to set up the DHCP server on your router 29 How to set up DHCP reservation 30 How to find your network on the Internet 30 How to clone a MAC address 31 How to connect to your corporate office using a VPN 32 How to optimize yo...

Страница 6: ...t in firewall 46 Port Forwarding and Port Triggering How to set up port forwarding 57 How to set up port forwarding for a single port 57 How to set up port forwarding for multiple ports 58 How to set up port forwarding for a range of ports 58 How to set up port range triggering for online gaming 59 How to configure your Xbox for online gaming 60 Maintaining and Monitoring How to back up and restor...

Страница 7: ...w to find your network on the Internet 30 How to clone a MAC address 31 How to connect to your corporate office using a VPN 32 How to optimize your router for gaming and voice 32 How to remotely change your router settings 34 How to enable Voice over IP on your network 35 How to configure UPnP 35 How to use a router as an access point 36 How to put your new router behind an existing router 37 To a...

Страница 8: ...nge triggering for online gaming 59 How to configure your Xbox for online gaming 60 Maintaining and Monitoring How to back up and restore your router configuration 61 How to restore factory defaults 61 How to upgrade the router s firmware 62 How to check the status of your router 64 How to disable the Ethernet port status lights 65 How to test your Internet connection 66 How to configure and use l...

Страница 9: ...How to find your network on the Internet 30 How to clone a MAC address 31 How to connect to your corporate office using a VPN 32 How to optimize your router for gaming and voice 32 How to remotely change your router settings 34 How to enable Voice over IP on your network 35 How to configure UPnP 35 How to use a router as an access point 36 How to put your new router behind an existing router 37 To...

Страница 10: ...set up port forwarding 57 How to set up port forwarding for a single port 57 How to set up port forwarding for multiple ports 58 How to set up port forwarding for a range of ports 58 How to set up port range triggering for online gaming 59 How to configure your Xbox for online gaming 60 Maintaining and Monitoring How to back up and restore your router configuration 61 How to restore factory defaul...

Страница 11: ...r network on the Internet 30 How to clone a MAC address 31 How to connect to your corporate office using a VPN 32 How to optimize your router for gaming and voice 32 How to remotely change your router settings 34 How to enable Voice over IP on your network 35 How to configure UPnP 35 How to use a router as an access point 36 How to put your new router behind an existing router 37 To add your route...

Страница 12: ...ver 56 Port Forwarding and Port Triggering How to set up port forwarding 57 How to set up port forwarding for a single port 57 How to set up port forwarding for multiple ports 58 How to set up port forwarding for a range of ports 58 How to set up port range triggering for online gaming 59 How to configure your Xbox for online gaming 60 Maintaining and Monitoring How to back up and restore your rou...

Страница 13: ...dvanced security Keep Wi Fi freeloaders and Internet threats at bay with WPA2 encryption and SPI firewall to help keep your network protected Benefits of Fast Ethernet Use the four Fast Ethernet 10 100 ports for quick file sharing between computers and servers Home network ready Connect computers printers and more to your wireless network and the Internet QoS traffic prioritization technology deli...

Страница 14: ...ccessful Wi Fi Protected Setup connection Flashes slowly during bootup during firmware upgrades and during a Wi Fi Protected Setup connection Flashes quickly when there is a Wi Fi Protected Setup error Power Connect the included AC power adapter to this port Caution Use only the adapter that came with your router Port activity indicator Green network activity indicator Network and Internet port Gr...

Страница 15: ...ep Wi Fi freeloaders and Internet threats at bay with WPA2 encryption and SPI firewall to help keep your network protected Benefits of Fast Ethernet Use the four Fast Ethernet 10 100 ports for quick file sharing between computers and servers Home network ready Connect computers printers and more to your wireless network and the Internet QoS traffic prioritization technology delivers maximum speed ...

Страница 16: ...ty on Wi Fi Protected Setup enabled network devices For more information see How to set up wireless security using Wi Fi Protected Setup on page 43 Power indicator Stays on steadily while power is connected and following a successful Wi Fi Protected Setup connection Flashes slowly during bootup during firmware upgrades and during a Wi Fi Protected Setup connection Flashes quickly when there is a W...

Страница 17: ...ory defaults on page 61 Determining your router s version To determine your router model s version either examine the back panel differences are shown on the preceding page or the system label on the bottom of the router If your router is version 2 a V2 appears on the label Serial No N de série MAC Address Adresse MAC FCC ID Q87 E1200V2 IC 3839A E1200V2 CANADA ICES NMB003 RSS210 Class Classe B Mod...

Страница 18: ...roughput for smoother and faster HD video streaming file transfers and wireless gaming Advanced security Keep Wi Fi freeloaders and Internet threats at bay with WPA2 encryption and SPI firewall to help keep your network protected Benefits of Fast Ethernet Use the four Fast Ethernet 10 100 ports for quick file sharing between computers and servers Network ready Connect computers printers scanners a...

Страница 19: ...ected and following a successful Wi Fi Protected Setup connection Flashes slowly during bootup during firmware upgrades and during a Wi Fi Protected Setup connection Flashes quickly when there is a Wi Fi Protected Setup error Power Connect the included AC power adapter to this port Caution Use only the adapter that came with your router Port activity indicator Green network activity indicator Netw...

Страница 20: ...I firewall to help keep your network protected Benefits of gigabit Use the four Gigabit Ethernet 10 100 1000 ports for quick file sharing up to 10 faster than standard Ethernet between other Gigabit enabled devices like computers and servers Built in USB port The USB port lets you add an external USB drive to your network and share files at home or over the Internet You can also connect a USB prin...

Страница 21: ...see How to set up wireless security using Wi Fi Protected Setup on page 43 Power indicator Stays on steadily while power is connected and following a Wi Fi Protected Setup connection Flashes slowly during bootup during firmware upgrades and during a Wi Fi Protected Setup connection Flashes quickly when there is a Wi Fi Protected Setup error Power Connect the included AC power adapter to this port ...

Страница 22: ... Fi freeloaders and Internet threats at bay with WPA2 encryption and SPI firewall to help keep your network protected Benefits of gigabit Use the four Gigabit Ethernet 10 100 1000 ports for quick file sharing up to 10 faster than standard Ethernet between other Gigabit enabled devices like computers and servers Built in USB port and UPnP media server The USB storage port lets you add an external U...

Страница 23: ...ded blue and to wired Ethernet network devices on your network Internet port Connect an Ethernet cable also called a network or Internet cable to this port color coded yellow and to your modem Wi Fi Protected Setup button Press this button to easily configure wireless security on Wi Fi Protected Setup enabled network devices For more information see How to set up wireless security using Wi Fi Prot...

Страница 24: ... activity indicator Network or Internet port Green network activity indicator On Ethernet ports turns on when a cable connects the port to another Gigabit Ethernet port On the Internet port turns on while connected to a modem Yellow network activity indicator Flashes to indicate network activity over that port ...

Страница 25: ...terswitheachotherandtothemodem Internet service to your home provided by an ISP Internet Service Provider 2 Make sure that your modem is working Your ISP can help you set up your modem and verify that it s working correctly 3 Set up your router See How to set up your router on page 13 4 To connect a computer or other network device to the network see How to connect a computer to your network on pa...

Страница 26: ... double click the Setup icon 3 Follow the on screen instructions to complete your router setup When setup has finished Cisco Connect has also been installed onto your hard drive After your router has been set up and Cisco Connect has been installed you can use Cisco Connect to easily manage many of your router s settings To start Cisco Connect on a Windows computer 1 Click Start All Programs then ...

Страница 27: ...ter in a location away from other electronics motors and fluorescent lighting Many environmental variables can affect the router s performance so if your wireless signal is weak place the router in several locations and test the signal strength to determine the ideal position If possible upgrade wireless network interfaces such as wireless network cards in computers from older wireless standards t...

Страница 28: ...rd security type and security key so you don t have to remember them To create an Easy Setup Key 1 Run Cisco Connect then click Add device under Computers and devices The Computers and other devices screen opens 2 Click Computer 3 Select No I don t have an Easy Setup Key then click Next 4 Insert a USB drive into an available USB port on your computer This USB drive will be your new Easy Setup Key ...

Страница 29: ...a computer without using an Easy Setup Key you will need to print or take note of some information Important When you manually connect a computer to the network the computer will not have Cisco Connect installed on it To manually connect a computer to your network 1 Run Cisco Connect then click Add device under Computers and devices The Computers and other devices screen opens 2 Click Computer 3 S...

Страница 30: ...rmation 3 Write down the Network name SSID Security Key and Security Type information or click Print these settings if you have a different printer already connected 4 Follow your printer s instructions for entering the wireless network information into your printer 5 After the printer connects to your network click Next in Cisco Connect 6 Return to the computer running Cisco Connect then click Ne...

Страница 31: ...mation 3 Write down the Network name SSID Security Key and Security Type information or click Print these settings if you have a printer attached 4 Follow your device s instructions for entering the wireless network information into the device 5 After the device connects to your network return to the computer running Cisco Connect then click Next 6 Enter a name for device then click Finish For mor...

Страница 32: ...areaskedtosetapassword To access parental controls for the first time 1 Run Cisco Connect then click Change under Parental controls The Parental controls password screen opens 2 Enter a password from 4 to 32 characters then enter a secret question and answer The password must contain from 4 to 32 valid characters which are A Z a z and 0 9 The answer to the secret question should be something not e...

Страница 33: ... over each computer on your home network You can set the controls on only those computers that children can access To select computers that will have parental controls 1 In the Parental controls main screen click add under the Restrict Internet access on box 2 Click the computer name then click OK The computer is added to the list of computers with parental controls 3 To remove parental controls f...

Страница 34: ...in screen 4 To save your changes click Finish 5 Repeat the above steps for each computer that you want to set parental controls for How to set up guest access to your network For E1200 E1500 E2500 E3200 E4200 You can use your router s guest access feature to provide your guests with access to the Internet while restricting their access to other resources on your local network The guest network is ...

Страница 35: ...our guests Tips To keep your guest network secure click Change to change the guest password when the guest no longer needs access to the account You can view the Guest account s name and password in Cisco Connect s main screen 4 In the Total guests allowed drop down box select the number of simultaneous guest network users you want to allow 5 Click Finish to apply your changes Tip The first time y...

Страница 36: ...browser based utility you may not be able to manage your router using Cisco Connect We recommend using the procedure below to change your router s login information To change your router s name and password 1 Run Cisco Connect then click Change under Router settings 2 Under Personalize click Change A Changing router name and password warning appears 3 Click Yes if you want to continue 4 Enter the ...

Страница 37: ... or Open a web browser on a computer connected to your network then go to 192 168 1 1 If your router is version 2 look for V2 on router s bottom label you can go to myrouter local instead The router prompts you for a user name and password 2 Enter the user name and password then click OK The utility s main menu opens Tips If you set up your router without using Cisco Connect your router s default ...

Страница 38: ...hanging settings click Save Settings at the bottom of the screen 7 To exit the browser based utility close the web browser window Tip For field descriptions click Help in the right side of the screen How to manually set up your Internet connection In most cases Cisco Connect automatically sets up your Internet connection see How to start Cisco Connect on page 14 For some ISPs Internet Service Prov...

Страница 39: ...ick Save Settings at the bottom of the page How to get the most out of your dual band router For E2500 E3200 E4200 I bought a dual band router but I m not sure that I m getting the most out of it What should I check Of the many reasons for owning a dual band router the most common is to ensure available bandwidth for streaming high definition video At the same time owners want to make sure that th...

Страница 40: ... click the BasicWireless Settings or Wireless Settings page 3 Click Manual This enables you to make changes to all of the fields below a Network Mode Your choice depends upon the clients that will connect to your network If all of your devices are Wireless N capable you can select Wireless N Only for either or both bands On the 5 GHz band you can select Mixed default which accepts connections from...

Страница 41: ... a Passphrase field appears and you must enter a passphrase Tip Wireless N networks should use the WP2 Personal security mode for best performance 4 To apply your changes click Save Settings at the bottom of the screen How to set up the DHCP server on your router For ALL Your router can be used as a DHCP Dynamic Host Configuration Protocol server to automatically assign an IP address to each compu...

Страница 42: ... a DHCP reservation 6 Click Save Settings Tip For field descriptions click Help on the right side of the screen How to find your network on the Internet For ALL Why would I need to find my network on the Internet If you want to remotely access a USB drive attached to your router or view a web camera you need to find your network on the Internet Working with several DDNS service providers your rout...

Страница 43: ...uter s MAC address is registered with your ISP and you do not want to re register the MAC address then you can clone the address assign the registered MAC address of your previous device to your new router If you want to use the MAC address from an old router that you are replacing with your new router you should first determine the MAC address of your old router then manually enter it into your n...

Страница 44: ...ugh field settings click Help in the right side of the screen More complete descriptions are provided below IPSec Passthrough IPSec Internet Protocol Security is a suite of protocols used to implement secure exchange of packets at the IP layer The VPN clients on the local network can establish an IPSec VPN tunnel through the router This option is enabled by default PPTP Passthrough PPTP Point to P...

Страница 45: ...ve the same priority and it would be easier to disable Internet Access Priority for the same result Applications and Online Games Let you assign a priority for an application or online game a Select the application or online game that you want to add from the drop down list then select the priority b Click Apply then click Save Settings Tip If you want to add a new application or game you need to ...

Страница 46: ... from anywhere on the Internet select Any IP Address default next to Allowed Remote IP Address Otherwise enter a range of allowed IP addresses 7 For Remote Management Port keep the setting of 8080 default unless you already have a device on your network that uses port 8080 such as a web camera 8 Click Save Settings at the bottom of the screen to accept your changes 9 Click the Administration tab t...

Страница 47: ...ther NAT traversal solutions such as STUN Session Traversal Utilities for NAT TURN Traversal Using Relay NAT or ICE Interactive Connectivity Establishment select Disabled default Note You may need to contact your VoIP service provider to determine the type of NAT traversal configuration they use How to configure UPnP For ALL What is UPnP UPnP Universal Plug and Play allows devices connected to a n...

Страница 48: ... to interference you can use your old router to extend the range of your wireless network This is a complex process so this procedure assumes that you have some networking knowledge Tip Check the documentation for your old router Some brands of routers include either a switch on the outside of the case or a software option to convert it to an access point If either of these options is available fo...

Страница 49: ...ur old router to match the passphrase on your new router e Change the wireless channel to a non conflicting channel Some manufacturers have an Auto function for channel selection that automatically selects a wireless channel that does not interfere with other nearby wireless networks If your old router supports an Auto function select that Otherwise you may need to manually select the wireless ope...

Страница 50: ...ars c Type ipconfig then press Enter Tip Although you can determine your computer s IP address in many ways this method is very fast d Take note of the IP address In this example the IP address is 192 168 100 192 To determine the address range by using a Mac computer a Connect your computer into your upstream network s router b From the Dock click System preferences click Network then click Ethern...

Страница 51: ...f content your employees or family access you can create an account with an Internet filtering site such as www opendns com or www bsecure com After you create an account with them use their DNS in place of your ISP s DNS To use their DNS Setup Basic Setup 1 Log into the browser based utility see How to open the browser based utility on page 25 2 Click the Setup tab then click the Basic Setup page...

Страница 52: ...et up a device in the DMZ Applications Gaming DMZ 1 Configure your device with a static IP address See your device s documentation for help with setting a static IP address or use DHCP reservation see How to set up the DHCP server on your router on page 29 2 Log into the browser based utility see How to open the browser based utility on page 25 3 Click the Applications Gaming tab then click the DM...

Страница 53: ... d Click Select next to the device that you want to place in the DMZ In this example the first device was selected The corresponding MAC address was copied into the MAC Address field as shown below e Click Save Settings to apply your changes ...

Страница 54: ...on Management 1 Log into the browser based utility see How to open the browser based utility on page 25 2 Click the Administration tab then click the Management page 3 In the Router Access section enter a secure password for your router then re enter the password to confirm it Your password should be at least eight characters in length The most secure type of password should include a mix of upper...

Страница 55: ... indicates the status of Wi Fi Protected Setup while you are connecting devices When Wi Fi Protected Setup is connecting a network device the light flashes slowly If there is an error the light flashes quickly for two minutes Wait until it stops flashing then try again When Wi Fi Protected Setup has finished connecting a device the light is continuously lit Wait until the light is continuously lit...

Страница 56: ...up PIN Use this method if your client device asks for the router s PIN To connect a device using the device s Wi Fi Protected Setup PIN Wireless Basic Wireless Settings 1 Log into the browser based utility see How to open the browser based utility on page 25 2 Click the Wireless tab then if your router is not an E4200 click the Basic Wireless Settings page 3 Click Wi Fi Protected Setup 4 On the cl...

Страница 57: ...g MAC filtering you can allow only known MAC addresses onto your network You can also exclude specific MAC addresses or deny them access to your wireless network Example Because each MAC filtering configuration is unique the following procedure uses the simplified example of setting up MAC filtering to allow one wireless device access to the network To set up MAC filtering to allow one wireless de...

Страница 58: ...l network from Internet threats This option is enabled by default On some router models this setting is separated into IPv6 and IPv4 options so that each can be handled separately Caution To help protect your network you should keep this option enabled Filter Anonymous Internet Requests This filter blocks Internet requests from unknown sources such as ping requests This option is enabled by defaul...

Страница 59: ...our network via the Internet the router will allow those requests to the appropriate computers Note To use your router s IPv6 Internet connectino settings IPv6 service from your ISP Internet service provider is required For more information on this service ask your ISP To set IPv6 firewall settings Applications Gaming IPv6 Firewall 1 Log into the browser based utility see How to open the browser b...

Страница 60: ... see How to share folders and set access rights on page 53 How to create shared folders To create a shared folder Storage Disk 1 Log into the browser based utility see How to open the browser based utility on page 25 2 Click the Storage tab then click the Disk page 3 Click Create Share next to the partition you want to share The Shared Folder screen opens 4 If you want to share the entire partitio...

Страница 61: ...word is needed for read and write access to the drive Before you can manage group and user access to shared folders you must disable anonymous disk access To disable anonymous disk access Storage Administration 1 Log into the browser based utility see How to open the browser based utility on page 25 2 Click the Storage tab then click the Administration page 3 Next to Anonymous Disk Access select D...

Страница 62: ...n and Guest are preconfigured for router access The password for the Admin user is the same password that you use to access the router By default the user Admin is a member of the group named Admin and the user Guest is a member of the group named Guest To keep it simple consider creating user accounts on your router that use the same user names and passwords that are used by your computer s opera...

Страница 63: ... browser based utility on page 25 2 Make sure that Anonymous Disk Access has been disabled See How to disable anonymous disk access on page 49 3 Click the Storage tab then click the Disk page 4 In the Shared Folder section click Edit next to the shared folder you want to change group access for 5 To grant a group access the shared folder click the group s name in the Available Groups column then c...

Страница 64: ...igure the FTP server To configure the FTP server Storage FTP Server 1 Log into the browser based utility see How to open the browser based utility on page 25 2 Click the Storage tab then click the FTP Server page 3 Next to FTP Server click Enabled Tip If you used Cisco Connect to set up your router the FTP Server Name field is already completed with the name of your wireless network If you set up ...

Страница 65: ...o share To navigate to a previous folder click Return to Upper Folder To view and select folders within a folder click Enter into Folder next to the folder name 4 To create a folder enter a unique folder name into the New Folder box then click Create 5 To change group access select a group in the Available Groups or Groups with Access column then click or to move the group to the other column 6 To...

Страница 66: ...tion on using the FTP client software see its documentation or help OR Type the router s IP address into a web browser s Internet address field press Enter then enter your user name and password FTP software and web browsers display FTP content in many ways but you can usually use these common actions to navigate through FTP folders Click a folder name to open it Click a double period or Up to a h...

Страница 67: ... navigate to a previous folder click Return to Upper Folder To view and select folders within a folder click Enter into Folder next to the folder name 8 To create a folder enter a unique folder name into the New Folder box then click Create 9 To save your selections and create the media folder click Save Settings A summary of shared folders is displayed 10 To delete an individual media folder clic...

Страница 68: ...o connect an UPnP device to your router s media server 1 Connect your UPnP device to your home network with wired Ethernet cable or wireless networking If you are connecting wirelessly you need to know your network s name and password See your device s documentation for help 2 On your UPnP device change the media source to the media server name you specified on your router See How to set up your r...

Страница 69: ...erver To set up single port forwarding Applications Gaming Single Port Forwarding 1 Follow your device s instructions for configuring it with a static IP address or use DHCP reservation to assign it a permanent address see How to set up the DHCP server on your router on page 29 2 Log into the browser based utility see How to open the browser based utility on page 25 3 Click the Applications Gaming...

Страница 70: ... Port Forwarding page 5 For each entry enter a descriptive name in the Application Name field 6 For each entry enter in the same port number for the External Port and the Internal Port 7 In the To IP Address field enter the last three digits of the IP address you have reserved for the computer you want to forward Internet traffic to The rest of the IP address has already been completed for you 8 S...

Страница 71: ...orks with ports between 6881 and 6999 Depending on your computer s firewall software you may need to open a range of ports in your firewall to enable software that uses port range forwarding How to set up port range triggering for online gaming For ALL Why would I use port triggering instead of port forwarding Port range triggering allows the router to watch outgoing data for specific port numbers...

Страница 72: ...P port 53 TCP UDP port 3074 To set up an Xbox using multiple entries of single port forwarding Applications Gaming Single Port Forwarding 1 Connect your Xbox 360 to your router 1 Log into the browser based utility see How to open the browser based utility on page 25 2 Set up a DHCP reservation for the IP address of the Xbox See How to set up the DHCP server on your router on page 29 OR Refer to yo...

Страница 73: ...ter configuration Administration Management 1 Log into the browser based utility see How to open the browser based utility on page 25 2 Click the Administration tab then click the Management page 3 Click Restore Configurations at the bottom of the screen A separate window opens 4 Click Browse to navigate to the location of your configuration file then select the file and click Open 5 To restore th...

Страница 74: ...How to upgrade the router s firmware For ALL WhywouldIneedtoupgrademyrouter sfirmware Linksysmayperiodically publish a firmware upgrade either to fix a problem or to add features to your router Important Do not interrupt the upgrade process You should not turn off the router or press the Reset button during the upgrade Doing so may permanently disable the router If you are upgrading from a laptop ...

Страница 75: ...ave changed Make a backup of your router configuration before starting the upgrade process See How to back up and restore your router configuration on page 61 7 In the browser based utility click the Administration tab then click the Firmware Upgrade page 8 Click Browse then go to the location where you saved the upgrade file 9 Select the upgrade file then click Start Upgrade and follow the on scr...

Страница 76: ...hen click Cisco Connect The Cisco Connect main menu opens 2 Look in the upper right corner of the Cisco Connect main menu If your router is online and secure you see online secure and a green indicator To check your router status using the browser based utility Status Router Status Local Network Status Wireless Network Status Ports 1 Log into the browser based utility see How to open the browser b...

Страница 77: ...nly for the E3200 and E4200 for each of the Ethernet ports and the Internet port are displayed How to disable the Ethernet port status lights Why would I want to disable the Ethernet port status lights Depending on the placement of the router in a home some users might find the lights distracting You can easily disable the lights using Cisco Connect but you can also disable them using the browser ...

Страница 78: ...then click the Basic Setup page 3 Set Rear Port Lights to Off then click Save Settings at the bottom of the page How to test your Internet connection What utilities are included in my router to test my Internet connection Your router includes two diagnostic tests Ping and Traceroute that let you check network connections including network devices and your Internet connection To diagnose your Inter...

Страница 79: ...ceroute Test section then click Start to Traceroute A window opens with the test results How to configure and use logs What kind of logging capabilities does my router have Your router can track all traffic for your Internet connection Your router supports four types of logs CAUTION All logs that are not saved will be lost whenever the router restarts To enable and view router logs Administration ...

Страница 80: ...stination port numbers for incoming Internet traffic Outgoing Log Local IP addresses destination URLs IP addresses and service port numbers for outgoing Internet traffic Security Log Logins for the browser based utility DHCP Client Log Local DHCP server status information 6 To save the log click Save the Log then click OK or Save CAUTION All logs that are not saved will be lost whenever the router...

Страница 81: ...ty Firewall Firewall Internet Filter Web Filter VPN Passthrough VPN Passthrough Applications Gaming Single Port Forwarding Single Port Forwarding Port Range Forwarding Port Range Forwarding Port Range Triggering Port Range Triggering DMZ DMZ IPv6 Firewall QoS QoS Quality of Service Wireless Internet Access Priority Upstream Bandwidth Category Summary Administration Management Router Access Local M...

Страница 82: ...Passthrough VPN Passthrough Access Policy Parental Controls Target Devices Schedule Block Specific Sites Applications Gaming Single Port Forwarding Single Port Forwarding Port Range Forwarding Port Range Forwarding Port Range Triggering Port Range Triggering DMZ DMZ IPv6 Firewall E1200V2 E1500 only QoS QoS Quality of Service Wireless Internet Access Priority Upstream Bandwidth Category Summary Adm...

Страница 83: ...net Filter Web Filter VPN Passthrough VPN Passthrough Access Policy Parental Controls Target Devices Schedule Block Specific Sites Applications Gaming Single Port Forwarding Single Port Forwarding Application Name Port Range Forwarding Port Range Forwarding Application Name Port Range Triggering Port Range Triggering DMZ DMZ IPv6 Firewall QoS QoS Quality of Service Wireless Internet Access Priorit...

Страница 84: ...assthrough Storage Disk Disk Management Shared Folder Format Disk FTP Server Setup Access Administration Information Anonymous Access User Management Group Management Access Policy Parental Controls Target Devices Schedule Block Specific Sites Applications Gaming Single Port Forwarding Application Name Port Range Forwarding Application Name Port Range Triggering DMZ IPv6 Firewall QoS QoS Quality o...

Страница 85: ...ed Folder Media Server UPnP Media Server Setup Database FTP Server Setup Share Administration Information User Management Group Management Access Restrictions Parental Controls Target Devices Schedule Block Specific Sites Applications Gaming Single Port Forwarding Application Name Port Range Forwarding Application Name Port Range Triggering DMZ IPv6 Firewall QoS QoS Quality of Service Wireless Int...

Страница 86: ...i Protected Setup Windows 7 Operating Temp 0 to 40 C 32 to 104 F Storage Temp 20 to 60 C 4 to 140 F Operating Humidity 10 to 80 non condensing Storage Humidity 5 to 90 non condensing NoteS For regulatory warranty and safety information see the CD that came with your router or go to Linksys com support Specifications are subject to change without notice Maximum performance derived from IEEE Standar...

Страница 87: ...g n WPA2 WMM Wi Fi Protected Setup Windows 7 Operating Temp 0 to 40 C 32 to 104 F Storage Temp 20 to 60 C 4 to 140 F Operating Humidity 10 to 80 non condensing Storage Humidity 5 to 90 non condensing NoteS For regulatory warranty and safety information see the CD that came with your router or go to Linksys com support Specifications are subject to change without notice Maximum performance derived ...

Страница 88: ...n WPA2 WMM Wi Fi Protected Setup Windows 7 Operating Temp 0 to 40 C 32 to 104 F Storage Temp 20 to 60 C 4 to 140 F Operating Humidity 10 to 80 non condensing Storage Humidity 5 to 90 non condensing NoteS For regulatory warranty and safety information see the CD that came with your router or go to Linksys com support Specifications are subject to change without notice Maximum performance derived fr...

Страница 89: ...G N Operating Temp 0 to 40 C 32 to 104 F Storage Temp 20 to 60 C 4 to 140 F Operating Humidity 10 to 80 relative humidity non condensing Storage Humidity 5 to 90 non condensing NoteS For regulatory warranty and safety information see the CD that came with your router or go to Linksys com support Specifications are subject to change without notice Maximum performance derived from IEEE Standard 802 ...

Страница 90: ...rtifications FCC IC CE Wi Fi A B G N Operating Temp 32 to 95 F 0 to 35 C Storage Temp 4 to 140 F 20 to 60 C Operating Humidity 10 to 80 relative humidity non condensing Storage Humidity 5 to 90 non condensing NoteS For regulatory warranty and safety information see the CD that came with your router or go to Linksys com support Specifications are subject to change without notice Maximum performance...

Страница 91: ...tions FCC IC CE Wi Fi a b g n Windows 7 DLNA Operating Temp 32 to 104 F 0 to 40 C Storage Temp 4 to 140 F 20 to 60 C Operating Humidity 10 to 80 relative humidity non condensing Storage Humidity 5 to 90 non condensing NoteS For regulatory warranty and safety information see the CD that came with your router or go to Linksys com support Specifications are subject to change without notice Maximum pe...

Страница 92: ...ted States and other countries A listing of Cisco s trademarks can be found at www cisco com go trademarks All other trademarks mentioned in this document are the property of their respective owners 2012 Cisco and or its affiliates All rights reserved Visit linksys com support for award winning 24 7 technical support 111216MS ...

Отзывы: