5-104
Cisco Wireless LAN Controller Configuration Guide
OL-17037-01
Chapter 5 Configuring Security Solutions
Configuring IDS
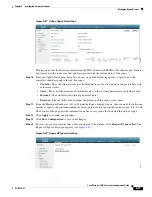
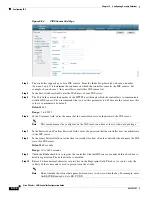
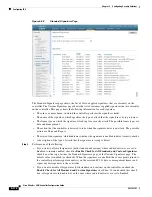
Figure 5-54
CIDS Sensor Add Page
Step 3
The controller supports up to five IDS sensors. From the Index drop-down box, choose a number
(between 1 and 5) to determine the sequence in which the controller consults the IDS sensors. For
example, if you choose 1, the controller consults this IDS sensor first.
Step 4
In the Server Address field, enter the IP address of your IDS server.
Step 5
The Port field contains the number of the HTTPS port through which the controller is to communicate
with the IDS sensor. Cisco recommends that you set this parameter to 443 because the sensor uses this
value to communicate by default.
Default:
443
Range:
1 to 65535
Step 6
In the Username field, enter the name that the controller uses to authenticate to the IDS sensor.
Note
This username must be configured on the IDS sensor and have at least a read-only privilege.
Step 7
In the Password and Confirm Password fields, enter the password that the controller uses to authenticate
to the IDS sensor.
Step 8
In the Query Interval field, enter the time (in seconds) for how often the controller should query the IDS
server for IDS events.
Default:
60 seconds
Range:
10 to 3600 seconds
Step 9
Check the
State
check box to register the controller with this IDS sensor or uncheck this check box to
disable registration. The default value is disabled.
Step 10
Enter a 40-hexadecimal-character security key in the Fingerprint field. This key is used to verify the
validity of the sensor and is used to prevent security attacks.
Note
Do not include the colons that appear between every two bytes within the key. For example, enter
AABBCCDD instead of AA:BB:CC:DD.


