background image

128


CP30 Mobile Computer 

Reference Manual


9.2 BUTTON ASSIGNMENT UTILITY 

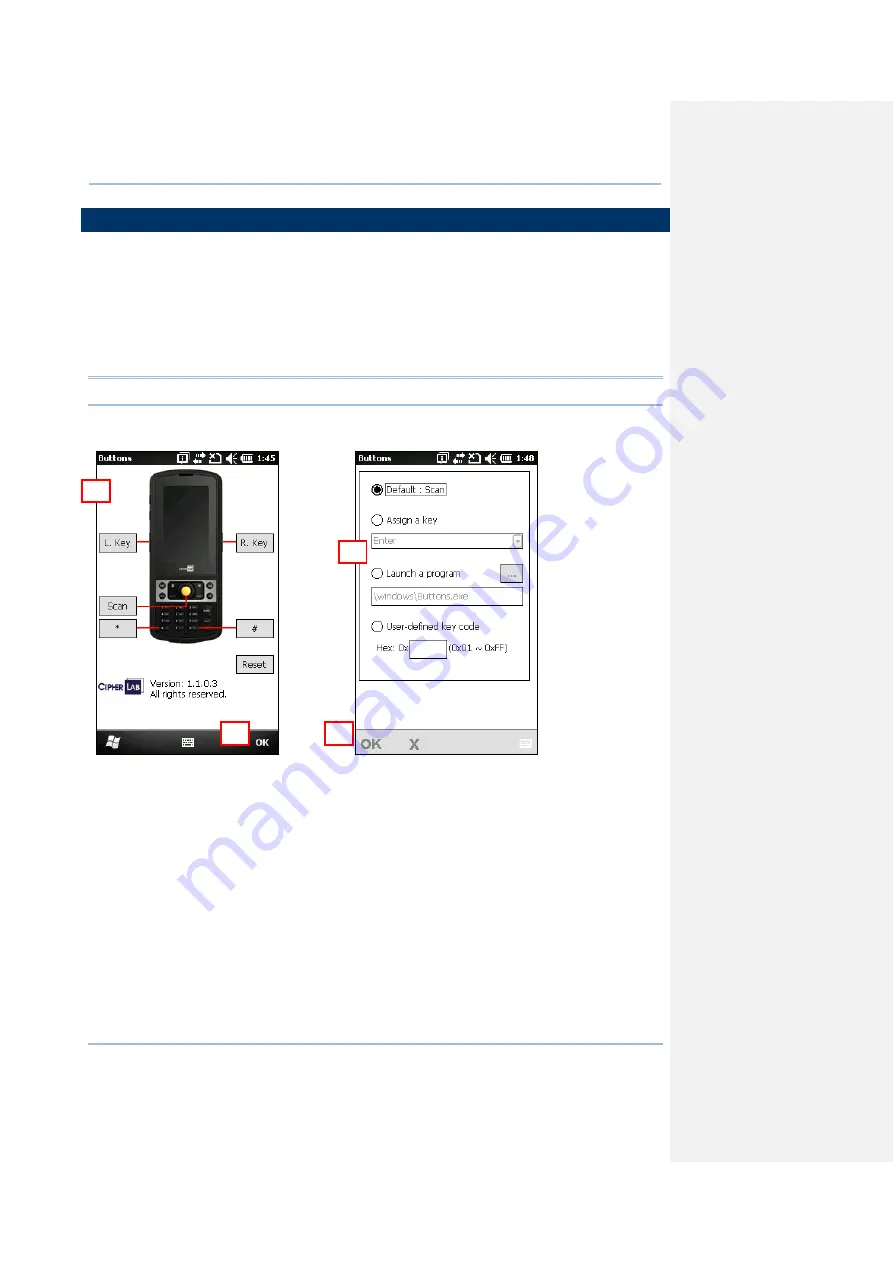
The  Button Assignment Utility  allows the following keys to be re-defined to another 

key or serve as a shortcut key for launching a specific program. 


[Scan] 


Two side triggers on each side of the touch screen 


[

] (Asterisk) 


[

#

] (Hash) 


Note:  By default, the two side triggers are programmed to serve as Scan keys. 

Go to Start | CipherLab Utilities to open the Button Assignment Utility


1)


Tap the label of one of these keys.   

For example, tap [L. Key] to configure the side trigger on the left.   


2)


You may change the key function between the following options: 


Default: Recovers the default function of a key. 


Assign a key: Defines a key to act as another key. Use the drop-down box to select a 

function to assign.   

Available key options include: 

Enter 
Scan 
Esc 
Delete 

Содержание CP30 Series

Страница 1: ...Windows Mobile 6 5 Computer CP30 Version 1 16 ...

Страница 2: ...RLAB does not warrant that this document is error free No part of this publication may be reproduced stored in a retrieval system or transmitted in any form or by any means electronic mechanical photocopying recording or otherwise without the prior written permission of CIPHERLAB CO LTD For product consultancy and technical support please contact your local sales representative Also you may visit ...

Страница 3: ...uit different from that to which the receiver is connected Consult the dealer or an experienced radio TV technician for help This device complies with Part 15 of the FCC Rules Operation is subject to the following two conditions 1 This device may not cause harmful interference and 2 this device must accept any interference received including interference that may cause undesired operation FOR CANA...

Страница 4: ...t SAR value for this model when tested by CIPHERLAB for use at the body position is 1 02 W kg 10g SAFETY PRECAUTIONS RISK OF EXPLOSION IF BATTERY IS REPLACED BY AN INCORRECT TYPE DISPOSE OF USED BATTERIES ACCORDING TO THE INSTRUCTIONS The use of any batteries or charging devices which are not originally sold or manufactured by CipherLab will void your warranty and may cause damage to human body or...

Страница 5: ... to move against the surface If you want to put away the mobile computer for a period of time download the collected data to a host computer and then take out the battery pack Store the mobile computer and battery pack separately If you shall find the mobile computer malfunctioning write down the specific scenario and consult your local sales representative ...

Страница 6: ...08 EN 301 489 7 V1 3 1 2005 11 EN 301 489 17 V2 1 1 2009 05 EN 301 489 24 V1 4 1 2007 09 EN 300 328 V1 7 1 2006 EN 300 440 1 V1 6 1 2010 EN 300 440 2 V1 4 1 2010 EN 301 511 V9 0 2 EN 62311 2008 EN 301 908 1 V4 2 1 EN 301 908 2 V4 2 1 EN 55022 2006 A1 2007 EN 50360 2001 The manufacturer also declares the conformity of above mentioned product with the actual required safety standards in accordance w...

Страница 7: ... update registry backup file Preparing for backup Update Full partial restore descriptions and screenshot Delete 9 1 Easy Cloning path for saving registry files automatic manual restore Modified 9 2 Button assignment key function description 1 12 Jan 02 2012 Delete Remove OS update 1 11 Nov 08 2011 Delete Remove HSUPA Spec 1 10 Oct 12 2011 Modified Update BT chapter working time Delete Remove Com ...

Страница 8: ......

Страница 9: ...munications 9 Using Wireless Networks 10 Using Cable 10 Using Cradle 11 USING THE CP30 MOBILE COMPUTER 15 1 1 Battery 15 1 1 1 Battery Status Indications 16 1 1 2 Power Management 17 1 2 Memory 18 1 2 1 Caution of Data Loss 18 1 2 2 Check Storage Space 18 1 3 Keypad 19 1 3 1 Keypad Settings 20 1 3 2 Alpha Key 21 1 3 3 Shift Key 21 1 3 4 Function Key 22 1 3 5 Programmable Keys 22 1 4 Touch Screen 2...

Страница 10: ...ctiveSync 40 2 4 1 Synchronization with Your Computer 40 2 4 2 Add Remove Programs 41 2 4 3 Explore Device 42 2 4 4 Backup Restore 43 2 5 Reset 44 2 5 1 STANDBY Mode 44 2 5 2 Software Reset Warm Boot 44 2 5 3 Hardware Reset Cold Boot 45 CONFIGURING CP30 MOBILE COMPUTER 47 3 1 smart shell 48 3 2 Settings 50 3 2 1 Connections 52 3 2 2 Personal 53 3 2 3 System 54 3 3 Device Name Configuration 57 3 3 ...

Страница 11: ...er 91 6 4 2 Make a Call 92 6 4 3 Answer a Call 93 6 5 Configuring GPRS Network 95 USING READER CONFIGURATION UTILITY 99 7 1 Run ReaderConfig exe 100 7 2 Barcode Reader Settings 101 7 3 Data Output 102 7 4 Notifications for Good Read 104 7 5 Symbology Settings 105 USING CAMERA 107 8 1 Camera Interface 108 8 2 Taking an Image 109 8 3 Shooting a Video 111 8 4 Pictures Videos 112 8 4 1 View an Image 1...

Страница 12: ... Electrical Characteristics 142 Physical Characteristics 142 Environmental Characteristics 143 Programming Support 143 Accessories 144 SCAN ENGINE SETTINGS 145 Symbologies Supported 146 LASER SE955 149 Reader Settings Table 149 Symbology Settings Table 151 Miscellaneous 154 AIM Code ID Code Characters 155 AIM Code ID Modifier Characters 155 2D IMAGER SE4500 161 Reader Settings Table 161 Symbology ...

Страница 13: ...ns Integrated with Bluetooth and 802 11b g technologies you may choose to add the GSM GPRS module to gain greater speeds and optimal mobility In particular an integrated GPS receiver is made available for use with third party location based applications This manual serves to guide you through how to install configure and operate the mobile computer The Care Maintenance section is specifically prep...

Страница 14: ...DHC is supported up to 16GB Two reader options 1D laser scanner or 2D imager Built in digital camera 3 2 CMOS sensor and auto focus Ambidextrous side triggers Total wireless solution connectivity includes Bluetooth 802 11b g and GSM EDGE GPRS UMTS A 3 2 color transflective TFT display delivers excellent visibility in all lighting conditions and transmissive display Programmable feedback includes s...

Страница 15: ...AC Power Adaptor LCD Protective Film SIM Sticker Pack Quick Guide ACCESSORIES Protective Cover Spare rechargeable battery pack Charging Cradle 3 5mm Earphone 4rings RELATED DOCUMENTATION Log in to GoBetween to access related documentation about the CP30 mobile computer from the CipherLab Central Service CCS platform Download the GoBetween desktop or mobile device application or launch the GoBetwee...

Страница 16: ...4 CP30 Mobile Computer Reference Manual ...

Страница 17: ...essaging right 3 Volume Buttons 4 Side Triggers user definable 5 Touch Screen 6 Scan Key user definable 7 Microphone 8 Headset Jack 9 I O Connector Memory Card Slot 10 Power Key 11 Digital Camera 12 Scanning Window 13 Stylus to be tethered 14 Speaker 15 Battery Compartment 16 Battery Cover Latch QUICK START ...

Страница 18: ...ttery compartment at a proper angle 30 45 so that the metal contacts of the battery are met with the protruding contacts inside the compartment Make sure that the battery is snugly fit into the compartment 4 Replace the battery cover 5 Slide the battery cover latch to the end till you hear a click sound to make sure the cover is locked in Warning 1 Please check the battery latch is at the lock pos...

Страница 19: ...y cover 2 Remove the battery cover as well as the battery 3 Insert the SIM card to the SIM card slot following the card orientation as shown 4 Replace the battery and battery cover 5 Slide the battery cover latch to the end till you hear a click sound to make sure the cover is locked in ...

Страница 20: ... the memory card It will be rejected automatically for removal 3 Replace the rubber cover Note We suggest using Toshiba and SanDisk class 4 card types CONNECTING HEADSET The headset jack is at the bottom of the mobile computer You can use the headset for audio playback or communication via the phone application Messenger etc 1 Flip up the rubber cover 2 Connect the headset to the headset jack 3 Re...

Страница 21: ...red while charging and will turn green when charging is done Backup battery Supports for RTC retention when main battery is not existent It takes over 1 hour to charge the backup battery to full A full backup battery is available for about 90days Charging Temperature It is recommended to charge the battery at room temperature 18 C to 25 C for optimal performance Battery charging stops when the tem...

Страница 22: ...cro USB end of the USB cable to the I O connector 3 For fast charging connect the other end of the USB cable to the USB power adaptor 4 Insert the USB power adaptor to a suitable power outlet The left LED lights red while charging It will turn green when charging is done Note 1 You may connect the USB cable to PC for data communications and charging 2 CP30 supplied a Multiple Adaptor please select...

Страница 23: ...a transmission is required Refer to Using ActiveSync Note Make sure that you have Microsoft ActiveSync installed on your computer before you connect the cable from the cradle to your computer CP30 Indicator Status Description Charging Red solid Charging the mobile computer Green solid Charging done Red flashing Battery is abnormal Cradle Indicator Status Description Charging Red solid Charging the...

Страница 24: ...e has been pushed to upward for ActiveSync On mode 2 Seat the mobile computer in the cradle ActiveSync Off Mode Only charging is allowed in this mode The mobile computer will only be charged via adaptor power The ActiveSync on your PC is disabled 1 Connect the power adaptor cable directly to the power supply outlet Make sure the plastic bolt in front of the cradle been pushed to downward for Activ...

Страница 25: ...13 Quick Start ...

Страница 26: ......

Страница 27: ...ing time may vary by working condition Spare Battery The spare battery for accessory takes charge when the main battery is removed or drained out However you have to replace the main battery as soon as possible Backup Battery Lithium Battery RTC retention when main battery is not existent Warning The battery cover must be in position If not the mobile computer cannot turn on by pressing Power or w...

Страница 28: ...tart Settings and tap Power Battery Icon Description External power source is connected and main battery is charging Main battery level 100 76 Main battery level 76 51 Main battery level 51 26 Main battery level 26 6 when main battery charge become low 10 and needs charging Main battery charge become very low 5 and needs charging immediately Warning 1 Once the battery charge drops below 10 the low...

Страница 29: ...nnectivity Bluetooth 802 11b g or GSM GPRS that is not in use Shorten the turn off Backlight time go to Start Settings System and tap Backlight Refer to 1 4 1 Adjust the LCD Backlight Disable key light function go to Start Settings System and tap Keypad to select Always off item to disable keypad Backlight function Go to Start Settings and tap Power In the Battery tab you can always monitor the ch...

Страница 30: ...s only to retain the contents of RTC on condition that the backup battery has sufficient power If you want to put away the mobile computer for a couple of days you should be aware that data loss occurs when the main batteries discharge completely Therefore it is necessary to backup data and files before putting away the mobile computer 1 2 2 CHECK STORAGE SPACE Go to Start Settings System and tap ...

Страница 31: ...19 Chapter 1 Using the CP30 Mobile Computer 1 3 KEYPAD The Alphanumeric keypad includes alphanumeric navigation function keys and so on This keypad is set to numeric mode by default ...

Страница 32: ...ht of keypad is turned off by default It is suggested to turn on the keypad backlight while working in a dark area however using backlight while on battery power will substantially reduce battery power The keypad backlight is set to be automatically turned on for 5 seconds when any key is pressed You may have it always turned off or turned on instead ...

Страница 33: ... case and lower case alphabetic modes 1 3 3 SHIFT KEY Status Icon Shift Key Input Mode Press one time The Shift key modifies the next key pressed Depending on the input mode 1 In numeric mode it will modify the next key pressed and is user definable 2 In alpha lower case alphabetic mode it will show a single upper case character after press Shift key one time For example input ABC it will show Abc...

Страница 34: ... Fn again and the icon will go off Note It is not necessary to long press the Fn key The default Fn key combinations are defined as below Key Combination Action Fn 1 F1 Softkey 1 Fn 2 F2 Softkey 2 Fn 3 F3 Talk Fn 4 F4 End now active window and return to home screen Fn 5 F5 n a Fn 6 F6 Volume Up Fn 7 F7 Volume Down Fn 8 F8 Fn 9 F9 Fn 0 F10 Record Note Press the Fn key first and then press the secon...

Страница 35: ... the backlight while working in a well lit area or automatically turn off the mobile computer when not in use 1 4 1 ADJUST THE LCD BACKLIGHT Go to Start Settings System and tap Backlight to configure related settings In the Backlight External Power configuration screen you can select the Turn off backlight if device is not used for check box to disable the backlight function and select the time fr...

Страница 36: ...rated through screen alignment Go to Start Settings System and tap Screen to configure related settings You may re calibrate the touch screen smooth the font edges or adjust the text size displayed on the screen if necessary Warning DO NOT use any pointed or sharp objects to move against the surface of the screen ...

Страница 37: ...n off Good Read Top right Messaging Amber flashing Messages received e g missed call voicemail new SMS MMS message or e mail 1 5 2 AUDIO The speaker is used to play sounds for events in Windows and programs or play audio files such as WAV files In addition it can be programmed for status feedback In noisy environments you may consider connecting a headset instead A headset jack is provided which i...

Страница 38: ...rking in noisy environments Tap the top of the screen to invoke the title bar drop down list and then tap the volume setting icon to change the system volume or phone ring You may mute it or have it vibrate instead Note You can switch the volume settings among On Vibrate and Off items in the Volume control screen Volume adjustment slider bar is only available in volume On mode ...

Страница 39: ... are enabled by default while running the ReaderConfig exe utility If you need to scan barcodes that are encoded in a different symbology enable the symbology first Refer to Appendix II Laser SE955 1D and Appendix III 2D Imager 2D for using the barcode reader utility 1 6 2 DIGITAL CAMERA An integrated 3 2 mega pixel CMOS camera in the mobile computer is specifically designed for collecting image d...

Страница 40: ... and battery LED indicator to show battery charging status Supports 2 modes ActiveSync On and Off for charging and date transmission Charging Time shall be less than 4 hours DC Input 5V 2A DC Jack on the back of cradle 100 240VAC 50 60Hz 5VDC 5 2A with DC jack for AC adaptor Due to the limitation of CP30 terminal charging circuit it supports 1000mA charging current through ActiveSync disable or on...

Страница 41: ...lls in mind and explore this Windows Mobile device at ease Tap an item to select it Tap and hold an item to see a menu that enables tasks such as cut copy rename delete etc Tap at the bottom of the screen to close an active window a dialog box or a running application Tap OK at the bottom of the screen to save the current settings and exit the application or minimize the window in some application...

Страница 42: ...key will be available at the bottom of the screen as well If you are using the mobile computer for the first time there are a couple of things to do after the Home Screen comes up The Getting Started wizard that will walk you through e mail setup changing the background image setting up Bluetooth headset connection etc Go to Start Settings and tap Home to change theme background and status items s...

Страница 43: ...ake emergency calls if your service provider supports it EDGE service available EDGE connection is established GPRS service available GPRS connection is established Incoming call Missed call Antenna signal status Phone power off Antenna signal status PIN Code required for powering on the Phone Antenna signal status Phone power on the more bars the stronger the signal Connection is active Wi Fi Net...

Страница 44: ...detected networks for Wireless local area networking WLAN connection which is not available until Wi Fi power is turned on through Wireless Manager Alternatively you may tap Notification on the left soft key bar Tap it to change the system volume or phone ring You may mute it or have it vibrate instead Tap it to monitor the charging status and change the power scheme Tap it to change the clock and...

Страница 45: ...uetooth beams Bluetooth A2DP profile is in use Tap it to access the Bluetooth devices list Tap it to overlook a missed call Tap it to check a new e mail Tap it to check a new voicemail Tap it to send an SMS text message Speakerphone is on Tap it to access the Bluetooth configuration Tap it to configure ActiveSync connection settings Roaming is on ...

Страница 46: ...34 CP30 Mobile Computer Reference Manual 2 1 4 START MENU Tap to open the Start Menu You can tap to access application programs find useful utilities developed by CipherLab or configure system settings ...

Страница 47: ... unavailable Lock CP30 Go to Start Menu and tap the lock icon on the soft key bar to protect your mobile computer Password Lock You may further apply password protection to block unauthorized access Go to Start Settings and tap Lock Simple PIN Set up a password 4 digit at least Strong alphanumeric Set up a strong password 7 character at least Unlock CP30 Drag the lock slide to left or right of the...

Страница 48: ... show or hide the software keyboard Data entry can be performed by the following methods Physical Keypad Type with the hardware keypad Data Capture Scan barcode in applications e g Notes CipherLab s FORGE Application Generator etc Software Keypad Type or write using SIP Soft Input Panel Tap the SIP button on middle soft key bar to show or hide the input panel ...

Страница 49: ...AM TO START MENU 1 Tap Start File Explorer 2 Navigate through file folders to find the program you desire 3 Tap and hold the program to select Copy from the pop up menu 4 Navigate to the Programs folder My Device Windows Start Menu Programs 5 Tap and hold anywhere blank on the screen to select Paste Shortcut from the pop up menu The new program will be added to the Programs folder 6 Go to Start Me...

Страница 50: ...t desired any longer Warning Always remember to save data or settings before you exit a program Tap to close an active window a dialog box or a running application If the button is not displayed on the soft key bar press ESC on the physical keypad Tap OK to save the current settings and exit the application or minimize the window in some applications If the button is not displayed on the soft key ...

Страница 51: ...t to search for If you have looked for this item before tap the drop down list and select it In the Type box select a data type to help narrow your search If the data type of your file is other than listed you may try Larger than 64 KB However if such file is less than 64 KB it will not be searchable 3 Tap Search 4 In the Results list tap the item you want to open ...

Страница 52: ...run the program For detailed information on the program you may click the Help menu and then select the Microsoft ActiveSync Help 2 4 1 SYNCHRONIZATION WITH YOUR COMPUTER 1 Follow these instructions for initial ActiveSync operation Connect the USB cable from the mobile computer or via a cradle to your computer Turn on the mobile computer or seat in the cradle 2 Your computer will automatically det...

Страница 53: ...ar 3 Navigate to the target folder e g the Programs folder Windows Start Menu Programs depending on where you wish to access the program 4 Navigate through file folders on your computer to find the new program CAB EXE etc 5 Right click the program and select copy from the pop up menu 6 Back to the target folder in step 3 Right click anywhere blank and select Paste from the pop up menu 7 On the mob...

Страница 54: ...s Start Menu Programs 7 Right click anywhere blank on the window and select Paste from the pop up menu The new program will be added to the Programs folder 8 On the mobile computer go to Start Menu and the new program will appear now Note Create Shortcut Cut and Paste The same result can be performed by Copy and Paste Shortcut Create a New Folder 1 When connected open the Microsoft ActiveSync wind...

Страница 55: ...bile Basics 2 4 4 BACKUP RESTORE To best protect your work you should regularly back up information on your mobile computer You can perform a backup by during the ActiveSync operation The backup file is stored on your desktop computer ...

Страница 56: ...ile computer enters standby mode the system is ready for use but not using It means the system is in power saving status and waiting for user start Enter Standby Press the Power key for about 0 2 seconds to enter Standby mode Resume from Standby Press the Power key for about 0 2 seconds to awake the mobile computer Alternatively you may press the Scan key Warning To save battery power it is sugges...

Страница 57: ...ialize RAM Perform a hardware reset if software reset cannot be properly operated Hardware Reset Cold Boot 1 Remove the battery cover and the main battery 2 Replace the main battery and the battery cover 3 Turn on the mobile computer by pressing the Power key for 3 seconds Warning Data loss may occur when files are not properly closed before hardware reset ...

Страница 58: ...46 CP30 Mobile Computer Reference Manual ...

Страница 59: ... settings is provided for your reference IN THIS CHAPTER 3 1 smart shell 48 3 2 Settings 50 3 3 Device Name Configuration 57 Tap to open the Start Menu and tap Settings to configure related settings Chapter 3 CONFIGURING CP30 MOBILE COMPUTER ...

Страница 60: ...T SHELL CipherLab Smart Shell is a utility allows you to customize some settings and behavior s You can easy to employ and control the programs installed via Smart Shell utility For more information please refer to the CipherLab Smart Shell User Guide ...

Страница 61: ...or recently used items and services Tap it to activate or close any listed program or enable any running programs According to active screen to support change settings Tap it to enable Bluetooth Tap it to enable Wi Fi Tap it to enable GSM GPRS Fight Mode Tap it to disable all wireless signals The color of Fight Mode icon will changed from white to red ...

Страница 62: ...er to 2 1 1 Home Screen Appearance tab Customize the theme and background of the Home Screen Items tab Select items that will appear on the Home Screen and configure Home Screen timeout Lock Tap it to apply password protection to limit access to the mobile computer and any screen or keypad input will be blocked Refer to 2 1 5 Device Lock Power Battery tab You may view the current charge of main ba...

Страница 63: ...grams etc Notifications tab Select to play sounds as notifications for some events Connections Refer to 3 2 1 Connections Personal Refer to 3 2 2 Personal System Refer to 3 2 3 System Microsoft My Phone Tap it to synchronize contacts calendars tasks and so on with a Microsoft My Phone account You will be asked to sign in using your Windows Live ID ...

Страница 64: ...d allowing company deployment on multiple mobile computers USB to PC Tap it to change the USB connection type By default it will automatically establish the connection and start the ActiveSync operation when the mobile computer is connected to PC When your PC connects to a local area network or the Internet the USB connection may be disconnected for priority concern In this case try to disable adv...

Страница 65: ...formation refer to 4 1 1 Power On via Wireless Manager and 6 1 1 Wireless Manager Phone 3 2 2 PERSONAL Go to Start Settings Personal Buttons Tap it to adjust the character input repeat delay and rate move the slider to right or left for repeat speed Owner Information Identification tab Enter your contact information Notes tab Enter your notes Phone Refer to 6 2 Phone ...

Страница 66: ...ghtness of the LCD backlight when on battery power External Power tab You may configure when to turn on off the backlight the brightness of the LCD backlight when on external power the mobile computer being seated in the cradle for charging or connected for direct charging Certificates You may view or modify digital certificates that some applications use to establish trust for secure connections ...

Страница 67: ...er AGPS tab You may select to enable AGPS function to improve GPS performance Ephemeris tab You may configure how to download ephemeris data or tap Download to update ephemeris at any time The data is valid for seven days according to the system date and time The date of last download will be displayed at the lower left of the screen Keypad You may change the keypad backlight behavior By default t...

Страница 68: ...libration ClearType tab You may apply Clear Type fonts Text Size tab You may use the slider to adjust the text size Task Manager You may have a list of all applications which are currently running on the mobile computer Tap and hold the application to switch to enable or end it if processing too many applications will waste a lot of memory or CPU resource ...

Страница 69: ...57 Chapter 3 Configuring CP30 Mobile Computer 3 3 DEVICE NAME CONFIGURATION 3 3 1 CHANGE DEVICE NAME Go to Start Settings System and tap About to change the device name on the Device ID tab if necessary ...

Страница 70: ...ter has the following features 28 key WQVGA screen A scan engine that employs Laser scan engine Integrated communications Bluetooth Wi Fi and GSM GPRS Integrated GPS receiver and camera Device ID Modular Component Types 1st digit Reader module 0 none 2 Laser SE955 3 2D Imager 2nd digit Reserved 0 3rd digit Bluetooth GSM GPRS 0 none 1 Bluetooth 4 GSM GPRS 5 Bluetooth GSM GPRS 4th digit Wi Fi GPS 0 ...

Страница 71: ...59 The Wi Fi module integrated on the mobile computer lets you configure and connect to network wirelessly IN THIS CHAPTER 4 1 Wi Fi Power 60 Chapter 4 USING 802 11 RADIO ...

Страница 72: ...60 CP30 Mobile Computer Reference Manual 4 1 WI FI POWER 4 1 1 POWER ON VIA WIRELESS MANAGER 1 Go to Start Wireless Manager as shown below 2 Tap All or Wi Fi to turn on the power ...

Страница 73: ...1 Chapter 4 Using 802 11 Radio 3 When the Wi Fi status is Available it means it is turned on and Wi Fi networks are available 4 1 2 WLAN CONNECTION 1 Tap Menu Wi Fi Settings to configure related settings ...

Страница 74: ... for the current AP is 71 dBm or stronger but no more than 68 dBm four bar The RSSI for the current AP is 67 dBm or stronger Encryption The RSSI for the current AP has a data encryption for connection fail The signal for the current AP is unavailable A strong signal four bars usually means that the wireless network is close or there is no interference For best performance connect to the wireless n...

Страница 75: ... icon will appear on the title bar and the connected network name will be displayed for Wi Fi status in Wireless Manager Note If the Wi Fi power item is disappeared during the Wi Fi connection please go to the ActiveSync configuration screen to enable Allow wireless connection on device when connected to the desktop check box that located in the File Connection Settings of ActiveSync to appear Wi ...

Страница 76: ...64 CP30 Mobile Computer Reference Manual ...

Страница 77: ...rofile PAN Human Interface Device Profile HID supports keyboard and mouse without cursor Headset Profile HSP Hands Free Profile HFP Generic Access Profile GAP Generic Object Exchange Profile GEOP Advanced Audio Distribution Profile A2DP Audio Video Remote Control Profile AVRCP Phone Book Access Profile PBAP ActiveSync Over Bluetooth IN THIS CHAPTER 5 1 Bluetooth Power 66 5 2 Search Devices 68 5 3 ...

Страница 78: ...66 CP30 Mobile Computer Reference Manual 5 1 BLUETOOTH POWER 5 1 1 POWER ON VIA WIRELESS MANAGER 1 Go to Start Wireless Manager as shown below 2 Tap All or Bluetooth to turn on the power ...

Страница 79: ...means it is turned on and deployment is enabled 5 1 2 CHANGING BLUETOOTH SETTINGS Tap Menu Bluetooth Settings to configure related settings On the Mode tab you may select to enable disable Bluetooth function or whether hide the mobile computer from other Bluetooth devices ...

Страница 80: ...EVICES 1 In the Bluetooth configurations screen on the Devices mode tab you can search for other Bluetooth device or go to Start Settings Bluetooth for the same settings 2 Tap Add new device or Add on the soft key bar to search for other Bluetooth devices ...

Страница 81: ...hapter 5 Using Bluetooth 3 Wait for a few seconds and it will list the discovered devices If you do not see the devices that want to be connected make sure it is set discoverable Tap Refresh to search again ...

Страница 82: ...70 CP30 Mobile Computer Reference Manual 5 3 PAIR DEVICES 5 3 1 PAIR 1 Select a connected device and tap Next 2 If necessary please enter the password that is specified on the remote device Tap Next ...

Страница 83: ...71 Chapter 5 Using Bluetooth 3 Tap Done 4 Once paired successfully the device will appear in the device list Tap it to view available Bluetooth services or modify its display name ...

Страница 84: ...Devices tab tap and hold the desired device to select Delete from the pop up menu Note The mobile computer must be unpaired on the remote device as well For example also remove it from the device list on the remote device Both devices must be unpaired and removed ...

Страница 85: ...from the pop up menu 2 Make sure the Serial Port service is enabled for use on the remote Bluetooth device For PC example you can launch the Bluetooth Device configuration utility and in the Bluetooth Device configuration screen tap COM Ports tab tap Add as below Select Incoming device initiates the connection item tap OK ...

Страница 86: ... For PC example You can use just like Hyper Terminal application tool to confirm the connection between your PC and mobile computer By the way the Hyper Terminal COM port No has to set as same as the incoming port No of your PC 4 On the Bluetooth configuration screen of mobile computer tap Refresh to select Serial Port check box click Save ...

Страница 87: ...75 Chapter 5 Using Bluetooth 5 On the COM Ports tab tap New Outgoing Port 6 Select the remote device and then tap Next ...

Страница 88: ...76 CP30 Mobile Computer Reference Manual 7 Select a COM port and then tap Finish For Bluetooth please select COM0 or COM3 for connection 8 Tap OK ...

Страница 89: ...s to find the file you wish to send to the remote device 3 Tap and hold the file to select Beam File from the pop up menu 4 Tap the required remote device to send the file via Bluetooth The mobile computer will start uploading the file Wait a few seconds for the remote device to receive the file When it is done tap OK to return ...

Страница 90: ...ctions Beam and make sure the Beam Mode is enabled in order to receive all incoming beams 2 On the remote device send a desired file to the mobile computer via Bluetooth 3 When the Receiving Data dialog appears on the screen tap Yes The received data will be saved to My Device My Documents ...

Страница 91: ...igure Bluetooth settings correctly on your computer first 1 Configure Bluetooth settings for your computer such as Turn discovery on adding a COM port Incoming the COM port value depend on your computer active etc 2 Allow connections to the specified COM port in ActiveSync ...

Страница 92: ...veSync service is enabled for use on the remote computer For the Bluetooth connection via ActiveSync you have to take off the USB cable between mobile computer and remote computer so that it can release the ActiveSync check box as below for connection Select ActiveSync check box then click Save to continue ...

Страница 93: ...e SIM card before turning on the power Refer to Inserting SIM Card Note If the SIM card is not in position you may make emergency calls if the service is supported IN THIS CHAPTER 6 1 Phone Power 82 6 2 Phone Application 85 6 3 Phone Settings 87 6 4 Making Phone Calls 91 6 5 Configuring GPRS Network 95 Chapter 6 USING THE PHONE ...

Страница 94: ...puter Reference Manual 6 1 PHONE POWER 6 1 1 WIRELESS MANAGER 1 Phone power is turned on by default If not go to Start Wireless Manager to access Wireless Manager 2 Tap All or Phone to turn on the power Wireless Manager ...

Страница 95: ... icon will be displayed on the title bar 4 Tap Menu Phone Settings to configure related settings if necessary Note Phone Settings is only available when the phone power has been turned on You can find out the security setting change PIN code on your SIM card and so on if necessary Refer to 6 3 Phone Settings ...

Страница 96: ...SSING 1 On the Home Screen the notification icon on the title bar show that the SIM card is missing 2 Tap Phone or press the SEND button on the physical keypad to access the phone application Depending on your service provider only emergency calls are allowed ...

Страница 97: ...r s name and the contact name and or phone number when making or receiving a call Tap the scroll bar next to the display panel to browse call history which keeps a record of the phone number that called in or out or you missed Tap a contact name to view edit the contact details send or beam contact or add to speed dial list Tap the Menu button on the soft key bar to switch the view options The pho...

Страница 98: ... browse edit call history and pick the number you want to call Talk button allows you to make or receive a call Alternatively you may press SEND from the keypad End button allows you to hang up a call Alternatively you may press END from the keypad 6 2 3 VOLUME Tap the title bar and then the speaker icon on the title bar drop down list to change the system volume or phone ring You may mute it or h...

Страница 99: ...87 Chapter 6 Using the Phone 6 3 PHONE SETTINGS Tap Menu Options to configure phone settings if necessary Sounds tab Tap the Sounds tab to adjust the ring type ring tone and the keypad sound ...

Страница 100: ...on the mobile computer allows three chances to input the correct PIN code If input fails three times the PIN will be blocked and you will need to obtain the PUK code from your network operator and unblock the SIM card on your cellular phone mobile computer Services tab Tap the Services tab to get the phone service settings from your network operator ...

Страница 101: ...e Phone Network tab Tap the Network tab to change phone network settings and edit your preferred networks Others tab Tap the Others tab to configure GPRS authentication type broadcast channels and SMS transmission settings ...

Страница 102: ...90 CP30 Mobile Computer Reference Manual Band tab Tap the Band tab to change the band type and the local band in your geographic region ...

Страница 103: ...s Dialling Using the dial pad on the screen or the physical keypad simply enter the number you want to call From Contacts Browse the contact list via the display panel to find the contact or number you want to call Using Speed Dial Enter the speed dial number of the desired contact From Call History Browse call history via the display panel to pick the number you want to call 1 means reserved Spee...

Страница 104: ... Reference Manual 6 4 2 MAKE A CALL Dialling Out Tap the green Talk button on the phone keypad or press SEND from the physical keypad Hanging up Tap the red End button on the phone keypad or press END from the physical keypad ...

Страница 105: ...ring a Call Tap the call status button on the soft key bar and you may select to turn on the speaker mute the receiver or hold the line 6 4 3 ANSWER A CALL Answering a Call Tap the Answer button or press SEND from the physical keypad ...

Страница 106: ...or press END from the physical keypad Viewing a Missing Call When the status icon is displayed on the title bar and tap it will see a missing call icon appears By the way the top right LED will also flash amber tap the Notification on the soft key bar to view missing messages ...

Страница 107: ...URING GPRS NETWORK 1 Tap Start Settings Connections and select Connections 2 Initially you have to configure the GPRS settings Tap Add a new modem connection and follow the on screen instructions to enter the connection name and modem types ...

Страница 108: ... Computer Reference Manual 3 Enter the connection name and select Cellular Line GPRS 3G from the drop down list Tap Next 4 Specify the GPRS AP name for the mobile computer to connect to for example internet Tap Next ...

Страница 109: ...97 Chapter 6 Using the Phone 5 Tap Finish Note You must connect to the GPRS modem specified by the mobile phone operator ...

Страница 110: ...98 CP30 Mobile Computer Reference Manual ...

Страница 111: ...nage the barcode reader integrated on the mobile computer IN THIS CHAPTER 7 1 Run ReaderConfig exe 100 7 2 Barcode Reader Settings 101 7 3 Data Output 102 7 4 Notifications for Good Read 104 7 5 Symbology Settings 105 Chapter 7 USING READER CONFIGURATION UTILITY ...

Страница 112: ...eld To meet your application requirements proceed to configure associated reader settings as well as barcode settings Note 1 The ReaderConfig exe utility will automatically detect the reader module that is currently installed in the mobile computer 2 If you wish to reload the default settings delete the ReaderCfgINI txt file in the Flash Storage before enabling the program or tap Restore Defaults ...

Страница 113: ...Laser SE955 2D Reader The 2D scan engine is capable of reading linear and 2D barcodes If installed tap the Barcode Reader button to configure the reader settings for 2D scan engine Refer to the Reader Settings Table in Appendix III 2D Imager Decode Session Timeout The value from 1 to 9 sec sets the maximum time decode processing continues during a decode attempt The default value is 3 sec Redundan...

Страница 114: ...n RDP server is selected run the Remote Desktop Connection program to connect to a remote computer Note that this option is unable to emulate double bytes such as Big 5 or Unicode characters on the remote PC Local machine Windows Message When selected a Windows message will be broadcasted after decoding Intercept the decode message in your application Call Windows API ReadMsgQueue in your applicat...

Страница 115: ...the mobile computer to confirm each scan It will automatically add an ENTER character in front or to the end of one scan None Scan Enter_char Enter_char Scan Scan ENTER Auto Enter Character Auto ENTER must be enabled None Carriage return Tab Space Comma Semicolon Carriage Return Prefix String 0 10 characters NULL Suffix String 0 10 characters NULL Display Code Type Select the check box to prefix t...

Страница 116: ...Read via speaker Mute or Sound 1 9 Sound 1 Good Read via vibrator 0 5 0 sec 0 Disable the vibrator 0 Disable Good Read LED Select the check box to enable Good Read LED The top left LED will become green to indicate a successful decoding Disable Note If you want to maximize the Reader Configuration window to fill the screen for next using please select Maximize me on the next start check box Maximi...

Страница 117: ...enable or disable a specific symbology Note The symbology settings vary by the scan engine installed Refer to Appendix I Scan Engine Settings for the symbologies supported by a scan engine Refer to the Symbology Settings Table in Appendix II Laser SE955 Refer to the Symbology Settings Table in Appendix III 2D Imager ...

Страница 118: ...106 CP30 Mobile Computer Reference Manual ...

Страница 119: ...ous images from the built in camera Go to Start and tap Camera to open the image capture program IN THIS CHAPTER 8 1 Camera Interface 108 8 2 Taking an Image 109 8 3 Shooting a Video 111 8 4 Pictures Videos 112 8 5 Camera Settings 118 Chapter 8 USING CAMERA ...

Страница 120: ...tion of image resolution indicates the camera is in Still mode indicates the camera is in Video mode The buttons on bottom of the screen from left to right are described as below Button Description Tap to switch between Still and Video modes Tap to open Pictures Videos folder to view images and playback videos Refer to 8 4 Pictures Videos Tap to configure camera settings if necessary Refer to 8 5 ...

Страница 121: ...t you want to take a still picture You may drag the slider to zoom in or zoom out an image 2 Press Scan or Enter on the physical keypad to take a picture Each will be automatically saved under the directory My Device My documents My Pictures YYMMDD in the format of imgXXXXX jpg XXXXX stands for 5 digit serial number starting from 00000 by default Drag the slider to adjust the focus ...

Страница 122: ...lity is back to the preview screen you may tap the advanced buttons at bottom of the review screen which will be retained for five seconds by default Tap to return to the preview screen Tap to send this picture via text message or e mail Tap to delete this image file ...

Страница 123: ... to record a video Each recording will be automatically saved under the directory My Device My documents My Videos YYMMDD in the format of VideoXXX 3gp XXX stands for 3 digit serial number starting from 000 by default 3 Press Scan or Enter on the physical keypad to end recording Otherwise it will stop itself after reaching the time limit Refer to 8 4 3 Advanced Editing Settings Available recording...

Страница 124: ...s to open the default image folder My Device My Documents My Pictures 8 4 1 VIEW AN IMAGE 1 Locate the target folder and the desired picture The subfolders are named with the date YYMMDD 2 digit year 2 digit month and 2 digit date when images were taken Shortcut to Camera Subfolders in date format ...

Страница 125: ... bar right you may adjust the zoom start a slide show beam pictures edit or rotate pictures etc Refer to 8 4 3 Advanced Editing Settings Tap Send on the soft key bar left you may send the picture via text message or e mail 4 Tap OK to close the current window Time Stamp is displayed on the lower right of each picture ...

Страница 126: ...YYMMDD 2 digit year 2 digit month and 2 digit date when videos were recorded 2 Select a desired video and tap Play on bottom of the screen Tap Menu on the soft key bar right you may edit send or beam videos etc Refer to 8 4 3 Advanced Editing Settings 3 The video will be played in Windows Media player Tap to end the application Subfolders in date format ...

Страница 127: ...ptions you may have more editing options General tab When sending a picture by e mail it can be resized in favor of the transfer speed You may tap the drop down list to select a desired picture size if necessary You may also change the rotation direction of the picture in the General tab configuration screen ...

Страница 128: ...elect Play screensaver when connected to my PC and idle for 2minutes pictures stored in the default image folder My Device My Documents My Pictures can be used in a slideshow screensaver on the mobile computer Camera tab All captured still images are prefixed img saving to main memory at high compression level by default You may change the prefix save files to your memory card or adjust the compre...

Страница 129: ...ra Video tab While recording a video audio will be included You may disable the check box or set time limit for videos so that the file size can be reduced Tap OK to save the current settings and return to the previous window ...

Страница 130: ...ported White Balance By default the camera is set to adjust automatically Tap to select a specific scenario for setting white balance Icon Description Bright light Indoor light Sunny light Cloudy light Brightness Contrast Sharpness Tap it to adjust brightness contrast and sharpness ISO Speed ISO is the level of sensitivity of your camera to available light You can adjust the ISO speed by this icon...

Страница 131: ...in Still mode Storage By default the captured pictures are stored on the mobile computer s main memory Camera Mode Store Folder File Format Still Mode My Device My Documents My Pictures YYMMDD imgXXXXX jpg XXXXX stands for 5 digit serial number starting from 00000 Video Mode My Device My Documents My Videos YYMMDD VideoXXX 3gp XXX stands for 3 digit serial number starting from 000 For example Five...

Страница 132: ...120 CP30 Mobile Computer Reference Manual ...

Страница 133: ...y lets you assign a specific button as a hot key for launching a program or performing a certain action Signature Utility allows you to capture signatures with the touch screen GPS Viewer allows you to use the integrated GPS receiver with third party location based applications IN THIS CHAPTER 9 1 Backup Utility 122 9 2 Button Assignment Utility 128 9 3 Signature Utility 131 9 4 GPS Viewer 136 Cha...

Страница 134: ...f files after you have deleted them by accident or found them corrupted 9 1 1 MANAGING THE REGISTRY Go to Start CipherLab Utilities BackupUtility to open the Backup Utility If you are using this backup utility for the first time you must save the system registry as a first step Warning As long as you make any changes to the system configurations and settings you must tap Back up to update the syst...

Страница 135: ...sh to refresh the list of available items Go to the Registry tab and tap Back up Warning You may not be able to backup all data when programs are still running It is suggested that you disable all the applications before backup 9 1 3 BACKING UP FILES 1 Select the items you wish to backup and tap Backup 2 Tap if you need to save the backup to a different root or file name bkp By default it will sav...

Страница 136: ...bile Computer Reference Manual 3 Tap Start to pack all the selected items into one bkp file 4 Once the backup process is completed tap Report to view the log file if necessary 5 Tap OK to close the current window ...

Страница 137: ...125 Chapter 9 More Applications Note If you wish to backup files to this new root or file name in future runs you must tap OK to save the current settings and exit the application ...

Страница 138: ...y bkp files Select the backup file to be used for restore operation File Manipulation Tap Refresh to refresh the list of available backups If a backup file is not desired any more select it and tap Delete Full Restore Select a desired backup file from the list to perform full restore Partial Restore Depending on specific requirements you may perform a partial restore ...

Страница 139: ...the list 3 2 Select the desired items 4 3 Tap Restore 5 4 Tap Start to run the restore process 5 Once the restore process is completed you will be asked to perform a warm boot Tap OK to reboot the mobile computer Warning 1 You must perform a warm boot after the restore operation 2 You may encounter insufficient memory for the restore operation and be asked to check memory space on the system RAM F...

Страница 140: ...lt the two side triggers are programmed to serve as Scan keys Go to Start CipherLab Utilities to open the Button Assignment Utility 1 Tap the label of one of these keys For example tap L Key to configure the side trigger on the left 2 You may change the key function between the following options Default Recovers the default function of a key Assign a key Defines a key to act as another key Use the...

Страница 141: ...2A Launch a program Defines a key to quick launch an application Use the Browse button to select an executable file to open with the key or manually enter the path to the desired file When browsing for an executable file select All Folders in the drop down list to show all executable files stored under My Device My Documents directory or select other options in the drop down list to minimize the s...

Страница 142: ...ey code Allows users to change key function as desired by entering the hex value of the target key 3 Tap OK on the soft key bar for the change to take effect and save the current settings You may tap Reset to restore defaults 4 Tap OK to exit the application ...

Страница 143: ...Lab Utilities CipherlabSignature to open the signature capture program The icons on the toolbar from left to right are for these functions Button Description Create a new file Load a signature image Save the signature image to a file Clear the entire signature on the screen Configure signature settings if necessary Version information about the program Toolbar Signature Area ...

Страница 144: ...GNATURE 1 5 In the signature area use the stylus to write a signature 2 6 Tap to clear the entire signature and write a new one if necessary 3 7 Tap to save the signature as an image file in BMP or JPEG format 4 8 Tap OK to exit the program 格式化 項目符號及編號 格式化 項目符號及編號 ...

Страница 145: ...sage asking whether you want to modify the signature 6 10 Tap Yes to change the signature image if necessary Note The maximum resolution of an image is 640 x 480 pixels Therefore if you load an image at a pixel resolution greater than the limit it will then be trimmed to fit the size of current signature area 格式化 項目符號及編號 格式化 項目符號及編號 ...

Страница 146: ...NGING SIGNATURE SETTINGS Tap to configure signature settings if necessary Pen Width tab Set the pen width 1 5 in pixels for the signature writing Pen Colors tab Set the pen color from the available samples or entering the RGB values 0 255 for your color ...

Страница 147: ...Applications Background Colors tab Set the background color from the available samples or entering the RGB values 0 255 for your color Changing the background color will erase the signature you have captured in this file ...

Страница 148: ... mobile computer uses COM 7 to output NMEA messages as long as the COM port is opened In your application open the COM port with the correct configuration The table below lists the configuration of the integrated GPS receiver Serial Configuration COM Port Settings Baud Rate 4800 Data Bits 8 Parity None Stop bits 1 Note For multiple GPS enabled programs to access GPS data tap Start Settings System ...

Страница 149: ...rst Fix TTFF relies on environmental factors Normally it takes approximately 40 seconds for the receiver to locate the first satellite However it may take longer when satellite signals are blocked by tall vertical objects such as buildings or trees ...

Страница 150: ...signal 9 dB Green for fair signal strength 10 29 dB Blue for strong signal strength 30 50 dB Item Description Date Time Information of the current date and time Longitude Latitude Altitude Your location on earth by latitude and longitude coordinates plus altitude PDOP Position 3 D Dilution of Precision a separate measurement of DOP Direction Your direction when heading toward a target Speed Your s...

Страница 151: ...ocol is based on the national Marine Electronics Association s NMEA 0183 ASCII interface specification For details please refer to NMEA 0183 Version 3 01 which may be obtained from NMEA www nmea org You may save the NMEA codes as a text file and import it in a third party application ...

Страница 152: ......

Страница 153: ...module for Bluetooth version 2 0 EDR Class 2 connectivity WLAN Built in module for 802 11b g networking Certified for Cisco Compatible Extensions CCX version 4 WPAI support for only China area WWAN Ordering Option built in module for GSM GPRS EDGE UMTS GSM Bands 850 900 1800 1900 WCDMA Band 2100 GPRS GRPS class 12 EGPRS EDGE Multi Slot Class 12 UMTS DL UL HSDPA 7 2Mbps GPS GPS AGPS ephemeris downl...

Страница 154: ...thin 20 seconds upon GSM and WiFi on In this test mode the battery power will support the working time up to 10 hours PHYSICAL CHARACTERISTICS Color Touch Screen Display Display 3 2 TFT LCD 65k colors Resolution WQVGA 240 400 pixels Keypad Layout Alphanumeric keypad LED backlight programmable Notifications Status LED One for charging Red Green One for scanner Good Read and message Red Green Amber ...

Страница 155: ...4 kV contact discharge PROGRAMMING SUPPORT Development Environment Tools Integrated Development Environment Visual Studio 2008 Visual Studio 2005 Software Development Kit Microsoft SDK System API DLL for system configuration Reader API DLL for reader configuration Software Utilities Cipherlab software package Reader Configuration Utility FORGE Application Generator MIRROR Browser for web applicati...

Страница 156: ...144 CP30 Mobile Computer Reference Manual ACCESSORIES Accessory Options Protective Cover LCD Protective Film Spare rechargeable battery pack Charging Cradle ...

Страница 157: ...te 1 You cannot have 1D 2D scan engines installed on the mobile computer because they are both barcode readers 2 You can run only one utility or application at a time to control the reader For example while running ReaderConfig exe you should not run FORGE Application Generator STREAM Wireless Studio MIRROR Browser or any other application that uses ReaderDLL Appendix I SCAN ENGINE SETTINGS ...

Страница 158: ...posite Code MSI Postal Codes Industrial 25 Misc Interleaved 25 Convert to EAN 13 Matrix 25 Macro PDF Code 128 Code 128 GS1 128 EAN 128 ISBT 128 Code 2 of 5 Industrial 25 Discrete 25 Interleaved 25 Matrix 25 Chinese 25 Code 3 of 9 Code 39 Trioptic Code 39 Italian Pharmacode Code 32 EAN UPC EAN 8 EAN 13 Bookland EAN ISBN UPC E0 UPC E1 UPC A GS1 DataBar RSS GS1 DataBar Omnidirectional RSS 14 GS1 Data...

Страница 159: ...147 Appendix I Laser SE955 GS1 DataBar Limited RSS Limited GS1 DataBar Expanded RSS Expanded GS1 DataBar Expanded Stacked 2D Symbologies PDF417 MicroPDF417 Data Matrix Maxicode QR Code MicroQR Aztec ...

Страница 160: ......

Страница 161: ...l barcodes must be successfully read twice before being decoded Level 3 All barcodes except for the following barcodes must be successfully read twice before being decoded Following barcodes must be read three times Barcode Types Excluded Code Length MSI 4 characters or less Industrial 25 Discrete 25 8 characters or less Interleaved 25 8 characters or less Level 4 All barcodes must be successfully...

Страница 162: ...CP30 Mobile Computer Reference Manual Laser Mode Hold down the scan trigger to start with scanning The scanning won t stop until a a barcode is read b the preset timeout expires or c you release the trigger ...

Страница 163: ...ification must be enabled No Select Length One or two fixed lengths Range 1 55 4 55 Codabar Enable CLSI editing When applied the CLSI editing strips the start stop characters and inserts a space after the first fifth and tenth characters of a 14 character Codabar barcode The 14 character barcode length does not include start stop characters No NOTIS editing Decide whether to include the start stop...

Страница 164: ...nge 1 55 4 55 Chinese 25 Enable Code 39 Enable Convert to Code 32 Convert to Italian Pharmacode No Code 32 Prefix Prefix character A to Code 32 barcodes No Check digit verification Decide whether to verify the check digit If the check digit is incorrect the barcode will not be accepted No Transmit Check Digit Decide whether to include the check digit in the data being transmitted Check digit verif...

Страница 165: ...aBar Stacked and 4 GS1 DataBar Stacked Omnidirectional Enable GS1 Databar Limited Enable GS1 Databar Expanded This group consists of 1 GS1 DataBar Expanded and 2 GS1 DataBar Expanded Stacked Enable Convert RSS to UPC EAN Convert to UPC EAN only applies to GS1 Databar 14 and GS1 Databar Limited barcodes not decoded as part of a Composite barcode Convert to EAN 13 Strip the leading 010 from barcodes...

Страница 166: ...ddons redundancy When Auto discriminate is applied decide the number of times 2 30 of supplementary decoding the same barcode that makes a valid reading 10 times Transmit Check Digit Decide whether to include the UPC A UPC E UPC E1 check digit in the data being transmitted Yes Convert to UPC A The UPC E0 UPC E1 barcode will be expanded into UPC A and the next processing will follow the settings co...

Страница 167: ...atrix E UPC EAN Coupon UPC portion e GS1 DataBar RSS F Codabar G Code 93 H Code 11 I Interleaved 25 L PDF417 Macro PDF417 Micro PDF417 M MSI Q QR Code S Industrial 25 Discrete 25 IATA 2 of 5 U Maxicode X Code 39 Trioptic Bookland EAN US Postnet US Planet UK Postal Japan Postal Australian Postal Dutch Postal AIM CODE ID MODIFIER CHARACTERS Code Type Option Value Option Code 39 0 No check character ...

Страница 168: ... 012345678905 10 is transmitted to the host as a 18 character string E3001234567890510 Bookland EAN 0 Always transmit 0 Trioptic Code 39 0 Always transmit 0 Code 11 0 Single check digit has been verified 1 Two check digits has been verified 3 Check digit has been verified but not transmitted GS1 DataBar RSS 0 Always transmit 0 RSS 14 and RSS Limited will be transmitted with an Application Identifi...

Страница 169: ...mode unbuffered Macro symbols and symbols requiring the decoder to convey ECI escape sequences cannot be transmitted 3 The barcode contains a GS1 128 symbol and the first codeword is 903 907 912 914 915 4 The barcode contains a GS1 128 symbol and the first codeword is in the range 908 909 5 The barcode contains a GS1 128 symbol and the first codeword is in the range 910 911 A PDF417 barcode ABCD w...

Страница 170: ...I protocol not implemented FNC1 implied in first position 4 Model 2 ECI protocol implemented FNC1 implied in first position 5 Model 2 ECI protocol not implemented FNC1 implied in second position 6 Model 2 ECI protocol implemented FNC1 implied in second position Note For JPEG files these BPP settings are ignored for it always uses 8 bits per pixel ...

Страница 171: ...159 Appendix II Laser SE955 ...

Страница 172: ......

Страница 173: ... Level Level 1 Level 1 The following barcodes must be successfully read twice before being decoded Barcode Types Code Length Codabar 8 characters or less MSI 4 characters or less Industrial 25 Discrete 25 8 characters or less Interleaved 25 8 characters or less Level 2 All barcodes must be successfully read twice before being decoded Level 3 All barcodes except for the following barcodes must be s...

Страница 174: ...rate in its most aggressive state providing sufficient security in decoding most in spec barcodes Security Level 1 Select this option if misdecodes occur This level should eliminate most misdecodes Security Level 2 Select this option if Security Level 1 fails to eliminate misdecodes Security Level 3 Select this option if Security Level 2 also fails to eliminate misdecodes However selecting this op...

Страница 175: ...echnologies this gap can grow larger than the maximum size allowed preventing the scan engine from decoding a barcode If this problem occurs set it to Large Intercharacter Gaps to tolerate these out of specification barcodes Normal intercharacter gaps Large intercharacter gaps Normal Code 128 Enable GS1 128 UCC EAN 128 Read GS1 128 barcodes with leading FNC1 character Enable GS1 128 UCC EAN 128 Re...

Страница 176: ...igit in the data being transmitted No Select Length min max One or two fixed lengths Range 1 55 4 55 Matrix 25 Enable Redundancy Decide whether to enable decode redundancy No Check digit verification Decide whether to verify the check digit If the check digit is incorrect the barcode will not be accepted No Transmit Check Digit Decide whether to include the check digit in the data being transmitte...

Страница 177: ...t Length min max One or two fixed lengths Range 1 55 4 55 MSI Enable Check digit verification If Two Check Digits option is selected an additional verification is required to ensure integrity Select one of the algorithms below If the check digit is incorrect the barcode will not be accepted Check digit algorithm One Check Digit Single Modulo 10 Two Check Digits Mod 10 Mod 11 Mod 10 Mod 10 Single M...

Страница 178: ...ns Decode Only With Addons Auto discriminate Ignore Addons redundancy When Auto discriminate is applied decide the number of times 2 30 of supplementary decoding the same barcode that makes a valid reading 10 times EAN 8 extend No UCC coupon extended code Read UPC A barcodes starting with digit 5 EAN 13 barcodes starting with digits 99 and UPC A GS1 128 Coupon Codes UPC A EAN 13 and GS1 128 must b...

Страница 179: ...ther to include the UPC A UPC E UPC E1 preamble System Character and Country Code in the data being transmitted System Character Code 11 Enable Check digit verification Decide whether to verify the check digit If the check digit is incorrect the barcode will not be accepted Disable One Check Digit Two Check Digits Disable Transmit Check Digit Decide whether to include the check digit in the data b...

Страница 180: ...PC Composite Mode UPC barcodes can be linked with a 2D barcode during transmission as if they were one barcode UPC Never Linked Transmit UPC barcodes regardless of whether a 2D barcode is detected UPC Always Linked Transmit UPC barcodes and the 2D portion If the 2D portion is not detected the UPC barcode will not be transmitted CC A B or CC C must be enabled Auto discriminate UPC Composites Transm...

Страница 181: ...ed to C1 The first codeword of MicroPDF417 is 908 or 909 The original Code ID L4 will be changed to C2 The first codeword of MicroPDF417 is 910 or 911 The original Code ID L5 will be changed to C0 Disable Data Matrix Decide whether to use Data Matrix barcode symbol format Enable Data Matrix Inverse Decide whether to decode Data Matrix Inverse Regular Only Decode regular Data Matrix barcodes only I...

Страница 182: ... from an entire Macro PDF sequence only when the entire sequence is scanned and decoded If the decoded data exceeds the limit of 50 symbols no transmission because the entire sequence was not scanned Transmit Any Symbol in Set No Particular Order Transmit data from each Macro PDF symbol as decoded regardless of the sequence Passthrough All Symbols Transmit and decode all Macro PDF symbols and perf...

Страница 183: ...acro PDF sequences even if they encode the same data When you scan Macro PDF sequences scan the entire Macro PDF sequence without interruption MISCELLANEOUS 2D Engine Description Default Miscellaneous Options Transmit Code ID character Decide whether to include AIM Code ID in the beginning of data None AIM code ID character Refer to AIM Code ID Code Characters none ...

Страница 184: ...172 CP30 Mobile Computer Reference Manual ...

Страница 185: ...173 28 KEY KEYPAD Appendix IV KEY REFERENCE TABLES ...

Страница 186: ...e Key Alpha key pressed once Alpha key pressed twice Key Shift key pressed once Shift key pressed twice 1 sp 1 1 SP SP 2 abc 2 2 Abc ABC 3 def 3 3 Def DEF 4 ghi 4 4 Ghi GHI 5 jkl 5 5 Jkl JKL 6 mno 6 6 Mno MNO 7 pqrs 7 7 Pqrs PQRS 8 tuv 8 8 Tuv TUV 9 wxyz 9 9 Wxyz WXYZ 0 0 0 ...

Страница 187: ...175 Appendix IV Key Reference Tables USE OF FUNCTION Fn Key Function key pressed once 1 F1 2 F2 3 F3 4 F4 5 F5 6 F6 7 F7 8 F8 9 F9 0 F10 ...

Отзывы: