CIAS Elettronica S.r.l.
Ed. 1.2
Installation Manual
Page 27 of 36
NEWTON-L
If possible, seal the cable entry hole to prevent insects from entering inside equipment
Replace the front cover on the module and then lock it by tightening the stop screw
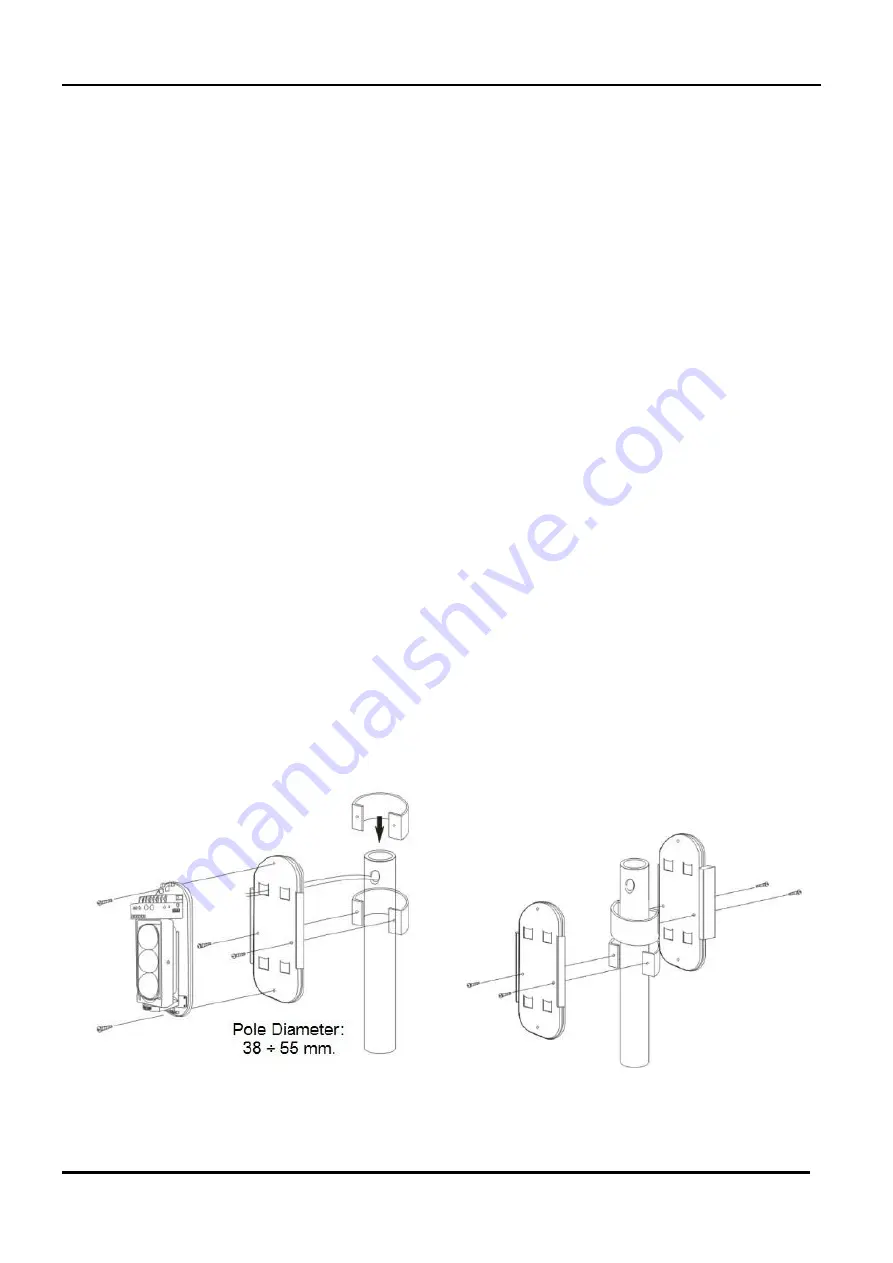
B: mounting to poles
Prepare a hole for connection cable exit at the desired height on the pole
Remove the front cover by unscrewing the screw located at the bottom of the module.
Using a screwdriver, lift the top part until the front separates from the bottom (see figure
on the previous page)
Pass the cable through the metal bracket provided
Using the supplied metal clamp, fasten the metal bracket to the pole
To install two units on the same pole, prepare both clamp fastenings and relative cable
exit holes
Tighten the metal bracket to the clamp
Position the plastic bottom of the module on the metal bracket, passing the connection
cable inside the corresponding hole
Tighten the plastic bottom fastening screws to the metal bracket
Adjust for correct alignment
If possible, seal the cable entry hole to prevent insects from entering inside equipment
Replace the front cover on the module and then lock it by tightening the stop screw
CAUTION: when installing multiple units to a pole, one of them must be structured with only
transmitters and the other, frontally, with only receivers, all having the same range. Perfectly
align the pair of modules with the same frequency selected and verify that the influence of
adjacent modules is less than the numerical value of at least 0.5 (Digit) with respect to its
received signal level.
NOTE: The pole, to which the clamp will be affixed for bracket and barrier mounting, must have
a diameter between 38 and 55 mm.
Содержание NEWTON-L
Страница 30: ...CIAS Elettronica S r l Ed 1 2 Installation Manual Page 29 of 36 NEWTON L 8 PRECAUTIONS FOR INSTALLATION...
Страница 38: ...NOTE...
Страница 39: ...NOTE...


