background image

INSTALLATION

 | 

ANLAGEN

 | 

INSTALLATIE

 | (FR) (UK) (DE) (NL)

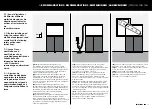
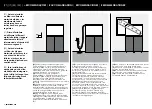
(FR) 

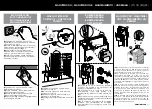
Placer à l’extrémité qui contient le câble. 

(Schéma A).

(UK) 

Place the end that contains the cable. 

(Figure A).

(DE) 

Das Ende mit dem Kabel anbringen 

(Abbildung A).

(NL) 

Bevestig het uiteinde met de kabel. (Figuur 

A).

ÉCLAIRAGE | LIGHTING

BELEUCHTUNG | VERLICHTING

COUVERCLE | LID | ABDECKUNG | DEKSEL

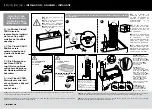
(FR) 

A

 -  Trappe d’alimentation

B

 - Poignée

(UK) 

A

 - Feeding hole

B

 - Handle

(DE) 

A

 - Futterklappe

- Griff

(NL) 

A

 - Voederklep

B

 - Handgreep.

EMOTIONS PRO

 | 5

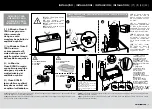
(FR) 

Placez le câble de la LED dans le trou 

correspondant.

(UK)

 Place the LED cable into the corresponding 

hole.

(DE) 

Das LED-Kabel durch die entsprechende 

Bohrung führen.

(NL)

 Plaats de LED-kabel in het bijbehorende 

boorgat.

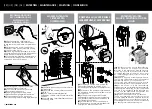
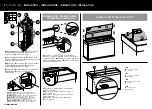
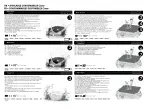
(FR) 1)

Pompe 

2)

Thermoplongeur 

3)

Courbe 

de sortie d’eau 

4)

masses filtrantes 

5)

support 

de consommables 

6)

entrées d’eau;

(UK)


1)

Pump 

2)

Heater 

3)

Water outlet curve 

4)

Filter media 

5)

Consumable holder 

6)

Water 

inlets;

(DE) 1)

Pumpe 

2)

Heizelement 

3)

Krümmung 

für Wasserauslass 

4)

Filtermassen 

5)

Verbrauchsmaterialhalter 

6)

Wassereinlässe;

(NL) 1)

Pomp  

2)

Verwarmer 

3)

Waterafvoerbocht 

4)

Filtermassa’s  

5)

Verbruiksondersteuning 

6)

Waterinlaten.

(FR) 

Attention

: Assurez-vous que le niveau de l’eau est 

conforme aux exigences dans le trou situé dans le coin 

supérieur droit.

(UK) 

Attention

: make sure the water level is as required when 

drilling in the upper right corner.

(DE) 

Achtung

: Vergewissern Sie sich beim Bohren in der oberen 

rechten Ecke, dass der Wasserstand den Anforderungen 

entspricht.

(NL) 

Let op

: Zorg ervoor dat het waterniveau overeenkomt 

met de vereisten bij het boren in de rechterbovenhoek.

A

B

A

4

6

2

5

1

3

6

Содержание EMOTIONS PRO 100

Страница 1: ...FR GUIDE CONSEILS UK INSTRUCTIONS AND ADVICE GUIDE DE RATGEBER NL HANDLEIDING EN TIPS PT GUIA CONSELHOS IT GUIDA E SUGGERIMENTI ES GUIA CONSEJOS SE INSTRUKTIONSFOLDER 60 80 100 120...

Страница 2: ...arium Kom en ontdek een nieuwe serie van aquariums met een modern design Wij wensen u vele jaren aquariumplezier PT Felicita es adquiriu um aqu rio Emotions Venha descobrir uma nova gama de aqu rios c...

Страница 3: ...Do not place the Emotions above an electrical appliance Make the drip curve so that the water does not come into contact with the socket DE F r das Emotions ist ein elektrischer Anschluss erforderlich...

Страница 4: ...t or to lift up the tank DE Nicht zum Abst tzen oder zum Heben verwenden NL Niet gebruiken als steun of om op te tillen RETIREZ LE COUVERCLE DU FILTRE REMOVE THE FILTER COVER FILTERDECKEL ABNEHMEN VER...

Страница 5: ...rmoplongeur 3 Courbe de sortie d eau 4 masses filtrantes 5 support de consommables 6 entr es d eau UK 1 Pump 2 Heater 3 Water outlet curve 4 Filter media 5 Consumable holder 6 Water inlets DE 1 Pumpe...

Страница 6: ...3 Das Filterabteil entfernen NL 1 Verwijder de bocht van de pomp 2 Trek de pomp en verwarmingskabels 3 Verwijder de filterafscheider om FR 1 Placez la pompe dans le s parateur du filtre de mani re ce...

Страница 7: ...WEISE GEBRUIKAANWIJZING FR UK DE NL DE Alle elektrischen Ger te des Aquariums Verwenden Sie diese Ger te nicht f r irgendeinen anderen Zweck als f r Aquarien im Hausbereich und ausschlie lich in Innen...

Страница 8: ...attenzione agli schizzi Non ponete il Emotions sopra un apparecchio elettrico Predisporre la curva di gocciolamento per evitar che l aqua entri in conttato con la presa ES El Emotions necesita un enc...

Страница 9: ...appoggio o per sollevare ES No utilizar para apoyar ni levantar SE Far inte anvandas som stod eller for lyft REMOVA A TAMPA DO FILTRO RIMUOVERE IL COPERCHIO DEL FILTRO RETIRAR LA TAPA DEL FILTRO AVL G...

Страница 10: ...h l PT 1 Bomba 2 Aquecedor 3 Curva de sa da de gua 4 Massas filtrantes 5 Suporte de consum veis 6 Entradas de gua IT 1 Pompa 2 Riscaldatore 3 Tubo di uscita dell acqua 4 Paste filtranti 5 Supporto pro...

Страница 11: ...s cables de la bomba y lo calentador 3 Retirar el separador del filtro SE 1 Avlagsna pumpkurva 2 Avl gsna pumpen och v rmekablar 3 Avl gsna separatorfiltret f r att avl gsna pump och motst nd PT 1 Col...

Страница 12: ...recolha para possibilitar o seu tratamento 4Partecipiamo alla protezione dell ambiente Il vostro apparecchio composto da diversi materiali che possono essere riciclati Lasciatelo in un punto di racco...

Страница 13: ...40 450 E mail sav ciano pt DE F r dieses Ciano Ger t wird eine Garantie von 24 Monaten ab dem Datum des Kaufs durch den Benutzer gew hrt die alle Material oder Herstellungsm ngel umfasst Diese Garanti...

Страница 14: ...prese d acqua sia privo di particelle ES Despu s del manten imiento verificar siempre que todas las entradas de agua est n libres de part culas SE Efter underh ll kon trollera alltid att var je h l r...

Страница 15: ...4 5 ion m canique 1 2 2 3 6 7 7...

Страница 16: ...glish Niet contractuele foto s Foto non contrattuali Fotos non contractuales Fotos n o contractuais Icke kontraktsm ssiga fotografier A40493 00 Available for Disponible pour Download now T l chargez l...

Отзывы: