13-7
13-3-1. Automatic range selection recording
・
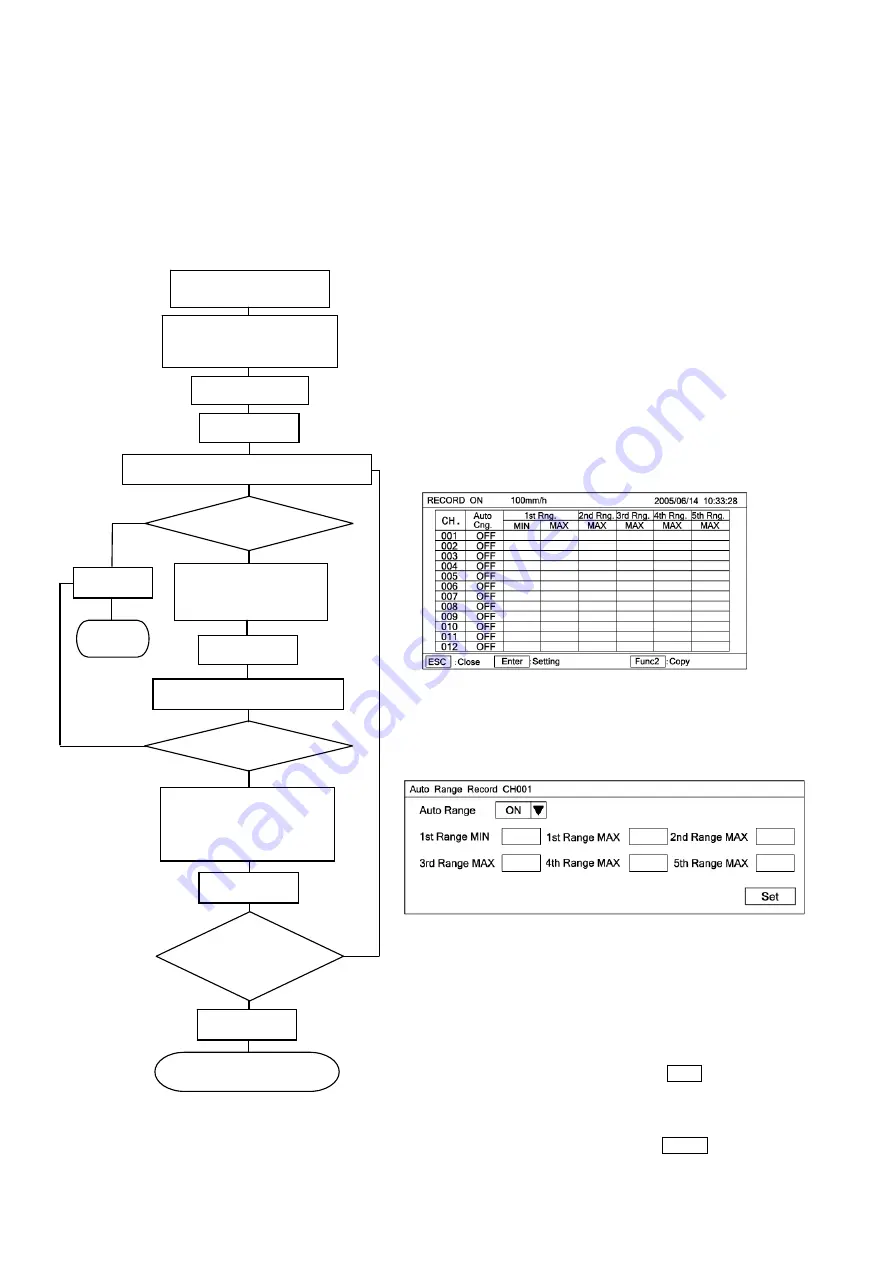
Recording ranges can be set up to max. 5 stages every channel.
・
Each range is automatically selected to the next range when it exceeds zero or span of each stage by 0.5mm on
the analog trace.
・
The relation between range stage number and each span setting is No.1 zero < No.1 span < No.2 span < No.3
span
・・・
.
【
Setting method
】
*
Set the following settings after checking if the [AUTO RNG] is selected on analog recording format (p13-6).
(
Note1
)
If a set value at the higher limit of No.1 range is
equal to or less than a set value at the lower limit of
No.1 range, the setting is not acceptable. This also
applies to the higher-limit of No.2 range, higher-limit
of No.3 range
・・・
, correspondingly.
①
Select OPT. MENU to enter the setting display mode, referring to page
6. A window opens and a setting items table is displayed.
②
Select a desired item to be set by moving the cursor by means of
・
・▲・▼
keys.
③
Select AUTO RNG.
④
Press Enter key to enter the setting table display (12 points
collective)screen.
(For the setting table display (12 points collective) screen, refer to
⑥
)
⑤
For stopping the setting, press Esc key. The screen returns to the last
one, each time Esc key is pressed once.
⑥
Move the cursor to a desired channel number to be set by
▲
or
▼
key.
The cursor does not move to any item other than CH. No.
⑦
After selecting a channel to be set, press Enter key.
A window opens and a setting parameter entry screen is displayed.
(For the setting parameter entry screen, refer to
⑧
)
⑧
Move the cursor to a desired channel number to be set by
・
・▲・
▼
keys.
Each time Enter key is pressed once, the cursor move in the sequence
of Auto Range
→
1st Range MIN
→
1st Range MAX
→
2nd Range
MAX
→
3rd Range MAX
→
4th Range MAX
→
5th Range MAX
→
Set.
The Auto Range selection parameter input area is determined by
selecting a setting parameter. A window opens. Select a parameter by
▲
or
▼
key.
After setting this screen, bring the cursor to Set .
⑨
Terminate the setting (change, addition) by pressing Enter key.
⑩
For copying a set value, press [Func 2] key in the screen in
⑥
.
Input the copy source and copy destination by numeric keys.
After the end of setting, bring the cursor to Copy and press [Enter]
key.
Setting table display(12points collective)
Status in
④
on page 6
Set
?
①
Esc key
NO
⑤
End
YES
Select a channel by
using
▲
or
▼
key
⑥
Selection of setting items
・
・▲・▼
keys
②
Enter key
③
Enter key
⑦
AUTO
RNG
④
Setting parameter display
Set?
NO
YES
Set by using
・
・
▲・▼
keys and numeric
keys (Change, addition)
Enter key
Is setting
continued?
YES
⑧
Status in
④
on page 6
NO
Esc key
⑨
Содержание LE5100
Страница 2: ......
Страница 89: ......
Страница 90: ...32 8 KUMANO CHO ITABASHI KU TOKYO 173 8632 Telephone 81 3 3956 2171 Facsimile 81 3 3956 0915 Printed in Japan ...


