background image

Chapter

 5Maintenance and Checkup 

58 

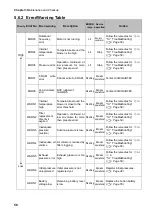
5.6.2


Error/Warning Table 

Priority


Error No.


Error/warning


Description


ERROR 

lamp


Device 

operation


Action


High 


Low 

ERR03 

Rotational 
frequency 
error 

Motor is not running. 

Lit 

Remains 
operational 

Follow the remedies for 

  in 

“5.7


Troubleshooting


(

  Page 59

). 

ERR04 

Internal 
temperature 
error 

Temperature around the 
blower is too high. 

Lit 

Stop 

Follow the remedies for 

  in 

“5.7


Troubleshooting

” 


(

  Page 59

). 

ERR06  Pressure error 

Operation  continued  at 
low  pressure  for  more 
than preset period. 

Lit 

Stop 

Follow the remedies for 

  in 

“5.7


Troubleshooting


(

  Page 59

). 

ERR07 

F-RAM  write 
error 

Cannot write to F-RAM.  Flashing 

Remains 

operational 

Contact CHIKO AIRTEC. 

ERR08 

Communication 
error 

BCC judgment 
mismatch 

Flashing 

Remains 

operational 

Contact CHIKO AIRTEC. 

WARN1 

Internal 
temperature 
high 

Temperature around the 
blower is close to the 
error threshold. 

Flashing 

Remains 

operational 

Follow the remedies for 

  in 

“5.7


Troubleshooting


(

  Page 59

). 

WARN2 

Filter 
replacement 
time limit 
expired 

Operation  continued  at 
low air volume for more 
than preset period. 

Flashing 

Remains 

operational 

Follow the remedies for 

  in 

“5.7


Troubleshooting


(

  Page 59

). 

WARN3 

Inadequate 
pressure 
(suction) 

Suction pressure is low.  Flashing 

Remains 

operational 

Follow the remedies for 

  in 

“5.7


Troubleshooting


(

  Page 59

). 

WARN4 

Inadequate  air 
volume 

Air volume is reduced by 
filter clogging. 

Flashing 

Remains 

operational 

Follow the remedies for 

  in 

“5.7


Troubleshooting”


(

  Page 59

). 

WARN5 

Exhaust 
pressure error 

Exhaust  pressure is too 
high. 

Flashing 

Remains 

operational 

Follow the remedies for 

  or 

  in   

“5.7


Troubleshooting


(

  Page 59

). 

WARN6 

Initial pressure 
unregistered 

Initial pressure is not 
registered yet. 

Flashing 

Remains 

operational 

Register initial pressures. 
(

  Page 48)


WARN7 

Battery 
voltage low 

Remaining  battery  level 
is low. 

Flashing 

Remains 

operational 

Replace the button battery. 
(

  Page 55)


Содержание CBA-1500AT3-HC-DSA-V1

Страница 1: ...ction Manual hereinafter referred to as this manual and operate it after often reading this manual Please keep this manual carefully to be able to use it at any time English Dust Collector for Laser M...

Страница 2: ...ectively The dust collector for laser marker is an energy saving type clean box that realizes air technology in a compact body Please read this instruction manual thoroughly and handle this machine co...

Страница 3: ...2 2 1 CBA 1500AT3 HC DSA V1 7 2 3 AT3 8 2 4 9 2 4 1 9 2 4 2 9 2 4 3 10 3 11 3 1 11 3 1 1 11 3 1 2 13 3 2 13 3 3 14 4 15 4 1 15 4 2 15 4 2 1 15 4 2 2 16 4 2 3 16 4 3 17 4 4 17 4 5 18 4 5 1 18 4 5 2 18...

Страница 4: ...2 5 6 2 25 5 7 26 6 27 6 1 27 6 1 1 29 6 1 2 29 6 1 3 30 6 2 30 6 2 1 RS485 30 6 2 2 30 7 31 7 1 31 7 2 31 7 3 32 7 3 1 CBA 1500AT3 HC DSA V1 32...

Страница 5: ...1 CMN023 005 Translation of the original instructions 3 1 1 1 1 2 10 60 80 1 3 0 40 80 100 1 000...

Страница 6: ...1 4 1 4 2 OFF 1 5...

Страница 7: ...1 CMN023 005 Translation of the original instructions 5 1 6...

Страница 8: ...2 6 2 2 1 200V 220 230V CE 1 1 2 1 1 HEPA 1 3m 200V 1 220 230V CE 1 1...

Страница 9: ...2 CMN023 005 Translation of the original instructions 7 2 2 2 2 1 CBA 1500AT3 HC DSA V1 1 1 1 2 AT3 BOX HEPA...

Страница 10: ...2 8 2 3 AT3 EL OLED No 1 7 2 4 9 4 15 1 1 1 1 OFF 3 3 3 14 ON ENTER 3 3 3 14 4 15 MODE SELECT 4 15...

Страница 11: ...2 CMN023 005 Translation of the original instructions 9 2 4 2 4 1 2 4 2 ON OFF 15 14 ENTER 3 ON 14 OFF 3 Ver ID Battery Date Time RS485 18...

Страница 12: ...2 10 2 4 3 OP kPa SP kPa DP kPa EP kPa Blower Runtime h 18 Total h Moter...

Страница 13: ...3 CMN023 005 Translation of the original instructions 11 3 3 1 3 1 1 0 40 80 RH REMOVE 1 1 1...

Страница 14: ...3 12 1 2 2 3 4 OFF ON 1 A OFF 40 50 A 2...

Страница 15: ...3 CMN023 005 Translation of the original instructions 13 3 1 2 10 1 2 3 2 1 ON RS485 ID 2 AT3 ON 3 4 1 7 3 ON OFF 3 30 ON OFF Ver ID...

Страница 16: ...3 14 3 3 WARN4 1 2 3 ENTER 3 Initial DP Get Y 4 ENTER MODE SELECT 5 1 7 Initial DP Check 6 Initial DP Entry WARN6 OFF 3 1 OFF 3 Initial DP Clr Y 2 ENTER MODE SELECT 3 Initial DP Clr...

Страница 17: ...l instructions 15 4 4 1 MODE SELECT 4 2 4 2 1 15 4 2 2 16 4 2 3 16 4 2 1 1 2 Shaking Set 3 ENTER 4 Shaking Manual 5 ENTER 6 Shaking Start Y 7 ENTER 8 MODE SELECT Com Setting Volume Down ST Other Setti...

Страница 18: ...4 16 4 2 2 20 180 20 1 2 Shaking Set 3 ENTER 4 Shake Time sec 5 ENTER 6 7 ENTER 8 MODE SELECT 4 2 3 0 60 60 1 2 Shaking Set 3 ENTER 4 Interval min 5 ENTER 6 7 ENTER 8 MODE SELECT...

Страница 19: ...uctions 17 4 3 1 25 1 9600bps 19200bps 38400bps 57600bps 115200bps 9600bps 8bit 8bit 8bit 9bit 8bit 1 2 1 1 2 Com Setting 3 ENTER 4 5 ENTER 6 7 ENTER 8 MODE SELECT 4 4 WARN4 1 2 Volume Down ST 3 ENTER...

Страница 20: ...4 5 2 18 4 5 3 19 4 5 1 1 2 Other Setting 3 ENTER Time Adjust 4 ENTER 5 6 ENTER 7 8 9 ENTER 10 MODE SELECT 4 5 2 Runtime 1 2 Other Setting 3 ENTER Time Adjust 4 Runtime Reset 5 ENTER Reset Runtime Y E...

Страница 21: ...4 CMN023 005 Translation of the original instructions 19 4 5 3 1 2 Other Setting 3 ENTER Time Adjust 4 Setting Reset 5 ENTER 1 YES ENTER 6 1 START 7 ENTER 4 6 4 OFF 1 2 3 ENTER No 4 4 5 MODE SELECT...

Страница 22: ...5 20 5 5 1 WARN2 1 5 1 1 1 1 1 2 2 1 3 1 4 2 1...

Страница 23: ...5 CMN023 005 Translation of the original instructions 21 5 1 2 2 2 1 2 2 3 2 4 2 5 2 6 2 7 4 3 2 5 1 3 HEPA 1 2 2 HEPA 2...

Страница 24: ...5 22 3 ACC 4 5 6 5 2 1 Littell fuse 218 250V 15A 1 2 3 ACC...

Страница 25: ...5 CMN023 005 Translation of the original instructions 23 5 3 CR2477 CR2477 1 2 3 2 4 5 6 7 5 4 1 1 1 1 5 5...

Страница 26: ...5 24 5 6 No 5 6 2 25 5 7 26 5 6 1 1 No No 2 MODE SELECT No 3 No 4 No 5 6 2 25 5 MODE SELECT 6 ENTER MODE SELECT ON WARN6 WARN7 ERR04 2 ERR04 No 1 WARN4 2 ERR04 ERROR CLEAR Y...

Страница 27: ...3 005 Translation of the original instructions 25 5 6 2 No ERR03 5 7 26 ERR04 5 7 26 ERR06 5 7 26 ERR07 F RAM F RAM ERR08 BCC WARN1 5 7 26 WARN2 5 7 26 WARN3 5 7 26 WARN4 5 7 26 WARN5 5 7 26 WARN6 14...

Страница 28: ...5 26 5 7 EL ON ON 5 2 22 1 2 3 4 1 4 ON OFF 30 1 2 1 2 5 1 20 5 1 20 5 1 20 5 1 20...

Страница 29: ...6 CMN023 005 Translation of the original instructions 27 6 6 1 6 1 1...

Страница 30: ...6 28 1 5V 0 2V LOW DC 1 2...

Страница 31: ...n of the original instructions 29 6 1 2 1 1 AT3 2 0 5V GND 1 5V 4 7k 3 NPN 3 NPN 3 NPN WARN2 WARN4 WARN5 ERR 1 2 0 5V 5 0V DCV 1 0 6 1 1 2 1 2 1 7 3 1 8 2 3 4 2 4 2 9 5 3 0 3 5 6 3 6 4 1 7 4 2 5 0 4 3...

Страница 32: ...6 30 6 1 3 ON OFF ON OFF 6 1 2 29 ON OFF 6 1 2 ON OFF ON OFF 6 2 RS 485 RS EN ON OFF 6 2 1 RS485 4 3 4 3 17 6 2 2...

Страница 33: ...500AT3 HC DSA V1 1140W 200V 11 6A 50 60Hz 4 1m3 min 15 0kPa 55 58dB 41 8kg CBA 1500AT3 HC DSA V1 CE 1140W 220 230V 11 6A 50 60Hz 4 1m3 min 15 0kPa 55 58dB 41 8kg 1 1m A dB 2 7 2 CBA 1500AT3 HC V1 CE 1...

Страница 34: ...7 32 7 3 7 3 1 CBA 1500AT3 HC DSA V1...

Страница 35: ...CMN023 005 Translation of the original instructions 33 12 7 2 7 2 31...

Страница 36: ...34...

Страница 37: ...T Mode 49 Shaking Setting Mode 49 4 2 1 Manual Setting Mode for shaking 49 4 2 2 Time Setting Mode for shaking 50 4 2 3 Interval time Setting Mode for auto shaking 50 Communication Format Setting Mode...

Страница 38: ...ents 62 6 1 3 Remote Operation 63 Communication Function 63 6 2 1 RS485 Communication 63 6 2 2 Ethernet 63 Chapter 7 Appendix 64 Specifications 64 Consumables List 64 Electrical Diagram 65 7 3 1 CBA 1...

Страница 39: ...ble explosive or corrosive mist smoke or gases CAUTION This device is designed for installation in a cleanroom or a clean factory Avoid installation in other areas such as outdoors Ensure a wide sucti...

Страница 40: ...o suck dry dust without potential dust explosion Be sure to connect the ground wire CAUTION Do not move the device while in operation Use the device in locations of pollution degree 2 Use a power supp...

Страница 41: ...CMN023 005 original instructions 39 English Safety Label Locations High voltage warning label High temperature warning label Do not disassemble label Name plate label High voltage warning label Name p...

Страница 42: ...adsorbs dust and fumes 1 Secondary filter Protects electrical parts from dust 1 Activated carbon cassette Adsorbs odors 1 Exhaust HEPA filter Cleans exhaust 1 Power cable 3m Connects to the power outl...

Страница 43: ...king motor chamber Reduces clogging of the primary filter Secondary filter Protects electrical parts from dust AT3 panel operation panel Operates the device Main power switch Turns ON OFF power to the...

Страница 44: ...essing of the Left or Right arrow button changes the suction power to the next lower or higher level During MODE SELECT mode each pressing of the Left or Right arrow button moves the cursor left or ri...

Страница 45: ...ring stoppage Normal mode During operation ON button OFF button MODE SELECT Mode Page 49 MODE SELECT button Registering Initial Pressures Page 48 ENTER button Held down for 3 sec Main power switch ON...

Страница 46: ...kPa External pressure Suction pressure Differential pressure Exhaust pressure Blower Temperature around blower Runtime h Accumulated run time resettable Indicates run time accumulated since the last r...

Страница 47: ...40 Ambient humidity 80 RH or lower without dew condensation Ambient conditions Indoors not exposed to direct sunlight free of corrosive flammable gases oil mist and dust Make sure the sticker is remo...

Страница 48: ...e insulation sheet from the button battery cover unit in the direction of the arrows leftward of downward CAUTION It will cause a huge consumption of the battery if the insulation sheet is removed whi...

Страница 49: ...rd to the power outlet Piping Connect the intake piping separately prepared to the inlet flange IMPORTANT Ensure appropriate piping during operation The piping should be as short as practicable with t...

Страница 50: ...tial DP Check Entry message and the suction power level and differential pressure values 6 When the registration completes the display shows the Initial DP Entry message and the device returns to norm...

Страница 51: ...o shaking Page 50 4 2 1 Manual Setting Mode for Shaking Shaking is performed manually when the unit is not in operation 1 Move to the MODE SELECT mode 2 Press the Up Down arrow buttons to move to the...

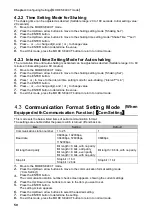
Страница 52: ...igit and or to change value 7 Press the ENTER button to determine the value 8 To exit this mode press the MODE SELECT button to return to normal mode Communication Format Setting Mode When Equipped wi...

Страница 53: ...setting 4 5 1 Clock Calibration Mode Page 51 Accumulated run time resetting 4 5 2 Accumulated Run Time Reset Mode Page 52 Setpoint resetting 4 5 2 Setpoint Reset Mode Page 52 4 5 1 Clock Calibration...

Страница 54: ...air volume down alert timing and resetting the accumulated run time 7 Move to the MODE SELECT mode 8 Press the Up Down arrow buttons to move to the other setting mode Other Setting 9 Press the ENTER...

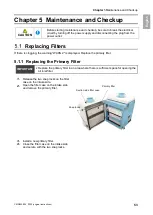
Страница 55: ...ogging the warning WARN 2 is displayed Replace the primary filter 5 1 1 Replacing the Primary Filter IMPORTANT Replace the primary filter in an area where there is sufficient space for opening the air...

Страница 56: ...move the secondary filter 6 Install a new secondary filter 7 Close the filter case on the intake side and secure with the snap locks after reattaching the filter presser plate and shaking guard with s...

Страница 57: ...nated by CHIKO AIRTEC Designated fuse 218 Series from Littell fuse 250 V 15A 1 Open the cover of the fuse box The cover cannot be removed 2 Take out the fuse box using a flathead screwdriver or other...

Страница 58: ...cked Exhaust condition Daily Exhaust port is not blocked Operation panel condition Daily Error or warning is not displayed Daily Care Method CAUTION Be sure to disconnect the plug from the power outle...

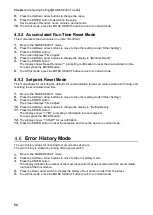
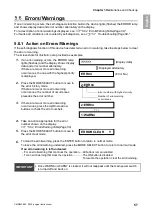
Страница 59: ...alternately Error No 2 Press the MODE SELECT button to move to the error history mode If there are two or more error warning occurrences the number of occurrences precedes the error number 3 If there...

Страница 60: ...e blower is close to the error threshold Flashing Remains operational Follow the remedies for in 5 7 Troubleshooting Page 59 WARN2 Filter replacement time limit expired Operation continued at low air...

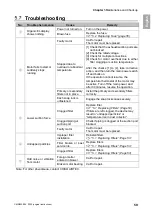
Страница 61: ...be active Turn off the main power and after 30 minutes resume the operation Primary or secondary filters not in place Install the primary and secondary filters correctly Each snap lock is unfastened E...

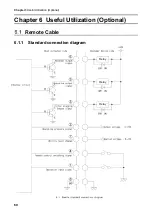
Страница 62: ...Chapter 6Useful Utilization Optional 60 Chapter 6 Useful Utilization Optional Remote Cable 6 1 1 Standard connection diagram Relay Relay Relay...

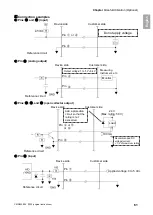
Страница 63: ...e Customer side Pin or Pin Output voltage 1 to 5 V 0 2 V Device side Customer side Pin Pin Measuring instrument etc Reference circuit Monitor Device side Customer side Pin Add a protection circuit so...

Страница 64: ...s Green Operation output signal 3 Outputs LO during operation and HI when stopped Green white Abnormal output signal 3 Outputs HI during operation and LO when an error occurs Filter clogging output si...

Страница 65: ...operated or changed on the device side during transition to remote operation The current suction power level is stored in memory This means that the previously effective level is stored even if main...

Страница 66: ...a 55 58dB 41 8kg 1 Noise value is measured with a hose connected to the suction port at a distance of 1m from the device on the A scale 2 When used with adhered zeolite Consumables List Part name Repl...

Страница 67: ...Chapter 7Appendix CMN023 005 original instructions 65 English Electrical Diagram 7 3 1 CBA 1500AT3 HC DSA V1...

Страница 68: ...IRTEC designated sales agent Blemish contamination or other appearance change that may occur during use Replacement of any consumable or accessory or use of any part not designated by CHIKO AIRTEC Fai...

Страница 69: ...MEMO...
Страница 70: ...CHIKO AIRTEC CO LTD 562 0012 2 27 24 2 27 24 Hakushima Minoh Osaka 562 0012 Japan TEL 81 072 720 5151 FAX 81 072 720 5133 URL http chiko airtec jp...

Отзывы: