background image

4

Installation Instructions

MSP-BBSP

E.

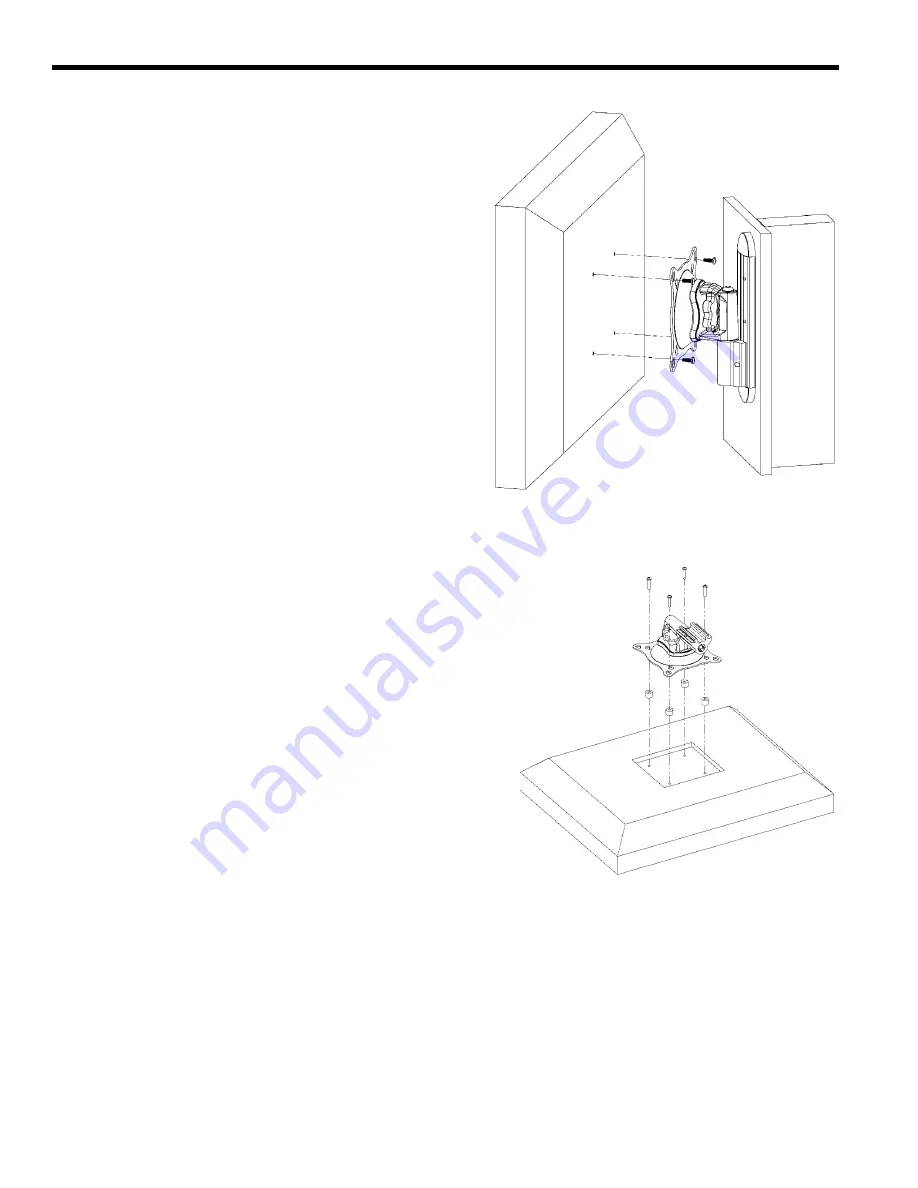
Install two remaining Phillips pan head screws through the 

mount and into the mounting holes of your display.

F.

Secure your display to the mount by tightening the four 

Phillips pan head screws.

WARNING:  Make sure your cables do not run through a pinch 

point.

G.

Connect and secure power/audio/video cables, making 

sure to leave sufficient slack to allow for movement of the 
display.

VESA Compliant Recessed Mounting

A. Place four 1/2” X 3/8” Nylon spacers or four 1/2” X 3/4” 

Nylon spacers, as necessary, over the mounting holes of 
your display (see Figure 6).

B.

Place the mount over the Nylon spacers, matching the hole 

pattern on your display (75mm or 100mm) with the hole 
pattern on the mount.

C.

Using four M4 X 20mm Phillips pan head screws for 1/2” 

X 3/8” Nylon spacer installation or four M4 X .7 X 30mm 
Phillips pan head screws for the 1/2” X 3/4” Nylon spacer 
installation, secure the mount to your display.

H.

Install the mount on the wall plate, set to desired height at 

one of the fixed height settings and secure by tightening 
the set screw (see Figure 3).

J.

Install the end caps on the wall plate (see Figure 4).

WARNING:  Make sure your cables do not run through a pinch 

point.

K. Connect and secure power/audio/video cables, making 

sure to leave sufficient slack to allow for movement of the 
display.

Non-VESA Compliant Mounts

A. Contact Chief Manufacturing for custom interface brack-

ets.

Figure 5. Flush Mounting

Figure 6. Recessed Mounting

Содержание MSP-BBSP

Страница 1: ......

Страница 2: ...components or other equipment WARNING The weight of the display placed on the mountmust not exceed 40 lbs 18 1 kg the maximum load capac ity of the mount WARNING Watch for pinch points Do not put your fingers between movable parts WARNING Make sure the mount and brackets are correctly oriented CAUTION Check the unit for shipping damage before you begin the installation CONTENTS SPECIFICATIONS 1 TO...

Страница 3: ...llation Instructions MSP BBSP DRAWINGS 10 Wood Screws Wall Plate M4 X 8mm 12mm 16mm 20mm or 30mm Phillips pan head screws 1 8 Spacers optional Adjustment Knob End Cap End Cap Set Screw Tension Adjustment Bolt ...

Страница 4: ...hillips head 10 wood screws supplied secure the wall plate see Figure 1 4 Install screw cover see Figure 2 5 Check mount to insure it is level and adjust to level if neces sary 6 Determine if you are installing a VESA compliant flush mount display VESA compliant recessed mount display or a non VESA compliant display and follow the appropriate instruc tions VESA Compliant Flush Mounting A Install t...

Страница 5: ...matching the hole pattern on your display 75mm or 100mm with the hole pattern on the mount C Using four M4 X 20mm Phillips pan head screws for 1 2 X 3 8 Nylon spacer installation or four M4 X 7 X 30mm Phillips pan head screws for the 1 2 X 3 4 Nylon spacer installation secure the mount to your display H Install the mount on the wall plate set to desired height at one of the fixed height settings a...

Страница 6: ...y see figure 7 6 Tighten six M4 X 16mm Phillips flat head screws Attach Centris Bracket to Display 1 Start two M4 x 8mm Phillips pan head screws into the top two mounting holes of interface bracket see figure 8 2 Hang mount from two screws 3 Install the remaining two M4 x 8mm Phillips pan head screws into the bottom two mounting holes of interface bracket 4 Secure the display to the mount Centris ...

Страница 7: ...ps screwdriver to tighten or loosen the Phillips pan head screw see DRAWINGS 2 Check for desired tension 3 Repeat Steps 1 and 2 until desired tension is obtained Lateral Tension Adjustment 1 Using a 3 16 hex wrench provided slightly tighten or loosen lateral tension adjustment bolt see DRAWINGS 2 Check for desired tension 3 Repeat Steps 1 and 2 until desired tension is obtained ...

Страница 8: ...ev A Chief Manufacturing Inc 8401 Eagle Creek Parkway Suite 700 CSAV Europe B V Savage MN 55378 USA Zekeringstraat 17 1014 BM PHONE 800 582 6480 Amsterdam Netherlands PHONE 952 277 3901 PHONE 31 0 20 5708923 FAX 952 894 6918 FAX 31 020 5708989 FAX 877 894 6918 europe chiefmfg com www chiefmfg com ...

Отзывы: