RM245 Series
System Components Removal and Installation
│
25
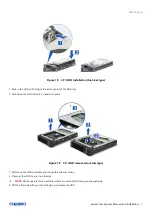
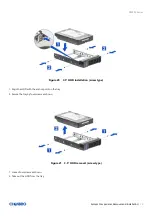
Figure 26
2.5’’ HDD Installation (tool-less type)
1. Align the two guide pins of the HDD tray with the side dimples on the HDD as shown.
2. Push down the HDD until it is locked into place.
NOTE:
To ensure proper system air flow requirements, all front drive bays must be populated with a drive carrier. Drive carriers
must be installed with either a drive or supplied drive blank.
NOTE:
There are drive carriers to support 2.5” devices and 3.5” devices. To maintain system thermals, all drive bays must
be populated with a drive carrier mounted with a hard disk drive, SSD, or supplied drive blank. Drive blanks used with the
3.5” dr
ive carrier can also be used to mount a
2.5” SSD into it as shown below.


