background image


Master/Slave 

The Master/Slave mode will allow you to link up to as many units you want in a daisy chain fashion. In 

this mode, the first unit in the daisy chain will automatically command all other units following. An 

optional TFX-SWF controller connected to the first unit in the chain will allow enhanced control 

functions.  

M A S T E R / S L A V E   S E T T I N G S  

1) 

Connect the (male) 3 pin connector side of the DMX cable to the output (female) 3 pin connector 
of the first fixture.  

2) 

Connect the end of the cable coming from the first fixture which will have a (female) 3 pin 
connector to the input connector of the next fixture consisting of a (male) 3 pin connector. Then, 
proceed to connect from the output as stated above to the input of the following fixture and so on 
as illustrated below in figure “Daisy Chain Connection”.  

Optional Controller

Daisy Chain 

Controller not required for 

Master/Slave operation


Note!  

For additional information on linking fixtures read under section “DMX Primer” 


DMX Mode 

Operating in a DMX Control mode environment gives the user the greatest flexibility when it comes to 

customizing or creating a show. In this mode you will be able to control each individual trait of the 

fixture independently.  

S E T T I N G   T H E   S T A R T I N G   A D D R E S S  

This DMX mode enables the use of a universal DMX controller device. Each fixture requires a "start 

address" from 1 to 511. A fixture requiring one or more channels for control begins to read the data 

on the channel indicated by the start address. For example, a fixture that occupies or uses 6 channels 

of DMX and was addressed to start on DMX channel 100, would read data from channels: 100, 101, 

102, 103, 104, and 105. Choose start addresses so that the channels used do not overlap and notate 

the start address selected for future reference.  

If this is your first time addressing a fixture using the DMX-512 control protocol, we suggest jumping 

to the Appendix section and read the “DMX Primer”. It contains very useful information that will help 

you understand its use. 

There are three different DMX 

channel configurations on the 

Stage Wash. Each mode or 

configuration allows the user to 

control the fixure in a different 

manner using a universal DMX 

controller.


A:0:0:1 

C & B  

AUTO 

AUDIO 

DMX Signal 
Received 

MODE

UP

DOW

RGB&D


TFX-64CM User Manual 

9


Revision: 2006-11-30/17:23


Содержание Stage Wash 1800

Страница 1: ...TFX 64CM Stage Wash 1800 USER MANUAL Chauvet 3000 N 29 th Ct Hollywood FL 33020 U S A 800 762 1084 954 929 1115 FAX 954 929 5560 www chauvetlighting com ...

Страница 2: ...NG MODES 8 Stand Alone Mode 8 Master Slave 9 DMX Mode 9 TFX SWF Easy Controller Optional 11 TFX CONPK Stage Wash Controller Pack Optional 11 APPENDIX 12 DMX PRIMER 12 DMX CHANNEL VALUES 13 RGB D Mode RGB and Dimmer 13 C B Mode Color and Brightness 13 RGB and Chase Mode 13 COLOR MIX TABLE PRESET 14 MAINTENANCE 19 RETURNS PROCEDURE 20 CLAIMS 20 GENERAL TROUBLESHOOTING 21 TECHNICAL SPECIFICATIONS 22 ...

Страница 3: ...includes important information about the installation usage and maintenance Please keep this User Guide for future consultation If you sell the unit to another user be sure that they also receive this instruction booklet Always make sure that you are connecting to the proper voltage and that the line voltage you are connecting to is not higher than that stated on decal or rear panel of the fixture...

Страница 4: ...de select Green or Red 0 100 dimmer 0 100 Blue or Green 0 100 fade time Dimmer 0 100 speed time 1725 watts of total brightness Built in beat activated and automatic programs stand alone Linkable via Master Slave Fan cooled DMX Channel Summary RGB Mode Channel Function 1 Red 2 Green 3 Blue 4 Dimmer C B Color Brightness Mode Channel Function 1 Color Selection 2 Dimmer Combined RGB Chase Mode Channel...

Страница 5: ...oke Clutch LED status window Built in microphone Voltage Selector Switch Control panel buttons DMX Input connector Sound sensitivity knob DMX Output connector Foot controller connector TFX 64CM User Manual 5 Revision 2006 11 30 17 23 ...

Страница 6: ...Note Align labels on lens cover and fixture to reinsert 1 Loosen the thumbscrews as illustrated in figure 1 3 total located near the front of the fixture 2 Pull the lens assembly out from the fixture as illustrated in figure 2 3 Hold the bi pin lamps with a napkin and pull top end of lamp upwards to remove from socket as illustrated in figure 3 4 Hold the new lamp with a lint free cloth and insert...

Страница 7: ... 0 to 100 switch Before applying power to a fixture check that the source voltage matches the fixture s requirement All fixtures must be connected to circuits with a suitable Earth Ground Mounting ORIENTATION This fixture may be mounted in any position provided there is adequate room for ventilation RIGGING Hanging Clamp It is important never to obstruct the fan or vents pathway Mount the fixture ...

Страница 8: ...gnal Received MODE UP DOWN AUDIO MODE ALSO SOUND ACTIVE 1 A steady hold of the MODE button will change the operating mode once then release the button 2 Repeat step 1 until you arrive at the AUDIO operating mode as indicated by the LED next to the label 3 Two parameters will now become available for the AUDIO mode Press the MODE button quickly to toggle between parameters F for Fade time 0 100 D f...

Страница 9: ...test flexibility when it comes to customizing or creating a show In this mode you will be able to control each individual trait of the fixture independently SETTING THE STARTING ADDRESS This DMX mode enables the use of a universal DMX controller device Each fixture requires a start address from 1 to 511 A fixture requiring one or more channels for control begins to read the data on the channel ind...

Страница 10: ...Color and Brightness mode Use channel 1 to move across the RGB spectrum 1 A steady hold of the MODE button will change the operating mode once then release the button 2 Repeat step 1 until you arrive at the C B operating mode as indicated by the led next to the label 3 The display will now read parameter A which represents the DMX channel address value Use the UP and DOWN buttons to change values ...

Страница 11: ...immediate color access fader access to 40 predefined mixed colors fade time control 12 different chase patterns to choose from chase speed control master dimmer level blackout button full on button sound button The TFX 32F provides the following features Selectable modes 1 Blackout 2 Color Hold 3 Chase Up and down pedal buttons select colors and chase patterns Please refer to the TFX 32CON and TFX...

Страница 12: ... fixture The order in which the fixtures are connected is not important and has no effect on how a controller communicates to each fixture Use an order that provides for the easiest and most direct cabling Connect fixtures using shielded two conductor twisted pair cable with three pin XLR male to female connectors The shield connection is pin 1 while pin 2 is Data Negative S and pin 3 is Data posi...

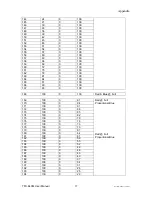
Страница 13: ...Mix table on the next page 1 000 Ù 255 Spectrum Color Mix See Color Mix Table 2 000 Ù 255 Dimmer Intensity 0 100 RGB and Chase Mode Mode Ch 1 Mode Ch 2 Ch 3 Ch 4 RGB Mode 000 Ù 029 Red 0 100 Green 0 100 Blue 0 100 8 Built in Programs Auto 030 Ù 094 Speed 8 Built in Programs Sound 094 Ù 159 Chase Auto 160 Ù 184 Speed Chase Sound 185 Ù 209 40 Color Chase Auto 210 Ù 234 Speed Dimming 0 100 Fade Time ...

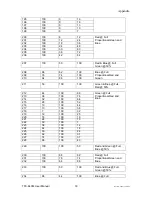
Страница 14: ...0 14 100 36 0 15 100 39 0 16 100 42 0 17 100 45 0 18 100 48 0 19 100 51 0 20 100 54 0 21 100 57 0 22 100 60 0 23 100 63 0 24 100 66 0 25 100 69 0 26 100 72 0 27 100 75 0 28 100 78 0 29 100 81 0 30 100 84 0 31 100 87 0 32 100 90 0 Red Full Proportional Green 33 100 93 0 34 100 100 0 Red Green Full 35 97 100 0 36 94 100 0 37 91 100 0 38 88 100 0 39 85 100 0 40 82 100 0 41 79 100 0 42 76 100 0 43 73 ...

Страница 15: ...Full Proportional Red 65 7 100 0 66 0 100 0 67 0 100 0 68 0 100 0 Green Full only 69 0 100 0 70 0 100 3 71 0 100 6 72 0 100 9 73 0 100 12 74 0 100 15 75 0 100 18 76 0 100 21 77 0 100 24 78 0 100 27 79 0 100 30 80 0 100 33 81 0 100 36 82 0 100 39 83 0 100 42 84 0 100 45 85 0 100 48 86 0 100 51 87 0 100 54 88 0 100 57 89 0 100 60 90 0 100 63 91 0 100 66 92 0 100 69 93 0 100 72 94 0 100 75 Green Full...

Страница 16: ... 55 100 117 0 52 100 118 0 49 100 119 0 46 100 120 0 43 100 121 0 40 100 122 0 37 100 123 0 34 100 124 0 31 100 125 0 28 100 126 0 25 100 127 0 22 100 128 0 19 100 129 0 16 100 130 0 13 100 131 0 10 100 Blue Full Proportional Green Blue Full Proportional Green 132 0 7 100 133 0 0 100 134 0 0 100 135 0 0 100 Blue Full only 136 0 0 100 137 3 0 100 138 6 0 100 139 9 0 100 140 12 0 100 141 15 0 100 14...

Страница 17: ... 166 90 0 100 167 93 0 100 168 100 0 100 Red Blue Full 169 100 0 97 170 100 0 94 171 100 0 91 172 100 0 88 173 100 0 85 174 100 0 82 175 100 0 79 176 100 0 76 177 100 0 73 178 100 0 70 179 100 0 67 180 100 0 64 181 100 0 61 182 100 0 58 183 100 0 55 184 100 0 52 185 100 0 49 186 100 0 46 187 100 0 43 188 100 0 40 189 100 0 37 190 100 0 34 191 100 0 31 192 100 0 28 193 100 0 25 194 100 0 22 Red Ful...

Страница 18: ...100 Green Blue Full Red 50 212 44 100 88 213 38 100 76 214 32 100 64 215 26 100 52 216 19 100 44 217 13 100 38 218 7 100 32 219 12 100 25 220 18 100 19 221 24 100 13 222 30 100 7 223 38 100 12 224 44 100 18 225 50 100 24 226 62 100 31 227 74 100 37 Green Full Proportional Red and Blue 228 86 100 43 229 100 100 50 Red and Green Full Blue 50 230 100 88 62 231 100 76 74 Red Full Proportional Green an...

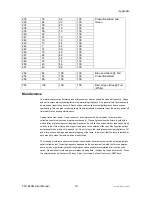
Страница 19: ...e dust collected on external vents and internal components Clean all glass when the fixture is cold with a mild solution of glass cleaner or Isopropyl Alcohol and a soft lint free cotton cloth or lens tissue Apply solution to the cloth or tissue and drag dirt and grime to the outside of the lens Gently polish optical surfaces until they are free of haze and lint Do not to touch the lamp glass when...

Страница 20: ... the customer s responsibility CHAUVET reserves the right to use its own discretion to repair or replace product s As a suggestion proper UPS packing or double boxing is always a safe method to use Claims Damage incurred in shipping is the responsibility of the shipper therefore the damage must be reported to the carrier upon receipt of merchandise It is the customer s responsibility to notify and...

Страница 21: ...ally Possible bad lamp or fixture is overheating Lamp may be at end of its life 9 Light will not come on after power failure Some discharge lamps require a cooling off period before the electronics in the fixture can kick start it again wait 5 to 10 minutes before powering up 9 Loss of signal Use only DMX cables Install terminator Note Keep DMX cables separated from power cables or black lights 9 ...

Страница 22: ...W 3200 K THERMAL Maximum ambient temperature 104 F 40 C FUSE Main 30mm Glass 15A Fast Blow PCB 20mm Glass 2A Fast Blow CONTROL PROGRAMMING Data input locking 3 pin XLR male socket Data output locking 3 pin XLR female socket Data pin configuration pin 1 shield pin 2 pin 3 Protocols DMX 512 USITT DMX Channels 2 to 4 ORDERING INFORMATION Stage Wash 1800 TFX 64CM Stage Wash Controller Pack TFX CONPK S...

Отзывы: