Chauvet EVE TF-20 Скачать руководство пользователя страница 2

1

EN

QUICK REFERENCE GUIDE

EVE TF-20 QRG Rev. 3

About This Guide

The EVE TF-20 Quick Reference Guide (QRG) has basic product information such as mounting and technical 
specifications.

Disclaimer

The information and specifications contained in this QRG are subject to change without notice.

Safety Notes

These Safety Notes include important information about installation, use, and maintenance.

Contact

Outside the U.S., United Kingdom, Ireland, Mexico, or Benelux, contact your distributor to request support or return a 
product. Visit 

www.chauvetdj.com

 for contact information.

What is Included

• EVE TF-20
• Track Adapter
• Barn Doors
• Warranty Card
• Quick Reference Guide

To Begin

Unpack your EVE TF-20 and make sure you have received all parts in good condition. If the box or contents appear 
damaged, notify the carrier immediately, not Chauvet.

• ONLY connect this product to a grounded and protected circuit.
• DO NOT look at the light source when the product is on.
• Make sure the power cord is not crimped or damaged.
• Never disconnect this product from power by pulling on the cord.
• When mounting this product overhead, ALWAYS use a safety cable.
• DO NOT allow flammable materials close to the product when it is operating.
• DO NOT touch the product’s housing when it is on because it will be hot.

• The voltage of the outlet to which you are connecting this product must be within the range stated on the 

decal or rear panel of the product.

• This product is for indoor use only! (IP20) To prevent risk of fire or shock, do not expose this product to rain 

or moisture.

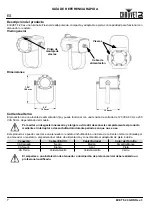
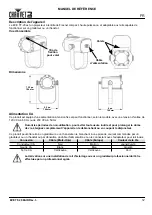
• Always mount this product in a location with adequate ventilation, at least 20 in (50 cm) from adjacent 

surfaces.

• Be sure that no ventilation slots on the unit’s housing are blocked.
• Never carry the product by the power cord. Use only the handle to carry this product.
• The maximum ambient temperature is 104 °F (40 °C). Do not operate this product at higher temperatures.
• In the event of a serious operating problem, stop using immediately.
• DO NOT open this product. It contains no user-serviceable parts.
• To eliminate unnecessary wear and improve its lifespan, during periods of non-use completely disconnect 

the product from power via breaker or by unplugging it.

Содержание EVE TF-20

Страница 1: ...Quick Reference Guide...

Страница 2: ...aged Never disconnect this product from power by pulling on the cord When mounting this product overhead ALWAYS use a safety cable DO NOT allow flammable materials close to the product when it is oper...

Страница 3: ...plugging in to a standard outlet controlled by a dimmer or rheostat or by splicing the power cable and connecting to the included track adapter To eliminate wear and improve its lifespan during perio...

Страница 4: ...he EVE TF 20 1 Cut the power cable leaving 1 5 feet for maneuverability 2 Strip enough of the cable and wires to allow for splicing 3 Dismantle the Track Adapter 4 Pass the cable through each piece an...

Страница 5: ...llow bolt and nut s and reassemble it Clamp Mounting Before mounting this product read the Safety Notes Clamp Mounting Diagram Splice Wires with included crimp connectors Neutral Ground Live Splice Wi...

Страница 6: ...230 VAC 50 Hz Fixed Parameter 120 V 60 Hz 230 V 50 Hz Consumption 24 W 24 W Operating current 0 3 A 0 15 A Power I O US Canada UK Worldwide Fixed Power Cord Edison US Local Plug Type Color Quantity Po...

Страница 7: ...o est retorcido ni estropeado Nunca desconecte este producto de la alimentaci n tirando del cable Cuando monte este producto en alto use un cable de seguridad NO permita la presencia de materiales inf...

Страница 8: ...a de corriente normal controlada por un atenuador o reostato o empalmando el cable de alimentaci n y conect ndolo al adaptador de pista incluido Para evitar un desgaste innecesario y alargar su vida t...

Страница 9: ...e el cable de alimentaci n dejando 45 cm de margen para maniobrar 2 Pele y deje al descubierto cable suficiente para poder hacer el empalme 3 Desmonte el adaptador de pista 4 Pase el cable a trav s de...

Страница 10: ...y la s tuerca s y vuelva a montarlo Montaje del soporte Antes de montar este producto lea las Notas de seguridad Diagramas de montaje del soporte Empalme los cables con los conectores incluidos Neutr...

Страница 11: ...ar metro 120 V 60 Hz 230 V 50 Hz Consumo 24 W 24 W Corriente de funcionamiento 0 3 A 0 15 A E S alimentaci n US Canad UK Mundial Cable de alimentaci n fijo Edison EE UU Enchufe local Tipo Color Cantid...

Страница 12: ...e soit jamais pinc ou endommag Ne d branchez jamais cet appareil en tirant sur le cordon d alimentation En cas de montage de l appareil en hauteur veillez toujours utiliser un c ble de s curit NE PAS...

Страница 13: ...ommand e par un gradateur ou un rh ostat ou par d rivation du c ble d alimentation et en le connectant avec l adaptateur pour rail inclus Durant les p riodes de non utilisation pour viter toute usure...

Страница 14: ...le c ble d alimentation en laissant 45 cm pour la maniabilit 2 D nudez suffisamment le c ble et les fils pour permettre la d rivation 3 D montez l adaptateur pour rail 4 Faites passer le c ble traver...

Страница 15: ...et le le s crou s puis remontez le Montage de la pince Veuillez lire les Consignes de S curit avant d installer ce produit Sch ma de montage de la pince D rivez les fils Avec connecteurs sertir inclus...

Страница 16: ...V 60 Hz 230 V 50 Hz Consommation 24 W 24 W Courant de fonctionnement 0 3 A 0 15 A E S alimentation US Canada UK Monde Europe Cordon d alimentation fixe Edison US Prise locale Type Couleur Quantit Alim...

Страница 17: ...Trennen des Ger ts von der Stromversorgung nie am Kabel Bei Montage ber Kopf immer ein Sicherungsseil verwenden KEINE entflammbaren Materialien w hrend des Betriebs in der N he des Ger ts lagern NIEMA...

Страница 18: ...nd geregelte standardm ige Steckdose oder splei en Sie das Stromkabel und verbinden Sie es mit dem beiliegenden Nachverfolgungs Adapter Um unn tigen Verschlei zu vermeiden und die Lebensdauer des Ger...

Страница 19: ...en Sie dabei ca 45 cm Raum f r Bewegung 2 Isolieren Sie zum Splei en eine ausreichende L nge des Kabels und der Dr hte ab 3 So nehmen Sie den Nachverfolgungs Adapter auseinander 4 F hren Sie das Kabel...

Страница 20: ...uppe wieder zusammen Schellenmontage Lesen Sie vor der Montage dieses Ger ts in jedem Fall die Sicherheitshinweise Schema f r Schellenmontage Splei en Sie die Dr hte mit den beiliegenden Crimp Verbind...

Страница 21: ...z Fest Parameter 120 V 60 Hz 230 V 50 Hz Stromverbrauch 24 W 24 W Betriebsstromst rke 0 3 A 0 15 A I O Eingangsbuchse USA Kanada GB weltweit Angeklemmtes Netzkabel Edison USA Lokaler Stecker Typ Farbe...

Страница 22: ...ato o danneggiato Non scollegare mai questa apparecchiatura dall alimentazione elettrica tirando il cavo Per il montaggio in alto dell unit utilizzare SEMPRE un cavo di sicurezza NON collocare materia...

Страница 23: ...tagliando parte del cavo di alimentazione e collegandolo all adattatore per binario incluso Per evitarne l eccessiva usura e migliorarne la durata nel tempo scollegare l unit dalla presa elettrica o d...

Страница 24: ...alimentazione lasciandone una sezione di 45 cm 2 spelare quanto basta il cavo ed i conduttori per consentire la giunzione 3 Smontaggio dell adattatore per binario 4 Far passare il cavo attraverso tut...

Страница 25: ...one cavo e i dadi e rimontare Montaggio con morsetto Prima di montare l unit leggere le Note di Sicurezza Schema di montaggio con morsetto Spelare i conduttori con connettori a crimpare inclusi Neutro...

Страница 26: ...V 60 Hz 230 V 50 Hz Consumo 24 W 24 W Corrente di funzionamento 0 3 A 0 15 A Ingresso uscita alimentazione US Canada Regno Unito Resto del Mondo Cavo di alimentazione fisso Edison US Spina locale Tip...

Страница 27: ...ct nooit los van het stopcontact door aan het snoer te trekken Gebruik een veiligheidskabel wanneer het product boven lichaamshoogte wordt gemonteerd GEEN brandbare materialen in de buurt van de unit...

Страница 28: ...ordt geregeld door een dimmer of regelweerstand of door de stroomkabel te splijten en het aan te sluiten op de meegeleverde spooradapter Om onnodige slijtage te elimineren en zijn levensduur te verlen...

Страница 29: ...e stroomkabel door en laat ongeveer 0 5 m over voor de wendbaarheid 2 Strip voldoende van de kabel en de draden om splijten mogelijk te maken 3 De spooradapter demonteren 4 Voer de kabel door elk stuk...

Страница 30: ...en en moer en en plaats het terug Klembevestiging Lees v r montage van dit product de Veiligheidsinstructies Montagediagram voor montage van de klem Draden splijten met meegeleverde krimpkoppelingen N...

Страница 31: ...AC 50 Hz Vaste Parameter 120 V 60 Hz 230 V 50 Hz Consumptie 24 W 24 W Bedrijfsstroom 0 3 A 0 15 A Power I O US Canada UK Wereldwijd Vast stroomsnoer Edison US Lokale stekker Type Kleur Aantal Vermogen...

Страница 32: ...ighting com EUROPE General Information Technical Support Address Stokstraat 18 Email eutech chauvetlighting eu 9770 Kruishoutem Website Belgium www chauvetlighting eu Voice 32 9 388 93 97 General Info...

Отзывы: