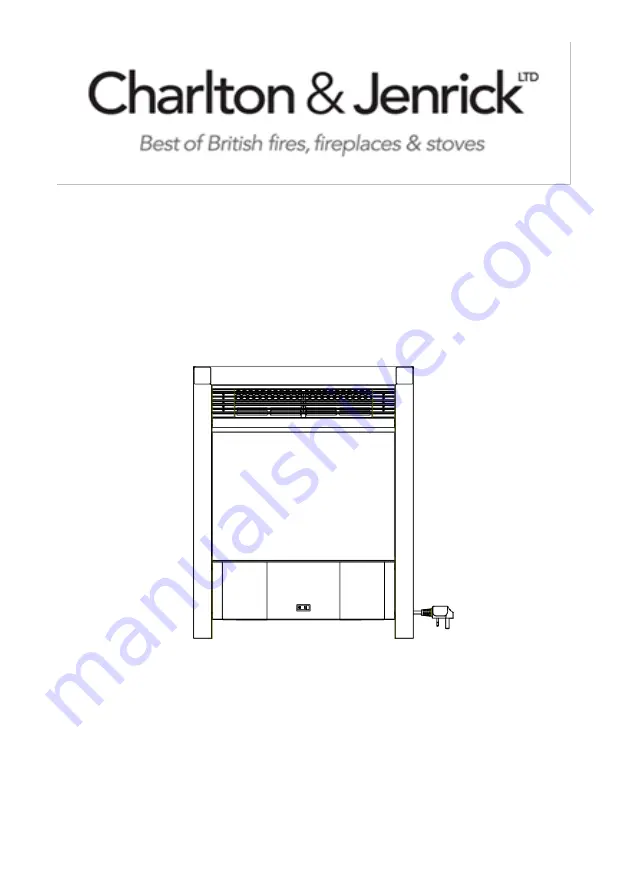
Charlton & Jenrick EF16NC Скачать руководство пользователя страница 1


LED Electric Fire 

Model No. EF16NC 


INSTALLATION AND OPERATION INSTRUCTIONS 


NOTE: This appliance is only suitable for well insulated spaces or 

occasional use. 

please read the instructions carefully before installation or 

use and keep for future reference

Содержание EF16NC

Страница 1: ...No EF16NC INSTALLATION AND OPERATION INSTRUCTIONS NOTE This appliance is only suitable for well insulated spaces or occasional use please read the instructions carefully before installation or use and keep for future reference ...

Страница 2: ...y Information 1 2 Technical Specifications 3 3 Parts and Hardware 3 4 Appliance Dimensions 4 5 Installation Instructions 5 6 Operating Instructions 9 6a Manual Control Panel 10 6b Remote Controls 11 7 Maintenance 12 8 Others 13 ...

Страница 3: ...been given supervision or instruction concerning use of the appliance by a person responsible for their safety Children shall not play with the appliance The Fuel bed contains some small glass beads which could be harmful to children if swallowed it is recommended that these are not used if children can access this appliance Cleaning and user maintenance shall not be made by children without super...

Страница 4: ...elmin 11 5W In standby mode elSB 0 36W Type of heat output room temperature control Single stage heat output and no room temperature control No Two or more manual stages no room temperature control No With mechanic thermostat room temperature control yes With electronic room temperature control No Electronic room temperature control plus day timer No Electronic room temperature control plus week t...

Страница 5: ... Unpacking the fire carefully make sure that the appliance is intact with no signs of damage caused by transport and no part has been exposed to water If in doubt do not use the appliance and contact an authorised service centre 3 2 Keep plastic wrapping away from children 3 3 Save the original packaging as this may be required in the event of service complaint with product 3 4 Check that all part...

Страница 6: ...ll clear Faux crystals 1set Washed Natural Coal 1 set Remote 1 AAA Battery 2 Instruction Manual 1 4 APPLIANCE DIMENSIONS NOTE A spacer frames for flat wall fixing can be purchased from your supplier Unit mm ...

Страница 7: ...e easily accessible to allow disconnection 5 3 For best results install out of direct sunlight 5 4 If installing in an existing fireplace and chimney always block the chimney with fibreglass insulation or similar to prevent it sucking air away through the appliance Failure to do this may cause poor performance and loss of heat or make the appliance cut out 5 5 The appliance should be connected to ...

Страница 8: ...s as above positions for fixing screw to dimensions Wo Ho and Lo 5 9b If Masonry wall drill 4 holes Φ8 Fit the plastic wall plug into the holes If wall is timber then drill a smaller hole to suit the screws the plastic wall plugs will not be required 5 9c Fit 4 screws ST5 25 leaving approximately 2mm projection between the panel and the underside of the screw head Opening Size For Insert Positions...

Страница 9: ...ighten the 4 screws to lock the appliance into position 5 9f Put 4pcs magnets with the size of 18 18 12 5 onto the frame For the Trim TR1622 11C fret 5 9g Put the trim and fret onto front of the appliance Then arrange the fuel bed to your own choice using the fuel bed items provided on the plastic shelf ...

Страница 10: ...appliance Then arrange the fuel bed to your own choice using the fuel bed items provided on the plastic shelf Installation of Spacer 5 9i A spacer is available to use the appliance as a fully outset Firstly secure the spacer to the wall or fireplace ensure the supply cable is passed under the cut out in the leg of the spacer and then fix the appliance into the spacer using the 4 self tapping screw...

Страница 11: ...nspect the appliance and replace any part of the electrical system if necessary before reuse WARNING To reduce the risk of fire keep textiles curtains or any other flammable material a minimum distance of 1 meter from the air outlet MAKE SURE the plug fits tight in the outlet Faulty wall outlet connections or loose plugs can cause the outlet to overheat Do not disconnect the power at the mains sup...

Страница 12: ...UAL CONTROL PANEL NOTE The manual button controls basic functions not a full range of controls Use the remote hand set to carry out all functions Main switch The main switch supplies power to all of the functions of the fireplace This must be in the ON position for any of the functions including the remote to work Power button Press once turns appliance and flame effects on Press again turns appli...

Страница 13: ... fire has four flame effects by pressing the flame effect button the unit will cycle through each effect HEATER Press once to turn Fan on and 10s later Low heat on Pilot lights illuminated Press again to turn High heat on Pilot lights illuminated Press third time to turn heat off 10s later fan off Pilot lights illuminated There are 3 levels you can cycle through including the OFF setting TEMP Digi...

Страница 14: ...on the appliance and the E S Control will be re set 6b 5 Ensure that the appliance is functioning correctly If the E S Control operates again the appliance should be checked by a competent electrician 7 MAINTENANCE WARNING Before any maintenance or cleaning of the exterior of the fireplace the unit should be disconnected from the power supply until it is cool off Remote Handset Battery Replacement...

Страница 15: ...g your health and well being When old appliances are replaced by the new ones it is a legal oblige for the retailer to take back the old appliance for disposals at least free of charge This fire complies with the Safety Standards EN 60335 1 and EN 60335 2 30 which covers the essential requirements of the Low Voltage Directive 2014 35 EU and the EMC standards EN 55014 1 EN 55014 2 EN 61000 3 2 and ...

Отзывы: