background image

Page 15 


Warranty 


The Chapman Warranty 

Chapman 

Machinery Ltd (herein ‘Chapman’ or ‘Chapman Machinery’) warrants that the machine referred to in the Warranty Registration Fo

rm will be free 

from manufacturing defects for a period of 24 months from the date of sale. This warranty does not affect your statutory rights, but merely adds to them. 

Should you have a problem within 24 months from the date of sale please contact your original dealer, or Chapman Machinery’s 

Service Department. 


Any part found to be defective during this period will be replaced or repaired, at our discretion, by the dealer or a authorised Service Engineer. 


Warranty Conditions 

-


The Warranty Registration Form must be completed and returned to Chapman Machinery Ltd within 30 days of the date of sale 


-


This warranty does not cover defects arising from fair wear and tear, wilful damage, negligence, misuse, abnormal working conditions, use in competition, 

failure to follow Chapman 

Machinery’s 

instructions (oral or written, including all instructions and re

commendation made in the Operator’s Manual) or 

alteration or repair of the 
machinery without prior approval. 


-


The machinery must have been serviced in accordance with the Operator’s Manual and the Service Log must have been 

kept up to date and made available to the 
dealer should service, repair or warranty work be undertaken. 


4. 

This warranty does not cover claims in respect of wearing parts such as blades, flails, paintwork, tyres, belts, hydraulic hoses, bearings, bushes, linkage 

pins, top links, ball ends unless there is a manufacturing or material defect or the cost of normal servicing items such as oils and lubricants. 


This warranty does not cover any expenses or losses incurred whilst the machinery is out of use for warranty repairs or parts replacement. 


This warranty does not extend to parts, materials or equipment not manufactured by Chapman Machinery, for which the Buyer shall only be entitled to the 

benefit of any such warranty or guarantee given by the manufacturer  to  Chapman Machinery. Only genuine replacement parts will be allowable for warranty 
claims. 


All parts replaced by Chapman Machinery under warranty become the property of Chapman Machinery and must be returned to Chapman Machinery if 

so requested. Such parts may only be disposed of after a warranty claim has been accepted and processed by Chapman Machinery. 


Chapman Machinery is not liable under this warranty for any repairs carried out without Chapman Machinery’s written consent o

r without Chapman 

Machinery being afforded a reasonable opportunity to inspect the machinery the subject of the warranty claim. Chapman 

Machinery’s 

written consent must, 

therefore, be obtained before any repairs are carried out or parts replaced. Use of non- Chapman Machinery parts automatically invalidates the Chapman 
Warranty. Failed components must not be dismantled except as specifically authorised by Chapman Machinery and dismantling of any components without 
authorisation from Chapman Machinery will invalidate this warranty. 


All warranty claims must be submitted to Chapman Machinery on Chapman Machinery Warranty Claim Forms within 30 days of completion of warranty 

work. 
Using the machine implies the knowledge and acceptance of these instructions and the limitations contained in this 
Manual. 


Transfer of Warranty 

The Chapman warranty be transferred to a subsequent owner of the machinery (for use within the UK only) for the balance of the warranty period subject to 
all of the stated warranty conditions and provided that the Change of Owner form is completed and sent to Chapman Machinery within 14 days of change of 
owner- ship. 


Chapman Machinery Ltd retain the right to refuse transfer of warranty. 


Chapman Machinery reserves the right to make alterations and improvements to any machinery 
without notification and without obligation to do so. 

Содержание PC120

Страница 1: ...PC120 Paddock Cleaner Original Instructions Chapman Machinery Ltd Hele Barton Week St Mary Holsworthy Devon EX22 6XR Tel 01288 308149 Email sales chapman co uk ...

Страница 2: ...4 Warranty 15 EC DECLARATION OF CONFORMITY 16 THIS MANUAL MUST BE HANDED TO THE OPERATOR BEFORE USE THE OPERATOR MUST UNDERSTAND FULLY THE CONTENT OF THIS HANDBOOK BEFORE USING THE MACHINE FOR THE FIRST TIME OF THE IMPLEMENT IS RESOLD THIS MANUAL MUST ACCOMPANY THE MACHINE NOTE The information contained in this manual is correct at the time of going to press However in the course of development ch...

Страница 3: ...eyes from insects and branches with either a visor or goggles Trailed equipment and loads Ensure all riders know the manufacturers recommended towing capacity and drawbar loading limit Always operate within these requirements Remember that your ability to control the ATV by your body movements will be considerably reduced when carrying a load or towing a trailer When selecting trailed equipment lo...

Страница 4: ...to machine components Both operators maintenance fitters should be familiar with the machine and fully aware of dangers surrounding improper use or incorrect repairs Before starting carry out a visual check on both machine towing vehicle as regards functionality road safety accident prevention rules Even when using the machine correctly accidents can occur It is imperative that nobody stand within...

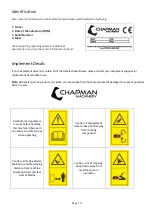
Страница 5: ...any other function may be both dangerous to persons and potentially damaging to components Use of the machine beyond the stated usage may invalidate any applicable warranty as well as being potential in breach of applicable safety regulations Identification Each machine is fitted with a serial plate shown below which details the following 1 Model 2 Date of Manufacture DOM 3 Serial Number 4 Mass Wh...

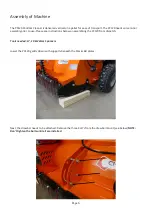
Страница 6: ...sembly prior to use Please see instructions below on assembling the PC120 from dispatch Tools needed 17 19 24mm Spanners Lower the PC120 gently down with supports beneath the black skid plates Next the drawbar needs to be attached Remove the three bolt s from the drawbar mount see below NOTE Don t tighten the bolts until all are installed ...

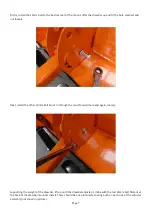
Страница 7: ...nstall the other 19mm bolt nut in through the most forward hole and again loosely Supporting the weight of the drawbar lift up until the drawbar adjuster is inline with the last 24mm bolt fitment at the back of the drawbar mount install There should be one aluminium spacing bush on each side of the adjuster assembly not shown in picture ...

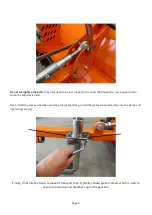
Страница 8: ...n the adjuster is used Next install the Jockey wheelby unwinding the jockey clamp install the jockey wheel assembly into the clamp and tightening securely Finally if not already done remove all transport tape typically yellow green marked which is used to secure the fuel cap and breather cap on the gearbox operating ...

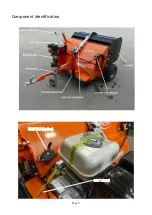
Страница 9: ...Page 9 Component Identification ...

Страница 10: ... your equipment supplier for replacement decals before use Note All decals must be present and visible It is imperative that these are replaced if damaged to prevent potential harm to users Carefully read operators manual before handling this machine Observe in structions and safety rules when operating Caution Entanglement Hazard Keep hands away from rotating components Caution Rotating blades Ma...

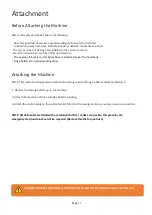
Страница 11: ...the handbook Drive belt s are in good working order Attaching the Machine NOTE This machine is designed to attach to the towing vehicle through a 50mm diameter ball hitch 1 Reverse the towing vehicle up to the machine 2 Attach the machine onto the towing vehicle scoupling 3 Attach the control cable to the control socket fitted on the towing machine ensuring a secure connection NOTE PC120 Models ar...

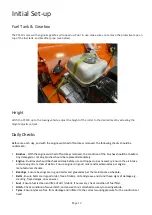
Страница 12: ...ng brushes should be replacedimmediately Engine Fluid levels should be checked daily before use and topped up as necessary Ensure the air intake and screen grid are clear of debris Ensure engine is in good order and maintained as per engine manufacturer schedule Bearings Ensure bearings are in good order and greased as per the maintenance schedule Belts Ensure belts are in good order free of debri...

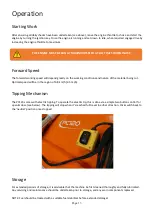
Страница 13: ...km h 2 5 mph Tipping Mechanism The PC120 comes with electric tipping To operate the electric tip this is done via a simple two button control for open close see below The tipping will stop when it s reached full travel in either direction Click switch back to the neutral position once stopped Storage For extended periods of storage it is advisable that the machine be first cleaned thoroughly and f...

Страница 14: ... of emergency stop control LUBRICATE Lubricate main rotor bearings apply 20 shots of grease to each main rotor bearing After every 100 hours or annually whichever occurs first in addition to the above CHECK Check belt condition replace if required Check axle bearing condition replace or lubricate as required Check main rotor bearings condition replace as required Check condition of battery connect...

Страница 15: ...terials or equipment not manufactured by Chapman Machinery for which the Buyer shall only be entitled to the benefit of any such warranty or guarantee given by themanufacturer to Chapman Machinery Only genuine replacement parts will be allowable for warranty claims All parts replaced by Chapman Machinery under warranty become the property of Chapman Machinery and must be returned to Chapman Machin...

Страница 16: ...Name of Representative James Chapman Position of representative Director The Basis on which Conformity is being Declared I declare that as the authorised representative the above information in relation to the supply manufacture of this product is in conformity with the stated standards and other related documents following the provi sions of Machinery Directive 2006 42 EC directives The products ...

Отзывы: