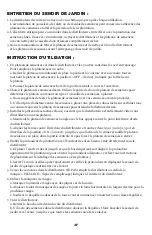
2 . Row Marker Assembly
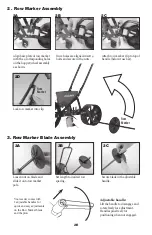
Align base plate of row marker
with the 4 corresponding holes
on the hopper/wheel assembly
as shown.
2A
2E
2B
2C
Once holes are aligned, insert 4
bolts and secure with 4 nuts.
Attach row marker clip to top of
handle (below cross bar).
Lock row marker into clip.
2D
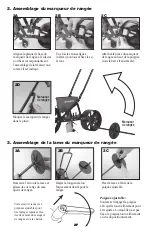
3. Row Marker Blade Assembly
Loosen nut on blade and
slide it onto row marker
pole.
3A
3B
3C
Set length to desired row
spacing.
Secure blade with adjustable
handle.
Row
Marker
Row
Marker
Adjustable handle:
Lift the handle to disengage and
rotate freely for adjustment.
Handle spins freely for
positioning when not engaged.
Your seeder comes with
2 adjustable handles for
quick and easy adjustments
on the Row Marker blade
and the plow


