

Technical instructions
WPX30
v2.0EN
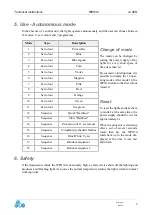
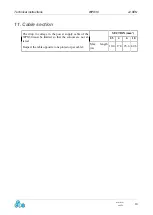
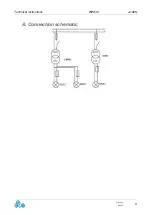
7. Installation
It is highly recommended to use the services of a professional for the installa-
tion.
The light is locked in the wall support using a bayonet system. The wall support must be fixed on
the wall. According to the type of the pool, there are various possible ways to fix the support.
Co coating or tiles: The body of the cable gland A is sealed in concrete with its nut E. The
wall support is fixed directly on the wall using the 3 supplied screws* and plugs.
Co liner: Seal the wall conduit B with its nut E in concrete and glue an O-ring F before
positioning the liner. Place then an O-ring F at the pool side and screw the cable gland A. The wall
support is fixed directly on the wall using the 3 supplied screws* and plugs.
One-piece pool: Screw the body of the cable gland A with an O-ring F at the pool side using the
nut E at the back of the wall. The wall support is fixed directly on the wall using the 3 supplied
screws* and plugs.
Panel + liner: Glue an O-ring F on the panel before placing the liner. Glue a second O-ring F at the
pool side after the positioning of the liner. The body of the cable gland A is screwed using a nut E
at the back. The wall support is fixed directly on the wall using the 3 supplied screws* and plugs.
www.c-
cei.fr
6


