


CAVE-TEK TeamUp A01 Camera User Guide
3
3.3
Remote Control
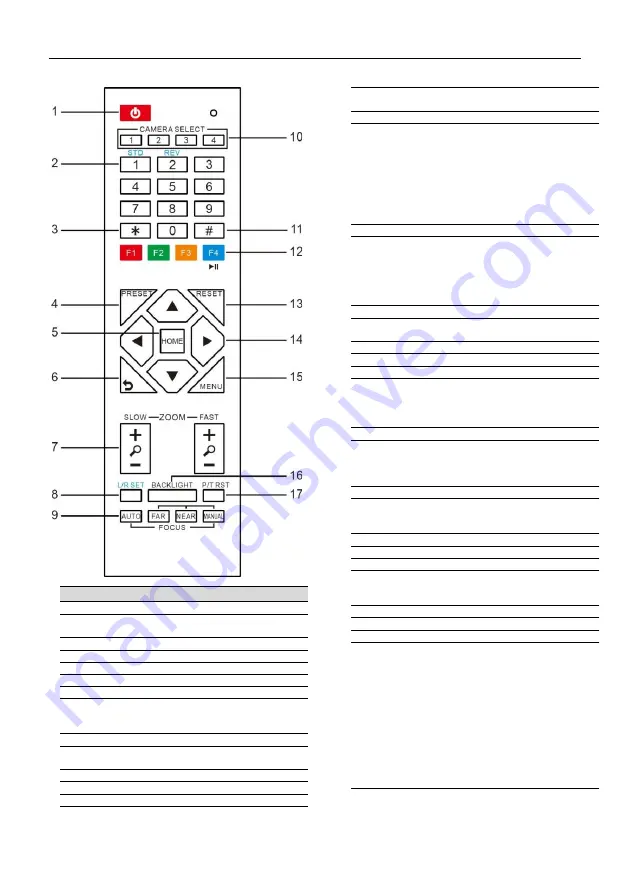
Key Description
1. Standby Key
Press this button to enter standby mode. Press it
again to enter normal mode.
2. Number Key
To set preset or call preset.
3. *Key
To configure the special function key.
4. Preset Key
Set preset: Store a preset position.
[SET PRESET] + Numeric button (0-9): Setting a
corresponding numeric key preset position.
5. HOME Key
Confirm the selection, or move the camera back to
the middle position
6. Return Key
Return to the previous menu
7. Zoom Key
Slow Zoom: Zoom In [+] or Zoom Out [-] slowly
Fast Zoom: Zoom In [+] or Zoom Out [-] fast
8. Left/Right Setting Key
Press with 1 button and 2 buttons setting the
direction of the Pan-Tilt.
●
Simultaneously press L/R Set +1[STD]: set the
Pan-Tilt to turn the same direction as the L/R
Set.
●
Simultaneously press L/R Set +2[REV]: set the
Pan-Tilt to turn the opposite direction as the
L/R Set.
9. Focus Key
To adjust the focus.
Press [AUTO] adjust the focuses on the center of
the object automatically. Or to adjust the focus
manually.
Press [MANUAL] adjusts the focus on the center of
the object manual.
10. Selection Key
Press the button corresponding to the camera you
want to operate with the remote controller.
11. #Key
To configure the special function key.
12. IR Remote Control Key
[*]+[
#
]+[F1]: Address 1
[*]+[
#
]+[F2]: Address 2
[*]+[
#
]+[F3]: Address 3
[*]+[
#
]+[F4]: Address 4
13. Reset Key
Clear preset: Erase a preset position.
[CLEAR PRESET] + Numeric button (0-9)
Or: [*]+[#]+[CLEAR PRESET]: Erase all the preset
individually.
14. PTZ Control Key
Press arrow buttons to perform panning and tilting.
Press [HOME] button to face the camera back to
front.
15. Menu Key
MENU: enter or exit OSD MENU.
16. Backlight Key
BLC ON/OFF: Press this button to enable the
backlight compensation. Press it again to disable
the backlight compensation.
17. PTZ Reset Key
Preset Pan/Tilt self-test.
18. Special Function Key
[*]+[
#
]+[1]: Change OSD menu to English
[*]+[
#
]+[4]: Display current IP address
[*]+[
#
]+[6]: Reset to system defaults
[*]+[
#
]+[8]: Display camera firmware Info.
[*]+[
#
]+[9]: set mounting mode (normal / vertical
flip)
[
#
]+[*]+[4]: Set Network configuration to DHCP
[*]+[
#
]+[Manual]: Reset network to default.
[*]+[
#
]+[F1]: Assign Camera to IR Address 1
[*]+[
#
]+[F2]: Assign Camera to IR Address 2
[*]+[
#
]+[F3]: Assign Camera to IR Address 3
[*]+[
#
]+[F4]: Assign Camera to IR Address 4


