background image

70

Other Playback Functions (PLAY)

Other Playback Functions (PLAY)

The following are menu operations you can use to configure various camera settings.

.

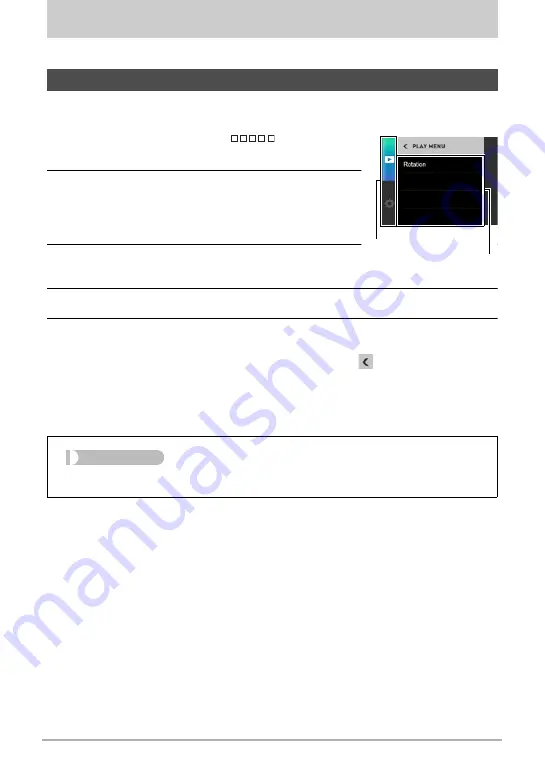
Example Menu Screen Operation

1.

In the PLAY mode, touch “

” (Show 

Icons).

2.

Touch “MENU”.

This will display the menu screen.

• Menu contents are different in the REC mode and 

PLAY mode.

3.

Touch the tab where the menu item you want 
to configure is located.

4.

Touch the item whose setting you want to change.

5.

Configure the setting of the item in accordance with the screen 
contents.

• To navigate back to the previous menu level, touch “

”.

.

Menu Operations in This Manual

Menu operations are represented in this manual as shown below. Touch the indicated 
icons and items, and perform operations as they are indicated, from left to right.

Using the PLAY Menu

Tabs

Items

Procedure

Enter the PLAY Mode 

*

 MENU 

*

 Rotation

Содержание Exilim EX-FR100

Страница 1: ...ad the precautions contained in this User s Guide Keep the User s Guide in a safe place for future reference For the most up to date information about this product visit the official EXILIM Website at...

Страница 2: ...ct your original retailer The shape of the power cord plug varies according to the country or geographic area where the camera is sold Accessories Camera EX FR100 Controller EX FR100CT Hinge Unit Come...

Страница 3: ...IO COMPUTER CO LTD shall not be held liable for any damages or lost profits caused by loss of memory contents due to malfunction repair or any other reason Note that the example screens and product il...

Страница 4: ...You Turn On the Camera 29 Preparing a Memory Card 31 Supported Memory Cards 31 To load a memory card 32 To format initialize a new memory card 33 To Shoot a Snapshot 34 Selecting an Auto Recording Mo...

Страница 5: ...Viewing the Image Menu 63 Zooming an On screen Image 63 Creating a Movie of a Day s Images Highlight Movie 64 Creating a Collage of a Day s Snapshots Highlight Photo 66 Changing the Highlight Score of...

Страница 6: ...e Screen 95 Viewing Snapshots and Movies in the Multi Camera Mode 97 Multi Image Screen Operations 97 Single Image Screen Operations 99 Printing 100 Printing with a Computer 100 Using the Camera with...

Страница 7: ...ppendix 117 Safety Precautions 117 Shock resistant Splashproof Dustproof 124 Precautions During Use 128 Power Supply 141 Charging 141 Battery Precautions 142 Using the Camera in another Country 142 Di...

Страница 8: ...ESET button page 149 CARD cover page 32 Speaker Lens page 18 Microphone pages 18 51 Shutter button page 35 0 Movie page 49 FREE lever page 16 USB port pages 20 23 USB cover pages 20 23 Strap holes Con...

Страница 9: ...bk bp bq bm 3 9 White Balance page 57 Focus mode page 59 Digital zoom page 48 Auto Send page 82 Remaining movie memory capacity page 155 Remaining snapshot memory capacity page 155 Snapshot image size...

Страница 10: ...ges High Speed CS page 42 Interval Shooting page 44 Auto Send page 82 Protect indicator Folder name file name page 108 Snapshot image size page 55 Highlight Score page 67 Make up page 53 White Balance...

Страница 11: ...in the folder named 100CASIO Movie Playback NOTE If you do not perform any operation for about three seconds during snapshot viewing or movie playback icons will become transparent Movie recording tim...

Страница 12: ...unit and tripod nut make it possible to shoot from a variety of different angles The camera can also be rotated 90 degrees which means you can change the orientation of a snapshot with little physica...

Страница 13: ...elect snapshot and movie highlights and create a movie of them Time Lapse Creates a movie of snapshots you shot Wireless Connection Turns your smartphone into a camera remote controller and allows you...

Страница 14: ...Quick Start Basics Simultaneous Use of Two Cameras Multi Camera Mode You can register two cameras on the controller and operate them both at the same time or individually See page 86 for more informat...

Страница 15: ...the camera Use a blower or other means to keep the lens and flash window free of dirt and dust and wipe gently with a soft dry cloth You can attach the controller to the camera and use the camera as...

Страница 16: ...operation lamp with the C mark on the hinge unit The indentations in the lens ring indicate the orientation of the long dimension of the image being shot To remove the hinge unit from the camera 1 Wh...

Страница 17: ...camera s operation lamp with the A mark on the hinge unit 2 Rotate the camera clockwise about 15 degrees until its operation lamp is aligned with the B mark on the hinge unit 1 Use the tripod nut to...

Страница 18: ...ORTANT The carabiner strap is not intended for mountain climbing use It is designed only to support the camera NOTE When shooting hold the camera still Carefully press the shutter button and take care...

Страница 19: ...scroll forward through images Spread Holding your thumb and forefinger against the screen as you spread them out Use spread to enlarge the screen image Squeeze Holding your thumb and forefinger agains...

Страница 20: ...ction to a computer Using the included micro USB cable To charge with the USB AC adaptor While the camera and controller are turned off connect in the sequence shown below When disconnecting the USB A...

Страница 21: ...lit Charging complete Operation Lamp Status Meaning Lit green Camera turned on Charging stopped Slow red amber flashing In sleep state Charging High speed red green flashing Charging stopped due to ab...

Страница 22: ...unction The shape of the power plug depends on each country or geographic area If the operation lamp is not lit or flashing during charging check the orientation of the USB cable connectors Make sure...

Страница 23: ...ra will establish a USB connection with the computer Charging will continue Charging will also continue if you turn on the controller Note that certain types of computers or connection environments ma...

Страница 24: ...High speed red green flashing Charging stopped due to abnormal internal temperature USB AC adaptor problem battery problem page 141 timer operation Lit green Charging complete Operation Lamp Status M...

Страница 25: ...subject to fixed standards Use of an inferior device or a device that is not up to standard can cause malfunction and or failure of your camera Operation is not guaranteed in the case of a computer b...

Страница 26: ...ndicator may change when you switch between the REC mode and PLAY mode Leaving the camera for about 8 days with no power supplied while the battery is dead will cause its date and time settings to be...

Страница 27: ...troller need to be turned on in order to use them Turning on the camera causes the camera and controller operation lamps to light green and automatically starts an operation to establish a Bluetooth w...

Страница 28: ...there is a Bluetooth wireless technology connection between the camera and controller the camera and controller will enter a sleep state The operation lamp slowly flashes green while the camera is in...

Страница 29: ...raphic areas may not support display language selection 1 Turn on the camera and controller page 27 If this is the first time you are turning on power a language selection screen will appear If the sc...

Страница 30: ...country controls its local time offset and the use of summer time and so they are subject to change While the camera is connected to a smartphone with the EXILIM Connect app you can execute auto date...

Страница 31: ...wing types and capacities microSD memory cards up to 2GB microSDHC memory cards greater than 2GB up to 32GB microSDXC memory cards greater than 32GB up to 2TB Note that the ability to use any particul...

Страница 32: ...of the camera slide it into the card slot all the way in until you hear it click securely into place 3 Close the CARD cover IMPORTANT Never insert anything besides a supported memory card page 31 int...

Страница 33: ...r files on it will delete its contents Normally you do not need to format a memory card again However if storing to a card has slowed down or if you notice any other abnormality re format the card Be...

Страница 34: ...tation Recording mode 4 Touch Auto or Premium Auto Pro to select the auto recording mode you want To Shoot a Snapshot Selecting an Auto Recording Mode Setting REC Screen Icon Display Description Auto...

Страница 35: ...the camera or controller to start movie recording Recording will stop if you press 0 Movie again See page 49 for details NOTE You also touch a location on the screen to focus on it and then shoot the...

Страница 36: ...ocus point on the screen and focuses there When shooting with Premium Auto Pro the message Processing Premium Auto Please wait may appear on the monitor screen If you feel the camera is taking too lon...

Страница 37: ...also can clear the information to view only the snapshot page 111 You can zoom the screen image by touching the monitor screen page 63 If you are recording a snapshot that is very important to you it...

Страница 38: ...ngle file 1 Enter the PLAY mode 2 Touch Show Icons 3 Touch 4 Touch Delete 1 File 5 Flick the screen the left or right to scroll through images until the one you want to delete is displayed 6 Touch Del...

Страница 39: ...a high value This can cause the camera to take relatively longer to be ready to shoot again after you press the shutter button Do not perform any operation while the image recording operation is in p...

Страница 40: ...C mode If the camera is in the PLAY mode touch REC to enter the REC mode 2 Touch Show Icons 3 Touch the item whose setting you want to change To configure REC mode settings Menu page 52 Recording mode...

Страница 41: ...the mode normally used for shooting page 34 Premium Auto Pro With Premium Auto Pro recording the camera automatically determines whether you are shooting a subject or scenery and other conditions Pre...

Страница 42: ...you selected High Speed CS Prerecord go to step 5 5 Touch Pre REC This will start pre recording of a group of images that will be continually updated until you press the shutter button To stop the pre...

Страница 43: ...le an Art Shot scene is selected the Art Shot effects will not be applied to the movie image Sample images shown on Art Shot scene screens were not shot with this camera An image shot with an Art Shot...

Страница 44: ...ch the Interval Shooting mode icon 3 Touch the Interval Shooting scene you want to use Touching will display a detailed explanation about each scene Flick upwards or downwards on the monitor screen to...

Страница 45: ...5 sec is selected for the Interval setting To recover from the sleep state press any controller button Next touching on the monitor screen will display the number of recorded images The maximum numbe...

Страница 46: ...out two seconds If you are performing manual camera operations or if the camera is out of the sleep state when the Interval Shooting operation reaches a shooting interval Interval Shooting recording f...

Страница 47: ...ile an Interval Shooting operation is in progress 1 On the controller press any button to recover from the sleep state 2 Perform the required controller or camera operation to shoot the image you want...

Страница 48: ...Telephoto images are prone to blurring caused by camera movement when you press the shutter button Because of this stabilizing the camera by placing it on a level surface etc is recommended Zoom oper...

Страница 49: ...utter button To record a movie Movie Quality REC Screen Icon Display Frame Rate Image Size Pixels Description FHD 30p 30fps 1920x1080 Select this setting to record full high definition FHD movies The...

Страница 50: ...ng Premium Auto Pro is enabled for FHD 30p movies and STD movies only Using Premium Auto Pro uses up the battery charge more quickly than using Auto recording Minimizing the Effects of Camera Movement...

Страница 51: ...our fingers etc Good audio recording results are not possible when the camera is too far away from what you are trying to record Shooting movies for long periods in areas where temperature is relative...

Страница 52: ...change To cancel and exit the menu touch or press the controller s shutter button 5 Touch the item 6 Configure the setting of the item in accordance with the screen contents To navigate back to the p...

Страница 53: ...acro as the focus mode page 59 If the focus frame remains red while the AF Only setting is selected it means that the image is not in focus because the subject is too close etc If this happens point t...

Страница 54: ...nce Focus lock is cancelled if you touch the screen or about five minutes after focus lock is activated Procedure Enter the REC mode MENU r REC MENU Tab Movie Anti Shake You can reduce blur due to cam...

Страница 55: ...printing an image L size through a print service attaching an image to e mail when viewing the image on a computer etc The size of an image indicates how many pixels it contains and is expressed as ho...

Страница 56: ...exposure compensation value you set remains in effect until you change it Exposure Compensation Range 2 0 EV to 2 0 EV Unit 1 3 EV To cancel exposure compensation change the EV value to 0 0 NOTE When...

Страница 57: ...setting that matches your shooting conditions Daylight Overcast etc When shooting with Premium Auto Pro the white balance setting is fixed at Auto WB Adjusting White Balance White Balance Setting Des...

Страница 58: ...o finish recording an image after it is shot You will not be able to perform any operation while image recording is in progress When shooting with Premium Auto Pro the ISO setting is fixed at Auto Spe...

Страница 59: ...as AF Auto Focus while shooting with Premium Auto Pro Selecting a Focus Mode Focus Settings REC Screen Icon Display Type of Shot Focus Mode Approximate Focus Range 1 Snapshot Movies Snapshot Movies AF...

Страница 60: ...e image is recorded in normal orientation not mirror imaged NOTE You can change an image displayed on the screen to a mirror image by flicking the image Procedure Enter the REC Mode MENU r REC MENU Ta...

Страница 61: ...s grid lines on the monitor screen The grid lines provide references that help you keep the camera vertically and horizontally straight Turning on Image Review Review Type 1 Displays a full screen vie...

Страница 62: ...he monitor screen NOTE Playback may not be possible for movies not recorded with this camera When a movie is played back on the camera the audio output from the camera speaker will be out of sync with...

Страница 63: ...ith Interval Shooting are displayed as grouped images A question mark will be displayed for images that cannot be displayed for some reason Snapshots can be zoomed on the monitor screen up to 2X 1 In...

Страница 64: ...3 Touch Highlight Movie icon Touching will display a detailed explanation about image editing functions Flick upwards or downwards on the monitor screen until Highlight Movie is displayed and then to...

Страница 65: ...d bottom of the image will be cropped as required If a portrait orientation image is incorporated in to a Highlight Movie there will be black bands on the left and right of the image When there is a t...

Страница 66: ...how images should be chosen for conversion to a Highlight Photo 5 Touch to select the date or Interval Shooting for which you want to create a Highlight Photo 6 Touch to display the layout you want t...

Страница 67: ...ete is displayed and then touch to select it 5 Touch the score you want to assign to the selected image You can flick the screen left or right to scroll to another image and change its score as well 6...

Страница 68: ...7 After settings are the way you want touch Back to return to the screen in step 5 8 Use touch the up and down arrows to display the recording date or Interval Shooting of the images you want to use t...

Страница 69: ...age is incorporated in to a Time Lapse Movie there will be black bands on the left and right of the image When there is a large number of images this function will stop processing when the Time Lapse...

Страница 70: ...de 3 Touch the tab where the menu item you want to configure is located 4 Touch the item whose setting you want to change 5 Configure the setting of the item in accordance with the screen contents To...

Страница 71: ...he image you want to rotate 2 Touch This will rotate the image 90 degrees to the left 3 When the image is in the orientation you want touch NOTE Note that this procedure does not actually change the i...

Страница 72: ...artphone that supports Bluetooth Smart Note that the Bluetooth wireless technology that connects your camera with a smartphone is different from the Bluetooth wireless technology that connects the cam...

Страница 73: ...nal Movies are not displayed by Gallery app Movies are stored in a folder named EXILIM Connect A separate movie player is required to playback movies whose files have the file name extension MOV Depen...

Страница 74: ...uide in your native language please use a version in another language Your camera has a variety of different wireless modes Select the wireless mode that suits your specific requirements 1 Touch Show...

Страница 75: ...cular smartphone or tablet IMPORTANT App functions and the required operating environment are subject to change without notice Android terminal 1 Open Play Store Google Play 2 In the search field type...

Страница 76: ...it is already paired with first unpair them and then pair again Re pairing the camera and smartphone will result in all pending unsent images to remain unsent Camera Controller Operation 1 Touch the W...

Страница 77: ...martphone establishes a wireless LAN connection with the camera the camera s wireless LAN connection lamp lights blue and the message Start up the phone app appears on the controller s monitor screen...

Страница 78: ...ss LAN connection between the camera and a smartphone This problem may be caused when the smartphone is already wirelessly connected to one of the networks or devices below Go to your smartphone s Wi...

Страница 79: ...rtphone tap Remote Capture 4 Compose the image on the smartphone s screen as you shoot For information about how to use Shoot with phone refer to the EXILIM Connect manual page 74 Cannot Connect with...

Страница 80: ...uch the Wireless icon 2 Touch Send to phone 3 Touch Send Selected Image 4 Touch the image you want to send to the smartphone Selecting the image of a file causes its check box to become selected To ex...

Страница 81: ...the camera s monitor screen change the smartphone s Wi Fi settings so your camera is selected for connection page 76 4 On the smartphone start up its browser app Accessing the URL displayed by the cam...

Страница 82: ...lected for this setting images are sent to the paired smartphone automatically Images are sent to the smartphone while the camera is in the sleep mode If there is no wireless connection between the ca...

Страница 83: ...to Off before they are sent If the connection between the camera and smartphone is terminated while there are still unsent images Auto Send will be cancelled The next time the camera and smartphone a...

Страница 84: ...less LAN connection between the camera and a smartphone IMPORTANT Before changing the wireless LAN password unpair the camera from its paired smartphone page 85 1 Touch the password digit you want to...

Страница 85: ...g select the camera SSID again and input the new password Android terminal Tap the field where the SSID of the camera is displayed in the Wi Fi settings and select Forget Select the camera SSID again...

Страница 86: ...hooting with two cameras You could point one camera at yourself and the other camera at a scene and simultaneously record the scene and your reaction to it Possibilities are unlimited Switching betwee...

Страница 87: ...r it on the controller To register a second camera on the controller 1 If there is a memory card loaded in the second camera remove it 2 On the menu screen touch the Setup tab 3 Touch Multi Pairing 4...

Страница 88: ...ause the operation lamps of the camera and the controller to flash orange to indicate that camera registration has started To unregister a camera 1 Turn on the controller and one of the cameras This w...

Страница 89: ...hich is the one the controller will always connect with first 1 On the menu screen touch the Setup tab 2 Touch Multi Pairing 3 Touch Camera Priority The names of the cameras registered on the controll...

Страница 90: ...date and time settings of Camera 2 will automatically be synced with the date and time of Camera 1 In the case of portrait orientation the Multi Image screen will show images above and below instead...

Страница 91: ...er camera the one you did not select above NOTE Turning off a camera while in the Multi Camera Mode will cause that camera to be disconnected from the controller and will automatically cause the contr...

Страница 92: ...ait orientation In this view you can shoot with both cameras simultaneously or you can shoot individually with one camera Shooting Simultaneously with Both Cameras You can use the operations below to...

Страница 93: ...to stop recording Interval Shooting with Two Cameras Use the procedure below to perform an Interval Shooting operation with two cameras 1 Touch This will displays the Interval Shooting setting screen...

Страница 94: ...ality or configure other REC menu settings while the Multi Image screen is displayed To configure such settings touch or to display the Single Image screen of the camera whose REC menu settings you wa...

Страница 95: ...camera NOTE You can also record a snapshot on a particular camera by pressing the camera s shutter button To shoot a movie 1 On the controller press 0 Movie This starts movie recording on the currentl...

Страница 96: ...enu screen REC mode screen and wireless mode settings you configure for Camera 1 or Camera 2 on the Single Image screen are maintained when you return to Multi Image screen and even when you exit the...

Страница 97: ...y Viewing Snapshots To scroll snapshots simultaneously on both cameras 1 If is on the display flick the screen left or right If is on the display touch it to toggle to To scroll snapshots on a particu...

Страница 98: ...displayed Multi Image Screen Operations Pressing the controller shutter button or 0 Movie button while the cameras are in the PLAY mode will cause both cameras to switch simultaneously to the REC mode...

Страница 99: ...will switch to the REC mode Pressing the camera shutter button or 0 Movie button while the controller is in the PLAY mode will start an image recording operation on the camera If you start recording w...

Страница 100: ...er and Saving Files page 105 to store the image you want to print and then display the image on your Macintosh screen 2 Click File and then Print 3 Configure print settings and then click Print This w...

Страница 101: ...USB connection pages 102 105 Play back and edit movies You can play back movies pages 104 107 To edit movies use commercially available software as required Windows users should refer to Using the Cam...

Страница 102: ...ra and precautions when connecting see page 24 2 Press p Power to turn on the camera When you turn on the camera check to make sure that the color of its operation lamp changes from red to green or am...

Страница 103: ...it If you want to keep the existing DCIM folder you need to change its name or move it to a different location before performing the next step 8 Windows 10 Windows 8 1 users On the Documents menus cl...

Страница 104: ...iginal unrotated orientation Viewing CS and interval shot images on a computer will individually display the component images in the group CS and interval shooting images cannot be viewed as a group o...

Страница 105: ...es with your computer Using the Camera with a Macintosh When you want to do this Operating System Version Required Software Save images to your Macintosh and view them there manually OS X Installation...

Страница 106: ...zes the memory card loaded in the camera or the camera s built in memory if it does not have a memory card loaded as a drive The appearance of the drive icon depends on the Mac OS version you are usin...

Страница 107: ...cture on page 109 An image that was rotated on the camera will be displayed on your Macintosh screen in its original unrotated orientation Movie Playback Precautions To play back a movie first save it...

Страница 108: ...how file names are displayed on the camera s monitor screen see page 10 The total number of folders and files allowed depends on the image size and quality and capacity of the memory card being used...

Страница 109: ...g another camera s DCF compliant images to this camera and view them Memory Folder Structure DCIM Folder Recording Folder Image File Movie File Recording Folder Recording Folder Recording information...

Страница 110: ...omputer If you later decided to return a DCIM folder to the camera however be sure to change its name back to DCIM The camera is designed to recognize only a root file with the name DCIM Note the came...

Страница 111: ...p Tab Info Selecting On displays setup status and other information For information about menu operations see page 52 Adjusting Monitor Screen Brightness Screen 2 Brightness that is greater than 1 whi...

Страница 112: ...recording sound is emitted during an Interval Shooting operation Locking the Camera or Controller Screen Orientation Rotation Lock Camera Off The camera detects its orientation when you are shooting a...

Страница 113: ...hange year month day hour minute 2 Touch or to change the currently selected value You can specify a date from 2001 to 2049 To switch between 12 hour and 24 hour format touch the 12 24 hour switch ico...

Страница 114: ...els sold in certain geographic areas may not support display language selection Procedure MENU Setup Tab Sleep Use this function to specify how much time should be allowed to laps until the controller...

Страница 115: ...y card will delete all protected images stored there Check the battery level before starting a format operation and make sure it is not too low Formatting may not be performed correctly and the camera...

Страница 116: ...e installed on the camera Check this screen after updating the camera s firmware to confirm that updating was actually performed Procedure MENU Setup Tab Multi Pairing You can connect a second camera...

Страница 117: ...are specifically prohibited The example at left indicates that disassembly is prohibited The black dot 0 means that the indicated action must be performed Indications within this symbol are actions t...

Страница 118: ...on it etc and never apply solder to it Never place the battery into a microwave oven dehumidifier high pressure generating device etc Never remove the outer sticker from the battery Do not use or leav...

Страница 119: ...or other vehicle or while walking Looking at the monitor while in motion creates the risk of serious accident USB AC Adapter Misuse of USB AC adapter creates the risk of fire and electric shock Be sur...

Страница 120: ...be sure to unplug the USB AC adapter from the power outlet and put in a place away from objects used by animals and pets An animal or pet chewing on the power cord can cause it short leading to the r...

Страница 121: ...radio interference or other problems on other devices is being caused while using this product do not use the wireless functions of this product Use of wireless functions creates the risk of radio in...

Страница 122: ...t end normally within the specified charging time stop charging anyway and contact your local CASIO authorized service center Continued charging creates the risk of battery overheating fire and explos...

Страница 123: ...Doing so can cause the display panel glass to crack and lead to personal injury Should the monitor screen ever become cracked never touch any of the liquid inside the monitor screen Doing so creates...

Страница 124: ...ring high speed travel on water during motor sports while riding a personal watercraft etc is not supported 0 Dustproof Corresponds to IEC JIS Protection Class 6 IP6X dustproofing IMPORTANT The shock...

Страница 125: ...supported Use of the controller s touch panel is not supported while the controller is submerged Precautions during Underwater Use The camera is designed for use at depths no greater than 1 5 meters 4...

Страница 126: ...The temperature of the water used to wash the camera should be no greater than 30 C 86 F Never use detergent hot water or strongly running water to clean the camera Doing so creates the risk of leaki...

Страница 127: ...ions Should water ever leak into the camera and cause malfunction due to improper use CASIO COMPUTER CO LTD will not be held liable for any damage to internal components battery recording media etc lo...

Страница 128: ...cted to extreme changes in temperature or humidity Inside of a motor vehicle on a hot day or in an area subjected to strong vibration Condensation Sudden and extreme temperature changes such as that w...

Страница 129: ...t close the cover completely and leave one end out of position Precautions During Wireless Function Wireless LAN Bluetooth Wireless Technology Use Operation of this product may affect or may be affect...

Страница 130: ...ble for any such violations Other Precautions The camera becomes slightly warm during use This is normal and does not indicate malfunction Copyrights Except for your own personal enjoyment unauthorize...

Страница 131: ...ce mark of Apple Inc iOS is a trademark or registered trademark of Cisco Systems Inc of the United States Wi Fi is a registered trademark of the Wi Fi Alliance The Bluetooth word mark and logos are re...

Страница 132: ...LAR PURPOSE AND NONINFRINGEMENT IN NO EVENT SHALL THE AUTHORS OR COPYRIGHT HOLDERS BE LIABLE FOR ANY CLAIM DAMAGES OR OTHER LIABILITY WHETHER IN AN ACTION OF CONTRACT TORT OR OTHERWISE ARISING FROM OU...

Страница 133: ...ted by a copyright notice that is included in or attached to the work an example is provided in the Appendix below Derivative Works shall mean any work whether in Source or Object form that is based o...

Страница 134: ...a lawsuit alleging that the Work or a Contribution incorporated within the Work constitutes direct or contributory patent infringement then any patent licenses granted to You under this License for th...

Страница 135: ...grant permission to use the trade names trademarks service marks or product names of the Licensor except as required for reasonable and customary use in describing the origin of the Work and reproduc...

Страница 136: ...of fees or royalties provided that 1 source code distributions include the above copyright notice this list of conditions and the following disclaimer 2 binary distributions include the above copyrigh...

Страница 137: ...sions granted by this License Source form shall mean the preferred form for making modifications including but not limited to software source code documentation source and configuration files Object f...

Страница 138: ...Source or Object form 3 Grant of Patent License Subject to the terms and conditions of this License each Contributor hereby grants to You a perpetual worldwide non exclusive no charge royalty free irr...

Страница 139: ...our modifications or for any such Derivative Works as a whole provided Your use reproduction and distribution of the Work otherwise complies with the conditions stated in this License 5 Submission of...

Страница 140: ...and all other commercial damages or losses even if such Contributor has been advised of the possibility of such damages 9 Accepting Warranty or Additional Liability While redistributing the Work or De...

Страница 141: ...will terminate it automatically even if the battery is not fully charged If the battery has not been used for a very long time charging may terminate automatically after only about 60 minutes 1 Using...

Страница 142: ...some time fully use up its charge before storing it To prevent over discharging of an unused battery fully charge it and then load it in the camera and fully use up the charge about once every six mon...

Страница 143: ...ervice center to have the battery replaced Make sure that the camera is turned off before removing the battery The edges of the back cover are sharp Take care not to cut your fingers when removing it...

Страница 144: ...tion of the arrow to remove the cover 3 Rotate the cover on the end of the controller in the direction indicated by the arrow to remove it 4 Remove the six screws that secure the back of the controlle...

Страница 145: ...ndicated in the illustration and lift the battery up to remove it Old Rechargeable Battery Handling Precautions Insulate the positive and negative terminals with tape etc Do not peel the covering off...

Страница 146: ...e of this periodic re formatting of a memory card is recommended Electrostatic charge electrical noise and other phenomena can cause data to become corrupted or even lost Make sure that you always bac...

Страница 147: ...tting IMPORTANT Some menu items may not be available depending on the recording mode being use REC Menu Default setting depends on country or geographic region PLAY Menu Reset Initial Default Settings...

Страница 148: ...o Send Off Auto Send File Settings T Only Resize When Sending 3M WLAN password Unpairing Screen 0 Info On Rotation Lock Camera Off Controller Off Camera Sound Vibration On Adjust Date Style Language S...

Страница 149: ...t your retailer or a CASIO authorized service center Power will not turn off Nothing happens when a button is pressed Use a thin object to press the RESET buttons page 8 near the camera s memory card...

Страница 150: ...underexposure of images Adjust Brightness to the side page 56 The image is out of focus during movie recording 1 Focusing may not be possible because the subject is outside the focus range Shoot withi...

Страница 151: ...ault password settings see page 77 Bluetooth wireless technology A connection cannot be established between the camera and controller 1 The camera cannot connect with the controller if they are too fa...

Страница 152: ...y be a problem with the camera s memory data If this is the case perform the reset operation to initialize the camera s setup page 115 After that configure each setting If the language selection scree...

Страница 153: ...le due to insufficient memory capacity or because a folder cannot be created If you want to record more delete files you no longer need from the applicable camera page 38 File could not be saved becau...

Страница 154: ...es There are no files in built in memory or on the memory card This file cannot be played The file you are trying to access is corrupted or is a type that cannot be displayed by this camera This funct...

Страница 155: ...ame Rate MaximumFile Size Built in Memory 1 Recording Capacity Maximum Recording Time with microSD Memory Card 2 File Size of 1 minute Movie FHD 30p 1920x1080 Monaural 14 2 Megabits second 30 frames s...

Страница 156: ...hot and movie recording capacity values are approximate and intended for reference only Actual capacity depends on image contents File size and data rate values are approximate and intended for refere...

Страница 157: ...ctive Pixels 10 2 Megapixels Imaging Element Size 1 2 3 inch CMOS backlit Total Pixels 12 76 Megapixels Lens Focal Distance F2 8 f 2 87 mm equivalent to 16 mm in 35 mm format Zoom Up to 4 0X when Digi...

Страница 158: ...frequency range 1 to 11ch Encryption WPA2 Communication Controller Bluetooth Communication standard Bluetooth ver2 1 EDR Output class Class 2 Monitor Screen Controller 3 0 inch TFT color LCD 921 600 d...

Страница 159: ...of time the camera is left turned on and ambient temperature in the area where the camera is used all greatly affect recording time and number of shots values Number of snapshots Operating Time 235 s...

Страница 160: ...The power cord used must comply with relevant national and or international standards Input 100 to 240 V AC 50 60 Hz 100 mA Output 5 0 V DC 650 mA Operating Temperature Requirements 5 to 35 C 41 to 9...

Страница 161: ...nformity can be found on http doc casio com To comply with the relevant European RF exposure compliance requirements this EX FR100 EX FR100CT must not be co located or operating in conjunction with ot...

Страница 162: ...connected Consult the dealer or an experienced radio TV technician for help CAUTION Changes or modifications not expressly approved by the party responsible for compliance could void the user s autho...

Страница 163: ...2016 CASIO COMPUTER CO LTD 6 2 Hon machi 1 chome Shibuya ku Tokyo 151 8543 Japan MA1608 A M29...

Отзывы: