

Figure 9. Memory screens
2
3
4
1
1
2
3
4
5
6
7
1. Windshield (covering the removable microphone)
2. Removable amplifier
3. On/Off key
4. Display
Introduction
This Quick Start guide helps you to familiarise yourself with the CEL-63x instrument
quickly, so that you can begin to use it without delay.
The guide assumes this is the first time you have used the instrument. It therefore
includes instructions to install the batteries, switch ON and set up the instrument to be
ready for use, calibrate it, take measurements, and store it safely.
We want you to get the best possible performance from the CEL-63x instrument, and
we recommend you refer to the Operator’s Manual for detailed information.
Field Guide
CEL-63x Series Sound Level Meters
CASELLA MEASUREMENT
Regent House,
Wolseley Road,
Kempston,
Bedford,
MK42 7JY,
U.K.
Phone: +44 (0) 1234 844 100
Fax: +44 (0) 1234 841 490
E-mail for technical support: [email protected]
For online Technical Support: http://supportdesk.casellacel.com
Figure 1. The CEL-63x series
5. Soft keys and
6. Navigation keys
7. Run/Stop key
A
B
A
B
Taking Measurements
(Refer to Figure 10)
The measurement options and screen details will vary, depending on the instrument
type you are using.
The instrument must be in the
Measurement Stop
mode (with red bars at the top and
bottom of the screen) before you can start a measurement.
Press the
Run/Stop
key ( ) to start making measurements. The screen shows green
bars at the top and bottom.
D
For instruments that include this option, the broadband values can be viewed as a
bargraph or as a graphical time history on the
Graph
screen. Press the
View
key ( )
to toggle between the
Graph
and the
Main
screens.
Certain instrument types provide two additional Octave (or 1/3 Octave) screens (refer
to Figure 12). Use the
View
key ( ) to toggle the screens. Use the left/right navigation
keys ( ) to move across the frequency bands in the Graph view. Use the up/down
navigation keys to toggle between showing L and L functions
max
eq
Each bar in the graph represents an octave band measured in Hz or kHz. To view a
table of the octave values, press the
View
key ( ).
In 1/3 Octave mode, use the up/down navigation keys to change the displayed
frequencies on the table.
Some instruments in the CEL-63x range can display all the screens shown in
Figure 11 and Figure 12.
The
Marker
screen allows you to tag noise data and record audio, for example noise
B
B
C
B
from a road vehicle, with a specific identity using one of four markers.
When the measurement run has finished, press the
Run/Stop
key ( ). A screen is
displayed asking you to confirm the action - press
Yes
to end the run.
Switch the CEL-63x instrument off when you are not using it to record measurements,
and remove the batteries if the instrument will not be used for extended periods of
time.
Always protect the instrument from physical damage and from water.
To protect the microphone, you should always keep the windshield fitted.
For more information about any of the topics summarised in this Quick Start guide and
additional functions, refer to the User Manual.
D
Storage
More information
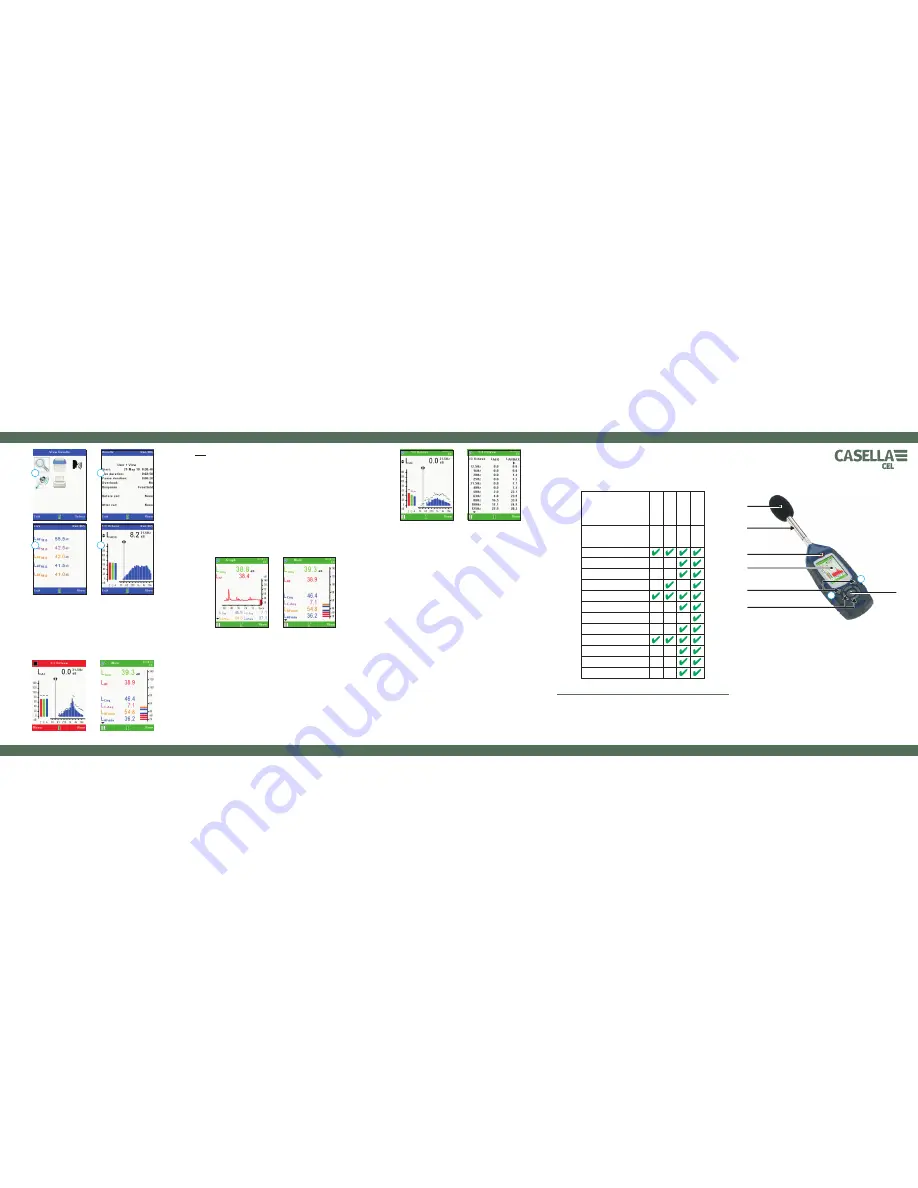
Instrument types
Table 1 below lists the instrument types and shows the capabilities of each
instrument in the range. Please remember that the features that are available to you
and the screens that you can see depend on the type of instrument you are using.
Table 1. CEL-63x instrument types, applications and capabilities
Document number FG40-04
©
2011 Casella Measurement
Figure 10. Example Stop and Run screens
Note:
A
Record Notes
screen will appear prior to starting a measurement if
Audio
Notes
have been activated. Refer to User Manual for more details.
The
Play
symbol
is displayed at the top left-hand corner of the screen, and the
Pause symbol
is displayed at the bottom left-hand corner of the screen. The left-
hand soft key ( ) is the
Pause/Run
control and toggles between these two modes
when operated.
The screen displays
PAUSED!
when measurements are paused. The incremental
run number and its duration are displayed at the top right-hand corner of the screen. If
the Run Duration Timer is set, an icon that shows a stopwatch is displayed next to the
countdown timer. To enable or disabled the Run Duration Timer, use the
Settings
screens (refer to Figure 6). If the Run Duration Timer is not set, the digital timer clock
counts up until you stop the measurement run manually (by pressing the
Run/Stop
key ).
Run Screens
4
;
A
D
Figure 11. Graph and Main screens
Figure 12.
graph and list views
1/3 Octave
E
n
v
ir
o
n
m
e
n
ta
l
(w
it
h
l
o
g
g
in
g
)
O
c
c
u
p
a
ti
o
n
a
l
E
n
v
ir
o
n
m
e
n
ta
l
O
c
c
u
p
a
ti
o
n
a
l
(w
it
h
l
o
g
g
in
g
)
C
E
L
-6
3
3
C
E
L
-6
3
0
C
E
L
-6
3
1
C
E
L
-6
3
2
Cumulative Results
Period Results
Statistical Parameters (Ln%)
Audio Notes
Profile Results
Application
Model number
Marker Events
Level Events
External Events
ONLINE Mode
NNR Mode
SLM Mode
Timers
www.casellameasurement.com
Think Environment. Think Casella.


