27
26
10) The display shows “nAME 02.01 ”.
Type in the second line of name.
11) Press PRT/* key.
12) The display shows “MSGno ”.
13) Press PRT/* key. (If you do not wish to program the price, please press
key)
The display shows “MSGno EntEr”.
14) Type the message number using the Numeric keypad. The message number can be from 0
to 1000. Press the PRT/* key when finished.
15) The display shows “PriCE ”.
16) Press PRT/* key. (If you do not wish to program the price, please press
key) The
display shows “PriCE EntEr 0.00”.
17) Type the price amount using the Numeric keypad. The price can be from 0 to 999999.
Press PRT/* key when finished.
18) The display shows “LiFE”. (The number in this field will represent the amount of days
this commodity can be sold by. It can be from 0 to 365.)
19) Press PRT/* key. (If you do not wish to program the shelf life, please press
key) The
display shows “LiFE EntEr 0”. Type the shelf life using the Numeric keypad. The shelf
life can be from 0 to 365 which represent the number of days after the Packed On Date.
This is how the Sell By Date is calculated: Packed On Date + Shelf Life = Sell By Date.
20) Press the PRT/* key.
21) The display shows “tArE”. (Tare is used to store the weight of the container to be used
with this PLU. The tare is subtracted from the gross weight of the item at the time of
weighing.)
22) Press PRT/* key. (If you do not want a tare, please press
key) The display shows “tArE
EntEr 0.00”. Type the tare value you want on the Numeric keypad. Press the PRT/* key.
23) The display shows “GCodE”. (The group code is a number from 0 to 99 that is printed on
the label. It can be used to group PLUs in to sections, for example: all beef PLUs are
group code 10, all poultry PLUs are group code 20, etc.. )
24) Press PRT/* key (If you do not want to enter a group code, press
key) The display
shows “GCodE EntEr 0”. Type the group code number you want on the Numeric keypad.
Press PRT/* key.
25) The display shows “SAvE”. If you want to save this PLU to memory, press the PRT/*
key. The display shows “PLU”.
(If you do not want to save this PLU to memory press
key and the display shows
“ESC”. Press the PRT/* key to exit without saving this PLU.
26) If you wish to program another PLU, go back to step 2.
If you wish to finish PLU programming, press the C key.
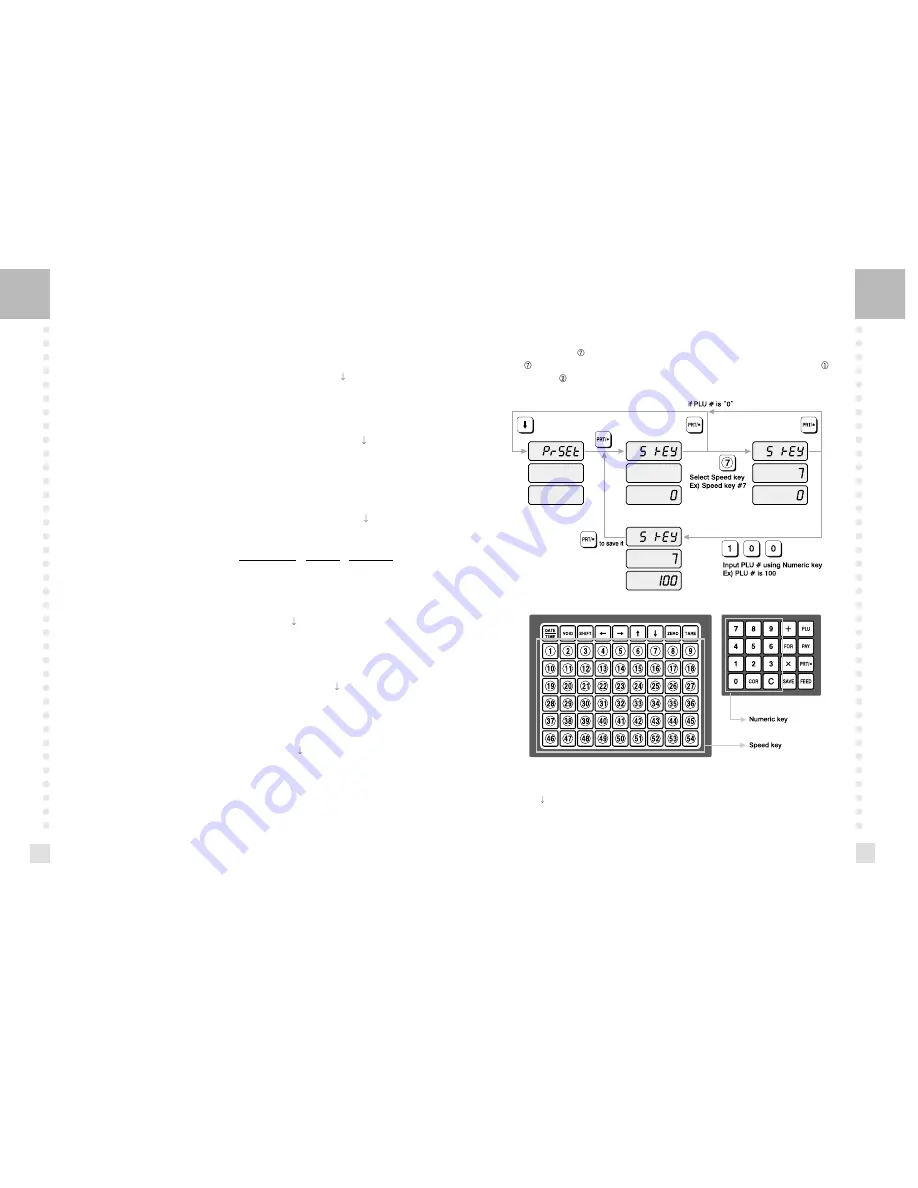
4.3 Preset keys Programming
The preset keys are used to quickly access a PLU with only one key press. For example, if
you had preset key
programmed to call up PLU number 100, all you need to press is preset
key . When you initialize the scale (it automatically sets up all the preset keys as: preset
=
PLU 1, preset
= PLU 2... preset 54 = PLU 54.
1) To go to PROGRAM mode press 10000 by using numeric keys and VOID key. And then
press
key.
2) The display shows “PrSEt”.
3) Press PRT/* key.
Содержание LP 1.6 Series
Страница 1: ...LP 1 6 Series Label Printing Scale OWNER S MANUAL ...
Страница 33: ...65 64 26 48mm 68mm 27 58mm 63mm 28 58mm 63mm 29 58mm 60mm 30 58mm 60mm ...
Страница 34: ...66 ...


