background image

59SU5A: Installation, Start-up, Operating and Service Maintenance Instructions

Manufacturer reserves the right to change, at any time, specifications and designs without notice and without obligations.

27

Alternate Power Supplies

This furnace is designed to operate on utility generated power which has

a  smooth  sinusoidal  waveform.   If  the  furnace  is  to  be  operated  on  a

generator  or  other  alternate  power  supply,  the  alternate  power  supply

must produce a smooth sinusoidal waveform for compatibility with the

furnace electronics.  The alternate power supply must generate the same

voltage, phase, and frequency (Hz) (

Table 13

) or the furnace rating plate.

Power  from  an  alternate  power  supply  that


is  non-sinusoidal  may

damage the furnace electronics


or cause erratic operation.

Contact the alternate power supply manufacturer for specifications and

details.

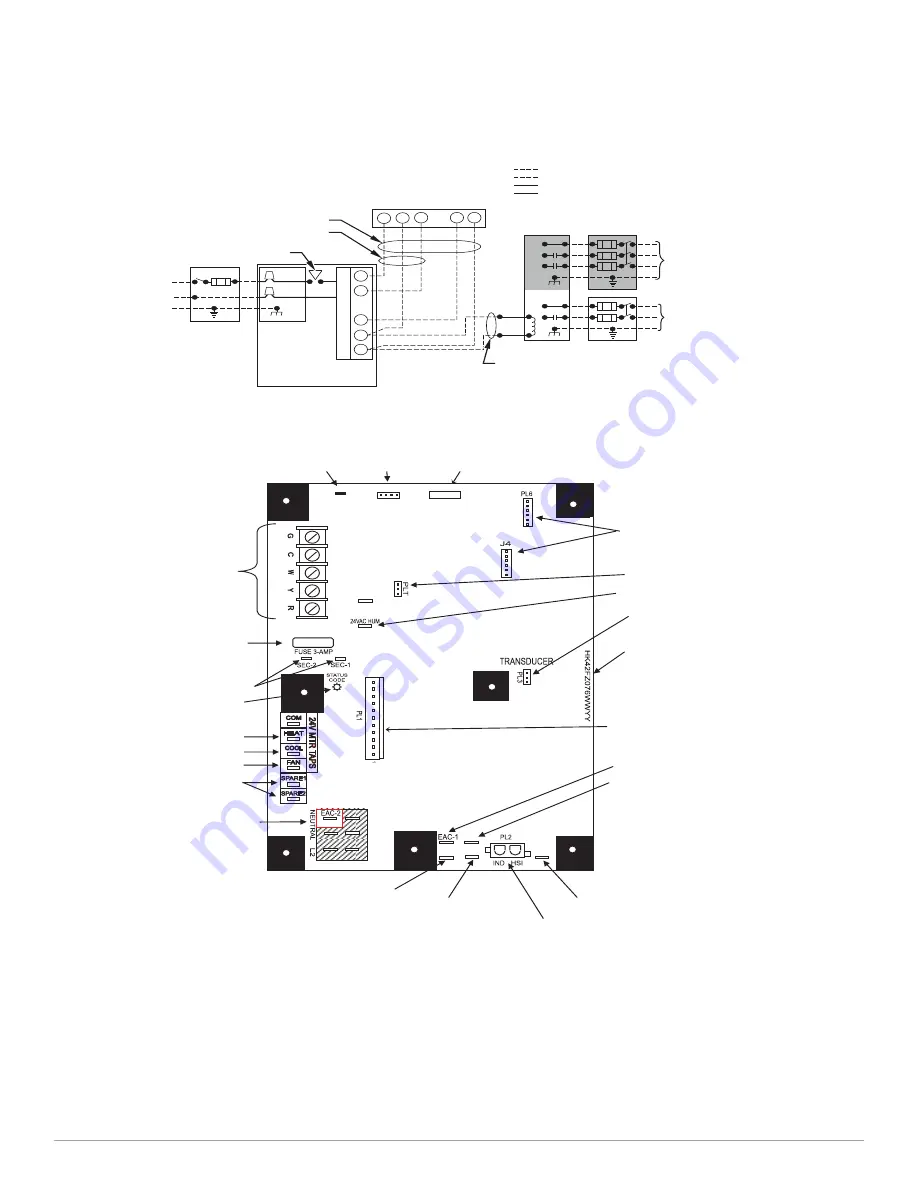
A190079

Fig. 40 – Typical Single-Stage Wiring Diagram

A190409

Fig. 41 – Example of Single Stage Furnace Control

115-V FIELD-

SUPPLIED

DISCONNECT

AUXILIARY
J-BOX

24-V

TERMINAL

BLOCK

THREE-WIRE

HEATING-ONLY

FIVE WIRE

NOTE 1

NOTE 2

FIELD-SUPPLIED
DISCONNECT

CONDENSING
UNIT

TWO
WIRE

FURNACE

C
O
N

T

R
O

L

R

G

COM

W

C

R

G

Y

GND

GND

FIELD 24-V WIRING
FIELD 115-, 208/230-, 460-V WIRING
FACTORY 24-V WIRING
FACTORY 115-V WIRING

208/230- OR
460-V
THREE
PHASE

208/230-V
SINGLE
PHASE

BLOWER DOOR SWITCH

WHT

BLK

WHT

BLK

NOTES:

Connect Y-terminal in furnace as shown for proper blower operation.
Some thermostats require a "C" terminal connection as shown.
If any of the original wire, as supplied, must be replaced, use
same type or equivalent wire.

W

   Y

GND

THERMOSTAT
TERMINALS

1.
2.
3.


24-V THERMOSTAT 

TERMINALS 

PL2 

 (115-VAC) HOT SURFACE IGNITER  & 
INDUCER MOTOR CONNECTOR 

 (L2) NEUTRAL 

CONNECTIONS  

115-VAC (BL) BLOWER MOTOR LINE 

VOLTAGE  CONNECTION  

EAC-1 TERMINAL 

 (115-VAC  EAC + HUM 1.0 AMP MAX.)  

PL1 

 LOW VOLTAGE MAIN HARNESS 

CONNECTOR plus INDUCER PWM  

TRANSFORMER 24-VAC 

CONNECTIONS  

3-AMP FUSE  

STATUS LED LIGHT  

HEAT OFF-DELAY 

MODEL PLUG 
CONNECTOR  

HUMIDIFIER TERMINAL 

(24-VAC 0.5 AMP MAX.) 

BOARD PART NUMBER 

LOCATION  

COOLING SPEED 

TAP  

HEATING SPEED 

TAP 

PR 

115-VAC (PR) TRANSFORMER 

PRIMARY  

J2 DEFEAT 

JUMPER 

TEST/TWIN 

J2 

J1

J1 HEAT OFF-DELAY 

JUMPER SELECT 

L1 

HUM 115-VAC TERMINAL 

(115-VAC  EAC + HUM 1.0 AMP MAX.)  


FACTORY RUN TEST PORT  

(FACTORY ONLY) 

PROGRAMMING FLASH PORTS 

(FACTORY ONLY) 

BL 

115-VAC (L1) LINE VOLTAGE  

CONNECTION  

FAN SPEED TAP 

PL3 - PRESSURE 

TRANSDUCER INPUT 

PL4 

HUM 

115VAC 

SPARE UNUSED 

TAPS 

Содержание 59SU5A

Страница 1: ...Valve Outlet Pressure for Gas Heat Values at Altitude 60 000 48 Table 24 Gas Valve Outlet Pressure for Gas Heat Values at Altitude 80 000 49 Table 25 Gas Valve Outlet Pressure for Gas Heat Values at Altitude 100 000 49 SERVICE AND MAINTENANCE PROCEDURES 50 WINTERIZATION 56 PARTS REPLACEMENT INFORMATION GUIDE 59 MODEL NOMENCLATURE 59 TRAINING 59 Most states in the USA and jurisdictions in Canada ha...

Страница 2: ...exterior of the building at a minimum height of eight 8 feet above grade directly in line with the exhaust vent terminal for the horizontally vented gas fueled heating appliance or equipment The sign shall read in print size no less than one half 1 2 inch in size GAS VENT DIRECTLY BELOW KEEP CLEAR OF ALL OBSTRUCTIONS 4 INSPECTION The state or local gas inspector of the side wall horizontally vente...

Страница 3: ...y death or property damage Improper installation adjustment alteration service maintenance or use can cause carbon monoxide poisoning explosion fire electrical shock or other conditions which may cause personal injury or property damage Consult a qualified service agency local gas supplier or your distributor or branch for information or assistance The qualified service agency must use only factor...

Страница 4: ...charged outdoors Connect this furnace to an approved vent system only as specified in the Venting section of these instructions 5 Never test for gas leaks with an open flame Use a commercially available soap solution made specifically for the detection of leaks to check all connections as specified in the Gas Piping section 6 Always install furnace to operate within the furnace s intended temperat...

Страница 5: ...one of the furnace model sizes can be used if the heating load is less than half of the furnace model s output capacity Use Air Conditioning Contractors of America Manual J and S American Society of Heating Refrigerating and Air Conditioning Engineers or other approved engineering method to calculate heating load estimates and select the furnace Excessive oversizing of the furnace may cause the fu...

Страница 6: ...In the state of Massachusetts This product must be installed by a licensed plumber or gas fitter When flexible connectors are used the maximum length shall not exceed 36 in 914 mm When lever type gas shutoffs are used they shall be T handle type The use of copper tubing for gas piping is not approved by the state of Massachusetts Electrical Connections US Current edition of National Electrical Cod...

Страница 7: ...ervicing and cleaning Always comply with minimum fire protection clearances Table 1 The following types of furnace installations may require OUTDOOR AIR for combustion due to chemical exposures Commercial buildings Buildings with indoor pools Laundry rooms Hobby or craft rooms Chemical storage areas If air is exposed to the following substances it should not be used for combustion air and outdoor ...

Страница 8: ... the space Spaces having less than 50 cubic feet per 1 000 BTUh 4 8 cubic meters per kW require the Outdoor Combustion Air Method Spaces having at least 50 cubic feet per 1 000 BTUh 4 8 cubic meters per kW may use the Indoor Combustion Air Standard or Known Air Infiltration Method Outdoor Combustion Air Method 1 Provide the space with sufficient air for proper combustion ventilation and dilution o...

Страница 9: ...ace may be considered a space that freely communicates with the outdoors provided there are adequate permanent ventilation openings directly to outdoors having free area of at least 1 in 2 4 000 BTUh of total input rating for all gas appliances in the space 3 In spaces that use the Indoor Combustion Air Method infiltration should be adequate to provide air for combustion permanent ventilation and ...

Страница 10: ...ilation and Dilution Air from Outdoors AIR CHANGES PER HOUR ACH OTHER THAN FAN ASSISTED TOTAL 1 000 S BTUH GAS INPUT RATE FAN ASSISTED TOTAL 1 000 S BTUH GAS INPUT RATE 30 40 50 26 40 60 80 100 120 140 Space Volume Ft3 M3 0 60 1 050 29 7 1 400 39 6 1 750 49 5 910 25 8 1 400 39 6 1 500 42 5 2 000 56 6 2 500 70 8 3 000 84 9 3 500 99 1 0 50 1 260 35 6 1 680 47 5 2 100 59 4 1092 30 9 1 680 47 5 1 800 ...

Страница 11: ... An indoor coil condensate drain or humidifier drain can be connected to the external furnace condensate drain provided The drains are not hard piped together and There is an air gap at the point where the two drain lines meet or All condensate piping is at least 3 4 PVC and there is a relief tee at the top of condensate drain piping as shown see Fig 11 A200069 A200070 WARNING CARBON MONOXIDE POIS...

Страница 12: ...4 NOTE Coil may require metal spacer or shield between furnace and coil See coil install requirements Table 6 Fig 11 Example of Field Drain Attachment Table 5 Condensate Trap Configurations Part Installation Configuration Horizontal Upflow Upflow Offset Required Required Required Not Required Required Required Not Required Required Required Not Required Not Required Required accessory kit purchase...

Страница 13: ...TICE Upflow installations utilizing the right side air return opening should follow the Upflow Specific Steps Offset Installation to ensure the full opening is available for return ductwork CAUTION CUT HAZARD Failure to follow this caution may result in personal injury Sheet metal parts may have sharp edges or burrs Use care and wear appropriate protective clothing safety glasses and gloves when h...

Страница 14: ... 2 Screw the trap to the trap offset adapter see Fig 16 3 Screw the trap adapter plate to the casing using the supplied sheet metal screw see Fig 16 4 Remove factory installed collector box cap Run tube from port on upper left of the collector box to the relief port on the trap adapter Fig 19 If the tube is too long cut any extra length from the tube Horizontal Specific Steps 1 Accessory Horizonta...

Страница 15: ... machine screw see Fig 23 Drilling pilot holes is recommended to better align the plate with the knockout opening 4 Install the second trap plate at the remote location 5 ft or less away from the furnace Fig 23 5 Using two field supplied 1 2 in CPVC tubes of the desired length 5 ft or less and 2 field supplied CPVC elbows run the drain from the adapter plate on the furnace to the remote adapter pl...

Страница 16: ...lded should be treated as un shielded and require a spacer Dimensional requirements see Fig 26 3 For 3rd party unshielded coils consult manufacturer for design of a field fabricated shield that completely shields all plastic composite materials from direct exposure to any part of the heat exchanger All adapters are field fabricated according to the dimensions for the metal shield see Fig 25 and fo...

Страница 17: ...rnace must be pitched for proper condensate drainage see Fig 31 Supply Air Connections For a furnace not equipped with a cooling coil the outlet duct shall be provided with a removable access panel This opening shall be accessible when the furnace is installed and shall be of such a size that the heat exchanger can be viewed for possible openings using light assistance or a probe can be inserted f...

Страница 18: ...bottom closure panel to install leveling legs To remove bottom closure panel see Fig 34 To install leveling legs 1 Position furnace on its back Locate and drill a hole in each bottom corner of furnace 2 For each leg install nut on bolt and then install bolt with nut in hole Install flat washer if desired 3 Install another nut on other side of furnace base Install flat washer if desired 4 Adjust ou...

Страница 19: ... for return air connection A200088 Fig 32 Working Platform for Attic Installation NOTE Furnace shown is a direct vent application Refer to the venting section for allowable vent configurations NOTE N Coil only add 8 in separation between coil and furnace for all other unshielded coils See evaporator coil spacer or shield requirements NOTE Local codes may require a drain pan and condensate trap whe...

Страница 20: ... 29 each opening used will require a filter A filter rack or any field supplied accessory air cleaner can also be installed in the common return duct prior to entering the return air opening in any orientation The furnace may be used with an optional external media filter cabinet The optional media filter cabinet uses either a standard 1 in 25 mm filter or 4 in 102 mm wide media filter which can b...

Страница 21: ...oring subbase not required 19 1 2 495 21 5 8 549 20 1 8 511 22 1 4 565 24 1 2 622 Upflow Applications on Combustible or Noncombustible Flooring subbase not required 23 584 21 1 8 537 23 5 8 600 22 1 4 565 16 x 25 Filter 406 x 635 mm Factory Accessory Washable Factory Accessory Media Representative After Market Filter Media Fiberglass Pleated CFM L s 1 in 2 5 cm 4 in 10 cm 1 in 2 5 cm 2 in 5 cm 1 i...

Страница 22: ...ace and a return air base counts as a side and bottom return 7 The entry indicates an unstable operating condition Ductwork Acoustical Treatment NOTE Metal duct systems that do not have a 90 degree elbow and 10 ft 3 M of main duct to the first branch take off may require internal acoustical lining As an alternative fibrous ductwork may be used if constructed and installed in accordance with the la...

Страница 23: ... in w c turn off electric shutoff switch located on furnace gas control valve and accessible manual equipment shutoff valve before and during supply pipe pressure test After all connections have been made purge lines and check for leakage at furnace prior to operating furnace The gas supply pressure shall be within the maximum and minimum inlet supply pressures marked on the rating plate with the ...

Страница 24: ... 8 inch for 115 VAC Electric GAS SUPPLY MANUAL SHUT OFF VALVE REQUIRED SEDIMENT TRAP UNION NOTE Union may be inside the vestibule where permitted by local codes FRONT WARNING ELECTRICAL SHOCK FIRE OR EXPLOSION HAZARD Failure to follow safety warnings could result in dangerous operation serious injury death or property damage Improper servicing could result in dangerous operation serious injury dea...

Страница 25: ... in 22 mm knock out on the desired side of the casing Remove the knock out from the casing NOTE If electrical entry through the furnace top panel is used a 7 8 in 22 mm hole must be drilled through the top panel 2 Drill two 2 1 8 in 3 mm pilot holes through the dimples in the furnace casing near the 7 8 in knock out NOTE If electrical entry through the furnace top panel is used mark the screw hole...

Страница 26: ... Box bracket 3 Secure BX cable to J Box bracket with connectors approved for the type of cable used 4 Connect field ground wire and factory ground wire to green ground screw on J Box mounting bracket see Fig 38 5 Connect field power and neutral leads to furnace power leads see Fig 40 6 Attach furnace J Box cover to mounting bracket with screws supplied in loose parts bag Do not pinch wires between...

Страница 27: ...ONDENSING UNIT TWO WIRE FURNACE C O N T R O L R G COM W C R G Y GND GND FIELD 24 V WIRING FIELD 115 208 230 460 V WIRING FACTORY 24 V WIRING FACTORY 115 V WIRING 208 230 OR 460 V THREE PHASE 208 230 V SINGLE PHASE BLOWER DOOR SWITCH WHT BLK WHT BLK NOTES Connect Y terminal in furnace as shown for proper blower operation Some thermostats require a C terminal connection as shown If any of the origin...

Страница 28: ...ards and American Society for Testing and Materials ASTM standards For approved materials for use in the U S A Table 16 This furnace is also CSA approved for venting with M G DuraVentRPolyProR or Centrotherm InnoFlueR polypropylene venting systems using single Table 13 Electrical Data FURNACE SIZE VOLTS HERTZ PHASE OPERATING VOLTAGE RANGE Permissible limits of the voltage range at which the unit o...

Страница 29: ... Vent 2 Pipe system see Fig 54 and for Ventilated Combustion Air Non direct Vent 1 Pipe system see Fig 55 For exterior termination arrangements for Direct Vent 2 Pipe system see Fig 56 WARNING CARBON MONOXIDE POISONING HAZARD Failure to follow the instructions outlined below for each appliance being placed into operation could result in carbon monoxide poisoning or death For all venting configurat...

Страница 30: ...onal code authorities see Fig 54 Allowable vent and combustion air terminations see Fig 56 Ventilated Combustion Air The vent pipe for a Ventilated Combustion Air System must terminate outdoors For references to vent clearances required by National code authorities see Fig 55 Allowable vent terminations see Fig 57 The combustion air pipe terminates in a well ventilated attic or crawl space Follow ...

Страница 31: ...pe connected to the tee or the External Vent Trap Kit to help prevent contaminants from entering the furnace see Fig 43 The External Vent Trap Kit accessory may be used as a trap for the combustion air inlet pipe if a large amount of moisture must be removed The drain line may be connected to the same drain as the furnace condensate and the evaporator coil condensate line ONLY if the inlet air tra...

Страница 32: ...alent Vent Length is still longer than the longer TEVL of the vent pipe or combustion air pipe then that diameter of pipe selected may be used When installing vent systems pipe lengths of 10 ft 3 M or less use the smallest allowable pipe diameter Using a pipe size greater than required for short venting systems may result in loss of efficiency incomplete combustion flame disturbance or flame sense...

Страница 33: ... Insert a length of vent pipe through the coupling into the outlet of the vent elbow 6 Tighten the clamp around the outlet of the vent elbow Torque the clamp to 15 lb in A13074 Fig 47 Vent Coupling and Adapter with Gaskets A210034 Fig 48 Inducer Vent Elbow Install the remaining vent and combustion air pipes as shown below It is recommended that all pipes be cut prepared and pre assembled before pe...

Страница 34: ...ter 3 Remove the pipe from the furnace and the adapter and cut off any excess pipe 4 Clean and prime the end of the pipe that is flush with the vent adapter with a primer that is appropriate for the type of pipe being used 5 Re insert the pipe through the casing into the vent elbow 6 Tighten the clamp around the outlet of the vent elbow Torque the clamp to 15 lb in 7 Apply cement to the end of the...

Страница 35: ...tructions are provided as a reference only Determine an appropriate location for termination kit using the guidelines provided in section Locating The Vent Termination in this instruction 1 Cut one 4 in diameter hole for 2 in kit or one 5 in diameter hole for 3 in kit 2 Loosely assemble concentric vent combustion air termination components together using instructions in kit 3 Slide assembled kit w...

Страница 36: ...ntative drawing only some models may vary HORIZONAL LEFT LEFT VENT CONFIGURATION A11329A Representative drawing only some models may vary HORIZONTAL LEFT RIGHT VENT CONFIGURATION Fig 51 Horizontal Left Appearance may vary See Notes for Venting Options A11337 Representative drawing only some models may vary HORIZONTAL RIGHT VERTICAL VENT CONFIGURATION 1 2 3 4 5 6 7 5 Rotate vent elbow to required p...

Страница 37: ... for use in the U S A 3 UL 1738 vent systems must be composed of pipe fittings cements and primers from the same supplier Material Description Type ASTM ULC UL Specification Pipe Fittings Solvents Primers Cements PVC Pressure Pipe Schedule 40 D1785 UL 1738 DWV Schedule 40 D1785 D2665 D2466 Cellular Core Schedule 40 F891 or F656 D2564 SDR 26 N A D2241 D2665 SDR 21 N A D2241 IPEX Schedule 40 ULC S63...

Страница 38: ...0 20 30 25 15 15 10 10 20 40 30 25 20 45 40 30 20 5 20 15 10 20 20 15 10 5 20 25 20 15 20 30 25 20 40 15 10 5 15 15 10 5 20 15 15 10 20 20 15 10 Unit Size 80 000 BTUH Winter Design Temp F Pipe Dia in Uninsulated 3 8 in Insulation 1 2 in Insulation 1 2 2 3 4 1 2 2 3 4 1 2 2 3 4 20 15 40 40 35 30 15 50 90 75 65 15 50 70 70 70 0 15 20 15 10 5 15 50 45 35 30 15 50 50 40 35 20 15 10 5 15 35 30 20 15 15...

Страница 39: ...0 ft 22 M Use length of the longer of the vent or air inlet piping system Add equiv length of 3 90º long radius elbows use the highest number of elbows for either the vent or inlet pipe 3 x 3 ft 0 9 M 9 ft 2 7 M From Table 19 Add equiv length of 2 45º long radius elbows use the highest number of elbows for either the vent or inlet pipe 2 x 1 5 ft 0 5 M 3 ft 0 9 M From Table 19 Add equiv length of ...

Страница 40: ...istances when vent termination is located more than 6 ft 2 M away from an inside corner refer to the appropriate Direct Vent or Non Direct Vent Clearance Table Clearance description when termination is at least 3 ft 1 M away and not more than 6 ft 2 M away from an inside corner Clearance above grade veranda porch deck balcony or anticipated snow level 12 in 305 mm Clearance to a permanently closed...

Страница 41: ...hanical air supply inlet 6 ft 1 8 M 3ft 9 M above if within 10 ft 3 M horizontally L Clearance under a veranda porch deck or balcony 12 in 305 mm Permitted only if veranda porch deck or balcony is fully open on a minimum of two sides beneath the floor See Note 4 Manufacturer s Recommendation See Notes 3 8 M Clearance to each side of the centerline extended above or below vent terminal of the furna...

Страница 42: ...mendation See Note 8 K Clearance to a mechanical air supply inlet 6 ft 1 8 M 3ft 9 M above if within 10 ft 3 M horizontally L Clearance under a veranda porch deck or balcony 12 in 305 mm Permitted only if veranda porch deck or balcony is fully open on a minimum of two sides beneath the floor See Note 4 Manufacturer s Recommendation See Notes 3 8 M Clearance to each side of the centerline extended ...

Страница 43: ...72mm for 2 in 51mm Abandoned masonry used as raceway per code 12 in 305 mm min from overhang or roof Maintain 12 in 305mm minimum clearance above highest anticipated snow level or grade whichever is greater Side wall termination with 2 elbows preferred 12 in min 305 mm from overhang or roof Maintain 12 in 305mm minimum clearance above highest anticipated snow level or grade whichever is greater 6 ...

Страница 44: ...Pour one quart liter of water into funnel tube Water should run through collector box overfill condensate trap and flow into open field drain 7 Remove funnel and tube from collector box and replace collector box drain plug A190304 Fig 59 Prime Condensate Trap WARNING FIRE HAZARD Failure to follow this warning could result in personal injury death and or property damage This furnace is equipped wit...

Страница 45: ...s supply manual shutoff valve to OFF position l Turn off furnace power supply m Remove manometer from the inlet pressure tap of the gas valve n Tighten set screw on inlet tower pressure tap with 3 32 in hex wrench or if 1 8 in NPT plug was removed apply pipe dope sparingly to end of plug and re install in the gas valve 2 4 Adjust gas valve outlet pressure determined in Step 2 to obtain correct inp...

Страница 46: ... 2 Return and supply ducts for excessive restrictions causing static pressures greater than the maximum heating static listed on the rating plate c Adjust air temperature rise by adjusting blower speed Increase blower speed to reduce temperature rise Decrease blower speed to increase temperature rise d Turn thermostat down below room temperature and remove blower access door e To change motor spee...

Страница 47: ... Main or upper door in upflow position doors are properly installed 5 Verify that the Status LED glows If not check that the power supply is energized and that the blower door is secure Interpret diagnostic codes see Fig 63 6 Cycle test furnace with room thermostat to be sure that it operates properly with the room thermostat Check all modes including Heat Cool and Fan 7 Check operation of accesso...

Страница 48: ...1 2 2 2 3 2 3 2 4 2 5 875 2 0 2 1 2 1 2 2 2 3 2 3 900 1 9 2 0 2 0 2 1 2 1 2 2 5400 925 1 8 1 8 1 9 2 0 2 0 2 1 1646 950 1 8 1 8 1 8 1 9 1 9 2 0 975 1 8 1 8 1 8 1 8 1 8 1 9 1000 1 8 1 8 1 8 1 8 1 8 1 8 Table 23 Gas Valve Outlet Pressure for Gas Heat Values at Altitude 60 000 Tabulated Data Based on 60 000 BTUH Input for 0 ft 0m to 5400 ft 1646 M above sea level ALTITUDE RANGE ft m AVG GAS HEAT VALU...

Страница 49: ... 2 2 2 2 2 3 2 4 2 4 875 2 0 2 0 2 1 2 2 2 2 2 3 900 1 9 1 9 2 0 2 0 2 1 2 2 5400 925 1 8 1 8 1 9 1 9 2 0 2 1 1646 950 1 8 1 8 1 8 1 8 1 9 2 0 975 1 8 1 8 1 8 1 8 1 8 1 9 1000 1 8 1 8 1 8 1 8 1 8 1 8 Table 25 Gas Valve Outlet Pressure for Gas Heat Values at Altitude 100 000 Tabulated Data Based on 100 000 BTUH Input for 0 ft 0m to 5400 ft 1646 M above sea level ALTITUDE RANGE ft m AVG GAS HEAT VAL...

Страница 50: ...interrupted 1 To retrieve status code proceed with the following NOTE NO thermostat signal may be present at control and all blower OFF delays must be completed a Remove blower access door b Close blower door interlock switch c Using a length of wire briefly short the TEST TWIN terminal to the C terminal on the furnace control 2 When above items have been completed the LED flashes the most recent ...

Страница 51: ...et lockout Check for Blocked burner inlet Blocked burner mesh Poor inducer flow Excess wind 31 PRESSURE TRANSDUCER INPUT DOES NOT SENSE TARGET PRESSURE OR PRESSURE IS OUT OF RANGE Check for Excessive wind Proper vent sizing Restricted vent Defective inducer motor Inadequate combustion air supply Defective pressure transducer Low inlet gas pressure if LGPS used Low inducer voltage 115 VAC Frozen or...

Страница 52: ...d motor 7 If a greasy residue is present on blower wheel remove wheel from the blower housing and wash it with an appropriate degreaser To remove wheel NOTE Before disassembly mark blower motor and blower housing so motor and each arm is positioned at the same location during reassembly a Disconnect ground wire attached to blower housing b Remove screws securing cutoff plate and remove cutoff plat...

Страница 53: ...tch is closed Exercise caution to avoid electrical shock from exposed electrical components when manually closing this switch for service purposes SET SCREW MOTOR WHEEL HUB MOTOR SHAFT FLAT SCREW MOTOR ARM GROMMET SCREW LOCATION BLOWER HSG ASSY BRACKET BRACKET ENGAGEMENT SEE DETAIL A CAPACITOR OR POWER CHOKE WHEN USED BRACKET SCREW GND BLOWER HSG ASSY MOTOR BLOWER WHEEL BLOWER CUTOFF BLOWER DETAIL...

Страница 54: ... If damaged or missing replace gasket before reinstalling 6 To replace igniter and bracket assembly reverse items 5a through 5d 7 Reconnect igniter harness to the igniter dressing the igniter wires to ensure there is no tension on the igniter itself see Fig 66 8 Turn on gas and electrical supplies to furnace 9 Verify igniter operation by initiating control board self test feature Run the furnace t...

Страница 55: ...eat exchangers should be replaced rather than trying to clean them thoroughly due to their intricate design A build up of soot and carbon indicates that a problem exists which needs to be corrected such as improper adjustment of manifold pressure insufficient or poor quality combustion air improper vent termination incorrect size or damaged manifold orifice s improper gas or a restricted heat exch...

Страница 56: ... as well the inducer will operate during the 90s If the BTS does not reset during this time a permanent lockout will result and power must be cycled to reset Check BTS and fault code 26 for more information The blower door must be installed for power to be conducted through the blower door interlock switch ILK to the furnace control CPU transformer TRAN inducer motor IDM blower motor BLWM hot surf...

Страница 57: ...rgized as long as the blower motor BLWM is energized During a call for heat the furnace control CPU will transition the blower motor BLWM to FAN tap The blower motor BLWM will remain ON until the main burners ignite then shut OFF and remain OFF for 25 seconds before coming back on at HEAT tap The blower motor BLWM will revert to FAN tap after the heating cycle blower off delay is completed When th...

Страница 58: ...20 150 or 180 seconds cooling or heat pump 90 seconds 12 BLWM is locked rotor overload protected by redundant electronic control circuits 13 J15 and J16 not available on all motors Blower motor BLWM leads may be hardwired at motor 14 Some motors may use black instead of gray for COOL motor tap Hi Speed 15 Inductor not used on all models PL3 PTD PL12 R G BK 2 3 1 BL NOTE 3 GV R Y R LS PL1 W 1 1 2 3...

Страница 59: ...RIER 7310 West Morris Street Indianapolis IN 46231 U S A Have available the model number series number and serial number located on the unit rating plate to ensure correct replacement part MODEL NOMENCLATURE TRAINING My Learning Center is your central location for professional residential HVAC training resources that help strengthen careers and businesses We believe in providing high quality learn...

Страница 60: ...21 Catalog No 59SU5A 05SI REV A Replaces 59SU5A 05SII 59SU5A Installation Start up Operating and Service Maintenance Instructions Manufacturer reserves the right to change at any time specifications and designs without notice and without obligations 60 ...

Отзывы: