


62-11785
8–18
8.7.3
Filter-Drier
a. Check Filter-Drier
The unit must be running in cool for this test. Check for a restricted or plugged filter-drier by feeling the liquid line
inlet and outlet connections of the drier cartridge.
If the outlet side feels cooler than the inlet side, then the filter-drier should be replaced.
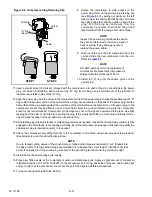
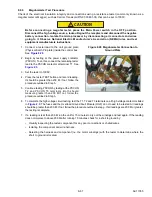
b. Replace Filter-Drier
1. Pump down the low side. Refer to
2. Remove bracket, loosen the inlet connection to relieve any remaining pressure then remove drier.
3. Procure new O-rings. Lubricate the O-rings, back side of sleeves and coupling nuts. Using a backup wrench at
each connection torque 30 to 38 ft/lbs (40.7 to 51.5 Nm).
4. Leak check, evacuate & dehydrate, and charge system as required. Refer to
&
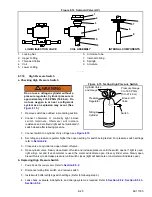
8.7.4
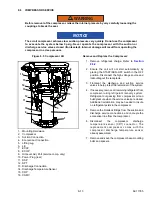
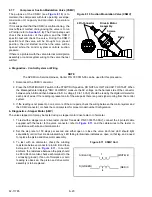
Replacing Receiver Sight Glass Or Fusible Plug
1. Remove the refrigerant charge. Refer to
.
2. Loosen the sight glass or fusible plug to relieve any remaining pressure. Remove and discard glass or plug.
3. Using new o-ring, install component. Torque the sight glass to 15 to 25 ft/lbs (20.3 to 33.9 Nm). Torque the fusible
plug to 48 to 96 inch/lbs (5.4 to 10.8 Nm).
4. Leak check, evacuate & dehydrate, and charge system as required. Refer to
&
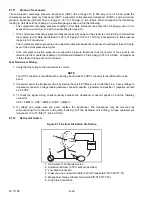
8.7.5
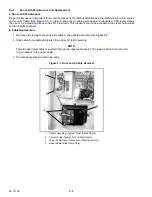
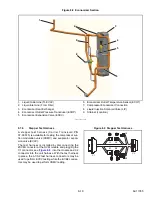
Economizer Heat Exchanger
1. Pump down the low side. Refer to
.
2. Ensure the unit will not start automatically by placing the START/RUN-OFF switch in the OFF position.
Disconnect the high voltage source and lockout/tagout the receptacle.
3. Remove insulation, brackets and clamps from economizer line assemblies as required (refer to
4. Remove the economizer expansion valve and liquid injection solenoid valve coils.
5. Remove the economizer outlet pressure transducer and economizer outlet temperature sensor.
6. Unbraze four lines at the economizer connections.
7. Note orientation of economizer (mounted with connection markings upside-down). Remove economizer heat
exchanger, bolt replacement economizer heat exchanger in place and rebraze lines by reversing the previous
steps.
8. Leak check, evacuate the unit and charge.
9. Reinstall the economizer outlet pressure transducer, economizer outlet temperature sensor, valve coils and
insulation.
10. Place unit back in service and check operation.
Содержание VECTOR 8100
Страница 2: ......
Страница 4: ......
Страница 12: ...62 11785 viii ...
Страница 16: ...62 11640 12 ...
Страница 18: ...62 11785 ...
Страница 24: ...62 11785 1 6 1 3 SAFETY DECALS ...
Страница 25: ...1 7 62 11785 ...
Страница 26: ...62 11785 1 8 ...
Страница 27: ...1 9 62 11785 ...
Страница 28: ...62 11785 1 10 ...
Страница 30: ...62 11785 ...
Страница 50: ...62 11785 ...
Страница 82: ...62 11785 ...
Страница 96: ...62 11785 4 14 ...
Страница 98: ...62 11785 ...
Страница 129: ...5 31 62 11785 ...
Страница 130: ...62 11785 5 32 ...
Страница 134: ...62 11785 6 4 ...
Страница 138: ...62 11785 ...
Страница 230: ...62 11785 ...
Страница 271: ...8 41 62 11785 ...
Страница 272: ...62 11785 8 42 ...
Страница 274: ...62 11785 ...
Страница 286: ......
Страница 287: ......
Страница 288: ...62 11785 10 8 ...
Страница 292: ......
Страница 293: ......