


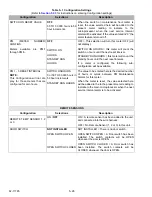

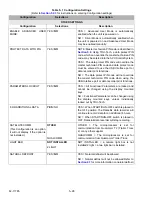

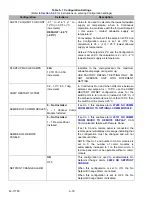


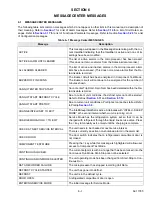

62-11785
5–18
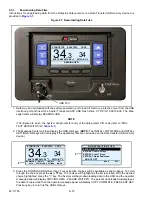
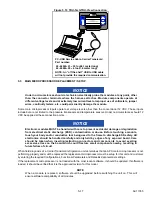
The preferred method for setup of the main microprocessor is to use the display mounted keys or a Data Transfer
USB memory device. All required changes, except unit specific and time sensitive data, may be performed using
the USB memory device.
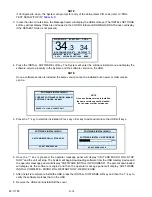
If a USB is not available the main microprocessor may be setup using TRU-Tech. TRU-Tech allows entry of all
required data. If neither a USB memory device or TRU-Tech and service cable is available, the main
microprocessor may be setup for immediate use using the display mounted keys. Changes to the default DataLink
data recorder settings may not be entered using the display mounted keys. If the main microprocessor is setup
using the display mounted keys and this feature is needed, it may be loaded at a later date.
5.5.1
Pre-Replacement Steps
Before the unit can be started using the replacement main microprocessor certain unit specific and time sensitive
data must be known.
TIP
Print this page and fill out the following for use when entering the data.
That information includes:
• Unit Serial Number _______________________________________________
• Unit Model Number _______________________________________________
• Standby Protect Hours ____________________________________________
• Switch On Protect Hours __________________________________________
• Standby Hours __________________________________________________
• Switch On Sleep Hours ___________________________________________
• Date and Time __________________________________________________
• ID Number _____________________________________________________
1. If possible, power the original system up by entering PC Mode, or by placing the START/RUN - OFF switch
in the START/RUN position.
2. Insert a Data Transfer USB memory device and download all data from the DataLink data recorder.
3. Scroll through the data list and hour meter readings and make note of the unit specific data listed above. If
the original main microprocessor will not power up, gather the unit specific data from the model/serial num-
ber nameplate and estimate hour meter readings from the unit maintenance records. If a Data Transfer USB
memory device will be used to setup the replacement main microprocessor, write the required data to the
device. Also, if the current configuration file is available for this customer from the TransCentral web site, it
should be transferred to the device prior to beginning work.
5.5.2
Main Microprocessor Module Replacement
1. Ensure the unit will not start automatically by disabling any two way communication, placing the START/
RUN-OFF switch in the OFF position and removing the negative battery cable.
2. Release the tabs and remove the two 35 pin connectors and 8 pin connector from the front of the module.
3. Replace module. Tighten mounting hardware to 96 inch/lbs (10.8 Nm).
4. Reinstall connectors ensuring tabs are fully locked in place.
Содержание VECTOR 8100
Страница 2: ......
Страница 4: ......
Страница 12: ...62 11785 viii ...
Страница 16: ...62 11640 12 ...
Страница 18: ...62 11785 ...
Страница 24: ...62 11785 1 6 1 3 SAFETY DECALS ...
Страница 25: ...1 7 62 11785 ...
Страница 26: ...62 11785 1 8 ...
Страница 27: ...1 9 62 11785 ...
Страница 28: ...62 11785 1 10 ...
Страница 30: ...62 11785 ...
Страница 50: ...62 11785 ...
Страница 82: ...62 11785 ...
Страница 96: ...62 11785 4 14 ...
Страница 98: ...62 11785 ...
Страница 129: ...5 31 62 11785 ...
Страница 130: ...62 11785 5 32 ...
Страница 134: ...62 11785 6 4 ...
Страница 138: ...62 11785 ...
Страница 230: ...62 11785 ...
Страница 271: ...8 41 62 11785 ...
Страница 272: ...62 11785 8 42 ...
Страница 274: ...62 11785 ...
Страница 286: ......
Страница 287: ......
Страница 288: ...62 11785 10 8 ...
Страница 292: ......
Страница 293: ......