052950-001r1 1
June,
2005
C
AREFREE
S
IDE
-O
UT
C
ANOPY
R
EPLACEMENT
RV Kits
These instructions are for canopy replacement only for
•
SOKII
W
/
DEFLECTOR OR FULL CASE
;
•
S
UMMIT
;
AND
,
•
A
&
E
S
LIDE
T
OPPER
WARNING
T
HESE PROCEDURES DEAL DIRECTLY WITH THE PRE
-
WOUND SPRING TENSION IN THE ROLL BAR
.
F
AILURE TO EXCERCISE CARE AND
/
OR
FAILURE TO FOLLOW THE INSTRUCTIONS CAN RESULT IN PERSONAL INJURY AND
/
OR PROPERTY DAMAGE
.
SOKII
C
ANOPY
R
EPLACEMENT
R
EMOVING THE
O
LD
F
ABRIC
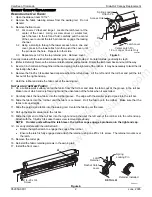
1. Open the slide out room 10"-12".
2. Remove the screws and end caps from the pivot brackets and set
aside.
3. Remove the screws and deflector or full case and set aside.
4. Remove the fabric retaining screws from the awning rail. Do not
discard.
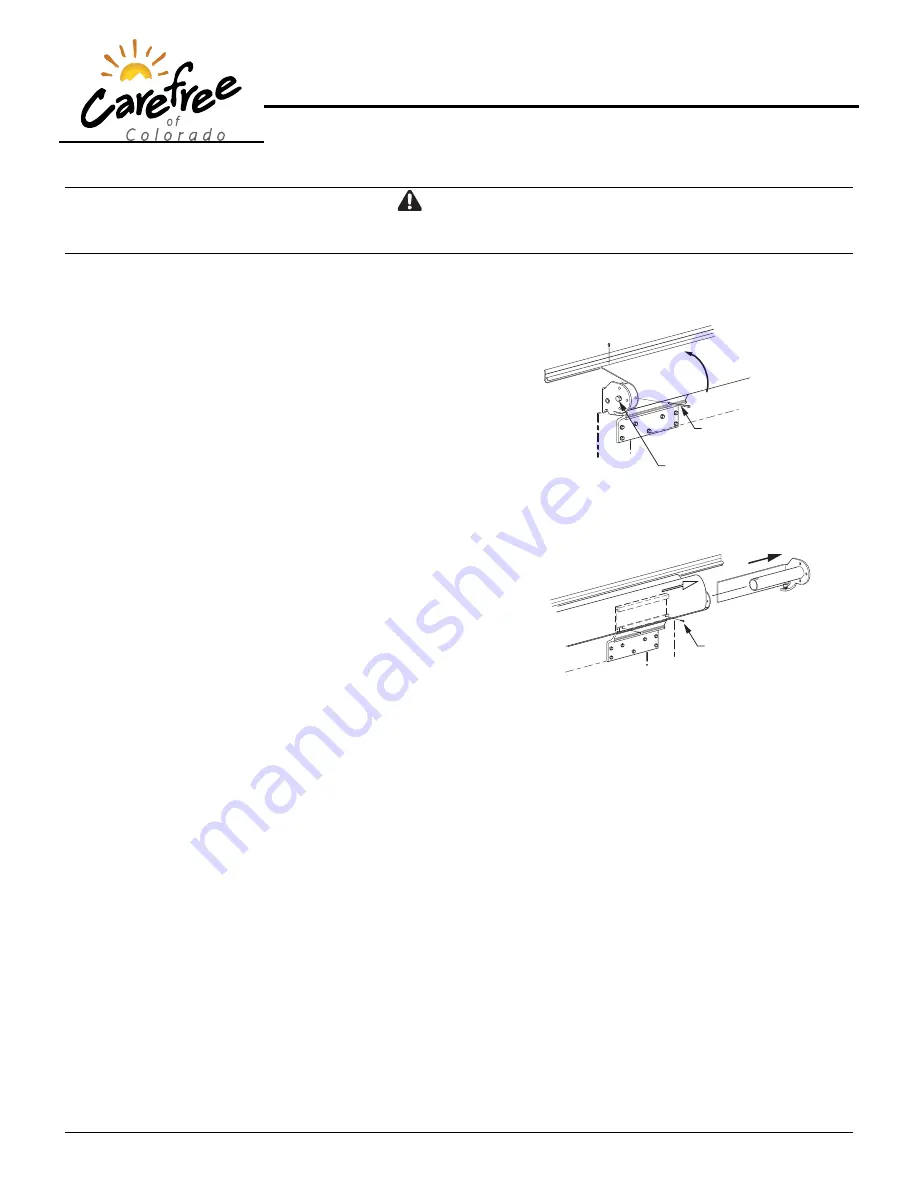
5. On the left side of the rollbar align the holes in the rollbar with the
holes in the pivot bracket inside the rollbar. It may be necessary
to rotate the rollbar to align the holes.
6. Insert the furnished 2 inch cotter pin through the holes. Insert the
pin as far as possible.
7.
(See Figure 1)
Grasp the roll bar and loosen the spring attach bolt on
the outside of the LH pivot bracket. Loosen only 2-3 turns,
DO NOT
REMOVE
. The rollbar can now spin freely.
NOTE: When rotating the roll bar the bolt may have a
tendency to tighten. Loosen as needed.
8. Unroll the fabric off of the roll bar by rotating the roll bar toward the
coach.
9.
(See Figure 2)
Holding or supporting the
RIGHT
end of the roll
bar; remove the attaching screws and remove the
RIGHT
pivot
bracket from the mounting bracket and roll bar and set aside.
10. Simultaneously slide the fabric to the right from the awning rail and rollbar.
I
NSTALLING THE
N
EW
F
ABRIC
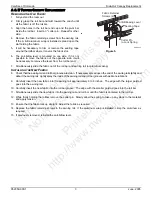
11. Check that the awning rail and roll bar grooves are clean. If necessary spread open the end of the awning rail slightly;
deburr the awning rail. Lightly spray the inside of the awning rail and roll bar grooves with a silicone lubricant.
12. Carefully insert the new fabric into the awning rail approximately 6 to 8 inches. The edge with the larger polyrod
goes into the awning rail.
13. Carefully insert the new fabric into the roll bar groove. The edge with the smaller polyrod goes into the roll bar.
14. Simultaneously slide the new fabric into the awning rail and roll bar until the fabric is centered in the roll bar.
15. Insert the right pivot bracket into the roll bar and mounting bracket. Secure with the screws removed previously.
16. Slowly roll up the fabric onto the roll bar. Ensure that the fabric is rolling straight. Adjust the fabric position as required.
17. After the fabric has been rolled up, tighten the spring attach bolt on the outside of the LH pivot bracket.
18. While firmly holding the rollbar remove the cotter pin. Slowly allow the spring to take up any slack in the material
and apply tension.
19. Replace the fabric retaining screws in the awning rail.
20. Install the defector or full case.
21. Install the end caps.
Fabric Retainer
Screws (2)
SOK2022
Cotter Pin
to Lock Spring
Roller Spring
Attach Bolt
Figure 1.
SOK2022a
RH Pivot Bracket
Pivot Bracket
Retaining Screws
(2 per bracket)
Figure 2.
Manual
Compliments
of
Northwest
RV
Supply
Printed
From
http://www.nwrvsupply.com


