


27
U
s
ing the Menu
s
Rearranging Menu Settings
1 Select [Move].
>
[
¥
My Menu]*
>
[Edit]
>
[Move]
* Each My Menu set appears on a different page. Select the page that corresponds to the desired set.
2 Push the joystick up/down to select the setting you want to move and then press SET.
• The
]
icon will appear next to the setting you selected to move.
3 Push the joystick up/down to move the setting to the desired position and then press SET.
Removing Menu Settings
1 Select [Delete].
>
[
¥
My Menu]*
>
[Edit]
>
[Delete]
* Each My Menu set appears on a different page. Select the page that corresponds to the desired set.
2 Push the joystick up/down to select the setting you want to remove and then press SET.
3 Select [OK] and then press SET twice.
Resetting the My Menu Submenu
1 To reset all the menu settings registered to the My Menu set, select [Reset All].
>
[
¥
My Menu]*
>
[Edit]
>
[Reset All]
* Each My Menu set appears on a different page. Select the page that corresponds to the desired set.
2 Select [OK] and then press SET twice.
Renaming the Selected My Menu Set
You can give each of the 5 My Menu sets a more descriptive name to make them easier to identify.
1 Select [Rename].
>
[
¥
My Menu]*
>
[Edit]
>
[Rename]
* Each My Menu set appears on a different page. Select the page that corresponds to the desired set.
2 Enter the desired name (8 characters long) using the keyboard screen.
U
s
ing the Virtual Keyboard
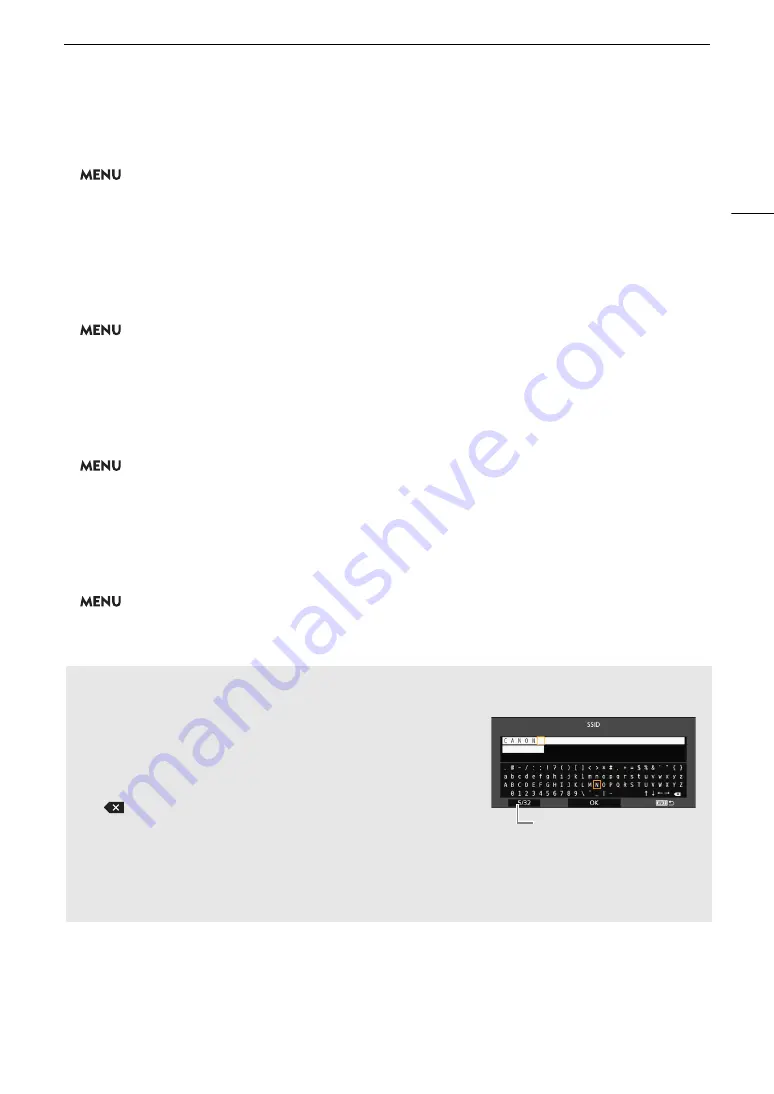
S
creen
The virtual keyboard will appear on the screen. The layout may differ slightly depending on the function.
1 U
s
e the joy
s
tic
k
to
s
elect a character and then pre
ss
S
ET to
add it.
• Push the joystick up/down/left/right to select the desired
character and press SET to enter it. Use the arrows (
/
/
/
) to
change the position of the cursor and the backspace character
(
) to delete the last character entered.
• Repeat this step as necessary to enter the desired text.
• Some characters will not be available, depending on the
function.
• Press the CANCEL button to return to the previous screen without entering any text.
2 After entering the de
s
ired text,
s
elect [OK] and then pre
ss
S
ET to clo
s
e the
k
eyboard
s
creen.
Current character / Character limit
Содержание XF705
Страница 1: ...4K Camcorder Instruction Manual PUB DIE 0524 000A ...
Страница 130: ...Saving and Loading Camcorder Settings 130 ...
Страница 142: ...Clip Operations 142 ...
Страница 152: ...Working with Clips on a Computer 152 ...
Страница 178: ...FTP File Transfer 178 ...


