background image

147 

Editing Functions


N

 Converting Movie

s

 into Fa

s

t Motion 

S

cene

s

You can convert MP4 

s

cene

s

 recorded in the built-in memory into fa

s

motion 

s

cene

s

 on the memory card to give them a time-lap

s

e quality. 

The fa

s

t motion rate

s

 you can 

s

elect for the conver

s

ion are the 

s

ame a

s


tho

s

e available during fa

s

t motion recording (

A

92).

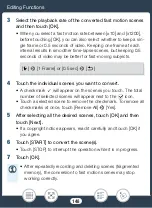
1

Open the index screen that contains the scenes you want to 
convert (

A

64).

2

S

elect the video quality of the converted fast motion scenes.

* Only  nece

ss

ary if you want to join all the 

s

elected 

s

cene

s

 into a 

s

ingle 

fa

s

t motion 

s

cene.

• If you convert AVCHD movie

s

 with a frame rate of 60i, the 

frame rate of the re

s

ulting MP4 movie will be 30P.

• After repeatedly recording and deleting 

s

cene

s

 (fragmented 

memory), MP4 conver

s

ion may 

s

top wor

k

ing correctly.

S

cene

s

 recorded u

s

ing different frame rate

s

 cannot be joined 

into a 

s

ingle 

s

cene during MP4 conver

s

ion.

9

N

ƒ ’

y

}

Playbac

k

F

Format

S

hooting mode

[Edit] 

>

 [Conv. Fa

s

t Motion (

&'8

)] 

>

 [Join 

S

cene

s

]* 

>


De

s

ired video quality of the converted movie

s

Содержание Vixia hf r700

Страница 1: ...PUB DIE 0486 000 NTSC HD Camcorder Instruction Manual N ...

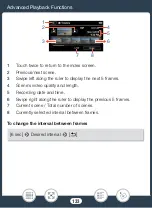
Страница 2: ...s of Panasonic Corporation and Sony Corporation Google Android Google Play YouTube are trademarks of Google Inc Manufactured under license from Dolby Laboratories Dolby and the double D symbol are trademarks of Dolby Laboratories Facebook is a registered trademark of Facebook Inc IOS is a trademark or registered trademark of Cisco in the U S and other countries and is used under license The Twitte...

Страница 3: ...ines This product is licensed under AT T patents for the MPEG 4 standard and may be used for encoding MPEG 4 compliant video and or decoding MPEG 4 compliant video that was encoded only 1 for a personal and non commercial purpose or 2 by a video provider licensed under the AT T patents to provide MPEG 4 compliant video No license is granted or implied for any other use for MPEG 4 standard ...

Страница 4: ...memory card or built in mem ory the term memory by itself refers to both Scene refers to one movie unit recorded with a single recording operation Important precautions related to the camcorder s opera tion Additional notes and topics that complement the basic operating procedures Restrictions requirements or preconditions regarding the function described A Reference page number within this manual...

Страница 5: ...at the bottom of the page offers up to four buttons to let you get quickly to the information you want to find Jump to the general table of contents Go to a list of select functions grouped by their uses in real life situations This alternative index can be very useful for beginners who encounter a particular challenge but are not sure of what function to use Jump to the alphabetical index The but...

Страница 6: ...so may result in permanent data loss or damage to the memory Do not open the memory card slot cover Do not disconnect the power source or turn off the cam corder Do not change the camcorder s shooting mode Do not press the button When a USB cable is connected to the camcorder do not disconnect the USB cable ...

Страница 7: ...subjects and shooting conditions 14 Playback editing and others 15 N Wireless functions 16 Getting to Know the Camcorder 18 Supplied Accessories 18 Names of Parts 19 Preparations 24 Charging the Battery Pack 25 Using a Memory Card 29 Memory Cards Compatible for Use with the Camcorder 29 Inserting and Removing a Memory Card 30 First Time Settings 33 Basic Setup 33 Changing the Time Zone 37 Initiali...

Страница 8: ...g Scenes and Photos 73 Advanced Recording Functions 77 Recording Settings and Shooting Modes 78 Selecting the Movie Recording Format AVCHD MP4 78 Selecting the Video Quality 78 N Selecting the Memory Built in Memory Memory Card for Recordings 80 N Dual Recording and Relay Recording 81 Selecting the Shooting Mode 82 Baby Mode 84 Highlight Priority Mode 85 Cinema Mode and Cinema Look Filters 86 Spec...

Страница 9: ...io 120 Audio Scenes 120 Using Headphones 121 Using an External Microphone 123 Advanced Playback and Editing Functions 125 Advanced Playback Functions 126 Capturing Video Snapshot Scenes and Grabbing Still Frames from a Movie 126 Playback with Background Music 129 Selecting the Playback Starting Point 132 Photo Slideshow 134 Editing Functions 136 Dividing Scenes 136 Trimming Scenes 137 Changing the...

Страница 10: ...ory onto an External Hard Drive 164 Copying Recordings to an External Video Recorder 169 N Wi Fi Functions 171 Overview of the Camcorder s Wi Fi Functions 172 The Camcorder s Wi Fi Functions 177 Using an iOS or Android Device as a Remote Control 177 Playback via Browser Viewing Recordings Using a Web Browser on an iOS or Android Device 189 Saving Recordings and Uploading Movies to the Web Using an...

Страница 11: ...pendix Menu Options Lists 217 Appendix Onscreen Icons and Displays 241 Trouble 250 Troubleshooting 250 List of Messages 262 Do s and Don ts 280 Handling Precautions 280 Maintenance Others 286 Cleaning 286 Condensation 286 Using the Camcorder Abroad 287 General Information 289 Optional Accessories 289 Specifications 293 Reference Tables 298 Index 303 ...

Страница 12: ...ious moments and use the especially designed stamps to keep track of baby s growth Baby Mode A 84 Shoot a cool time lapse video or use slow motion to check your golf swing Slow Fast Motion Recording A 92 Decorate movies with graphics and stamps Decoration A 95 Create a dynamic montage sequence with short cuts Video Snapshot A 105 9 ...

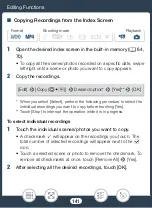
Страница 13: ...rmat Movie Format A 78 Getting the look you want Let the camcorder select the best settings according to the shooting scene to get beautiful video and photos N mode A 56 Make the image brighter or darker than the exposure set by the camcorder Exposure A 111 Get more life like detail when shooting a scene with very bright areas Highlight Priority Mode A 85 Highlight Priority shooting mode ...

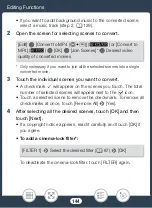
Страница 14: ...Shoot great video of special scene situations with minimal settings Shooting Modes A 82 Obtain natural looking colors even under special lighting conditions White Balance A 115 Optimize the exposure for the desired subject just by touching the screen Touch AE A 112 Keep the subject in focus and the exposure optimized while shooting a moving subject Face Detection and Tracking A 106 Cinema look fil...

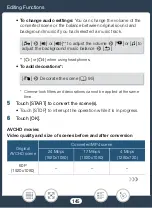
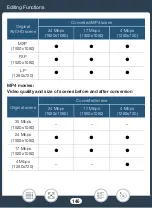
Страница 15: ... Converting Movies into Fast Motion Scenes A 147 N Save all the recordings in a memory directly onto an external hard disk even without a computer Memory Save A 164 Lock your files to avoid inadvertently deleting or changing them Locking Files from Editing A 68 Play back scenes or a slideshow of photos with background music Playback with Background Music A 129 Enjoy your recordings on a TV HDMI Co...

Страница 16: ...n CS100 Connect Station A 163 194 N Wireless functions Use your smartphone or tablet as a remote control while recording CameraAccess plus A 177 Use a Web browser on your smartphone or tablet to access and play back the recordings in the camcorder Playback via Browser A 189 ...

Страница 17: ...N iMAGE GATEWAY CANON iMAGE GATEWAY A 196 Use the NFC function to effortlessly connect your camcorder to your NFC enabled Android device NFC A 178 184 189 Connect the camcorder to your home network and wirelessly stream your recordings Media Server A 203 Wi Fi Connection to an Access Point A 206 Review and change Wi Fi settings for advanced users Wi Fi Settings A 212 ...

Страница 18: ... to save AVCHD movies to a computer and to transfer music files to the camcorder or a memory card For details on using the software refer to the Transfer Utility LE Software Guide included with the downloaded software CA 110 Compact Power Adapter BP 727 Battery Pack IFC 300PCU S USB Cable HTC 100 S High Speed HDMI Cable Getting Started Leaflet Transfer Utility LE Startup Guide The camcorder may ma...

Страница 19: ... mode button A 48 2 ON OFF button 3 Memory card slot cover A 30 4 Memory card slot A 30 5 MIC microphone terminal A 123 6 AV OUT terminal A 150 152 headphones terminal A 121 7 HDMI OUT terminal A 150 151 8 USB terminal A 150 153 1 2 5 6 7 8 3 4 ...

Страница 20: ... A 50 2 DC IN terminal A 25 3 Grip belt Adjust the grip belt so that you can reach the zoom lever with your index finger and the Y button with your thumb 4 Lens cover switch Move the lens cover switch down to to open the lens cover 1 2 3 4 ...

Страница 21: ...21 Front view Top view 1 Stereo microphone A 120 239 2 N NFC near field communication touchpoint A 180 194 3 Speaker A 67 4 Zoom lever A 59 1 2 3 4 ...

Страница 22: ...screen A 23 40 2 ACCESS indicator A 6 50 54 3 N Wi Fi antenna A 176 4 POWER CHG charge indicator Green On Red Charging A 25 5 Battery attachment unit A 25 6 Serial number 7 Tripod socket A 282 8 BATTERY RELEASE switch A 26 1 2 3 4 5 6 7 8 ...

Страница 23: ...o the recording conditions The screen is produced using extremely high precision manufac turing techniques with more than 99 99 of the pixels operating to specification Less than 0 01 of the pixels may occasionally misfire or appear as black red blue or green dots This has no effect on the recorded image and does not constitute a malfunc tion For details about how to take care of the touch screen ...

Страница 24: ... be used and how to insert one into the camcorder First Time Settings When you turn on the camcorder for the first time you will need to complete the basic setup and set the camcorder s language date and time movie format AVCHD or MP4 and recording memory N only Basic Operation of the Camcorder In this section you can learn more about basic operations such as using the touch screen changing operat...

Страница 25: ...pack or directly using the compact power adapter 1 Plug the compact power adapter into a power outlet For Asia only Connect the power cord to the compact power adapter before plugging the power cord into the power outlet 2 Connect the compact power adapter to the camcorder s DC IN terminal 1 2 1 2 1 ...

Страница 26: ...l go out when you turn off the camcorder After a moment the POWER CHG indicator will turn on in red battery pack charging The red POWER CHG indicator will go out when the battery pack is fully charged If the indicator flashes refer to Troubleshooting A 255 Fully charging the supplied battery pack will take approximately 7 hours and 45 minutes To remove the battery pack 1 Slide d in the direction o...

Страница 27: ...uipment that is not expressly recommended for use with this camcorder To prevent equipment breakdowns and excessive heating do not connect the supplied compact power adapter to voltage converters for overseas travels or special power sources such as those on aircraft and ships DC AC inverters etc We recommend charging the battery pack in temperatures between 10 C and 30 C 50 F and 86 F If either t...

Страница 28: ...rally There fore charge them on the day of use or the day before to ensure a full charge Battery packs for this camcorder can display the remaining battery time The first time you use a battery pack fully charge it and then use the camcorder until the battery pack is com pletely exhausted Doing so will ensure that the remaining recording time will be displayed accurately For details about how to t...

Страница 29: ...anDisk To record movies with a video quality of 60P or 35 Mbps or to use slow fast motion recording we recommend using memory cards rated CLASS 6 or 10 When using an SD memory card without a Speed Class rating or one rated CLASS 2 you may not be able to record movies Memory card type SD card SDHC card 0 SDXC card SD Speed Class After repeatedly recording and deleting scenes fragmented memory it wi...

Страница 30: ...e basic setup will appear To use a memory card for recording turn off the camcorder and insert the memory card before performing the basic setup After completing the basic setup A 33 be sure to initialize the memory card with the camcorder before using it for the first time A 38 About the Speed Class Speed Class is a standard that indi cates the minimum guaranteed data transfer speed of mem ory ca...

Страница 31: ...CHG indicator is off 3 Open the memory card slot cover 4 Insert the memory card at a slight angle with the label facing toward the lens all the way into the memory card slot until it clicks The memory card slot is at a slight angle toward the lens so be careful not to damage the memory card when inserting it 5 Close the memory card slot cover Do not force the cover closed if the memory card is not...

Страница 32: ... sides that are not interchange able Inserting an SD card facing the wrong direction can cause a malfunction of the camcorder Be sure to insert the memory card as described in step 4 SD cards have a physical switch to prevent writing on the card so as to avoid the accidental erasure of the card s con tent To write protect the memory card set the switch to the LOCK position ...

Страница 33: ...sing the Touch Screen A 40 1 Open the LCD panel If this is the first time you turn on the camcorder the language selection screen will appear You can also press to turn on the camcorder 2 Touch the language that you want to be used for onscreen displays and then touch æ You can select one of 27 languages You may need to scroll down to find your language After you select a language the Date Format ...

Страница 34: ...t date and time by changing all the fields in the same way Touch 24H to use 24 hour clock or leave it unselected to use 12 hour clock AM PM 7 Touch OK and then touch æ After you set the date and time the Movie Format screen will appear 8 Touch or to select the movie format and then touch æ N After you select the movie format the v Rec Media for Movies screen will appear where you can select the me...

Страница 35: ... recorded based on a photo size of 1920x1080 11 Touch OK The basic setup is complete The settings you selected will appear briefly and then the camcorder will be ready to record After completing the basic setup you can close the LCD panel or press to turn off the camcorder Some buttons such as ON or OFF in some screens will appear in English regardless of the language selected You can change the b...

Страница 36: ...ischarge completely and the date and time setting may be lost In such case recharge the built in lithium battery A 285 The next time you turn on the camcorder you will have to perform the basic setup again You can change the 1 q Power On Using LCD Panel setting so that you can turn the camcorder on and off only by pressing ...

Страница 37: ...ur home location or that of your destination This section requires using the camcorder s menus For details about how to use the menus refer to Using the Menus A 41 1 Open the Time Zone DST screen 2 Touch to set the home time zone or to set the time zone of your destination when you are traveling 3 Touch Í or Î to set the desired time zone If necessary touch to adjust for daylight saving time 4 Tou...

Страница 38: ...r use with the image mix function image mix frames 1 Power the camcorder using the compact power adapter Do not disconnect the power source or turn off the camcorder until the initialization is completed 2 Initialize the memory N Q 1 Touch this option if you want to physically erase all the data rather than just clear the file allocation table of the memory 9 N ƒ y Playback F Format Shooting mode ...

Страница 39: ...dings in advance using an external device A 156 Initializing a memory card will permanently erase any music files and images you may have transferred to the memory card N The music files and image mix frames that come pre installed in the built in memory will be restored after it is initialized Q About FlashAir cards Initializing a FlashAir card with this camcorder will reset the card s wireless s...

Страница 40: ...the intuitive touch screen interface you have all the controls at your fingertips 1 Touch Touch on an element displayed on the touch screen Used to start playing back a scene in an index screen to select a set ting from the menus etc 2 Swipe While touching the screen swipe your finger up and down or left and right across the screen Used to scroll menus to browse through index screen pages or to ad...

Страница 41: ...etween the movies and photos index screens In both modes from the 0 Home menu you can open the 1Other Settings menus for more detailed settings and also to access the camcorder s various Wi Fi functions N only In the following cases you may not be able to perform touch operations correctly Using your fingernails or hard tipped objects such as ball point pens Operating the touch screen with wet or ...

Страница 42: ...nter 3 Touch the icon of the desired menu to open it See the following table for a description of each menu Menu item Description 1 Other Settings A 45 218 Opens the 1 Other Settings menus which give you access to various camcorder settings 3 Recording Setup recording mode only A 78 81 In this menu you can select among others the movie format video quality or memory used for recording Recording mo...

Страница 43: ...allows you to open this menu directly without going through the 0 Home menu Remote Control Streaming recording mode only A 177 Use your smartphone or tablet as a remote control to record with the camcorder You can also stream video from the camcorder and record it on the smartphone or tablet Photo Playback playback mode only A 70 Opens the photo playback index screen y Movie Playback playback mode...

Страница 44: ...deo snapshot scenes recorded in AVCHD format Wi Fi playback mode only A 171 Allows you to access the various Wi Fi functions such as upload ing recordings to the Web or playing back recordings using a smartphone N only The icon shown in the 0 Home menu indicates the shooting mode cur rently selected Menu item Description ...

Страница 45: ...ious aspects of the camcorder s operation For details refer to the complete list of settings in the appendix 1 Other Settings Menus A 218 In the 1 Other Settings menus settings are organized under sub menus tabs For brevity s sake these settings are referenced through out the manual like this 1 q Language H In this example to change the language you will need to do the following 1 Touch 0 to open ...

Страница 46: ...you want to change into the orange selection bar You can also touch Í or Î to scroll up down the menu Menu items not available appear grayed out You can touch any menu item on the screen to bring it directly into the selection bar 5 When the desired menu item is inside the selection bar touch æ 6 Touch the desired option and touch X You can touch X to close the menu at any time 2 3 4 5 ...

Страница 47: ...nto movie format shooting modes and playback modes Movie Format Refers to AVCHD or MP4 recordings While recording you can change the movie format from the 3 Recording Setup menu A 235 During playback use the index screen button A 66 to switch between play back of AVCHD scenes and MP4 scenes Recording When you open the LCD panel or press the camcorder will turn on in recording mode The shooting mod...

Страница 48: ...rs to playing back movies A 64 whether from the y index screen all scenes the 9 index screen only scenes recorded in 9 Baby mode or the index screen only video snapshot scenes recorded in AVCHD format The icon refers to viewing photos from the index screen A 70 N When switching to a playback mode the memory selected for playback will be the same one currently used for recording ...

Страница 49: ...r shooting modes use more advanced functions and enjoy full access to all menu settings refer to Advanced Recording Functions A 77 Basic Playback This section covers how to play back and delete movies and photos For more advanced options such as playback with background music dividing scenes and more refer to Advanced Playback and Editing Functions A 125 50 64 ...

Страница 50: ... the camcorder You can also press N By default movies are recorded in the built in memory You can select the memory that will be used to record movies A 80 Before you begin recording make a test recording first to check that the camcorder is operating correctly 9 N ƒ y Playback F Format Shooting mode 1 1 2 3 3 1 2 3 3 ...

Страница 51: ...e memory The ACCESS indicator will flash from time to time while the scene is being recorded When you have finished recording 1 Make sure that the ACCESS indicator is off 2 Close the LCD panel or press to turn off the cam corder 3 Slide the lens cover switch up To protect the lens keep the lens cover closed when you are not recording Be sure to save your recordings regularly A 156 especially after...

Страница 52: ... in bright places it may be difficult to use the LCD screen In such cases you can adjust the LCD backlight with the 1 t LCD Backlight setting or adjust the brightness of the LCD screen with the 1 t LCD Brightness setting If you plan on making a long recording while the camcorder is in a fixed position such as mounted on a tripod you can record with the LCD panel closed in order to conserve the bat...

Страница 53: ...sed for recording N only the remaining recording time available on the memory or the currently selected movie format Touch I in record standby mode or while recording to open the info panel For details about the onscreen icons refer to the appendix Onscreen Icons and Displays A 244 Touch to close the info panel ...

Страница 54: ...el to turn on the camcorder You can also press N By default photos are recorded in the built in memory You can select the memory that will be used to record photos A 80 By default the camcorder s shooting mode is set to N A 56 You can select a different shooting mode according to the shooting conditions A 82 9 N ƒ y Playback F Format Shooting mode 1 1 2 3 1 3 2 ...

Страница 55: ...e recording a movie will not appear When you have finished taking photos Turn off the camcorder and close the lens cover A 51 The information in the important precautions and addi tional notes sections in the previous pages A 51 52 apply also to photo shooting For details about the approximate number of photos that can be recorded on a memory card refer to Reference Tables A 299 Photos cannot be r...

Страница 56: ...rder will keep the subject in focus and correctly exposed and track it as it moves Automatic tele macro A 118 Just bring the camcorder close to a small subject at full telephoto and you will be able to focus a subject as close as 50 cm 1 6 ft Smart AUTO In N mode the camcorder will automatically detect certain charac teristics of the subject background lighting conditions etc It will then adjust v...

Страница 57: ...colors may not look natural In such case we recommend recording in mode A 91 There are times when the Smart AUTO function cannot detect the scene for example when you touch a subject on the screen tracking In such case N will be displayed as the Smart AUTO icon Subject Background Bright Blue skies Vivid colors People stationary People moving Subjects other than people such as landscapes Close obje...

Страница 58: ...es you can set the image stabilization manually A 222 Subject Background Sunset Dark Dark Spotlight Dark Night Scene People stationary People moving Subjects other than people such as landscapes Close objects Icon Shooting conditions Ä Dynamic IS Most general situations When the zoom is closer to the T end While following subjects at a distance moving left or right È Powered IS When zooming in on ...

Страница 59: ... p Zoom Speed set ting A 220 Additionally when the shooting mode is set to a mode other than N or 9 you can select the zoom type optical advanced or digital with the 2 Zoom Type setting A 237 Move the zoom lever toward T wide angle to zoom out Move it toward S telephoto to zoom in  Macro IS Close up of a subject à tripod mode When using a tripod Icon Shooting conditions 9 N ƒ y Playback F Format ...

Страница 60: ...as 50 cm 1 6 ft at full telephoto When 1 p Zoom Speed is set to Y Variable the zoom speed will be faster in recording standby mode than when actually recording except when pre recording A 238 is activated With the 1 p Zoom Position at Startup setting you can have the camcorder save the zoom position before it turns off so the zoom position will be the same the next time you turn on the camcorder ...

Страница 61: ...ance 1 Select the automatic mode in advance 2 Zoom in on the desired subject and touch The orange bar in the button indicates that automatic framing assistance is active Touch the button again to turn off the func tion 3 If you lose the subject move the camcorder to reframe the shot The camcorder will zoom out temporarily The original zoom position is indicated by a white frame If the camcorder do...

Страница 62: ...in advance 2 Zoom in on the desired subject 3 If you lose the subject touch and hold to zoom out momentarily The original zoom position is indicated by a white frame Operating the zoom lever while the camcorder is zooming in or out during automatic framing assistance will stop the auto matic zoom operation 1 2 3 0 1 Other Settings p Framing Assistance l Manual X ...

Страница 63: ... use the zoom lever to change the size of the frame 5 When the desired subject is correctly framed release The camcorder will zoom in on the area indicated by the white frame You can select the initial size of the framing assistance white frame with the 1 p Framing Assistance Area setting 1 2 3 ...

Страница 64: ...ode and playback mode You can press when the camcorder is off to turn it on directly in playback mode The index screen that appears will depend on the recording mode that was used previously 2 In the index screen look for the scene you want to play back If necessary change the index screen displayed 9 N ƒ y Playback F Format Shooting mode 1 Index screen button A 66 ...

Страница 65: ...es displayed A 66 Swipe left right 2a or touch Ï or Ð 2b to display the previ ous next index screen 0 Video Snapshot or 9 Baby Album 2a 2a 2b 2b Visual bar shows the rela tive location of the current index screen Scene information A 69 MP4 movies Folder name The last 4 digits represent the recording date 1103 November 3 Scene recorded in mode A 85 AVCHD movies Recording date Timeline A 132 Edit bu...

Страница 66: ...hange the memory N only or movie format to play back With the index screen button A 64 you can select the memory selected for playback N only and the format of the scenes dis played The icons shown in the index screen button may differ or the button may not appear on the screen depending on the camcorder model and index screen currently displayed N From the y index screen N From the 9 or index scr...

Страница 67: ...he playback controls 2 Touch Ý touch Ø or Ù to adjust the volume and touch K Playback controls 1 Stop the playback 2 Jump to the beginning of the scene Double tap to jump to the previous scene 3 Pause the playback Touch the index screen button Movie format or OK 7 6 5 8 9 1 2 3 4 Playback Playback pause 11 12 10 ...

Страница 68: ...Resume the playback 11 Grab the displayed frame and save it as an image file A 128 12 Slow playback backward forward Touch several times to increase the playback speed to 5x 15x 60x nor mal speed Touch several times to increase the playback speed to 1 8x 1 4x normal speed Locking files In playback mode you can use the lock files function to disable the Edit button and prevent inadvertently deletin...

Страница 69: ...back only from the y index screen Depending on the recording conditions you may notice brief stops in video or sound playback between scenes Sound will not be output from the built in speaker while head phones or the supplied High Speed HDMI cable is connected to the camcorder You may not be able to play back with this camcorder movies recorded on or copied onto a memory card using another device ...

Страница 70: ...screen N If necessary change the memory selected for play back A 66 When playing back scenes recorded in mode on the cam corder we recommend setting 1 q View Assistance to i On 9 N ƒ y Playback F Format Shooting mode 1 Index screen button A 66 0 Photo Playback ...

Страница 71: ...want to view The photo is displayed in single photo view Swipe left right to browse through the photos one by one 3b 3a 3b 3a Folder name The last four digits represent the recording date 1103 November 3 Visual bar shows the relative location of the current index screen Edit button A 240 To delete photos etc You can also lock it A 68 to protect your recordings ...

Страница 72: ...mp Touch Ï or Ð or swipe left right along the scroll bar to find the desired photo Touch K to return to single photo view The following image files may not be displayed correctly Images not recorded with this camcorder Images edited on a computer Images whose file names have been changed 2 1 3 ...

Страница 73: ...e index screen that contains the scene or photo you want to delete A 64 70 To delete all the scenes or photos recorded on the same date saved in the same folder swipe left right until a scene or photo you want to delete appears 2 Delete the recordings When you select Select perform the following procedure to select the individual recordings you want to delete before touching Yes Touch Stop to inte...

Страница 74: ...kmark To remove all checkmarks at once touch Remove All Yes 2 After selecting all the desired recordings touch OK Options date or folder name Delete all the scenes photos recorded on a particular date For AVCHD scenes a date will appear in the button For MP4 scenes and photos a folder name will appear The last 4 digits of the folder name indicate the date of the recordings ex 1103 November 3 Selec...

Страница 75: ...iew select the photo you want to delete A 70 2 Delete the photo 3 Swipe left right to select another photo to delete or touch X 9 N ƒ y Playback F Format Shooting mode Touch the screen to display the playback controls Ý Edit Delete Yes OK 9 N ƒ y Playback F Format Shooting mode Touch the screen to display the playback controls Edit Delete Proceed Yes ...

Страница 76: ...ot be recovered Save copies of important recordings before deleting them A 156 Photos that were protected with other devices cannot be deleted with this camcorder To delete all recordings and make all recordable space avail able again you may prefer to initialize the memory A 38 ...

Страница 77: ...ecial situations For example slow fast motion recording to create unique time lapse scenes fun decorations and faders for your scenes and more When You Want More Control This section explains functions you can use when you want more control over how your recordings look It is more oriented for advanced users and covers functions such as white balance exposure compensation and frame rate Recording ...

Страница 78: ...movies are versatile and can be easily played back on smartphones or uploaded to the Web Selecting the Video Quality The camcorder offers several video quality options bit rates for record ing movies For AVCHD movies select 60P or MXP for higher quality or LP for longer recording times Similarly for MP4 movies select 35 Mbps or 24 Mbps for higher quality or 4 Mbps for longer recording times 9 N ƒ ...

Страница 79: ...ressive Bit rate measured in Mbps indicates how much video data is recorded in 1 second Depending on the device used you may not be able to play back your recordings on other devices Movies recorded in 60P or MXP mode cannot be saved on AVCHD discs You can copy such movies from the memory card onto Blu ray discs using a Blu ray Disc recorder that has an SD card slot and is compatible with AVCHD ve...

Страница 80: ... other devices Scenes exceeding 4 GB Scenes recorded at 35 Mbps exceeding 30 minutes Scenes recorded at a video quality other than 35 Mbps exceeding 1 hour Depending on the TV you may not be able to play back mov ies recorded in 60P or at 35 Mbps When the shooting mode is set to recording in 60P or 35 Mbps is not available When the shooting mode is set to 9 recording in 60P is not available 9 N ƒ ...

Страница 81: ...MP4 format it is ideal for transferring to another device or uploading to the Web Alternatively you can activate relay recording so if the assigned memory becomes full while recording movies recording will continue automati cally on the other memory Only relay recording Activate the desired function Dual recording is not available in the following cases When the shooting mode is set to 9 When the ...

Страница 82: ...ol manually some advanced settings Except for 9 mode 1 Touch the shooting mode button on the top left corner of the screen The button will show the icon of the shooting mode currently selected If the camcorder is set to N mode the button will show one of the Smart AUTO icons A 57 Alternatively you can open the shooting mode selection screen from the 0 Home menu 0 Shooting Mode 2 Swipe up down to b...

Страница 83: ...on recording Great for beginners or if you just prefer not to bother with detailed camcorder settings Highlight Priority Record bright scenes with a more natural gradation and more life like detail in the brightest areas of the picture A 85 Cinema Give your recordings a cinematic look and use cinema look filters to create unique movies A 86 ƒ Scene From nightscapes to beaches have the camcorder se...

Страница 84: ...g A 238 will be activated and cannot be turned off That way you will not miss memorable moments You can play back recordings made in 9 mode from the 9 or y index screen The Baby album 9 index screen is particularly convenient because it contains in chronological order only the scenes recorded in 9 mode When the shooting mode is set to 9 dual recording N only and recording in 60P are not available ...

Страница 85: ...right blue skies skin tones shimmering water surfaces shiny metal or glass structures and similar bright scenes Using brighter settings on a connected TV during playback of scenes recorded in mode you will be able to enjoy a smoother gradation and more life like detailed picture 1 Set the shooting mode to 2 Turn on the view assistance function 9 N ƒ y Playback F Format Shooting mode Touch the shoo...

Страница 86: ...pearance N You can also add cinema look filters when you convert mov ies to MP4 A 143 The selected cinema look filter will be applied and its number will appear in the FILTER button When playing back scenes recorded in mode the follow ing adjustments are recommended Playback on the camcorder Set 1 q View Assistance to i On Playback on a TV or external monitor Increase the bright ness of the TV com...

Страница 87: ...sired cinema look filter and then touch OK Options Default value The camcorder offers 5 cinema look filters Select the desired filter while previewing the effect on the screen 1 Cinema Standard 4 Sepia 2 Vivid 5 Old Movies 3 Cool Filter number will appear in the FILTER button Brief description onscreen guidance Preview the effect on the screen Filter name ...

Страница 88: ...cene mode Options Default value H Portrait The camcorder uses a large aperture to achieve a sharp focus on the subject while blurring the back ground I Sports To record scenes with lots of movement such as sport events and dance scenes J Night Scene To record nightscapes with lower noise 9 N ƒ y Playback F Format Shooting mode Touch the shooting mode button A 82 ƒ Scene OK Desired Special Scene mo...

Страница 89: ...orts without the subject being underexposed L Beach To record on a sunny beach without the subject being underexposed M Sunset To record sunsets in vibrant colors N Low Light To record in low light situations O Spotlight To record spotlit scenes P Fireworks To record fireworks ...

Страница 90: ...ect may become overex posed on cloudy days or in shaded places Check the image on the screen N Low Light Moving subjects may leave a trailing afterimage Picture quality may not be as good as in other modes White points may appear on the screen Autofocus may not work as well as in other modes In such case adjust the focus manually P Fireworks To avoid camcorder blur blur due to the cam corder movin...

Страница 91: ...rammed AE AE auto exposure shooting mode As with other shooting modes the camcorder automatically adjusts the shutter speed and aperture However this mode offers you the most versatility by allowing you to adjust other settings to achieve the results you are looking for 9 N ƒ y Playback F Format Shooting mode Touch the shooting mode button A 82 Programmed AE OK ...

Страница 92: ...cord movies with a unique look Additionally for some fast motion rates you can choose to record a single frame or a short bit of video about 0 5 seconds at every interval Sound is not recorded during slow fast motion recording N You can also convert previously recorded MP4 scenes into fast motion time lapse scenes A 147 1 Make sure the camcorder has sufficient power to complete the operation Inser...

Страница 93: ...g Off instead 3 Press Y to start recording While recording a scene counter will appear and its dividers will flash Note that the higher the fast motion rate used the more slowly the scene counter will advance 4 Press Y again to stop recording the time lapse or slow motion scene To set the recording time Recording one frame at each interval results in a smoother time lapse video Recording about 0 5...

Страница 94: ... sec 4 min x10 Every 0 33 sec Every 5 sec 10 min x20 Every 0 67 sec Every 10 sec 20 min x60 Every 2 sec Every 30 sec 1 hr x120 Every 4 sec Every 1 min 2 hr x1200 Every 40 sec Every 10 min 20 hr Slow fast motion recording cannot be used in the following cases When the video quality is set to 35 Mbps or 4 Mbps Slow motion x1 2 is available only when the video quality is set to 17 Mbps When the frame...

Страница 95: ...in gertip You can also add decorations when you convert movies to MP4 A 143 Decorating Scenes while Recording 1 Open the decoration screen In 9 mode only Touch Ò on the bottom right corner of the screen 2 Use a tool from the toolbar as explained in the following pro cedures 3 Press Y to record movies with your decorations You can add decorations even while recording a scene 9 N ƒ y Playback F Form...

Страница 96: ... to your decoration 5 Date Time or 9 in 9 mode Add the date and or time as a caption that will be included in the recording In 9 mode add stamps to track baby s age height and weight 6 Ü Image Mix Choose one of 26 different frames to add onto the canvas Animated Stamps and the Date Time or 9 stamps can not be used at the same time Decoration is not available when dual recording is activated N only...

Страница 97: ...he Pens and Stamps screen will appear 2 Touch the desired pen or stamp from the 6 icons on the left and then touch OK The main decoration screen will appear again 3 Draw freely on the canvas with your fingertip To select a different pen or stamp Repeat steps 1 and 2 To change color Touch Ó Ö select a color from the color palette OK To clear your freehand drawings and stamps Touch Ó Clear Yes OK To...

Страница 98: ... only To Use Animated Stamps When the shooting mode is set to 9 you can use especially designed baby themed animated stamps 1 Touch The Animated Stamps screen will appear 2 Touch one of the buttons and then touch OK 3 Touch anywhere on the canvas to place the selected ani mated stamp You can also drag some animated stamps to a different location Initializing a memory will erase any Pens and Stamps...

Страница 99: ...pear 4 You can touch any stamp and drag it to the desired location To use stamps from the 9 menu When the shooting mode is set to 9 in recording mode or during play back from the Baby album you can add stamps to the video to track baby s height weight and age You can track the information of up to 3 babies Only when playing back from the 9 index screen Baby album 9 N ƒ y Playback F Format Shooting...

Страница 100: ...h OK Baby s current age will be calculated and displayed inside the age button To register baby s height or weight Touch w next to the button of the information you want to change Touch Í Î to set the height weight and then touch OK The year of birth can only be set to 2014 and later 4 Touch any of the buttons to add the corresponding stamp Date the current date Time the current time baby s age he...

Страница 101: ... in advance and use for example a card reader to copy them to the memory card A 301 For the age stamp the display will change as follows Before 1 week days 1 week less than 1 month old weeks 1 month less than 1 year old months 1 year less than 2 years old years and months 2 years old and older only years For the height stamp only inches will be displayed until 35 inches and feet and inches will be...

Страница 102: ...ly designed image mix frames in 9 mode N Only when recording on or playing back scenes from a memory card You can also touch to read image mix frames saved in the built in memory 3 Touch OK to mix the selected frame with the live video N Before performing this procedure make sure that the memory selected for recording A 80 or playback A 66 contains the image mix frames ...

Страница 103: ...ng the bottom bar to adjust the chroma key set ting as necessary Mixing Your Own Images with Live Video When recording on a memory card you can use image files you create on your computer for the image mix Chroma Key function Make sure that the image you want to use has a blue or green area which will be replaced by the live video using Chroma Key mixing For details refer to About the image files ...

Страница 104: ...back the scene you want to decorate A 64 To use the various decorations especially designed for 9 mode play back a scene from the Baby album 9 index screen 2 Touch the screen to display the playback controls 3 Touch Ò to display the decoration toolbar 4 Decorate the scene using the tools from the toolbar as explained in the previous sections 5 Touch X to exit the decoration screen The image mix fr...

Страница 105: ...set to background music A 129 1 Activate video snapshot Touch OFF instead to deactivate video snapshot A blue border appears on the screen 2 Press Y The camcorder records for about 4 seconds the blue frame serves as a visual progress bar and then automatically returns to record standby mode You can change the length of the video snapshot scenes recorded with the 1 p Video Snapshot Length setting 9...

Страница 106: ...ing subjects such as pets or moving vehicles Face detection is always activated in N and 9 mode 1 Activate face detection To turn off face detection repeat the procedure selecting j Off instead Any of the following actions will deactivate the video snapshot function Turning off the camcorder pressing changing the shooting mode etc Changing the movie format AVCHD MP4 video quality or frame rate Act...

Страница 107: ...r person You can also touch other moving subjects such as a pet A white double frame will appear around the selected subject and track it as it moves Touch to remove the tracking frame The camcorder may mistakenly detect the faces of non human subjects In such case turn face detection off Touching somewhere with a color or pattern unique to the subject will make it easier to track However if there...

Страница 108: ...Special Scene mode is set to J Night Scene N Low Light or P Fireworks During slow fast recording mode When the digital zoom is activated and the zoom ratio is larger than 228x N While the camcorder is controlled remotely from an iOS Android device In certain cases tracking may not be able to track the sub ject Typical examples include Subjects extremely small or large in relation to the overall pi...

Страница 109: ...d fader appears To turn off faders repeat the procedure selecting j Off instead You can also change the fader settings while recording for example to apply only a fade out To fade in out Press Y in record standby mode to start recording with a fade in Press Y while recording to fade out and then stop recording 9 N ƒ y Playback F Format Shooting mode 2 R Faders Desired fader Desired fade screen col...

Страница 110: ...s set to and the cinema look filter is set to Old Movies During slow fast recording mode When recording scenes with decorations When recording video snapshot scenes While pre recording is activated When the video quality is set to 60P or 35 Mbps N While the camcorder is controlled remotely from an iOS Android device Turning off the camcorder will deactivate the selected fader ...

Страница 111: ...ture brighter or darker you can use Touch AE to have the camcorder optimize the exposure for the subject you indicate or you can use a combination of both Open the exposure adjustment screen Exposure Compensation 1 Touch n The exposure is locked and the exposure compensation dial appears with the compensation value set at 0 Touch n again to return the camcorder to automatic exposure 2 Touch Ï or Ð...

Страница 112: ...cted Touch n to return the camcorder to automatic exposure 2 Touch X to apply the adjusted exposure Using Touch AE also locks the exposure the exposure compen sation dial appears with the compensation value set at 0 Before touching X you can compensate the exposure further steps 2 and 3 in the previous procedure During exposure lock y and the exposure compensation value will appear on the screen I...

Страница 113: ...ocus 1 Touch D Touch D again to return the camcorder to autofocus 2 Touch and hold F or E to adjust the focus Exposure adjustment is not available when the shooting mode is set to ƒ and the Special Scene mode is set to P Fireworks Reflective surfaces Subjects with low contrast or without vertical lines Fast moving subjects Through wet windows Night scenes 9 N ƒ y Playback F Format Shooting mode 2 ...

Страница 114: ...ocusing distance changes to G 3 Touch X to lock the focus at the selected distance During manual focus D will appear on the screen Touch AF 1 Touch a subject that appears inside the frame The Touch AF mark I will flash and the camcorder will focus automatically on the subject or spot you touched on the screen Touch D again to return the camcorder to autofocus If necessary you can further adjust th...

Страница 115: ...m white balance with the fol lowing procedure before touching X The icon of the selected white balance setting will appear on the screen To set the custom white balance 1 Point the camcorder at a white object so it fills the screen 2 Touch Set WB When the adjustment is completed Å stops flashing and dis appears The camcorder will retain the custom white balance even if you turn it off 9 N ƒ y Play...

Страница 116: ...ts appear white under colored lighting When you select the custom white balance Set 2 Zoom Type to Optical Reset the white balance when you change locations or the lighting or other conditions change Depending on the light source Å may keep flashing The result will still be better than with à Automatic Custom white balance may provide better results in the fol lowing cases Changing lighting condit...

Страница 117: ... Default value 60 fields per second interlaced Standard frame rate of analog NTSC TV signals Shooting at 30 frames per second progressive Use this frame rate to easily edit your AVCHD movies for example to post them on the Web Recorded as 60i 30 frames per second progressive 24 frames per second progressive 9 N ƒ y Playback F Format Shooting mode 0 3 Recording Setup Video Quality I Desired frame r...

Страница 118: ... only looks larger but it also stands out more When the shooting mode is set to N tele macro will be activated automat ically when you zoom in to full telephoto and bring the camcorder up close to the subject To turn off telemacro touch W again The camcorder will automatically adjust the zoom to the telephoto end When the video quality is set to 60P Recording 60P or 35 Mbps the frame rate is autom...

Страница 119: ...ing actions will deactivate the tele macro function Turning off the camcorder Pressing Setting the shooting mode to N 9 or the P Fireworks Special Scene mode in ƒ mode Zooming out toward T wide angle Tele macro cannot be turned on off while recording ...

Страница 120: ...is set to 9 the audio scene is automatically set to Standard Options Default value Standard To record most general situations The camcorder records with stan dard settings Music To vibrantly record music performances and singing indoors Speech Best for recording human voices and dialog Forest and Birds To record birds and scenes in forests The camcorder clearly captures sound as it spreads 9 N ƒ y...

Страница 121: ...of the terminal to headphones output 2 Connect the headphones to the AV OUT terminal 3 Adjust the volume as necessary You can also swipe left right along the Headphones bar Ó will appear in the info panel A 241 Noise Suppression To record scenes while reducing noise from wind passing vehicles and similar ambient sound Ideal for recording at the beach or in places with a lot of noise 9 N ƒ y Playba...

Страница 122: ...just the headphone s volume also during playback While playing back movies adjust the volume the same way you would adjust the speaker s volume A 67 only using the head phone icons Ô Õ instead When using headphones make sure to lower the volume to an appropriate level Do not connect the headphones to the AV OUT terminal while 1 q AV Headphones is set to Ò AV The noise produced may be harmful to yo...

Страница 123: ...mmend using an external microphone Use commercially available headphones with a 3 5 mm minijack Even if AV Headphones was set to Ó Headphones in a playback mode the function of the AV OUT terminal will return automatically to AV output when you turn off the cam corder N Audio will not be output from the headphones terminal while Wi Fi functions are in use 9 N ƒ y Playback F Format Shooting mode ...

Страница 124: ...also connect to the camcorder s MIC terminal commercially available condenser microphones with their own power supply You can connect almost any stereo microphone with a 3 5 mm plug but audio recording levels may vary When referring to the instruction manual of the WM V1 note that the procedure written for manually adjusting the audio recording level does not apply to this camcorder Refer to ä Mic...

Страница 125: ...et to background music how to play back a slide show of your photos and more Editing Functions This section explains how to trim or divide scenes how to con vert scenes to smaller MP4 scenes and how to change the image used as the thumbnail of a scene in the Baby album N only In this section you will also find the procedure for copying recordings and for converting scenes into time lapse scenes 12...

Страница 126: ...pshot Scene 1 Play back the AVCHD scene from which you want to capture the video snapshot scene A 64 2 At the point where you want the video snapshot scene to start press Y The camcorder captures the video snapshot scene for about 4 seconds the blue frame serves as a visual progress bar and then enters playback pause mode Alternatively you can touch the screen and then touch to capture the video s...

Страница 127: ... video snapshot scene you may not be able to capture a video snapshot scene depend ing on the length of the source scene and the length currently selected for video snapshot scenes When you start capturing a video snapshot scene less than 1 second from the end of the scene the video snapshot scene will be captured starting from the beginning of the fol lowing scene During the playback of video sna...

Страница 128: ... from a scene is 1920x1080 1280x720 when frames are grabbed from an MP4 scene recorded at 4 Mbps video quality The recording date time of the frame grabs will reflect the date and time of recording of the original scene Still frames grabbed from a scene with a lot of fast movement may be blurred N Frame grabs will be saved on the memory selected for recording photos 9 N ƒ y Playback F Format Shoot...

Страница 129: ...ic and adjust the mix balance to your preference Only during the playback of a slideshow of photos For that procedure refer to Photo Slideshow A 134 1 Open the desired index screen A 64 2 Select the music track 1 Select the desired music track 2 Adjust the background music balance 3 Play back the original sound no background music 9 N ƒ y Playback F Format Shooting mode 0 1 Other Settings s Select...

Страница 130: ...usic or swipe left right along the Music Balance bar to adjust the background music balance as desired 4 Touch X and then touch a scene to start the playback with the selected background music To adjust the background music balance during playback During playback To delete a music track In the Select Music screen touch Í or Î to select the track you want to delete Touch the screen to display the p...

Страница 131: ...memory N only To play back recordings from a memory card with background music you will need to download the music files in advance A 301 After downloading the music files to your computer use Transfer Utility LE to transfer them to the memory that con tains the recordings you want to play back with background music For details refer to the Transfer Utility LE Software Guide PDF file Initializing ...

Страница 132: ...m 6 seconds to 6 minutes 1 Open the desired index screen for AVCHD movies A 64 2 Open the scene s Timeline screen The Timeline screen appears The large thumbnail will show the first frame of the scene Below it the timeline ruler shows frames taken from the scene at fixed intervals To return to the index screen touch K twice 3 Touch the desired frame in the timeline ruler to start playing back the ...

Страница 133: ... ruler to display the next 5 frames 4 Scene s video quality and length 5 Recording date and time 6 Swipe right along the ruler to display the previous 5 frames 7 Current scene Total number of scenes 8 Currently selected interval between frames To change the interval between frames 1 7 8 4 5 6 2 3 6 sec Desired interval K ...

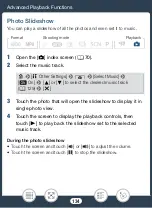
Страница 134: ... to display it in single photo view 4 Touch the screen to display the playback controls then touch Ð to play back the slideshow set to the selected music track During the photo slideshow Touch the screen and touch Ø or Ù to adjust the volume Touch the screen and touch Ý to stop the slideshow 9 N ƒ y Playback F Format Shooting mode 0 1 Other Settings Select Music i On Í or Î to select the desired m...

Страница 135: ...ter downloading the music files to your computer use Transfer Utility LE to transfer them to the memory that con tains the recordings you want to play back with background music For details refer to the Transfer Utility LE Software Guide PDF file Initializing a memory card will permanently erase any music files you may have transferred to the memory card N The music files that come pre installed i...

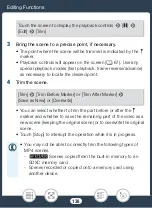
Страница 136: ...ding scenes 3 Bring the scene to a precise point if necessary Playback controls will appear on the screen A 67 Use any special playback modes fast playback frame reverse advance as necessary to locate the desired point 4 Divide the scene The video from the division point to the end of the scene will appear as a new scene in the index screen 9 N ƒ y Playback F Format Shooting mode Touch the screen ...

Страница 137: ...versing frames while dividing the scenes the interval between frames is about 0 5 seconds If the scene cannot be divided at the point where you paused the playback advance reverse a frame and then divide the scene During the playback of a scene that was divided you may notice some anomalies in the picture sound at the point where the scene was cut Scenes that are too short less than 3 seconds cann...

Страница 138: ...rt before or after the marker and whether to save the remaining part of the video as a new scene keeping the original scene or to overwrite the original scene Touch Stop to interrupt the operation while it is in progress You may not be able to correctly trim the following types of MP4 scenes N Scenes copied from the built in memory to an SDXC memory card Scenes recorded or copied onto a memory car...

Страница 139: ...image of the scene appears pause the playback and open the Set Thumbnail screen 4 Bring the scene to a precise point if necessary Playback controls will appear on the screen A 67 Use any special playback modes fast playback frame reverse advance as necessary to locate the desired point Scenes cannot be trimmed within about 0 5 seconds from the beginning or the end of the scene 9 N ƒ y Playback F F...

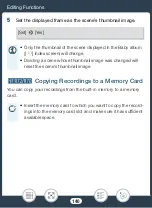
Страница 140: ...built in memory to a memory card Only the thumbnail of the scene displayed in the Baby album 9 index screen will change Dividing a scene whose thumbnail image was changed will reset the scene s thumbnail image Insert the memory card to which you want to copy the record ings into the memory card slot and make sure it has sufficient available space Set Yes ...

Страница 141: ...ecordings you want to copy before touching Yes Touch Stop to interrupt the operation while it is in progress To select individual recordings 1 Touch the individual scenes photos you want to copy A checkmark will appear on the recordings you touch The total number of selected recordings will appear next to the icon Touch a selected scene or photo to remove the checkmark To remove all checkmarks at ...

Страница 142: ...os recorded on a particular date For AVCHD scenes a date will appear in the button For MP4 scenes and photos a folder name will appear The last 4 digits of the folder name indicate the date of the recordings ex 1103 November 3 Select Select individual recordings to copy All Scenes or All Photos Copy all the scenes or photos 9 N ƒ y Playback F Format Shooting mode Touch the screen to display the pl...

Страница 143: ...cene you can apply unique cinema look filters background music and decorations to the converted scene N only The original scene must be saved in the built in mem ory whereas the converted MP4 scene will be saved on the memory card 1 Open the index screen that contains the scenes you want to convert A 64 N Select an index screen in the built in memory In the following cases you will not be able to ...

Страница 144: ...u touch The total number of selected scenes will appear next to the icon Touch a selected scene to remove the checkmark To remove all checkmarks at once touch Remove All Yes 4 After selecting all the desired scenes touch OK and then touch Next If a copyright notice appears read it carefully and touch OK if you agree To add a cinema look filter To deactivate the cinema look filter touch FILTER agai...

Страница 145: ...ilters and decorations cannot be applied at the same time 5 Touch START to convert the scene s Touch STOP to interrupt the operation while it is in progress 6 Touch OK AVCHD movies Video quality and size of scenes before and after conversion Original AVCHD scene Converted MP4 scene 24 Mbps 1920x1080 17 Mbps 1920x1080 4 Mbps 1280x720 60P 1920x1080 Ý Ø or Ù to adjust the volume y or Û to adjust the ...

Страница 146: ...80 Ü Ü Ü FXP 1920x1080 Ü Ü Ü LP 1280x720 Ü Ü Ü Original scene Converted scene 24 Mbps 1920x1080 17 Mbps 1920x1080 4 Mbps 1280x720 35 Mbps 1920x1080 24 Mbps 1920x1080 Ü Ü Ü 17 Mbps 1920x1080 Ü Ü Ü 4 Mbps 1280x720 Ü Original AVCHD scene Converted MP4 scene 24 Mbps 1920x1080 17 Mbps 1920x1080 4 Mbps 1280x720 ...

Страница 147: ... 64 2 Select the video quality of the converted fast motion scenes Only necessary if you want to join all the selected scenes into a single fast motion scene If you convert AVCHD movies with a frame rate of 60i the frame rate of the resulting MP4 movie will be 30P After repeatedly recording and deleting scenes fragmented memory MP4 conversion may stop working correctly Scenes recorded using differ...

Страница 148: ...want to convert A checkmark will appear on the scenes you touch The total number of selected scenes will appear next to the icon Touch a selected scene to remove the checkmark To remove all checkmarks at once touch Remove All Yes 5 After selecting all the desired scenes touch OK and then touch Next If a copyright notice appears read it carefully and touch OK if you agree 6 Touch START to convert t...

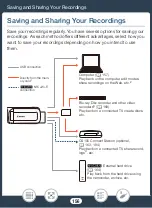
Страница 149: ...rder to an HDTV to play back your recordings Saving and Sharing Your Recordings This section explains how to save your recordings to various external devices a computer video recorders the optional CS100 Connect Station or an external hard drive without using a computer N only N Note that this chapter presents only connections to other devices using cables wired connections To use the camcorder s ...

Страница 150: ...nt cable This termi nal is an HDMI mini receptacle When using a commercially avail able HDMI cable make sure the HDMI cable is Type A to Type C 3 USB Terminal This terminal is a mini AB receptacle You can use the supplied USB cable to connect to a computer or other digital devices with standard A receptacles N only You can also use the optional UA 100 USB Adapter to connect the camcorder to an ext...

Страница 151: ...DMI High Definition Multimedia Interface connection 1 is a convenient all digital connection using a single cable for both video and audio When you connect the camcorder to an HDTV equipped with an HDMI terminal you can enjoy video and audio playback at the highest quality The camcorder adjusts the output resolution based on the capability of the HDTV The HDMI OUT terminal on the camcorder is for ...

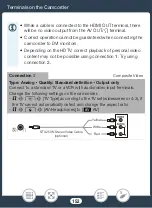
Страница 152: ...al video content may not be possible using connection 1 Try using connection 2 Connection 2 Composite Video Type Analog Quality Standard definition Output only Connect to a standard TV or a VCR with audio video input terminals Change the following settings on the camcorder 1 t TV Type according to the TV set widescreen or 4 3 if the TV cannot automatically detect and change the aspect ratio 1 q AV...

Страница 153: ...onnect Station to automatically back up your record ings N only You can also connect to an external hard drive to save a perfect copy of an entire memory USB Cable supplied Mini AB Standard A computer optional CS100 Connect Station Mini AB UA 100 USB Adapter optional USB cable supplied with built into the external storage Standard A External hard drive 햲 햳 N only ...

Страница 154: ... video input the same terminal to which you connected the camcorder Refer to the instruction manual of the connected TV 4 Turn on the camcorder and set it to playback mode 5 Open the desired index screen A 64 70 Play back the desired movies or photos If remaining battery time is an issue you can power the cam corder using the compact power adapter so the battery pack will not be consumed Sound fro...

Страница 155: ...al recorders with a compati ble memory card slot can play back AVCHD movies you record with this camcorder directly from the memory card Refer to the instruction manual of the device used Depending on the device used correct playback may not be possible even if the device is AVCHD compatible In such case play back the recordings on the memory card using the cam corder When playing back scenes reco...

Страница 156: ... you intend to use them Computer A 157 Play back on the computer edit movies share recordings on the Web etc 2 Directly from the mem ory card1 N External hard drive A 164 Play back from the hard drive using the camcorder archive etc USB connection Blu ray Disc recorder and other video recorders3 A 169 Play back on a connected TV create discs etc CS100 Connect Station optional A 163 194 Play back o...

Страница 157: ...using a USB connection Use the software Transfer Utility LE1 for AVCHD movies and the software CameraWindow2 for MP4 movies and photos 1 Software for AVCHD movies available as a free download from PIXELA s Web site 2 Software for photos and MP4 movies available as a free download from your local Canon Web site Saving AVCHD Movies Windows Mac OS With the software Transfer Utility LE you can save to...

Страница 158: ... exe and the Software Guide PDF file 3 Install the software as explained in the PDF Software Guide Connecting the Camcorder to a Computer 1 Camcorder Power the camcorder using the compact power adapter 2 Camcorder Open the desired index screen for AVCHD mov ies A 64 3 Connect the camcorder to the computer using the supplied USB cable Connection 3 햲 Refer to Connection Diagrams A 153 If a device se...

Страница 159: ...ow you can save MP4 movies and pho tos to your computer and easily organize them For the latest informa tion on compatibility and system requirements please visit your local Canon Web site Installation Install the software before you connect the camcorder to the computer for the first time Make sure to install the software even if you have a dif ferent version of CameraWindow on your computer The ...

Страница 160: ...the instructions on the download Web site For Windows users if a User Account Control dialog box appears follow the instructions When the screen of the last step Finish is displayed the soft ware is correctly installed Click Finish to close the installer Connecting the Camcorder to a Computer 1 Power the camcorder using the compact power adapter 2 Open the y index screen for MP4 movies A 64 or ind...

Страница 161: ...Untransferred Images MP4 movies and photos you have not yet transferred to the computer will be saved Click Cancel to interrupt the transfer while it is in progress When the transfer is completed click OK and close CameraWin dow When the camcorder is connected to a computer Do not open the memory card slot cover Do not change or delete any of the camcorder s folders or files directly from the comp...

Страница 162: ...rash icon Applications Canon Utilities CameraWindow The following types of MP4 scenes will be recognized as mul tiple files on a computer Scenes exceeding 4 GB Scenes recorded at 35 Mbps exceeding 30 minutes Scenes recorded at a video quality other than 35 Mbps exceeding 1 hour Depending on the computer the software may not work cor rectly or you may not be able to play back movies When the camcor...

Страница 163: ...g the supplied USB cable N only You can also use the convenient NFC Wi Fi connection method A 194 1 Power the camcorder using the compact power adapter 2 Press to set the camcorder to playback mode 3 Select the USB connection type 4 Connect the camcorder to the connect station using the sup plied USB cable Connection 3 햲 Refer to Connection Diagrams A 153 If a device selection screen appears selec...

Страница 164: ...you recorded onto a commercially available external hard drive connected directly to the camcorder You can also use the camcorder to play back your record ings directly from the hard drive Initialize the hard drive A 168 when you use it with this camcorder for the first time Saving a Memory onto an External Hard Drive 1 Power the camcorder using the compact power adapter 2 Press to set the camcord...

Страница 165: ...mory you can check the name of the folder that will be created on the hard drive Every memory save opera tion will create a separate memory save folder with the date in numerical form used as the folder name Before disconnecting the external hard drive Before turning off or physically disconnecting the external hard drive be sure to safely end the connection to the camcorder to avoid damage to you...

Страница 166: ...ions on the same day for example if you saved the built in memory and then a memory card the folder name of memory save folders following the first one will end in a numerical suffix for example 1 2 Up to 10 memory save folders can be created for any given date and up to 300 memory save folders can be saved on a single hard drive You cannot use the following types of external hard drives USB power...

Страница 167: ...ording to play it back To switch to another memory save folder touch and select the memory save folder of the date you want to play back 4 When you have finished playing back be sure to safely end the connection to the external hard drive before physically disconnecting it To delete the memory save folder currently displayed 1 Delete the memory save folder 2 Safely end the connection to the extern...

Страница 168: ... can touch Cancel OK to cancel the initialization while it is in progress All recordings will be erased and the hard drive can be used without any problem 3 Safely end the connection to the external hard drive before physically disconnecting it A 165 Be careful when deleting recordings Once deleted record ings cannot be recovered Initializing the external hard drive will permanently erase all the ...

Страница 169: ...evice used so be sure to refer to the instruction manual of the digital video recorder In Standard Definition You can copy your movies by connecting the camcorder to a VCR or a digital video recorder with analog audio video inputs Video output will be in standard definition although the original scenes are in high defini tion 1 Power the camcorder using the compact power adapter 2 Connect the camc...

Страница 170: ... the scene you want to copy and pause the playback just before the desired scene 6 Camcorder Resume playback By default the date and time will be embedded in the output video signal You can change this using the 1 t Display Date Time setting 7 External recorder Start recording when the scene you want to copy appears stop recording when it ends 8 Camcorder Stop playback Use an external Blu Ray Disc...

Страница 171: ... camcorder s useful Wi Fi functions such as controlling the camcorder remotely with an iOS or Android device playing back the cam corder s recordings from a Web browser on a Wi Fi equipped device or using the optional CS100 Connect Station to easily save your recordings Wi Fi Connection and Settings This section explains how to connect your camcorder to an access point wireless router on an existi...

Страница 172: ...to refer to Wi Fi enabled iPhones and iPads while Android device refers to Wi Fi enabled Android smartphones and tab lets iOS Devices Install the CameraAccess plus app and use your iPhone or iPad as a remote control to record with the camcorder A 177 You can even stream video from the camcorder and record it directly on your iOS device Install the Movie Uploader app to save recordings on your iOS ...

Страница 173: ...om the camcorder and record it directly on your Android device Use a Web browser to access the camcorder and play back recordings on your Android device You can also save a local copy on your Android device A 189 CS100 Connect Station optional Convenient option to save play back and share your recordings You can use NFC technology to easily initiate the file transfer over a Wi Fi connection A 194 ...

Страница 174: ... the computer A 189 Connect the camcorder to an access point as a media server and play back your recordings on computers and other devices connected to the same home network A 203 CANON iMAGE GATEWAY Connecting the camcorder to an access point home network con nected to the Internet you can also share recordings on CANON iMAGE GATEWAY and enjoy a number of Web services including uploading recordi...

Страница 175: ...rnational standards When using an NFC compatible Android device you can easily pair the camcorder and the device simply by touching the NFC touchpoints on both devices together Depending on the manufacturer the access point may be referred to using a different name such as wireless LAN router or wireless network router Only NFC compatible devices running Android 4 0 to 4 4 5 0 or 5 1 Using an unpr...

Страница 176: ...i Fi antenna is located there and covering it may interfere with wireless signals Do not open the memory card slot cover during the wireless connection While using Wi Fi functions the camcorder s automatic power off function will be disabled The camcorder s Wi Fi functions cannot be used while the optional WM V1 Wireless Microphone is connected to the camcorder Wi Fi antenna ...

Страница 177: ...S Android device as a remote control to start recording on the camcorder and while using the Monitor from Home function you can even record the streamed image locally on your iOS Android device When using an NFC compatible Android device A 175 you can connect the camcorder and the device with a simple operation The CameraAccess plus app provided by PIXELA is available as a free download from the A...

Страница 178: ...ady to connect with the iOS or Android device Before you perform these procedures for the first time down load and install the latest version of the CameraAccess plus app on your iOS Android device The app can be down loaded for free from the following Web sites iOS devices App Store http appstore com cameraaccessplus Android devices Google Play http play google com store apps details id jp co pix...

Страница 179: ... Android devices not compatible with NFC In the Wi Fi settings screen turn on Wi Fi and select the network name that appears on the camcorder s screen step 1 If neces sary enter the password that appears on the camcorder s screen The camcorder s network name should appear in the list of net works access points detected by the device As long as you do not reset the camcorder s Wi Fi password you on...

Страница 180: ... Touch the NFC touchpoint on the Android device to the NFC touchpoint on the camcorder Align the center of the NFC touchpoints on both devices If there is no reaction try changing the position of the Android device slightly while it is touching the camcorder When the device is recognized the Android device will emit a beep sound and the CameraAccess plus app will start auto matically 2 Android dev...

Страница 181: ...you can check whether your home network s access point and Internet connection meet the requirements for using the Monitor while Out func tion For details about this program and links to the download page visit PIXELA s Web site http pixela jp cermc When using NFC compatible devices When touching an NFC compatible device to the cam corder be careful not to forcibly hit the device against the camco...

Страница 182: ...o step 5 2 Touch OK to open the settings screen 3 To enter the Password field touch Not configured Enter a unique password for the Monitor while Out function and touch OK The password is required for this function and must be between 4 and 8 characters long We recommend using an 8 character password using a mix of numbers and uppercase lowercase let ters To enter the password and the port number i...

Страница 183: ... to step 6 If no connections to access points have been saved in the cam corder the message Save the access point will appear on the screen Touch OK to configure and save a new access point connection step 2 in Wi Fi Connection Using an Access Point A 206 before continuing with this procedure 6 When the wireless connection is successfully established the camcorder s ID will be displayed on the scr...

Страница 184: ... Wi Fi connection to the Android device is terminated the camcorder will reconnect automatically to the previously selected access point The rest of this procedure is not necessary Continue as described in To use the Monitor while Out function A 185 iOS Android devices not compatible with NFC On the device turn on Wi Fi and select the same access point as that to which the camcorder is connected s...

Страница 185: ... password for the Monitor while Out function that you set in the camcorder step 3 A 182 and then touch Connect Use the app s onscreen controls to operate the camcorder while viewing the live image on the device When you have finished recording 1 Camcorder Touch End to end the wireless connection and turn off the camcorder 2 iOS Android device Close the CameraAccess plus app ...

Страница 186: ...ard will appear on the screen The illustra tion below explains the various keys you can use 1 Switch between letters and numbers special characters 2 Change the position of the cursor 3 Delete the character to the cursor s left backspace 4 Caps Lock When the numerical keyboard is displayed switches between set 1 and set 2 of special characters 2 4 3 1 ...

Страница 187: ...This function is not available in the following cases When the video quality is 60P or 35 Mbps When dual recording or relay recording is activated Depending on the connection and the strength of the wireless signal there may be interruptions in the live video image or the response may be slow About the optional CT V1 Camera Pan Table If you mount the camcorder on the optional CT V1 Camera Pan Tabl...

Страница 188: ...e are two possible directions for mounting a camcorder on the CT V1 This camcorder should be mounted so that the lens is aligned with the B mark on the underside of the CT V1 s camcorder base plate For details refer to the instruction manual of the CT V1 ...

Страница 189: ...vice When using an NFC compatible Android device A 175 you can con nect the camcorder and the device with a simple operation Depending on the device OS browser and video quality you may not be able to play back or save recordings 1 Camcorder From any movie index screen activate the Play back via Browser mode The camcorder s network name and password will appear The camcorder will be ready to conne...

Страница 190: ...etwork name that appears on the camcorder s screen step 1 If neces sary enter the password that appears on the camcorder s screen The camcorder s network name should appear in the list of net works access points detected by the device As long as you do not reset the camcorder s Wi Fi password you only need to enter the password the first time you connect the device When the Wi Fi connection is cor...

Страница 191: ...ot be played back Touch ö to return to the index screen Devices other than iOS devices Touch õ to save a local copy of the movie photo on the device When you have finished Camcorder Touch End OK to end the wireless connection and turn off the camcorder The following types of MP4 scenes will be recognized as mul tiple files on other devices Scenes exceeding 4 GB Scenes recorded at 35 Mbps exceeding...

Страница 192: ...free download from the App Store Depending on the iOS version used this feature is not available for MP4 mov ies recorded at 35 Mbps 1 Camcorder From any movie index screen activate the Movie Uploader function When playing back scenes recorded in mode increasing the brightness of the iOS Android device s screen is recom mended Before you perform this procedure for the first time install the Movie ...

Страница 193: ...d by the device As long as you do not reset the camcorder s Wi Fi password you only need to enter the password the first time you connect the device When the Wi Fi connection is correctly established Connected will appear on the camcorder s screen 3 iOS device Start the Movie Uploader app and select your camcorder s model name from the list on the screen 4 iOS device Use the Movie Uploader app to ...

Страница 194: ...can also connect the camcorder to the connect station using the supplied USB cable A 163 Depending on factors such as the wireless network condi tions it can take some time to upload video files The procedure above may differ depending on the version of iOS you are using For details about the Movie Uploader app visit PIXELA s Web site http www pixela co jp oem canon e movieuploader The following t...

Страница 195: ...e connect station Align the camcorder s mark with the center of the connect point on the connect station If there is no reaction try adjusting slightly the position angle of the camcorder while carefully holding it close to the connect point on the connect station or very gently touching the cam corder to the connect station If the camcorder was turned off it will turn on in playback mode 9 N ƒ y ...

Страница 196: ... albums by e mail to friends and family and more To use this function you will need an access point connected to the Internet Availability differs from area to area Web services is used in this text to refer to various Internet services sup ported by CANON iMAGE GATEWAY Saving a scene that is about 4 minutes long will take approxi mately 5 minutes When saving a large number of files the operation ...

Страница 197: ... s Web site also available in a version for mobile devices for informa tion on registration and countries regions where you can use this service Make sure you have completed the following general require ments Install CameraWindow on your computer A 159 Complete the free registration online for CANON iMAGE GATEWAY Have ready relevant account settings user name pass word etc for all the services yo...

Страница 198: ...to Connection Diagrams A 153 3 Computer CameraWindow will start automatically and the main screen will appear Windows If the AutoPlay dialog box appears instead click Downloads Images From Canon Camera to start the CameraWindow program Mac OS If a device selection window appears select your cam corder s model name and click OK 4 Computer In the CameraWindow s main screen click Cam era Settings Set...

Страница 199: ... services differ depending on the country region of use and may be updated from time to time For the latest details about available services and terms of use visit your local CANON iMAGE GATEWAY Web site If the date set in the camcorder is not correct the camcorder cannot connect to CANON iMAGE GATEWAY Make sure the date is correct before trying to establish a connection Once you have set the maxi...

Страница 200: ...connections to access points have been saved in the cam corder the message Save the access point will appear on the screen Touch OK to configure and save a new access point connection step 2 in Wi Fi Connection Using an Access Point A 206 before continuing with this procedure 2 Select the desired Web service When you select e mail the list of registered e mail addresses will appear Select the e ma...

Страница 201: ...otos touch OK If you are uploading to YouTube read the YouTube agreement carefully and touch I Agree if you agree The upload will begin automatically You can touch Stop to cancel the wireless transfer while it is in progress 5 Touch OK Checking your uploads using CANON iMAGE GATEWAY Library You can use the CANON iMAGE GATEWAY Library or Album screen to see the movies and photos you uploaded You ca...

Страница 202: ...file size that can be uploaded depends on the Web service Depending on the access point s wireless router s settings and capabilities it can take some time to upload files E mail addresses must consist of single byte characters Only e mail addresses with 16 or fewer characters before the mark can be set in the camcorder ...

Страница 203: ...hotos from a media server We recommend that you connect the computer to the access point using a LAN cable Refer also to the instruction manuals for the com puter software and access point 1 Camcorder From any movie index screen activate the media server function If you have previously configured and saved a connection to an access point the camcorder will connect automatically to the first access...

Страница 204: ...me SSID connection protocol and the camcorder s IP address and MAC address After touching View Information you can touch Change Con nection Point to configure and save a new connection to an access point or to select a different access point already saved in the camcorder 3 Computer Start your preferred media player software and select your camcorder s model name from the list of media servers On ...

Страница 205: ...he Camcorder s Wi Fi Functions Depending on the access point s wireless router s settings and capabilities playback may take time to start or may not appear smooth For details refer to Troubleshooting A 260 ...

Страница 206: ...protocol and is Wi Fi certified bears the logo shown to the right and a home network 1 Open the Network Setup screen 2 Touch the desired setup method Depending on the setup method chosen the procedure will be different Read the descriptions below and continue with the pro cedure described in the relevant page 9 N ƒ y Playback F Format Shooting mode 0 Remote Control Streaming from record standby mo...

Страница 207: ...The camcorder will generate a PIN code which you will enter into the browser You will need a WPS compatible access point and a computer or other device connected to it Continue the procedure as described in Wi Fi Protected Setup WPS A 208 Search for Access Points Following the camcorder s onscreen instructions you select the desired access point from a list and then enter the password Continue the...

Страница 208: ...e router the amount of time required may differ Make sure the router s WPS function is activated WPS PIN Code method From a computer or similar device connected to the access point use the Web browser to open the router s WPS settings screen After the 8 digit PIN code appears on the camcorder s screen enter it into your router s WPS settings screen 2 Within 2 minutes touch OK on the camcorder s sc...

Страница 209: ...you touch Search for Access Points the camcorder will take a few seconds to detect access points available in the vicinity and will dis play the first one Make a note in advance of the network name SSID and password encryption key of the access point you want to use This will usually be the wireless router on your home network To enter text for the various settings use the virtual keyboard A 186 1...

Страница 210: ...in Sharing Your Recordings Using Web Services A 200 Step 2 in Wireless Playback on a Computer A 204 Otherwise touch K X to close the menu Manual Setup Perform this procedure to manually configure the wireless connection settings This may be necessary for example if your access point s net work name SSID cannot be detected due to the stealth function being enabled Manual setup is for advanced users...

Страница 211: ...ame way and touch OK 6 Enter the Subnet Mask field in the same way and touch Next 7 Enter the Default Gateway field in the same way and touch Next 8 Enter the Primary DNS Server and Secondary DNS Server fields in the same way and touch Next 9 Touch OK to save the configuration If you were in the process of performing another procedure the camcorder will automatically connect to the access point Re...

Страница 212: ...n screen To view the connection settings for iOS Android devices 2 Touch Smartphone Connection Settings The camcorder s network name and password will appear The Wi Fi functions available and the setup method will vary depending on the specifications and characteristics of the Wi Fi network you want to use 9 N ƒ y Playback F Format Shooting mode 0 Remote Control Streaming from record standby mode ...

Страница 213: ...rk names of up to 4 access points saved in the cam corder will appear If fewer than 4 access point connections have been registered you can touch Not configured to set up a new access point A 206 3 Touch the network name of the access point whose settings you want to view The access point s settings will appear Touch Í and Î to view additional information screens To delete the access point connect...

Страница 214: ...the settings for the Monitor while Out function recording mode only 2 Touch Monitor while Out Settings The password and port number to be used for the Monitor while Out function will appear 3 If necessary change the settings Steps 3 and 4 in Streaming via Wi Fi and Internet Monitor while Out A 182 4 Touch K repeatedly to return to the 0 Home menu and then touch X to close the menu ...

Страница 215: ...net using the Wi Fi standard In most cases this will be your wireless router IP Address Exclusive number assigned to each device connected to the net work NFC Near field communication Standard for smartphones and other devices that allows a device to establish a communication protocol with another device just by bringing the devices to close proximity touching them together SSID Service Set Identi...

Страница 216: ... screens with reference pages to the rele vant functions Trouble Consult the troubleshooting advice and list of messages when you are experiencing some trouble with your camcorder Do s and Don ts This section contains important handling precautions and main tenance instructions General Information This section contains information about optional accessories that can be used with the camcorder and ...

Страница 217: ...Menus A 41 For details about each function see the reference page Menu options in blue and bold type like this indicate default values 0 Home Menu Menu item Setting options 1 Other Settings A 45 218 3 Recording Setup A 235 Shooting Mode A 82 9 Baby N Auto Highlight Priority Cinema ƒ Scene Programmed AE 2 Main Functions A 236 N Remote Control Streaming A 177 212 Monitor from Home Monitor while Out ...

Страница 218: ... 8 Media Server w Check Edit Settings p Camera Setup recording mode only Menu item Setting options Self Timer A 220 i On j Off Zoom Speed A 220 Y Variable Z Speed 3 Speed 2 Speed 1 Zoom Position at Startup A 220 Full Wide Angle Last Used Position Framing Assistance A 61 k Automatic l Manual Framing Assistance Area A 61 Wide Normal Narrow Menu item Setting options ...

Страница 219: ...klight Correction A 221 i On j Off Auto Slow Shutter A 221 i On j Off Flicker Reduction A 221 j Off 50 Hz 60 Hz Image Stabilizer A 222 Dynamic Standard j Off Intelligent IS A 58 È With È Á Without È Video Snapshot Length A 105 C 2 sec D 4 sec F 8 sec p Camera Setup recording mode only cont Menu item Setting options ...

Страница 220: ...e The zoom lever operates at a variable speed Press gen tly for a slow zoom press harder for faster zooms Speed 1 to Z Speed 3 The zoom lever operates at a constant speed Speed 1 is the slowest and speed 3 the fastest Zoom Position at Startup Allows you to choose the position of the zoom when you turn on the camcorder Full Wide Angle The zoom position will be at full wide angle Last Used Position ...

Страница 221: ... is set to and a cinema look filter other than Cinema Standard is selected When the shooting mode is set to ƒ and the Special Scene mode is set to J Night Scene K Snow L Beach M Sunset or O Spotlight Auto Slow Shutter The camcorder automatically uses slow shutter speeds to obtain brighter recordings in places with insufficient lighting Fastest shutter speed used 1 30 1 12 when the frame rate is se...

Страница 222: ...ates for a lower degree of camcorder shake such as when shooting while remaining stationary and is suitable for shooting natural looking scenes j Off Use this setting when the camcorder is mounted on a tripod This function is available only when the shooting mode is set to ƒ or If the degree of camcorder shake is too high the image stabilizer may not be able to fully compensate You can activate th...

Страница 223: ...s slide to the left as the slideshow advances Slideshow Transition A 223 j Off k Dissolve l Slide Image Video Snapshot Length A 126 C 2 sec D 4 sec F 8 sec t Display Setup Menu item Setting options Onscreen Markers A 224 j Off 3 Level White 4 Level Gray 5 Grid White 6 Grid Gray Display Date Time A 224 i On j Off Output Onscreen Displays A 225 i On j Off s Playback Setup playback mode only cont Men...

Страница 224: ...ly and or horizontally Using the onscreen markers will not affect the recordings Display Date Time playback mode only Select whether to display the date and time during playback For MP4 movies only the date will be displayed LCD Brightness A 225 LCD Backlight A 225 H Bright M Normal L Dim LCD Mirror Image A 225 i On j Off HDMI Status A 225 Demo Mode A 225 i On j Off TV Type A 226 4 3 TV Wide TV t ...

Страница 225: ...ve usage time of the battery pack When the compact power adapter is connected LCD Backlight will automatically change to H Bright LCD Mirror Image recording mode only When this setting is set to i On this function reverses the image on the screen horizontally when you rotate the LCD panel 180 degrees toward the subject In other words the screen will show a mirror image of the subject While the LCD...

Страница 226: ...ng according to the type of TV in order to display the picture in full and in the correct aspect ratio 4 3 TV TV sets with 4 3 aspect ratio Wide TV TV sets with 16 9 aspect ratio When the TV type is set to 4 3 TV during the playback of video originally recorded with an aspect ratio of 16 9 the picture will not be displayed fullscreen This setting is not available when the camcorder is connected to...

Страница 227: ...lands Norsk Polski Português Suomi Svenska Türkçe Time Zone DST A 37 home time zone or travel time zone New York list of world time zones DST adjustment Toggle on or off Date Time A 33 Date Time Date Format Y M D M D Y D M Y Y year M month D day 24H Toggle on 24 hour clock or off 12 hour clock View Assistance A 85 230 i On j Off Lock Files A 68 C On j Off ...

Страница 228: ...ory card Q N External Hard Drive Info A 231 AV Headphones A 121 152 Ò AV Ó Headphones Volume A 67 121 Speaker Ú Headphones Ö Notification Sounds A 231 High Volume ø Low Volume j Off Custom Control Button A 231 Functions in the 2 Main Functions menu A 236 Default Framing Assistance Battery Info A 231 q System Setup cont Menu item Setting options Ô Õ ...

Страница 229: ... Off A 233 i On j Off Power On Using LCD Panel A 233 Enable Off USB Connection Type A 233 Computer Connect Station Connect and Set NFC A 181 i On j Off Q FlashAir A 234 i On j Off N Initialize 8 A 38 Q Initialize 8 Built in Mem 8 Mem Card N only Complete Initialization Toggle on or off q System Setup cont Menu item Setting options ...

Страница 230: ...mode to enjoy a more life like image richer in detail Available Space in Memory recording mode only Used Space in Memory playback mode only Displays a screen where you can verify how much of the memory is currently available for recording or how much of it is in use ª indicates photos Estimated figures about available movie recording time and available number of photos are approximate and based on...

Страница 231: ...ated the camcorder will not emit some notification sounds Custom Control Button recording mode only The button dis played on the lower left of the screen is a customizable button By default the button s function is assigned to framing assistance but you can change its function to use it as a shortcut to one of the functions in the 2 Main Functions menu This will allow you to access one of your fre...

Страница 232: ... that has been initialized n Continuous File numbers will continue from the number following that of the last file recorded with the camcorder If a memory card you insert already contains a file with a larger num ber a new file will be assigned a number one higher than that of the last file on the memory card We recommend using the n Continuous setting Folders can contain up to 500 files MP4 movie...

Страница 233: ...is displayed will prevent the camcorder from shut ting off Power On Using LCD Panel When this setting is set to Enable opening the LCD panel turns the camcorder on while closing the LCD panel turns it off Set to Off to deactivate this feature In either case you can still use USB Connection Type playback mode only Selects the type of connection used by default when the camcorder is connected to an ...

Страница 234: ...r s firmware which is the software that controls the cam corder This menu option is usually unavailable N MAC Address Displays the camcorder s unique MAC media access control address Certification Logo Display You can verify part of the certification logos that apply to this camcorder Reset All Resets all of the camcorder s settings including any stored access point connections passwords and other...

Страница 235: ...0P Recording High Quality Standard Full HD Long Play When Movie Format is set to MP4 60P Recording High Quality Standard Full HD Long Play For these settings also I Frame Rate For these settings also I Frame Rate N Recording Media A 80 Rec Media for Movies Built in Memory 8 Memory Card Rec Media for Photos Built in Memory 8 Memory Card N Dual Relay Recording A 81 j Standard Recording Dual Recordin...

Страница 236: ...n Ò Decoration A 95 Ó Pens and Stamps Animated Stamps Date Time or 9 Baby mode stamps Ü image mix Ý pause live video ß minimize toolbar Slow Fast Motion A 92 Off x1 2 x2 x4 x10 x20 x60 x120 x1200 w recording time 1 Frame 0 5 sec R Faders A 109 j Off T Fade Trigger V Wipe Black Screen White Screen Zoom Type A 237 Optical Advanced Digital W tele macro Toggle on or off recording mode only ...

Страница 237: ...f view with optical zoom Digital With digital zoom light blue area on the zoom bar the image is processed digitally so image quality will deteriorate the more you zoom in È Powered IS A 238 ON OFF z Pre REC A 238 ON OFF Focus A 113 D manual focus Toggle on or off Touch AF frame y Exposure A 111 n manual exposure Toggle on or off Touch AE frame ä Mic Level A 239 m automatic n manual Audio Level Ind...

Страница 238: ...conds before you press Y so you do not miss important shooting opportunities When the shooting mode is set to 9 z Pre REC will automatically be set to ON and pre recording cannot be deactivated The camcorder will not record the full 3 seconds prior to pressing Y if the button was pressed within 3 seconds of having turned on pre recording or having finished the previous recording Any of the followi...

Страница 239: ...ent Adjust the audio recording level so the audio level meter goes to the right of the 12 dB mark yellow area only occasionally When you are using a microphone connected to the MIC terminal including the optional WM V1 Wireless Microphone the audio level indicator will be displayed automatically When the audio level meter reaches the red point 0 dB the sound may be distorted We recommend using hea...

Страница 240: ... Photos In single photo view Proceed copies the current photo N Convert to MP4 8 A 143 Q Convert to MP4 Delete A 73 Depending on the index screen date or folder name Select All Scenes or All Photos During playback pause This Scene In single photo view Proceed deletes the current photo N Conv Fast Motion 8 A 147 Divide A 136 Trim A 137 playback mode only ...

Страница 241: ...rouped according to the area in which they appear on the screen Please note that what icons appear depends on the movie format shooting mode and other func tions For details about each function see the reference page Recording mode Face detection frame A 106 User selected tracking frame A 106 Onscreen markers A 224 3 Level White shown Touch to open the info panel Touch to close the info panel ...

Страница 242: ...ne counter hours minutes seconds Advances only while recording x000 0 00 00 Slow fast motion recording and selected slow fast motion rate scene counter only while recording 92 00 Self timer and countdown 220 Ü Ñ z Memory card operation 249 Å Ä Image stabilization 222 Powered IS 238 Ä Â Ã Intelligent IS only in N mode 58 è é ê ë 000 min Remaining battery charge 249 Zoom bar momentarily only when op...

Страница 243: ...ed in red and the photo will not be recorded 54 Left side of the screen Icon Description Function A y 0 00 Exposure compensation 111 D Manual focus 113 W Tele macro 118 0 0 button Open the 0 Home menu 42 T V Faders 109 É Å White balance 115 Q FlashAir card In case of a FlashAir card error will be displayed Check the FlashAir card 234 Top of the screen cont Icon Description Function A ...

Страница 244: ... recording time on the memory 0h00m 80h00m As the remaining recording time decreases the icon will change from green to yellow and then red When the remaining recording time is 30 minutes or less this indicator will keep being displayed on the main screen even when you close the info panel When the memory is full End will appear next to the red icon and record ing will stop 298 0h00m 0h00m Relay r...

Страница 245: ...ng time on that memory will be displayed as well 81 Frame rate 117 Movie format 78 Video quality 78 Bottom of the screen Icon Description Function A button Take a photo 54 FILTER 1 to FILTER 5 FILTER button Change the cinema look filter 86 default Custom button The icon in the button will change depending on the currently assigned function setting 231 Info panel cont Icon Description Function A ...

Страница 246: ...while taking a photo 54 button Cancel the tracking function 106 Audio level indicator 239 2 Ò 2 button Open the 2 Main Functions menu When the shooting mode is set to 9 the button s function is automatically set to Ò Decoration and it cannot be changed 236 Bottom of the screen cont Icon Description Function A ...

Страница 247: ... Ø Ô Ó Memory card operation 249 Q FlashAir card In case of a FlashAir card error will be displayed Check the FlashAir card 234 0 00 00 80 00 00 Memory selected for playback and scene playback time hours minutes seconds 00 00 800 00 Memory selected for playback and current photo total number of photos Movie format 78 Video quality 78 000 Scene number 000 0000 File number 232 ...

Страница 248: ...7 For photos Ð Ð button Slideshow 134 f f button Return to the index screen 70 h h button Photo jump 72 Ý Ý button Volume and background music balance adjustment 129 button Grab the current frame and save it as an image file 128 Ò Ò button Decoration 104 button Capture a video snapshot scene 126 00 00 AM Jan 1 2016 Recording date and time 224 ...

Страница 249: ...Frame reverse Remaining battery charge The icon shows a rough estimate of the remaining charge of the battery pack An estimate of the remaining recording playback time in minutes will be displayed next to the icon When appears in red the battery pack is exhausted Replace the battery pack with a fully charged one Depending on the condition of the camcorder or battery the actual battery charge may n...

Страница 250: ...CHECK THIS FIRST Power supply Is the battery charged Is the compact power adapter correctly connected to the camcorder A 25 Recording Did you turn the camcorder on and correctly set it to recording mode A 50 54 If you want to record on a memory card is a compatible card correctly inserted into the camcorder A 30 Playback Did you turn the camcorder on and correctly set it to playback mode A 64 70 I...

Страница 251: ...0 C and 40 C 32 F and 104 F The battery pack is faulty Replace the battery pack The camcorder cannot communicate with the battery pack attached Battery packs not recommended by Canon for use with this camcorder cannot be charged using this camcorder If you are using a battery pack recommended by Canon for use with this camcorder there may be a problem with the battery pack Consult a Canon Service ...

Страница 252: ... match the beginning end of the recording There is a slight interval between pressing the button and the actual start end of recording This is not a malfunction The camcorder will not focus Autofocus does not work on the subject Focus manually A 113 The lens is dirty Clean the lens A 286 When a subject flits across in front of the lens the image appears slightly bent This is a phenomenon typical o...

Страница 253: ...g it continuously for long periods of time this is not a malfunction If the camcorder becomes unusually hot or it becomes hot after using it only for a short while it may indicate a problem with the camcorder Consult a Canon Service Center Playback Deleting scenes takes longer than usual When the memory contains a large number of scenes some oper ations may take longer than usual Save your recordi...

Страница 254: ...memory card To avoid the same problem save the recordings in the built in memory A 156 and initialize it using the Complete Initialization option A 38 Recordings on a memory card Save your recordings on a com puter A 157 Initialize the memory card using the Complete Ini tialization option A 38 Transfer the music files to the memory card A 301 and then copy back all your recordings from the compute...

Страница 255: ... A memory card error occurred Turn off the camcorder Remove and reinsert the memory card Initialize the memory card if the dis play does not change back to normal in red and End appear on the screen The memory card is full Replace the memory card or delete some recordings A 73 to free some space on the memory card Even after stopping recording the ACCESS indicator does not go off The scene is bein...

Страница 256: ... dark The LCD screen was dimmed Change the 1 t LCD Backlight setting to Normal or Bright The image on the screen appears too dark You set the shooting mode to or played back a scene recorded in mode with the view assistance function turned off Set 1 q View Assistance to On Screen displays turn on and off repeatedly The battery pack is exhausted Replace or charge the battery pack Remove the battery...

Страница 257: ...is displayed correctly but there is no sound from the built in speaker Speaker volume is turned off Adjust the volume A 67 If the supplied High Speed HDMI cable or optional STV 250N Ste reo Video Cable is connected to the camcorder disconnect it The AV OUT terminal is set to headphone output Set 1 q AV Headphones to AV There is no sound from the AV OUT headphones terminal N Audio will not be outpu...

Страница 258: ...eo noise appears on the TV screen When using the camcorder in a room where a TV is located keep a distance between the compact power adapter and the power or antenna cables of the TV There is no image on the TV screen and there is no sound The video input on the TV is not set to the video terminal to which you connected the camcorder Select the correct video input Disconnect the supplied High Spee...

Страница 259: ...OS X In such case click the Camera Window icon in the dock to launch the software Cannot save recordings on my computer When the memory contains too many recordings Windows 2 500 or more photos MP4 scenes Mac OS 1 000 or more photos MP4 scenes you may not be able to transfer recordings to a computer Try using a card reader to transfer recordings from the memory card N only To transfer the recordin...

Страница 260: ...tion that do not broadcast their network name SSID will not be detected by the camcorder during the Wi Fi network setup Perform the setup manually A 210 or turn off the stealth function of the access point Wireless playback on a computer or similar device is not smooth Playback may not be smooth depending on the access point s set tings and capabilities Try using the camcorder closer to the access...

Страница 261: ...rform the file transfer again Cannot complete a wireless connection to the camcorder Resetting the camcorder s settings using 1 q Reset All will reset the camcorder s network name and passwords Erase the camcorder s previous network settings from the iOS or Android device and connect the device to the camcorder again The Playback via Browser screen does not appear correctly on the Web browser The ...

Страница 262: ... a Canon Service Center N Built in memory is full The built in memory is full in red and End appear on the screen Delete some recordings A 73 to free some space Alternatively save your recordings A 156 and initialize the built in memory A 38 N Built in memory writing error Attempt to recover the data This message will appear the next time you turn on the camcorder if power supply was accidentally ...

Страница 263: ...convert the scene MP4 scenes whose resolution is smaller than the resolution selected for Conversion Quality cannot be converted N Scenes whose video quality is 4 Mbps or whose frame rate is 24P and scenes recorded using slow fast motion record ing cannot be converted to fast motion scenes Scenes that were recorded with other devices cannot be con verted to MP4 format N Cannot copy The total size ...

Страница 264: ...sing other devices Cannot play back You may not be able to play back scenes that were recorded with other devices or created or edited on a computer There is a problem with the memory If this message appears often without apparent reason contact a Canon Service Center N Cannot play back Cannot access the built in memory There is a problem with the built in memory Initialize the built in memory usi...

Страница 265: ...this camcorder A 38 Cannot record You cannot capture video snapshot scenes from scenes recorded or edited using another device There is a problem with the memory If this message appears often without apparent reason contact a Canon Service Center N Cannot record Cannot access the built in memory There is a problem with the built in memory Save your recordings A 156 and initialize the built in memo...

Страница 266: ... com puter Initialize the memory card with this camcorder A 38 Cannot save the canvas Cannot save your Pens and Stamps drawings in the memory Save your recordings A 156 and initialize the memory A 38 Cannot trim the scene Scenes that were copied to an SDXC card N only and scenes that were recorded or edited with other devices cannot be trimmed with this camcorder Charge the battery pack Battery pa...

Страница 267: ...reen you can resume record ing playback If the problem persists save your recordings A 156 and initialize the memory card A 38 Check whether the lens cover is open Slide the lens cover switch down Close the memory card slot cover The camcorder s memory card slot cover was opened while the camcorder was connected to the optional CS100 Connect Sta tion Close the cover File name error The folder and ...

Страница 268: ... scenes 3 999 scenes no further scenes can be copied onto the memory card Delete some scenes A 73 to free some space Mem Card Unable to recognize the data The memory card contains scenes recorded using a video config uration that is not supported PAL or SECAM Play back the recordings in the memory card with the device originally used to record them Memory card cover is open After inserting a memor...

Страница 269: ...next time you turn on the camcorder if power supply was accidentally interrupted while the camcorder was writing on the memory card and later the position of the card s LOCK switch was changed to prevent erasure Change the posi tion of the LOCK switch No memory card Insert a compatible memory card into the camcorder A 30 The memory card may not be inserted correctly Insert the memory card all the ...

Страница 270: ...ene recorded using another device Cannot divide the scene Scenes that were not recorded with this camcorder cannot be divided with this camcorder Scenes that were edited using software cannot be divided Scene recorded using another device Cannot play back the scene Scenes that were not recorded with this camcorder cannot be played back with this camcorder Select the desired scene number A number o...

Страница 271: ...P or 35 Mbps video quality option To record video on this memory card it is recommended to use Long Play video quality When using a memory card rated CLASS 2 you may not be able to record movies using a video quality option other than LP or 4 Mbps Too many photos and MP4 movies Disconnect the USB cable Disconnect the USB cable Try using a memory card reader or decrease the number of photos and mov...

Страница 272: ...enes recorded in mode on a TV or exter nal monitor using a bright picture mode or increasing the bright ness of the TV computer monitor or other screen is recommended Error writing to external hard drive This message will appear the next time you turn on the camcorder if power supply was accidentally interrupted while the camcorder was writing to the external hard drive Select Yes to try to recove...

Страница 273: ...on For details refer to the instruction manual of the CS100 Try turning off the camcorder and connect station After a moment turn them on again and restore the connection If the problem persists contact a Canon Service Center Closing the LCD panel turns off the camcorder File transfers in progress will be interrupted Keep the camcorder s LCD panel open while a wireless file transfer to the optiona...

Страница 274: ...r Search for Access Points option A 206 No access points found The access point set in the camcorder could not be found To avoid interference use the camcorder at some distance from devices that emit electromagnetic waves cordless phones micro wave ovens etc Make sure that you use the correct access point s network name SSID in the camcorder s Wi Fi settings A 209 If the access point is using MAC ...

Страница 275: ... For details refer to the instruction manual of your access point Make sure to touch OK on the camcorder s screen within 2 minutes of activating the Wi Fi Protected Setup signal on the access point whether by pressing the button or by entering the PIN code Unable to connect To avoid interference use the camcorder at some distance from devices that emit electromagnetic waves cordless phones micro w...

Страница 276: ...r to serve as the access point Unable to obtain an IP address If you are not using a DHCP server connect using the Manual Setup option and enter the IP address using the Manual option A 210 Turn on the DHCP server If it is already on make sure it is func tioning properly Make sure the address range for the DHCP server is sufficient If you are not using a DNS server set the DNS address to 0 0 0 0 S...

Страница 277: ...rder at some distance from devices that emit electromagnetic waves cordless phones micro wave ovens etc The camcorder may not be able to connect to the access point if too many devices are accessing it Wait awhile and try again to establish the connection Wi Fi error Incorrect authentication method Make sure the camcorder and access point are using the same authentication encryption method and pas...

Страница 278: ...onnection point network name SSID and other network settings Connect to a computer and use the dedicated software to set again An error occurred when connecting to the CANON iMAGE GATEWAY server Check the settings saved on CANON iMAGE GATEWAY and set them again in the camcorder Connect to a computer and use the dedicated software to set up This service may not be available in your region To use We...

Страница 279: ...on and try again later This image cannot be sent You attempted to upload a recording whose file type or file size is not supported by the selected Web service Check the recording before sending Try again There was a problem in the communication with the CANON iMAGE GATEWAY server or the server is temporarily down Try connecting the camcorder to the server again If the same error occurs wait awhile...

Страница 280: ...clos ing the LCD panel Handle the touch screen with care Do not apply excessive force and do not use ballpoint pens or other hard tipped tools to operate the touch screen This may damage the touch screen s surface Do not allow contact with metallic objects If metallic objects come in contact with the touch screen this may inadvertently cause incorrect operation of the camcorder Do not hold the cam...

Страница 281: ...i functions may be subject to inter ference from devices such as cordless phones and microwave ovens Keeping as much distance as possible from these devices or using the camcorder s Wi Fi functions at a different time of day may reduce such interference Do not point the camcorder toward an intense light source such as the sun on a sunny day or an intense artificial light source Doing so may damage...

Страница 282: ...to get a calm stable picture Exces sive camcorder movement while shooting and extensive use of fast zooms and panning can result in jittery scenes In extreme cases the playback of such scenes may result in visually induced motion sick ness If you experience such a reaction stop the playback immedi ately and take a rest break as necessary Long Term Storage If you do not intend to use the camcorder ...

Страница 283: ...To extend the battery life of the battery pack discharge it completely before storing it Charge and discharge all your battery packs fully at least once a year DANGER Treat the battery pack with care Keep it away from fire or it might explode Do not expose the battery pack to temperature higher than 60 C 140 F Do not leave it near a heater or inside a car in hot weather Do not try to disassemble o...

Страница 284: ...ordings on the memory card onto your computer Data may be corrupted or lost due to memory card defects or exposure to static electricity Canon shall not be liable for lost or corrupted data Do not touch or expose the terminals to dust or dirt Do not use memory cards in places subject to strong magnetic fields Do not leave memory cards in places subject to high humidity and high temperature Do not ...

Страница 285: ...er and leave it connected with the camcorder off The built in lithium battery will be fully charged after about 24 hours Disposal When you delete movies or initialize the memory only the file allocation table is altered and stored data is not physically erased When you dis pose of the camcorder or memory card or give either to another per son initialize the camcorder s built in memory N only or me...

Страница 286: ...use tissue paper LCD Touch Screen Clean the LCD touch screen using a clean soft lens cleaning cloth Condensation may form on the surface of the screen when the tem perature changes suddenly Wipe it with a soft dry cloth Condensation Moving the camcorder rapidly between hot and cold temperatures may cause condensation water droplets to form on its internal surfaces Stop using the camcorder if conde...

Страница 287: ...to evaporate will vary depending on the location and weather conditions As a general rule wait for 2 hours before resuming use of the camcorder Using the Camcorder Abroad Power Sources You can use the compact power adapter to operate the camcorder and to charge battery packs in any country with power supply between 100 and 240 V AC 50 60 Hz Consult a Canon Service Center for informa tion on plug a...

Страница 288: ...nds except in French territories like Guadeloupe and Martinique most of South America except in Argentina Brazil and Uruguay Asia Only in Japan the Philippines South Korea Taiwan and Myanmar Oceania US territories Guam American Samoa etc and some Pacific islands like Micronesia Samoa and Tonga ...

Страница 289: ...heir availability may differ from area to area Select accessories are described in more detail in the following pages For the latest informa tion please visit your local Canon Web site BP 718 BP 727 Battery Pack CG 700 Battery Charger CA 110 Compact Power Adapter HTC 100 High Speed HDMI Cable STV 250N Stereo Video Cable IFC 400PCU USB Cable ...

Страница 290: ...e N Call or visit your local retailer dealer for genuine Canon video accesso ries You can also obtain genuine accessories for your Canon cam corder by calling 1 800 828 4040 Canon U S A Information Center UA 100 USB Adapter WM V1 Wireless Microphone CT V1 Camera Pan Table CS100 Connect Station SC 2000 Soft Carrying Case ...

Страница 291: ...ng subjects at a distance The trans mitter is conveniently equipped with a clothing clip and the receiver can be attached to the camcorder s grip belt Use of genuine Canon accessories is recommended This product is designed to achieve excellent performance when used with genuine Canon accessories Canon shall not be liable for any damage to this product and or accidents such as fire etc caused by t...

Страница 292: ...n save an entire memory onto the device Check in advance the USB cable supplied with your external hard drive SC 2000 Soft Carrying Case A handy camcorder bag with padded compartments and plenty of space for accessories This mark identifies genuine Canon video accesso ries When you use Canon video equipment we rec ommend Canon brand accessories or products bearing the same mark ...

Страница 293: ...e with Exif Ver 2 3 Image compression JPEG This camcorder supports Exif 2 3 also called Exif Print Exif Print is a stan dard for enhancing the communication between camcorders and printers By connecting to an Exif Print compliant printer the camcorder s image data at the time of shooting is used and optimized yielding extremely high quality prints Recording Media N Built in memory O 32 GB P 16 GB ...

Страница 294: ...one Lens f 2 8 89 6 mm F 1 8 4 5 32x optical zoom 57x advanced zoom 35 mm equivalent 38 5 1 232 mm 32 5 1 853 mm when advanced zoom is on Lens Configuration 10 elements in 7 groups 1 aspheric element Filter Diameter 43 mm AF System Autofocus TTL or manual focus Minimum Focusing Distance 1 cm 0 39 in at full wide angle 1 m 3 3 ft throughout the zoom range When tele macro is on 50 cm 1 6 ft at full ...

Страница 295: ...ordings AVCHD movies 60P MXP FXP 1920 x 1080 pixels LP 1440 x 1080 pixels MP4 movies 35 Mbps 24 Mbps 17 Mbps 1920 x 1080 pixels 4 Mbps 1280 x 720 pixels Size of Photos 1920 x 1080 pixels 1280 x 720 pixels only when recording MP4 movies at 4 Mbps Terminals AV OUT Terminal 3 5 mm 4 pole minijack output only dual purpose terminal also for headphones stereo output Video 1 Vp p 75 Ω unbalanced Audio 10...

Страница 296: ...ng with compatible devices Wireless Frequency 2 4 GHz Supported Channels 1 11 Encryption Methods WEP 64 WEP 128 TKIP AES Power Others Power Supply rated 3 6 V DC battery pack 5 3 V DC compact power adapter Power Consumption MP4 movies at 17 Mbps with autofocus normal brightness 2 9 W Operating Temperature 0 40 C 32 104 F Dimensions W x H x D excluding the grip belt 53 x 58 x 116 mm 2 1 x 2 3 x 4 6...

Страница 297: ... Battery Pack Battery Type Rechargeable lithium ion battery Rated Voltage 3 6 V DC Operating Temperature 0 40 C 32 104 F Battery Capacity 2 760 mAh typical 9 7 Wh 2 685 mAh minimum Dimensions 30 3 x 34 2 x 40 1 mm 1 2 x 1 3 x 1 6 in Weight 60 g 2 1 oz Weight and dimensions are approximate Errors and omissions excepted The information in this manual is verified as of January 2016 Specifica tions an...

Страница 298: ...t point the camcorder will stop for about 3 seconds After that recording will continue as a separate scene Movie format quality and resolution Memory capacity1 8 GB 16 GB 32 GB 64 GB 60P 1920 x 1080 35 min 1 hr 15 min 2 hr 30 min 5 hr 5min 35 Mbps 1920 x 1080 30 min 1 hr 2 hr 4 hr MXP 24 Mbps 1920 x 1080 40 min 1 hr 25 min 2 hr 55 min 5 hr 55 min FXP 17 Mbps 1920 x 1080 1 hr 2 hr 5 min 4 hr 10 min...

Страница 299: ...at is set to MP4 and the video quality is set to 4 Mbps Charging times The charging times given in the following table are approximate and vary according to charging conditions and initial charge of the battery pack Photo size Number of photos 1920 x 1080 2 700 1280 x 720 6 100 Charging conditions Battery pack BP 718 BP 727 Using the camcorder 5 hr 35 min 7 hr 45 min Using the optional CG 700 Batt...

Страница 300: ...ess Typical recording times measure recording with repeated operations such as start stop recording and power on off Actual times will vary according to the recording configuration used and charging recording or playback conditions The effective usage time of the battery pack may decrease when recording in cold surroundings when using the brighter screen settings etc Battery pack Movie format Vide...

Страница 301: ...ons of the music files compatible with the camcorder are as follows Audio encoding Linear PCM Audio sampling 48 kHz 16 bits 2 channels Minimum length 1 second File type WAV N 3 music files come pre installed in the built in memory under the following folder CANON MY_MUSIC To play back recordings from a memory card with background music use Transfer Utility LE to transfer the music files from your ...

Страница 302: ...4 2 0 To use the image mix function while recording on a memory card use a card reader to copy the image files from your computer to the fol lowing folders on the memory card depending on the shooting mode you want to use Image mix frames that can be used only in 9 mode CANON PRIVATE MY_PICT BABY Image mix frames that can be used only in other modes CANON PRIVATE MY_PICT The camcorder can recogniz...

Страница 303: ...ion 221 AV OUT terminal 150 152 B Baby shooting mode 84 Baby album 64 Background music 129 134 Battery pack Battery information 231 Charging 25 Remaining charge indicator 249 Beach Special Scene mode 88 Built in backup battery 285 C Camera pan table 187 CameraAccess plus 177 CameraWindow download 159 CANON iMAGE GATEWAY 196 Changing a scene s thumbnail image 139 Chroma key 103 Cinema shooting mode...

Страница 304: ...ording 81 E Edit menu 240 Error messages 262 Exposure 111 Exposure compensation 111 External hard disk 164 External microphone 123 F Face detection 106 Facebook 192 196 Faders 109 File numbering 232 Fireworks Special Scene mode 88 FlashAir cards 234 Flicker reduction 221 Focus 113 Folder name 232 Frame rate 117 Framing assistance 61 G Grabbing frames Capturing snapshot scenes from a movie 126 Grip...

Страница 305: ... 236 Maintenance 286 Markers 224 Media Server 203 Memory card 29 284 Memory save 164 MIC terminal 123 Monitor from Home 178 Monitor while Out 181 Movie format AVCHD MP4 78 Movie Uploader 192 Music files download 301 N NFC near field communication 180 194 Night Scene Special Scene mode 88 Notification sounds 231 O Onscreen icons 241 Other Settings menus 45 218 P P Programmed AE shooting mode 91 Pla...

Страница 306: ...e memory for playback 66 for recording 80 Self timer 220 Serial number 22 Shooting mode 82 Shooting mode button 82 Slideshow 134 Slow fast motion recording 92 Smart AUTO 56 Snow Special Scene mode 88 Sports Special Scene mode 88 Spotlight Special Scene mode 88 Sunset Special Scene mode 88 T Tele macro 118 Telephoto 59 Time zone DST 37 Timeline 132 Touch AE 112 Touch AF 114 Touch screen operations ...

Страница 307: ...terminal 150 153 V Video quality 78 Video snapshot 105 126 View assistance for mode 230 Volume 67 W Web services 198 White balance 115 Wide angle 59 Wi Fi functions 171 Y YouTube 192 196 Z Zoom Framing assistance 61 Zoom speed 220 Zoom type 237 N only ...

Страница 308: ... be made and the Equipment will be return shipped to you shipping charges apply If you disapprove we will return ship the equipment at no charge to you Non Canon brand peripheral equipment and software which may be distributed with or factory loaded on the Equipment are sold AS IS without warranty of any kind by Canon USA including any implied warranty regarding merchantability or fitness for a pa...

Страница 309: ...LLOW LIMITATIONS ON HOW LONG AN IMPLIED WARRANTY LASTS SO THE ABOVE LIMITATION OR EXCLU SION MAY NOT APPLY TO YOU CANON USA SHALL NOT BE LIABLE FOR LOSS OF REVENUES OR PROFITS EXPENSE FOR SUBSTITUTE EQUIPMENT OR SERVICE STORAGE CHARGES LOSS OR CORRUPTION OF DATA INCLUDING WITHOUT LIMITATION LOSS OR CORRUPTION OF DATA STORED ON THE EQUIPMENT S HARD DRIVE OR ANY OTHER SPECIAL INCIDENTAL OR CONSEQUEN...

Страница 310: ...lies parts or devices with the Equipment that do not conform to Canon specifications or that cause abnormally frequent service problems iii repairs or services performed by any party other than a Canon Service Facility iv defective batteries or any exposure to water sand or dirt v shipping claim must be presented to the shipper b Any serial number on the video equipment is altered or removed c The...

Страница 311: ...ies conditions guarantees or representations Any recovery under this limited warranty shall not exceed the purchase price of the equipment Canon Canada does not assume or authorize any other per son to assume for Canon Canada any other liability with respect to this equipment This warranty does not extend to any person other than the original purchaser of the Equipment or the per son for whom it w...

Страница 312: ... Canada seulement CENTRO Y SURAMÉRICA CANON LATIN AMERICA INC One Canon Park Melville NY 11747 USA MÉXICO CANON MEXICANA S DE RL DE CV Blvd Manuel Ávila Camacho No 138 Piso 17 Col Lomas de Chapultepec C P 11000 México D F México CANON U S A INC NEW JERSEY OFFICE 100 Jamesburg Road Jamesburg NJ 08831 USA USA CANON U S A INC NEW JERSEY OFFICE 100 Jamesburg Road Jamesburg NJ 08831 USA CANON U S A INC...

Отзывы: