background image

104

SE
TTING

 UP FU

NCTIO

N

S FROM MEN

U

S

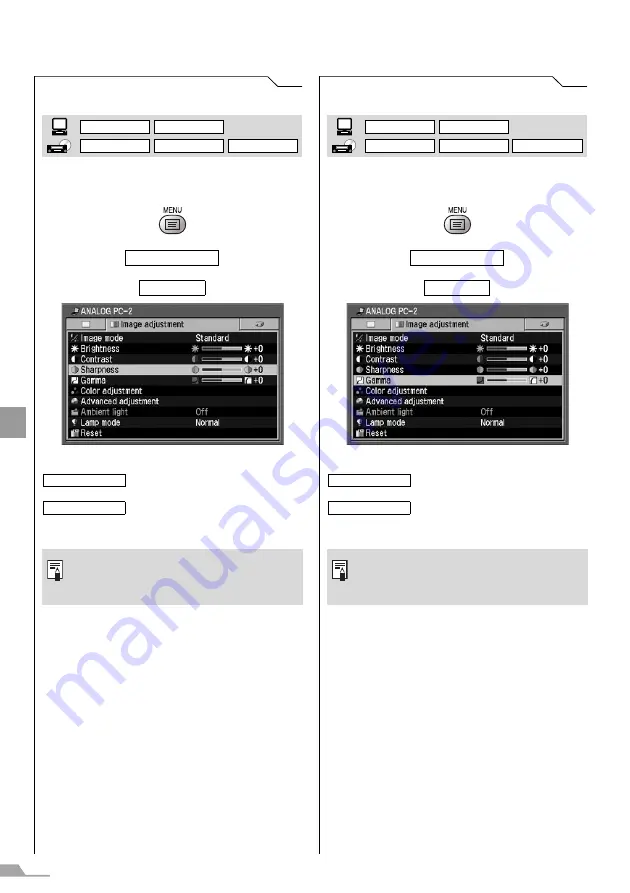
Adjusting the Sharpness

[Sharpness]

You can adjust the sharpness when you want to
make an image sharper or softer.

T

T

Press the [MENU] button when you finish.

Making a Gamma Correction

[Gamma]

You can make a gamma correction if light or
dark portions of an image are obscure.

T

T

Press the [MENU] button when you finish.

Image adjustment

Sharpness

Increases the sharpness of an
image.

Decreases the sharpness of an
image.

z

This setting is saved for the currently
selected input signal and image
mode.

DIGITAL PC

ANALOG PC

DIGITAL VIDEO

COMP./SCART

VIDEO/S-VIDEO

(SX7 MarkII)

>

<

Image adjustment

Gamma

Makes dark and obscure portions of
an image visible.

Makes light and obscure portions of
an image visible.

z

This setting is saved for the currently
selected input signal and image
mode.

DIGITAL PC

ANALOG PC

DIGITAL VIDEO

COMP./SCART

VIDEO/S-VIDEO

(SX7 MarkII)

>

<

Содержание SX7 MARKII

Страница 1: ...ons Before Use Setting Up the Projector Projecting an Image from the Computer Projecting an Image from AV Equipment Useful Functions Available During a Presentation Setting Up Functions from Menus Maintenance Troubleshooting Appendix Index User s Manual ENG ...

Страница 2: ... signal by pressing the button P48 50 z Select an appropriate input signal in accord with the signal from the computer 7 Press the button twice again P46 47 z Adjust the input signal focusing keystone distortion etc automatically with the auto setup function 8 Press the button P54 z Optimize the input signal with the auto PC function Skip this step if the projector is projecting an image properly ...

Страница 3: ...screen 5 Set up the AV equipment z Turn on the AV equipment and play the video image 6 Select the input signal by pressing the button P70 72 z Select DIGITAL VIDEO as the input signal for a digital video image For the other video image go to step 7 7 Press the button twice again P70 z Adjust the input signal focusing keystone distortion etc automatically with the auto setup function 8 Select the i...

Страница 4: ...29 Setting Up the Projector 32 Determining the Distance to the Screen 32 Determining the Installation Position 33 Projecting an Image from the Computer 36 Connecting the Projector to the Computer 36 Starting Projection 40 Adjusting the Image 42 Preparing the Computer 44 Performing the Auto Setup 46 Adjusting the Focus 51 Adjusting Keystone Distortion 52 Setting Up the Computer Screen Automatically...

Страница 5: ...he Tracking 93 Adjusting the Horizontal Position 94 Adjusting the Vertical Position 94 Adjusting the Number of Horizontal Pixels 95 Adjusting the Number of Vertical Pixels 95 Performing Progressive Processing 96 Selecting a Menu Position 96 Performing the Ceiling mounted Rear Projection 97 Correcting the Screen Color 98 Capturing a Logo to Be Projected SX60 X700 98 Selecting a Logo Display Positio...

Страница 6: ... Operation 114 Enabling Disabling the Guide Message 114 Turning On Off the LED Illumination 115 Setting up the Remote Control 115 Setting up the Digital Video Input Signal 116 Setting a Password 116 Registering a Password 117 Resetting to the Default Setting 117 Resetting the Lamp Counter 118 Maintenance 120 Cleaning the Projector 120 Cleaning and Replacing the Air Filter 121 Replacing the Lamp 12...

Страница 7: ...tions shown in the Troubleshooting section at the end of this booklet If the problem still persists contact the service center or the dealer where you purchased the projector CAUTION TO REDUCE THE RISK OF ELECTRIC SHOCK DO NOT REMOVE COVER OR BACK THERE ARE NO USER SERVICEABLE PARTS INSIDE EXCEPT LAMPS REFER SERVICING TO QUALIFIED SERVICE PERSONNEL THIS SYMBOL INDICATES THAT DANGEROUS VOLTAGE CONS...

Страница 8: ...r appropriate space above beside and behind of the projector cabinet for allowing air circulation and cooling of the projector Minimum clearances must be maintained If the projector is to be built into a compartment or similarly space the minimum distances must be maintained Do not cover the ventilation slot on the projector Heat build up can reduce the service life of your projector and can also ...

Страница 9: ... an unstable cart stand or table The projector may fall causing serious injury to a child or adult and serious damage to the projector Use only with a cart or stand recommended by the manufacturer or sold with the projector Wall or shelf mounting should be carried out in accordance with the manufacturer s directions and should use a mounting kit approved by the manufacturers An appliance and cart ...

Страница 10: ...wall outlet and refer servicing to qualified service personnel under the following conditions a When the power cord or plug is damaged or frayed b If liquid has been spilled into the projector c If the projector has been exposed to rain or water d If the projector does not operate normally after following the operating instructions Adjust only those controls that are covered in the operating instr...

Страница 11: ...he Battery Directive 2006 66 EC and or your national laws implementing those Directives If a chemical symbol is printed beneath the symbol shown above in accordance with the Battery Directive this indicates that a heavy metal Hg Mercury Cd Cadmium Pb Lead is present in this battery or accumulator at a concentration above an applicable threshold specified in the Battery Directive This product shoul...

Страница 12: ... interference to radio or television reception which can be determined by turning the equipment off and on the user is encouraged to try to correct the interference by one or more of the following measures z Reorient or relocate the receiving antenna z Increase the separation between the equipment and receiver z Connect the equipment into an outlet on a circuit different from that to which the rec...

Страница 13: ...age of the battery fluid z Remove the batteries when they have been exhausted or not in use for an extended period of time z Be sure to replace both batteries at the same time Do not mix batteries of different types z Insert batteries correctly according to the and markings z If a fluid from a battery leaks and comes in contact with your skin rinse the affected skin thoroughly as soon as possible ...

Страница 14: ...ed if you put it in the bag without replacing the adjustable foot z The carrying bag is not designed to protect the projector from external shocks When carrying the projector with it put in the carrying bag do not give a shock to it drop it or place anything on it The projector may be damaged or malfunctioned z Do not transport the projector through a courier or transport service with the carrying...

Страница 15: ...ything near the exhaust vent that may deform or deteriorate due to heat z Do not install the projector in a humid or dusty location or a position where there is a lot of oily or cigarette smoke Optical parts such as a lens and mirror may be stained resulting in poor picture quality z Do not place it near an exhaust outlet of air conditioning equipment Otherwise it may be damaged If the projector i...

Страница 16: ...placed 3 m 9 8 to 4 9 m 16 0 away Auto Setup Function for Easy Installation The Auto Setup Function allows you to install the projector easily by automatically adjust ing focus and keystone distortion Adobe RGB Color Space Compatibility SX7 II AdobeRGB color space compatibility achieves faithful color reproduction Home Cinema Mode Reproducing the Atmosphere of a Movie Theater SX60 You can reproduc...

Страница 17: ...r can be operated using buttons on the remote control or the top control on the main unit The remote control allows you to operate all functions of the projector In this manual the button operation is shown as below Symbols Used in This Manual Meanings of the following symbols used in this manual are as follows SX7 II Function or description only applicable to SX7 MarkII A precaution about operati...

Страница 18: ...ows Vista and Windows 7 are registered trade marks or trademarks of Microsoft Corporation in the United States and or other coun tries z Macintosh and Mac are registered trademarks of Apple Computer Inc registered in the United States and or other countries z Adobe is a registered trademark or trademark of Adobe Systems Incorporated in the U S and other countries z The HD ready logo is a trademark...

Страница 19: ...ore Use Setting Up the Projector Projecting an Image from the Computer Projecting an Image from AV Equipment Useful Functions Available During a Presentation Setting Up Functions from Menus Maintenance Troubleshooting Appendix Index BEFORE USE ...

Страница 20: ...emote control z Computer connection cable DVI Mini D sub 15 pin 1 8m 5 9 YH7 2052 z Power cord 1 8m 5 9 z USB cable 1 8m 5 9 YH7 2054 z Component cable RCA Mini D sub 15 pin 0 4m 1 3 YH7 2084 z Carrying bag z Lens cap z User s Manual CD ROM z Warranty card z Important Information and Quick Start Guide z Lens cap strap For the U S A and Canada For Continental Europe ...

Страница 21: ...signed to protect the projector from external shocks z Wait until the cooling fan stops before putting the projector in the carrying bag Do not put the projector in the carrying bag until the cooling fan stops rotating The projector may be damaged due to the heat z Attach the lens cap to the lens to protect it and put the projector in the carrying bag Replace the adjustable foot to prevent the dam...

Страница 22: ...he market can be connected Do not place any obstacle between the projector and the screen as the auto focusing function may fail to operate cor rectly Be sure to remove the lens cap during projection Failure to do so will result in cap deformation or fire hazards Caution Caution Adjustable Foot Lock Button P43 Top Control P24 25 28 Exhaust Vent Speaker Infrared Remote Receiver P29 Do not block the...

Страница 23: ...rojector on the Ceiling You can mount the projector on the ceiling You need an optional ceiling mount hanger part number RS CL07 and an optional ceiling mount pipe part number RS CL08 or RS CL09 when appropriate Contact the dealer where you purchased the projector for more detailed information z Make sure to use the optional ceiling mounting bracket z You should never install the ceiling mounting ...

Страница 24: ...auto adjustment on focus ing keystone distortion screen color correction and so on Auto Setup Function 4 IMAGE button P55 Switches among image modes image qualities 5 INPUT button P48 50 70 Switches among input signals 6 AUTO PC button P54 Adjusts tracking and so on automati cally in accordance with signal from a computer when ANALOG PC 1 or ANALOG PC 2 is selected 7 FOCUS button P51 Adjusts focus...

Страница 25: ...r keyboard under the USB connection Pressing scrolls to the previous page and pressing scrolls to the next page 14 D ZOOM button P81 Zooms the image in or out digitally Pressing enlarges the image and pressing reduces the image 15 SPOT button P83 Performs the spot light function 16 R CLICK button P82 Acts as the right button of a mouse under the USB connection 17 NO SHOW button P78 Switch display ...

Страница 26: ...26 BEFORE USE Input Terminals on Main Unit SX7 MarkII X700 SX60 1 2 3 7 6 5 4 8 9 10 10 1 2 3 7 6 5 8 9 10 10 ...

Страница 27: ...IGITAL PC ANALOG PC 1 ANALOG PC 2 and S VIDEO or VIDEO from the left The internal speaker outputs the audio signal corresponding to the selected image signal SX60 The input terminal of an audio signal The internal speaker outputs the audio signal no matter what the image signal is inputted 6 VIDEO IN terminal P66 Receives a composite video signal from an AV equipment 7 S VIDEO IN terminal P66 Rece...

Страница 28: ...urned on Blink between red and green The projector is under the power management mode 2 WARNING lamp P126 Flashes red when a problem has been detected on the projector 3 LED illumination lamp P115 Indicate the projector status with 3 blue LEDs Blinking from the left The projector is being turning on Blinking from the right The projector is being turned off Middle LED flashing slowly The image is b...

Страница 29: ...ns are inoperative when you attempt to operate the projector replace with new batteries z It is recommended to check the batteries before a presentation The remote control may be inoperative if z There is an obstacle between the remote control and main unit z The infrared remote receiver on the main unit is exposed to direct sunlight or strong light of lighting equipment z The remote control uses ...

Страница 30: ......

Страница 31: ... Setting Up the Projector Projecting an Image from the Computer Projecting an Image from AV Equipment Useful Functions Available During a Presentation Setting Up Functions from Menus Maintenance Troubleshooting Appendix Index SETTING UP THE PROJECTOR ...

Страница 32: ...lect the appropriate setting for Screen aspect with respect to the your screen 4 3 or 16 9 Refer to pages 59 74 and 101 for more detailed information on Screen aspect Screen size W x H cm 40 81 x 61 60 122 x 91 80 163 x 122 100 203 x 152 150 305 x 229 182 370 x 277 200 406 x 305 250 508 x 381 300 610 x 457 Projection distance Zoom max 1 2 m 3 9 1 8 m 5 9 2 4 m 7 9 3 0 m 9 8 4 5 m 14 8 5 4 m 17 7 5...

Страница 33: ...from any obstacle that may block the exhaust vent fan on the right side of the projector and the air intake vent on the bot tom of the projector z The screen must not be exposed to direct sunlight or light from lighting equipment In a bright room it is recommended to limit ambient lighting in order to improve the image quality Screen Optical axis Ceiling Mounting or Rear Projection You can mount t...

Страница 34: ......

Страница 35: ...g Up the Projector Projecting an Image from the Computer Projecting an Image from AV Equipment Useful Functions Available During a Presentation Setting Up Functions from Menus Maintenance Troubleshooting Appendix Index PROJECTING AN IMAGE FROM THE COMPUTER ...

Страница 36: ...omputer connection cable Input Signal Select ANALOG PC 1 P48 Computer Projector VGA cable To monitor output terminal mini D sub 15 pin terminal Input Terminal 2 ANALOG IN 2 Commercial VGA cable Input Signal Select ANALOG PC 2 P50 Computer Projector z To ensure projection of high resolution high quality images it is recommended to use high performance cables z An adapter may be required depending o...

Страница 37: ...e remote control as the computer mouse An image can not be projected simply by connecting the USB cable DVI cable Computer Projector To monitor output terminal DVI terminal Input Terminal 1 DIGITAL IN Optional DVI digital cable LV CA29 Input Signal Select DIGITAL PC P48 5 BNC cable Computer Projector To monitor output terminal 5 BNC output terminal Input Terminal 2 ANALOG IN 2 Commercial 5 BNC cab...

Страница 38: ...nal Image input terminal mini D sub 15 pin terminal Commercial VGA cable External monitor Projector z The speaker outputs the audio signal corresponding to the selected image signal z Use an audio cable without a built in resistor Using an audio cable with a built in resistor turns down the sound z Connect the audio cable between the AUDIO OUT terminal and an external audio visual equipment if you...

Страница 39: ... z Use an audio cable without a built in resistor Using an audio cable with a built in resistor turns down the sound z The built in speaker is monaural z The speaker plays the sound from the equipment which the audio cable is connected to regardless of the image input signal Audio cable AUDIO OUT terminal AUDIO IN terminal Commercial Audio cable Computer Projector SX60 ...

Страница 40: ...urned on for a while Wait until the lamp is cooled down and the POWER indicator lights in red Caution Connect the Ground Terminal Connect the ground terminal on the power plug to ground Otherwise the operating computer may suffer electromagnetic radiation problems and poor reception by TV and radio Unplug the Power Cord When the Projector is Not in Use The projector constantly consumes approximate...

Страница 41: ...he power cord without pressing the POWER button direct power on P112 z You can display a specified Logo on the countdown screen P100 z You can specify whether to enable or disable the LED illumination lamp P115 z You can skip the countdown window P100 Selecting a Language A window appears when the projector is turned on for the first time You can select a language to be used by the projector for d...

Страница 42: ...he ZOOM button The Zoom adjustment window appears 2 Adjust the image size 3 Press the OK button z Change the projector installation position if your desired image size is too large or too small to adjust with the zoom function P32 Zoom in Press for rough adjustment Press for fine adjustment Zoom out Press for rough adjustment Press for fine adjustment ...

Страница 43: ...fixed z With the adjustable foot the projection angle can be adjusted up to 10 degrees z If the projector is tilting in the lateral direction use the rear adjustable feet on both sides to adjust its angle You can adjust up to 10mm with one foot If Keystone Distortion is Too Large Extending the adjustable foot too far causes keystone distortion If the distortion is too large adjust the height of th...

Страница 44: ...ot available select the highest resolution under 1400 x 1050 under 1024 x 768 for X700 3 Click the OK button Windows Vista 1 Open the Control Panel from the start menu then select Appearance and Per sonalization Adjust screen resolution in the Control Panel Home 2 Select 1400 x 1050 pixels 1024 x 768 pix els for X700 or a resolution closest to the output signal resolution of the computer 3 Click t...

Страница 45: ... the Image from the Notebook Computer You can turn on the external monitor output via keyboard operation To turn on the external monitor output press an icon for an external monitor or a function key F1 to F12 while holding Fn key down For SX7 MarkII SX60 z If the display resolution of the computer is set to SXGA 1280 by 1024 dots or WXGA 1280 by 768 dots it is recommended to select True size as t...

Страница 46: ...correction white balance adjustment automati cally This is not enabled at the factory z Among 4 functions above the function that has been enabled in the menu is performed during the auto setup Auto focus Auto keystone and Auto input are enabled in the fac tory z You can manually set or adjust each function You can set or adjust a specific function inde pendently if you press the AUTO SET button d...

Страница 47: ...s the AUTO SET button The Auto setup window appears 3 Press the AUTO SET button again One or more functions highlighted in black are performed automatically z You can perform this step by selecting OK with the button and then pressing the OK button ...

Страница 48: ...g the connection to the computer or so Selecting ANALOG PC 1 or DIGITAL PC 1 Press the INPUT button The INPUT window appears 2 Select ANALOG PC 1 or DIGITAL PC in the menu with the INPUT button The selection is toggled through available input signal types from above z An LED for a terminal flashes in green if a cable is connected and an input signal is con firmed An LED for a terminal turns on if ...

Страница 49: ...IMAGE FROM THE COMPUTER 3 If the target input signal is unavailable from the list at the left press the button and then press the button to select the target input signal from the list at the right 4 Press the OK button ...

Страница 50: ... the INPUT button The selection is toggled through available input signals from above 3 If the ANALOG PC 2 is unavailable from the list at the left press and then press to select the ANALOG PC 2 from the list at the right 4 Press the OK button z Select ANALOG PC 2 for Input Terminal 2 z You can select any input signal type from all options through the button ...

Страница 51: ... appears 2 Press the POINTER buttons to adjust the focus 3 Press the OK button z You can activate the Auto focus function if you press the AUTO SET button now However if you select 16 9 D image shift for Screen aspect the auto focus function will be disabled z The projected image may be out of focus if the projection distance is beyond the range of 1 2 m 3 9 to 9 m 29 5 Move the projector installa...

Страница 52: ...opriately or you want to adjust the keystone distortion in a horizontal direction 1 Press the KEYSTONE button The Keystone adjustment windows appears 2 Press the POINTER buttons to adjust the focus z You can activate the Auto keystone function if you press the AUTO SET button now To reduce the length of the upper edge press To reduce the length of the lower edge press To reduce the length of the l...

Страница 53: ... horizontally within the range of 20 degrees The amount of adjustment may be less than 20 degrees depending on the combination of the amount of optical zooming input signal type and adjustment direction vertical or horizon tal z If the keystone distortion is too large to adjust move the projector installation position P32 z To reset the keystone adjustment to 0 press the KEYSTONE button again to d...

Страница 54: ...G PC 1 or ANALOG PC 2 1 Press the AUTO PC button The auto PC adjustment function is activated and the projected image is optimized z For some computers the auto PC adjustment function does not optimize the projected image If such is the case you need to make settings input signal select total dots track ing horizontal vertical positions horizontal vertical pixels etc for the input signal P91 93 95...

Страница 55: ...er in a dim room Photo 2 If you select Photo for Image mode make sure to set Ambient light in the Image adjustment as well You can correct an image according to the ambient light based on sRGB in Image mode and project the image with higher tone on the screen by setting Ambient light It is suited to project an ornamental photo etc under an ambient light AdobeRGB Select this if you want to project ...

Страница 56: ... or dark Contrast Adjust this to decrease or increase contrast of the entire image Sharpness Adjust this to soften or sharpen an image Gamma Adjust this when light or dark portions of an image are obscure Color adjustment Adjust this to adjust the color level and balance Advanced adjustment Adjust this when color tones are different from those of the original image z The results of adjustments are...

Страница 57: ... com pressed vertically or horizontally Select this mode under normal conditions Full screen will be disappeared from the menu screen if you select 16 9 or 16 9 D image shift for Screen aspect 4 3 Select this to display a computer screen with aspect ratio of 4 3 on the 16 9 screen if you have selected 16 9 D image shift for Screen aspect Auto Select this to project a wide screen or computer screen...

Страница 58: ... clear image can be obtained because of no image pro cessing z If the display resolution of the computer is higher than 1400 by 1050 dots 1024 by 768 dots for X700 select a lower resolution before starting projection z The upper lower left and or right portions of a projected image may be missing depending on the Aspect setting ...

Страница 59: ... image 1 Press the KEYSTONE button on the top control or remote control to open the D image shift adjustment screen 2 Press on the top control or remote control to adjust its vertical position 3 Press the OK button Select 4 3 from the Aspect menu if you want to project a video image with aspect ratio of 4 3 in this mode P57 z Wide is automatically selected for Aspect z Auto screen color may not co...

Страница 60: ...the AC outlet It continues to cool down the lamp even after removing the power cord z You may shorten the lamp life if turning off the projector while its lamp is still in an unstable state shortly after turning on the projector Wait at least 5 minutes before turning off the pro jector z Wait at least 5 minutes before turning on the projector when you turn off the projector It may shorten the lamp...

Страница 61: ...utted or any button on the top control or remote control is pressed Exit mode Select this mode to turn off the projector automatically In the exit mode the lamp is turned off and cooled down When the lamp has been cooled down the POWER indicator stops flashing in red and stays on and the power is turned off z Wait until the cooling fan stops before putting the projector in the carrying bag Do not ...

Страница 62: ......

Страница 63: ...g Up the Projector Projecting an Image from the Computer Projecting an Image from AV Equipment Useful Functions Available During a Presentation Setting Up Functions from Menus Maintenance Troubleshooting Appendix Index PROJECTING AN IMAGE FROM AV EQUIPMENT ...

Страница 64: ...Mini D sub 15 pin Please purchase either of the following cables according to the type of the terminal on the AV equipment z RCA terminal RCA x 3 RCA x 3 cable z D terminal D terminal RCA x 3 cable Supplied component cable Video output terminal INPUT Signal COMPONENT is selected automatically AV equipment Projector RCA component terminal D terminal Commercial component cable RCA x 3 Commercial com...

Страница 65: ...Digital video output terminal INPUT Signal Select DIGITAL VIDEO P71 AV equipment Projector HDMI terminal DVI terminal Input Terminal 1 DIGITAL IN Commercial HDMI adapter cable Commercial DVI cable z Set the input signal as COMPONENT by referring to Projecting an Image from the Com puter and 5 BNC cable if you want to connect the projector to an AV equipment using a 5 BNC extension cable via an vid...

Страница 66: ... VIDEO video cable S VIDEO output terminal S VIDEO OUT terminal SX7 MarkII X700 SX60 INPUT Signal VIDEO is selected automati cally AV equipment Projector Video input terminal VIDEO IN Commercial Video cable Video output terminal VIDEO OUT terminal Video cable SX60 SX7 MarkII X700 z Connect an audio cable if you want to use the projector s speaker SX7 II X700 P67 SX60 P39 ...

Страница 67: ...z Connect the audio cable between the AUDIO OUT terminal and an external audio visual equipment if you want to output the audio signal to the audio visual equipment P68 z The built in speaker is monaural Audio cable AV equipment Projector Commercial audio cable AUDIO OUT terminal RCA terminal Stereo mini jack Stereo mini jack RCA Stereo mini jack Audio input terminal AUDIO IN for DEGITAL IN ANALOG...

Страница 68: ...k Stereo mini jack Projector The audio visual equipment outputs the audio signal corresponding to the selected image signal SX7 MarkII X700 z Use an audio cable without a built in resistor Using an audio cable with a built in resistor turns down the sound z You can adjust the volume level of the audio signal to the audio visual equipment with the remote controller or the buttons on the top control...

Страница 69: ...p or the focus adjustment if you can not read the message due to out of focus P46 51 2 Prepare the AV equipment z Turn on the AV equipment and start playing the video image 3 Press the button to switch the input signal P70 z Select DIGITAL VIDEO as the input signal 4 Press the button twice P70 z Adjust the input signal focusing keystone distortion and so on automatically using the auto setup funct...

Страница 70: ...ck are performed automatically Selecting an Input Signal Select DIGITAL VIDEO among the following input signals by following the steps shown in the Selecting DIGITAL VIDEO section below if you want to project a digital content video image DIGITAL VIDEO Digital signal Connecting with an HDMI DVI cable or DVI digital cable COMPONENT Component signal Connecting with a supplied component cable SCART S...

Страница 71: ...p item in the menu with the INPUT button The selection is toggled through available input signal types from above 3 If DIGITAL VIDEO is unavailable from the list at the left press and then press to select it from the list at the right 4 Press the OK button z You can select any input signal type from all options through the button ...

Страница 72: ...u with the INPUT button The selection is toggled through available input signals from above 3 If the SCART is unavailable from the list at the left press and then press to select the SCART from the list at the right 4 Press the OK button z Select SCART for Input Terminal 2 z You can select any input signal type from all options through the button ...

Страница 73: ...io of 4 3 Full screen will be disappeared from the menu screen if you select 16 9 or 16 9 D image shift for Screen aspect 4 3 Select this to project a screen with aspect ratio of 4 3 on the 16 9 screen if you have selected 16 9 or 16 9 D image shift for Screen aspect Wide Select this to project a video image with aspect ratio of 16 9 Auto DIGITAL VIDEO COMPONENT Select this to switch between Full ...

Страница 74: ...le Aspect mode for each input signal 16 9 Select this when you use a screen with aspect ratio of 16 9 Select 4 3 from the Aspect menu if you want to project a video image with aspect ratio of 4 3 in this mode P73 The following table shows the available Aspect mode for each input signal Input signal Available Aspect mode VIDEO S VIDEO SCART Full screen Wide COMPONENT DIGITAL VIDEO Full screen Auto ...

Страница 75: ...Select 4 3 from the Aspect menu if you want to project a video image with aspect ratio of 4 3 in this mode P73 Input signal Available Aspect mode VIDEO S VIDEO SCART 4 3 Wide COMPONENT 480i 575i 480p 575p DIGITAL VIDEO 480p 575p 4 3 Wide COMPONENT 720p 1035i 1080i DIGITAL VIDEO 720p 1080i Wide z Keystone adjustment will be disabled Project the image at right angle to the screen z Auto focus Auto k...

Страница 76: ......

Страница 77: ...the Projector Projecting an Image from the Computer Projecting an Image from AV Equipment Useful Functions Available During a Presentation Setting Up Functions from Menus Maintenance Troubleshooting Appendix Index USEFUL FUNCTIONS AVAILABLE DURING A PRESENTATION ...

Страница 78: ...g image Freezing an Image The FREEZE message is shown on the screen Canceling the FREEZE function Press the button again to cancel the FREEZE function z You can capture a specified logo SX60 X700 P98 z You can show a logo such as a com pany logo while blackening out the image SX60 X700 P100 z The middle LED illumination lamp on the top control flash slowly while blackening out the image z A guidin...

Страница 79: ...ls the MUTE function Adjusting the Volume X Useful when X You want to adjust the volume level of the projectors speaker Adjusting the Volume Volume bar appears on the screen z For SX7 MarkII X700 you can also mute the audio with the same opera tion when you output the audio to the external audio visual equipment z Adjust the volume or mute setting on the computer if the volume level is too low z F...

Страница 80: ... Canceling the Countdown Press the button again to disappear the timer Page Up or Down through the Pages X Useful when X You want to page up or down through the projected application pages with the remote control You can page up or down in the projected application with the supplied remote con trol Page Up Page Down z This function is available only if the projector and the computer are con nected...

Страница 81: ... you want to zoom in stays out of the screen or out of the center of the screen you can move it to the desired position Zooming Out an Image Press this button repeatedly until the image becomes the desired size You can restore the original size of the image by pressing the OK button z The magnification appears on the screen when you press the D ZOOM button z The zoom ratio is 1x to 12x z You can f...

Страница 82: ...mputer and pro jector are turned off and then connect the supplied USB cable between the USB ter minals on the computer and the projector Moving the Cursor You can move the mouse cursor vertically and horizontally Using the Left Button of the Mouse You can click double click or drag an object with this button Using the Right Button of the Mouse USB terminal USB cable Computer Projector USB termina...

Страница 83: ...d image with a spotlight Showing the Spotlight A spotlight appears at the center of the screen and the image becomes dark except for the spotlight Press the button repeatedly to change the shape of the spotlight Moving the Spotlight Move the spotlight to a desired position No mark z If you select 16 9 D image shift for Screen aspect the SPOT function will be disabled z Press the OK button to cance...

Страница 84: ......

Страница 85: ...ting Up the Projector Projecting an Image from the Computer Projecting an Image from AV Equipment Useful Functions Available During a Presentation Setting Up Functions from Menus Maintenance Troubleshooting Appendix Index SETTING UP FUNCTIONS FROM MENUS ...

Страница 86: ...regardless of the input signal Image adjustment menu P102 This menu is used to make various adjustments to the projected image You can make the adjustments according to your preference while checking the image Symbols Indicating Item Categories Menu items are classified into two categories menu items used to project the image from the computer and menu items used to project the image from the AV e...

Страница 87: ...to select the appropriate tab Press to move the cursor on the tab if it is not on it 3 Press to select a menu item you want to set Continue to the next page z Press the MENU button again to close the menu window z Some menu items provide more detailed menu items Display settings tab System settings tab Image adjustment tab Image adj Menu items ...

Страница 88: ...n z Directly Example Tracking Press to increase decrease the setting z From a list Example Aspect Press the OK button to display a list Press to select a desired setting z With a slider Example Contrast Press to move the slider z In a different screen Example Menu position Press the OK button to display a dif ferent screen Then follow the instruc tion on the screen SX7 MarkII ...

Страница 89: ...89 SETTING UP FUNCTIONS FROM MENUS 5 Press the OK button In some menu items the setting is enabled just by making a selection 6 Press the MENU button when you finish The menu disappears ...

Страница 90: ...atio unchanged Projects a computer screen at 16 9 aspect ratio with its width matching to the width of the projecting area Projects a computer screen in its original size no enlargement reduc tion z Each item may become unavailable depending on the setting of the input signal or other menu items DIGITAL PC ANALOG PC Full screen 4 3 Auto Wide True size Display settings Aspect Switches among Full sc...

Страница 91: ... input signal type suitable for the com puter from the displayed signal types Press the MENU button when you finish Display settings Aspect Projects a normal image with aspect ratio of 4 3 on the screen with aspect ratio of 4 3 Projects an image with aspect ratio of 4 3 within the screen with aspect ratio of 16 9 Projects a video image with aspect ratio of 16 9 z Each item may become unavailable d...

Страница 92: ...t signal automati cally Select one of input signal types shown on the left if video image is not projected correctly in the Auto mode z Confirm the input signal type accord ing to the User s Manual that came with the AV equipment connected VIDEO S VIDEO Auto NTSC PAL SECAM NTSC4 43 PAL M PAL N Display settings Input signal select Selects the component format auto matically according to the input s...

Страница 93: ... image flickers or distorts T T T Press the MENU button when you finish Display settings Input signal settings Total dots Increases the total number of dots Decreases the total number of dots z Perform this adjustment if the auto PC adjustment function cannot adjust the project image correctly z The setting is recorded for ANALOG PC 1 and ANALOG PC 2 sepa rately ANALOG PC Display settings Input si...

Страница 94: ... Press the MENU button when you finish Display settings Input signal settings Horizontal position Moves the screen to the right Moves the screen to the left z Perform this adjustment if the auto PC adjustment function cannot adjust the project image correctly z The setting is recorded for ANALOG PC 1 and ANALOG PC 2 sepa rately ANALOG PC Display settings Input signal settings Vertical position Mov...

Страница 95: ... button when you finish Display settings Input signal settings Horizontal pixels Increases the number of pixels in the horizontal direction Decreases the number of pixels in the horizontal direction z Perform this adjustment if the auto PC adjustment function cannot adjust the project image correctly z The setting is recorded for ANALOG PC 1 and ANALOG PC 2 sepa rately ANALOG PC Display settings I...

Страница 96: ...s Progressive Does not perform the progressive processing Performs the progressive process ing Performs the appropriate progres sive processing depending on the input signal z You can use this function if the input signal is VIDEO S VIDEO or the com ponent signal is 575i or 480i You cannot use this function if the component signal is 1080i 1035i 720p 575p or 480p z This setting is saved for the cu...

Страница 97: ...mage is inverted in both vertical and hori zontal directions Select this if you project an image from behind the screen The pro jected image is inverted in the hori zontal direction Select this if you project an image from behind the screen with the pro jector hung from the ceiling The projected image is inverted in the vertical direction DIGITAL PC ANALOG PC DIGITAL VIDEO COMP SCART VIDEO S VIDEO...

Страница 98: ...is displayed Use this function if the Greenboard setting is inade quate If you manually adjust it press or button to select red green or blue Increases the color tone of each color Decreases the color tone of each color z If you select 16 9 D image shift for Screen aspect the auto screen color correction function will be disabled DIGITAL PC ANALOG PC DIGITAL VIDEO COMP SCART VIDEO S VIDEO Normal G...

Страница 99: ...press the MENU button Display settings User screen settings Logo position Select a position you want to dis play a logo and press the OK but ton z You cannot select Logo position if you have not captured a logo on the Logo capture screen DIGITAL PC ANALOG PC DIGITAL VIDEO COMP SCART VIDEO S VIDEO Upper L Upper R Center Lower L Lower R Display settings User screen settings No signal screen Displays...

Страница 100: ...ENU button Display settings User screen settings NO SHOW Displays no logo black screen Displays no logo blue background Displays a logo captured on the Logo capture screen SX60 X700 z You cannot select User logo if you have not captured a logo on the Logo capture screen SX60 X700 DIGITAL PC ANALOG PC DIGITAL VIDEO COMP SCART VIDEO S VIDEO SX60 X700 Black Blue User logo Display settings User screen...

Страница 101: ...his when you use a screen with aspect ratio of 16 9 and you want to move the projecting position vertically z If you select 16 9 or 16 9 D image shift Wide will be selected for Aspect If you want to project an image with aspect ratio of 4 3 when selecting 16 9 D image shift select 4 3 for Aspect z If you select 16 9 D image shift the keystone adjustment will be reset z An item may become unavailab...

Страница 102: ...ct an image according to the ambient light based on sRGB in Image mode and project the image with higher tone on the screen by setting Ambient light It is suited to project an ornamental photo etc under an ambient light DIGITAL PC ANALOG PC DIGITAL VIDEO COMP SCART VIDEO S VIDEO SX7 MarkII Standard Presentation Movie Photo Select this to project a movie with quality suited to seriously enjoy the a...

Страница 103: ...e image T T Press the MENU button when you finish Image adjustment Brightness Increases the brightness of an image Decreases the brightness of an image z This setting is saved for the currently selected input signal and image mode DIGITAL PC ANALOG PC DIGITAL VIDEO COMP SCART VIDEO S VIDEO SX7 MarkII Image adjustment Contrast Increases the contrast of an image The image becomes more vivid Decrease...

Страница 104: ...you finish Image adjustment Sharpness Increases the sharpness of an image Decreases the sharpness of an image z This setting is saved for the currently selected input signal and image mode DIGITAL PC ANALOG PC DIGITAL VIDEO COMP SCART VIDEO S VIDEO SX7 MarkII Image adjustment Gamma Makes dark and obscure portions of an image visible Makes light and obscure portions of an image visible z This setti...

Страница 105: ...m color Adjusts the intensity of each color Increases the color intensity Decreases the color intensity Adjusts the color reproducibility of dark portions of each color Increases the color reproducibil ity of color Decreases the color reproduc ibility of color z This setting is saved for the currently selected input signal and image mode z If you change R G B Gain or Offset once color temperature ...

Страница 106: ...creases the intensity of color Adjusts the color balance of a red dish or greenish image Corrects a reddish image Corrects a greenish image Refer to Making Color Adjustment 1 Refer to Making Color Adjustment 1 z You cannot make color adjustment if the video format is PAL PAL M PAL N or SECAM z This setting is saved for the currently selected input signal and image mode COMP VIDEO S VIDEO SX60 X700...

Страница 107: ...een if you select Adjust Press to select the Hue or Saturation slider and press to make an adjust ment Press the MENU button when you finish Image adjustment Advanced adjustment Mem color correct Disables the memorized color cor rection function Specifies the intensity of the memo rized color correction in three steps z This setting is saved for the currently selected input signal and image mode D...

Страница 108: ...pe and level brightness of the ambient light Select this if the ambient light source is a light bulb or bulb color fluorescent Select this if the ambient light source is a day white fluorescent Select this if the ambient light source is a daylight fluorescent DIGITAL PC ANALOG PC Off Adjust Type Tungsten Fluorescent Fluorescent H Select this if the ambient light is dark Select this if the ambient ...

Страница 109: ...utton to confirm and then press the MENU button Image adjustment Lamp mode Projects an image at the normal brightness level Reduces the lamp brightness and the fan noise z You can reduce the power consump tion of the lamp if you select in the quiet mode z This setting is saved for the currently selected input signal and image mode DIGITAL PC ANALOG PC DIGITAL VIDEO COMP SCART VIDEO S VIDEO SX7 Mar...

Страница 110: ...f the image set tings z The projector stores the image set tings for each input signal 8 and image mode up to 5 separately If you select OK the settings saved for the currently selected set of the input signal and image mode are reset DIGITAL PC ANALOG PC DIGITAL VIDEO COMP SCART VIDEO S VIDEO OK Cancel Performing Color adjustment or Advanced adjustment A check mark appears on the Image Adjustment...

Страница 111: ...functions are enabled disabled P46 70 z You can manually adjust each item Auto focus FOCUS button P51 Auto keystone KEYSTONE button P52 Auto input INPUT button P48 71 Auto screen color Menu function P98 z If you select 16 9 D image shift for Screen aspect you cannot change the setting of each item The auto setup function will also be disabled DIGITAL PC ANALOG PC DIGITAL VIDEO COMP SCART VIDEO S V...

Страница 112: ... func tion Enables the direct power on func tion z Wait at least 5 minutes before turning on the projector when you turn off the projector with the direct power on function It may shorten the lamp life if you turn on the projector immediately after turning it off z Set the previous Power management mode to Standby or Exit in addi tion to this setting if you want to enable the direct power on funct...

Страница 113: ...the OK button and all words in the menu will be displayed in the selected language Press the MENU button when you finish System settings Language English Germany French Italian Spanish Portuguese Swedish Russian Dutch Finnish Norwegian Turkish Polish Hungarian Czech Danish DIGITAL PC ANALOG PC DIGITAL VIDEO COMP SCART VIDEO S VIDEO Simplified Chinese Traditional Chinese Korean Japanese ...

Страница 114: ...moment when the OK button is pressed after selecting Main unit or Remote control Be sure to press the OK button on the top con trol or remote control which is not locked z To unlock the key lock function forc ibly remove the power plug from the AC outlet after the projection and then insert the power plug while hold ing down the OK button until the pro jector beeps DIGITAL PC ANALOG PC DIGITAL VID...

Страница 115: ...conds while holding down the OK button on the remote control The above operation toggles the channel between Ch1 the button flashes once and Ch2 the button flashes twice System settings LED illumination Turns off all LEDs Turns on LEDs as necessary z This setting does not effect the POWER indicator or WARNING lamp DIGITAL PC ANALOG PC DIGITAL VIDEO COMP SCART VIDEO S VIDEO Off On System settings O...

Страница 116: ... Projects a limited range digital sig nal z Refer to the User s Manual that came with the AV equipment for more detailed information on settings DIGITAL VIDEO F L System settings Other settings Password settings Disables the password protection Enable the password protection z Once you set a password the pass word entry screen appears at power on Enter a 4 digit password with and If the password i...

Страница 117: ...confirm and then press the MENU button System settings Other settings Register password z Press the MENU button without entering a password if you want to cancel registering the password DIGITAL PC ANALOG PC DIGITAL VIDEO COMP SCART VIDEO S VIDEO System settings Other settings Factory defaults Resets the projector s menu item settings Cancels resetting the menu item settings z All adjustments are ...

Страница 118: ...500 hours z If the time of use is SX7 MarkII X700 2000 hours or more SX60 2500 hours or more z If you replace the lamp Press the OK button to confirm and then press the MENU button System settings Other settings Lamp counter z Do not reset the lamp counter except when you have replaced the lamp Otherwise the lamp counter cannot indicate the correct timing for replac ing the lamp DIGITAL PC ANALOG ...

Страница 119: ...re Use Setting Up the Projector Projecting an Image from the Computer Projecting an Image from AV Equipment Useful Functions Available During a Presentation Setting Up Functions from Menus Maintenance Troubleshooting Appendix Index MAINTENANCE ...

Страница 120: ...ntil the pro jector cools down sufficiently more than 1 hour before cleaning the projector Other wise you may get burned or injured z Before cleaning the projector be sure to remove the power plug from the AC outlet Otherwise electric shock or fire may result Caution z Never use volatile cleaning liquid or benzine as these may damage the finish of the projector When using a chemical dust cloth mak...

Страница 121: ... of the arrow 3 Remove the air filter 4 Install a new air filter 5 Install the filter cover securely without any space Caution z The main unit is very hot immediately after turning off the projector Wait until the pro jector cools down sufficiently more than 1 hour before cleaning the projector Other wise you may get burned or injured z Before cleaning or replacing the air filter be sure to remove...

Страница 122: ... lamp in Lamp counter in the System settings menu P118 Caution z When replacing the lamp turn off the projector wait until the cooling fan stops remove the power plug from the AC outlet and let the projector stand for at least 1 hour Otherwise you may get burned because the main unit is very hot immediately after the projector is turned off z Do not touch the inner glass surface when you replace t...

Страница 123: ...p cover 3 Loosen two screws pull up the handle and then remove the lamp 4 Fully insert a new lamp and secure it with two screws After the installation be sure to push down the handle 5 Replace the lamp cover and tighten the screw 6 Turn on the projector 7 Bring up the menu and select System set tings Other settings Lamp counter P118 8 Select Reset OK to reset the lamp counter Lamp cover Screw Scre...

Страница 124: ......

Страница 125: ... Use Setting Up the Projector Projecting an Image from the Computer Projecting an Image from AV Equipment Useful Functions Available During a Presentation Setting Up Functions from Menus Maintenance Troubleshooting Appendix Index TROUBLE SHOOTING ...

Страница 126: ... Replace the lamp with a new one If the same warning is experienced again the lamp drive circuit may be defective Contact your dealer Three flashes Faulty lamp cover The lamp cover is open Unplug the projector from the power outlet then install the lamp cover and turn on the projector again If the lamp cover has been installed properly the lamp cover detection switch may be defective Contact your ...

Страница 127: ...r the exhaust vent is blocked and the internal temperature of the projec tor is increased You cannot release the safety device for safety reasons Con tact your dealer Cause Countermeasure Any connection cable is connected incorrectly Check whether the projector is connected to the computer or AV equipment correctly P36 64 20 seconds have not passed since the projector was turned on When the projec...

Страница 128: ...to the screen is appropriate If the distance is shorter than approximately 1 2 m 3 9 the projec tor cannot focus on the screen P32 133 The projector is not placed straight in front of the screen Check whether the projector is placed obliquely to the screen A slight error in the projection angle can be corrected through the keystone adjustment function P43 52 The projector has been moved to a place...

Страница 129: ... the notebook computer If the dual screen mode has been selected change it to the simultaneous display mode on the notebook computer The output setting method varies among computer manufac turers For more detailed information refer to the User s Man ual that came with your computer Cause Countermeasure The air intake or exhaust vent is blocked Check whether the air intake or exhaust vent is blocke...

Страница 130: ...iver of the projector is exposed to direct sunlight or strong light of lighting apparatus P29 The channel setting of the remote control does not match with the set ting of the projector Check whether the channel setting of the remote control has been changed You can check the Remote control setting in the System settings menu P115 The key lock function is prohibiting the remote control operation C...

Страница 131: ...Equipment Useful Functions Available During a Presentation Setting Up Functions from Menus Maintenance Troubleshooting Appendix Index APPENDIX Table of contents for Appendix Supported Computer Signal Types P132 Relationship between Screen Size and Projecting Distance P133 Glossary P134 Specifications P138 Index P140 Menu Configuration P144 ...

Страница 132: ...8 032 72 00 60 023 75 03 60 314 74 92 60 994 75 77 62 04 77 07 63 478 79 35 68 677 85 00 1280x768 WXGA 47 986 59 83 1280x800 SX7 MarkII 49 702 60 03 1360x768 47 712 60 02 1152 x 864 64 196 70 39 1152 x 900 61 17 65 28 61 846 66 00 71 399 75 64 1280 x 960 60 00 60 00 1280 x 1024 SXGA 62 50 58 63 63 337 59 98 63 364 59 95 63 735 60 01 63 791 60 18 63 899 60 00 63 981 60 02 71 694 67 19 76 97 72 00 7...

Страница 133: ... x 213 4 2 13 8 6 9 22 6 192 6 3 21 0 69 128 284 x 160 150 305 x 229 4 5 14 8 7 4 24 2 206 6 8 23 0 75 138 305 x 171 160 325 x 244 4 8 15 5 7 9 25 9 219 7 2 24 0 79 147 325 x 183 170 345 x 259 5 1 16 8 8 4 27 4 233 7 6 26 0 85 156 345 x 194 180 366 x 274 5 4 17 7 8 9 29 2 247 8 1 27 0 86 165 366 x 206 182 370 x 277 5 4 17 7 9 0 29 5 250 8 2 28 0 9 167 370 x 208 190 386 x 290 5 6 18 4 261 8 6 29 0 ...

Страница 134: ...he computer and Input Terminal 1 or Input Terminal 2 on this projector with a monitor cable Select ANALOG PC 1 for Input Terminal 1 and ANALOG PC 2 for Input Terminal 2 at pro jection Aspect P57 73 90 The aspect ratio is the ratio of the horizontal longer dimension to the vertical shorter dimension of a screen It is expressed as longer dimension shorter dimension The following aspect ratio is norm...

Страница 135: ...sion Connect the DVI output terminal on the computer and Input Terminal 1 on this projector with a DVI connection cable Select DIGITAL PC at projection DVI P37 48 65 70 A digital video signal connection interface for a computer and AV equipment This interface allows digital data to be transmitted without converting to analog data assuring high image quality with no signal degradation The DVI I int...

Страница 136: ...input progressive processing is required When the progressive function is turned off one screen is displayed using image signals per interlace signal deteriorat ing the vertical resolution of the image When the progressive function is turned on one screen is displayed using image signals per two interlace signals improving the vertical resolution of the image Turn off the progres sive function whe...

Страница 137: ... accumulate image information at the appropriate timing with reference to the synchronization signal within the image signal This process is called the tracking This projector can dis play an image properly by automatically adjust the tracking with the auto PC adjust ment function even if there is a small differ ence in the synchronization signal from an analog imaging device Video P27 66 92 An ou...

Страница 138: ...3 PAL M PAL N Input terminals Input Terminal 1 Digital PC analog PC digital video DVI I connector 29 pin Input Terminal 2 Analog PC component SCART mini D sub 15 pin VIDEO IN terminal composite RCA S VIDEO IN terminal S Video mini DIN 4 pin AUDIO IN terminal Audio signal SX7 MarkII X700 stereo mini jack x 3 SX60 stereo mini jack x 1 USB terminal For mouse control USB type B SERVICE PORT RS 232C mi...

Страница 139: ...computer cable for connection Mini D sub 15 pin 1 R 9 5 V power 2 G 10 Ground Vertical sync 3 B 11 Monitor ID0 4 Monitor ID2 12 DDC data 5 Ground Horizontal sync 13 Horizontal sync 6 Ground R 14 Vertical sync 7 Ground G 15 DDC clock 8 Ground B z The terminal specifications for the analog PC 2 input and component input are the same Screw Holes for installation of ceiling mount hanger M4 x 6 ...

Страница 140: ...N 26 65 DIGITAL PC 37 48 Digital PC 135 Digital video 116 Direct power on 112 Display settings menu 86 90 Displaying a logo SX60 X700 99 100 DVI 37 65 135 Dynamic gamma 106 E External monitor 38 F Factory defaults 110 117 FOCUS 51 Focusing 51 FREEZE 78 G Gain 105 135 Gamma correction 104 135 Guide 114 H HDCP 135 HDMI 65 136 Horizontal pixels 95 Horizontal position 94 I IMAGE 55 Image adjustment me...

Страница 141: ...tion 14 33 Projector on 100 P TIMER 80 R Rear projection 33 97 Register password 117 Remote control 24 29 115 Reset 110 117 Resolution 57 136 S Screen aspect 59 74 101 Screen color 98 Screen mode Aspect 57 73 Screen size 133 Selecting a display language 41 113 Sharpness 104 Signal type 132 SPOT 83 Spotlight 83 sRGB 56 102 136 S VIDEO 66 137 Switching to external monitor Preparing the notebook comp...

Страница 142: ... hanger RS CL07 z Replacement lamp Part No SX7 MarkII X700 RS LP04 SX60 RS LP03 z Ceiling mount hanger Part No RS CL07 z Ceiling mount pipe 35 cm 13 8 in to 55 cm 21 7 in Part No RS CL08 z Ceiling mount pipe 55 cm 21 7 in to 95 cm 37 4 in Part No RS CL09 z DVI digital cable Part No LV CA29 z SCART cable Part No LV CA31 z Network adapter Part No RS NA01 SX60 X700 ...

Страница 143: ...143 ...

Страница 144: ...92 Auto 1080i 1035i 720p 575p 480p 575i 480i SCART P92 575i Input signal settings ANALOG PC Total dots P93 Tracking P93 Horizontal position P94 Vertical position P94 Horizontal pixels P95 Vertical pixels P95 Progressive COMPONENT VIDEO S VIDEO P96 Off On Auto Menu position P96 Screen color Normal P98 Greenboard Adjust Red Green Blue Image flip H V None P97 Ceiling mounted Rear Rear Ceiling mounted...

Страница 145: ...f Adjust Type Tungsten Fluorescent Fluorescent H Level L M H Lamp mode Normal P109 Quiet Reset OK Cancel P110 Auto setup P111 Auto focus Off On Auto keystone Off On Auto input Off On Auto screen color Off On Return Power management mode Off P111 Standby Exit Direct power on Off P112 On Beep Off P112 On Key lock Off P114 Main unit Remote control Language English Turkish P113 Germany Polish French H...

Страница 146: ...05 Dietlikon Switzerland CANON GMBH Zetschegasse 11 A 1230 Wien Austria CANON España S A C Joaquín Costa 41 28002 Madrid Spain CANON PORTUGAL S A Rua Alfredo da Silva 14 Alfragide 2610 016 Amadora Portugal CANON Belgium N V S A Berkenlaan 3 1831 Diegem Mechelen Bel gium CANON Netherland NV Neptunusstraat 1 2132 JA Hoofddorp The Netherlands CANON LUXEMBOURG S A Rue des Joncs 21 L 1818 Howald Luxem ...

Отзывы: