background image

21

Cover

Contents

Part Names

Basic Operations

Printing via USB 
Cable

Troubleshooting

Appendix

Print Settings

3

  Confirm the setting.

z

z

To confirm the cropping area and return 

to the image display screen, press the 
<

o

> button. 

 is now shown in the 

lower left.

z

z

To crop other images for printing with the 

first one, repeat steps 1 – 3.

4

 Print.

z

z

Print as described in step 6 of “Printing 
Images” (

=


 15

).

z

z

After printing, crop settings are cleared.

• 

To adjust the cropping area once you have set it, press the EDIT button on the 
image display screen, press the <

u

><

d

> buttons to select [Adjust Cropping], 

and then press the <

o

> button. Repeat steps 2 – 3.

• 

To cancel cropping after you have set the cropping area, press the EDIT button 
on the image display screen, press the <

u

><

d

> buttons to select [Reset 

Cropping], press the <

o

> button to access the reset cropping screen, and 

then press the <

o

> button again.

• 

Cropping areas you have set are cleared if you turn off SELPHY or remove the 

memory card before printing.

• 

You can specify cropping for up to 99 images at once.

• 

Cropping is not available when printing with [Print All Images] or [DPOF Print] 

or when [Page Layout] (

=


 26

) is set to [ 

 Index] or [ 

 Shuffle].

• 

The cropping aspect ratio indicated by the frame displayed on images cannot 
be adjusted.

• 

To change the number of prints, press the <

u

><

d

> buttons on the image 

display screen in step 3. Note that specifying zero prints will not clear cropping 
settings.

Cropping Images

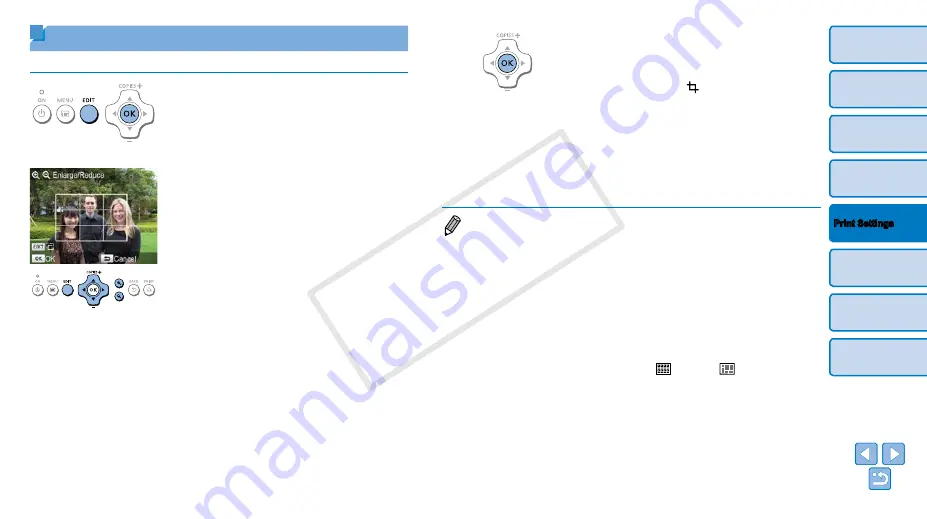
Print only selected areas of an image as follows.

1

  Access the cropping screen.

z

z

Choose an image as described in step 4 
of “Printing Images” (

=


 14

), press the 

EDIT button, and then press the <

o

button.

z

z

A crop frame is displayed, showing the 
image area that will be cropped.

2

  Adjust the image area to crop.

z

z

To switch the crop frame between portrait 
and landscape orientation, press the 
EDIT button.

z

z

To move the crop frame, press the 
<

u

><

d

><

l

><

r

> buttons.

z

z

To enlarge the crop frame, press the 
<

-

> button, and to reduce it, press the 

<

0

> button.

COP

Y

Содержание Selphy CP820

Страница 1: ...ns section before using the printer Reading this guide will help you learn to use the printer properly Store this guide safely so that you can use it in the future Click the buttons in the lower right to access other pages Next page Previous page Page before you clicked a link To jump to the beginning of a chapter click the chapter title at right From chapter title pages you can access topics by c...

Страница 2: ... Color Ink Paper Set Color Ink Paper Set Necessary Paper Cassette Product Name Paper Size Number of Possible Prints Color Ink Paper Set KP 36IP Postcard Postcard Size 36 Paper Cassette PCP CP400 included with SELPHY Color Ink Paper Set RP 54 Photo Paper 54 Color Ink Paper Set RP 108 Photo Paper 108 Color Ink Paper Set RP 1080V Photo Paper 1080 Color Ink Paper Set KP 72IN Photo Paper 72 Color Ink P...

Страница 3: ...uct This could result in electrical shock or fire If liquid comes into contact with the product unplug it from the outlet and consult your retailer or a Canon Customer Support Help Desk Before Use Images printed with this product are to be used for personal enjoyment Unauthorized printing of copyrighted material is prohibited The printer warranty is valid only in the country or area of purchase In...

Страница 4: ...understorms This could result in electrical shock or fire Immediately stop using the equipment and distance yourself from it Unplug the power cord periodically and using a dry cloth wipe away any dust or dirt that has collected on the plug the exterior of the power outlet and the surrounding area Do not handle the power cord with wet hands Do not use the equipment in a manner that exceeds the rate...

Страница 5: ...om a Camera 34 Troubleshooting 35 Appendix 38 Printing without a Power Outlet 39 Specifications 40 Handling and Maintenance 42 5 Cover Basic Operations Print Settings Printing via USB Cable Troubleshooting Appendix Contents Part Names Part Names Memory Card Slot 13 Paper Cassette Compartment 10 Paper Cassette Compartment Cover 10 Ink Cassette Lock 15 Ink Cassette Compartment 10 Ink Cassette Compar...

Страница 6: ...Press the 0 button to restore single image display Controls Icons in This Guide Name Function Screen LCD monitor Displays images setting screens or error messages 37 q Power button Turns SELPHY on or off 12 k MENU button Displays the menu screen 12 EDIT button Displays the editing menu and rotates the crop frame o OK button Confirms the selected item u Up More prints button Specifies the print qua...

Страница 7: ...l Preparations 8 Preparing the Ink Cassette 8 Preparing the Paper Cassette 9 Loading the Cassettes 10 Installing and Plugging in SELPHY 10 Attaching the Dust Protection Covers 11 Display Language 12 Supported Cards Images 13 Checking Supported Memory Cards and the Slot to Use 13 Supported Images 13 Printing Images 14 Avoiding Left Over Paper 16 Printing from USB Flash Drives 16 Making One Print fr...

Страница 8: ...f paper you will print on z z Make sure the ink sheet is taut Loose ink sheets may tear when loaded If the sheet is loose turn the sprocket as shown z z For an ink cassette that has a lock on the bottom press the lock as shown to release it as you turn the sprocket to make the sheet taut Ink sheet Do not hold the ink cassette with wet hands Avoid touching the ink sheet and avoid getting dust on it...

Страница 9: ...o the cassette z z When making postcard prints with space for a stamp load the paper with the stamp area facing as shown Glossy side 4 Close the inner cover z z Close the inner cover firmly until it clicks into place Leave the outer cover open when printing Printing on L Size Paper z z You can use Paper Cassette PCPL CP400 sold separately to print on L size paper z z To print on postcard paper rem...

Страница 10: ... z Close the ink cassette compartment cover 3 Load the paper cassette z z Making sure the outer cover is open 9 insert the paper cassette all the way into the compartment Installing and Plugging in SELPHY 1 Choose the right place to put SELPHY z z Place the printer on a table or other flat stable surface Never place the printer on an unstable or tilted surface z z Keep the printer away from source...

Страница 11: ...on covers will help keep paper clean and free of dust Note that dust protection covers are not included in some regions Attaching the Back Cover z z Insert the back dust protection cover as shown z z Insert the cover fully leaving no gaps between it and the printer Attaching the Front Cover z z Insert the tab of the front dust protection cover as shown z z Cannot be used with Paper Cassette PCC CP...

Страница 12: ... screen LCD monitor z z Never force the screen up more than 45 which may damage the printer or cause malfunction 3 Access the setting screen z z Press the k button z z Press the u d buttons to select Change Settings and then press the o button Approx 45 4 Access the language setting screen z z Press the u d buttons to select Language and then press the o button 5 Choose a language z z Press the u ...

Страница 13: ...hat require an adapter always insert the card into the adapter before inserting the adapter into the card slot If you mistakenly insert the memory card into the card slot without an adapter you may not be able to remove the card from the printer Use a memory card formatted with the device you shot the photos with Images on cards formatted with a computer may not be recognized For instructions refe...

Страница 14: ...hich may damage the printer or cause malfunction Approx 45 3 Insert the memory card into the slot z z Insert the memory card facing as shown until it clicks into place z z To remove the card push it in until it clicks and then slowly release it z z The image display screen used in the next step is displayed 6 4 Choose an image z z Press the l r buttons to select an image to print z z To jump forwa...

Страница 15: ...out open the ink cassette compartment cover without turning off the power z z To remove the ink cassette move the lock in the direction shown Insert a new ink cassette 8 10 Never pull out the paper cassette open the ink cassette compartment cover or remove a memory card while printing or when you hear printer operation sounds immediately after it has been turned on This may damage the printer To c...

Страница 16: ...ing from USB Flash Drives Images on USB flash drives sold separately can be printed the same way as images on memory cards Insert a USB flash drive z z Remove any inserted memory cards z z Insert a USB flash drive as shown z z After this all steps are the same as for printing images from memory cards 14 15 Some USB flash drives may be more difficult than others to insert and remove and some may no...

Страница 17: ...ginal package or a bag away from sunlight and dust Store any unused paper or ink cassettes in their unopened packages away from sunlight Storing Prints To remove any extra paper from the edges of a print fold the paper along the perforations and tear the edges off When writing on prints use an oil based pen To prevent discoloration do not store prints where temperatures exceed 40 C 104 F in humid ...

Страница 18: ...e regions Clean the printer z z Remove the ink cassette if it is in the printer z z With the arrow side face up slide the cleaner unit all the way in and out of the ink cassette compartment 2 3 times z z Store the cleaner unit in a bag or other container to keep it free of dust Do not touch the white strip on the cleaner This may affect cleaning performance Do not use other types of cleaners which...

Страница 19: ...ng Passport Images 23 Adjusting Settings 24 Configuring Settings 24 Choosing the Finish Print Finish 25 Printing with a Border around Images Borders 25 Choosing a Layout Page Layout 26 Optimal Prints with Auto Correction Image Optimize 27 Adjusting the Brightness 27 Making Skin Look Smooth Smooth Skin 28 Adjusting the Color Tone My Colors 28 Reducing the Appearance of Red Eye Correct Red Eye 29 Pr...

Страница 20: ...number of prints z z Press the u d buttons to specify the number of prints 4 Print z z Press the p button to start printing z z To cancel printing press the v button If the memory card contains more than 1 000 images the 999 most recent images are printed as determined by shooting date You can specify up to 99 prints in step 3 However the total number of prints cannot exceed 999 For example you ca...

Страница 21: ...ping areas you have set are cleared if you turn off SELPHY or remove the memory card before printing You can specify cropping for up to 99 images at once Cropping is not available when printing with Print All Images or DPOF Print or when Page Layout 26 is set to Index or Shuffle The cropping aspect ratio indicated by the frame displayed on images cannot be adjusted To change the number of prints p...

Страница 22: ...that options available for Short Side are automatically updated based on the Long Side length z z Standard Check the indicated image size and press the o button 3 Choose an image to print z z Press the l r buttons to select an image and then press the u button is shown in the lower right You can choose one or two images z z To specify the cropping area 21 press the EDIT button z z Print as describ...

Страница 23: ...in the list press the o button again to select the size displaying z z Pressing the EDIT button clears all When no sizes are selected pressing the EDIT button selects all sizes displaying z z Once you have selected the sizes to include in the list press the v button A warning message is displayed if you press the v button when no sizes are selected Press the o button to return to the Sizes screen ...

Страница 24: ...l color tones to make prints look distinctive or choose sepia or black and white prints Correct Red Eye 29 Correct images affected by red eye Date 29 Add camera shooting dates when you print Date Format 30 Adjust the date format Auto Power Down 30 Specify automatic power off when the printer is idle Language 12 Change the language of menus and messages Configuring Settings 1 Access the setting scr...

Страница 25: ...ient temperature of 10 35 C 50 95 F Turning off SELPHY will restore the default setting of Glossy You can have SELPHY retain configured settings even after being turned off With SELPHY off hold down the k u p buttons and then hold down the q button until SELPHY is displayed If you prefer SELPHY not to retain configured settings repeat this procedure after turning SELPHY off This procedure also det...

Страница 26: ...rinted with the settings in Date 29 Image Optimize 27 Correct Red Eye 29 Borders 25 Smooth Skin 28 or Brightness 27 Carrying out Print All Images 20 with Index selected allows you to print all images on the memory card as an index Combining Images of Various Sizes Shuffle z z Use the shuffle feature to have images arranged automatically in a variety of sizes z z Groups of up to 8 or 20 images can ...

Страница 27: ...ll restore the default setting of On When Index is selected in Page Layout 26 Image Optimize is not applied The degree of correction may vary depending on layout and paper size Adjusting the Brightness z z Adjust image brightness in a range of 3 to 3 z z Choose larger positive values to make images brighter or larger negative values to make them darker Turning off SELPHY will restore the default s...

Страница 28: ...ia Sepia tone Neutral Subdued prints with less contrast and color saturation B W Black and white Turning off SELPHY will restore the default setting of Off Some color options may prevent red eye correction 29 Making Skin Look Smooth Smooth Skin z z Make skin appear smooth and beautiful z z Off default On Correction may be applied to image areas other than skin in some cases and results may not be ...

Страница 29: ...ppearance of Red Eye Correct Red Eye z z Correct images affected by red eye z z Off default On Red eye correction may mistakenly be applied to areas of the image other than the affected eyes To avoid this select On only for images affected by red eye Turning off SELPHY or removing the memory card will restore the default setting of Off Red eye may not be detected or corrected well on faces coverin...

Страница 30: ...r about five minutes z z On default Off If an unsupported image is included 13 when printing multiple images Could not print some images Cancel printing is displayed and printing stops If Auto Power Down is On and SELPHY is not operated for approximately 5 minutes printing is canceled and SELPHY turns off When you turn SELPHY on again a blank sheet of paper may be ejected but never reuse ejected p...

Страница 31: ...Troubleshooting Appendix Printing via USB Cable Printing via USB Cable This chapter describes how to connect a camera or computer via a USB cable for printing Printing from a Computer 32 Printing from a Camera 34 Printing Using Camera Settings DPOF Print 34 COPY ...

Страница 32: ... CD ROM in the computer and double click the disc icon in Computer or My Computer z z Double click the Driver folder z z Depending on whether your computer is 32 or 64 bit as shown in System type double click the 32Bit or 64Bit folder System type can be accessed by right clicking Computer or My Computer and choosing Properties z z Double click Setup exe z z Follow the instructions displayed to com...

Страница 33: ...desktop mode Messages will be automatically dismissed once you resolve the issue indicated If a message is displayed on the computer you can also click Cancel to cancel printing Macintosh If SELPHY CP820 is not available as a destination printer register the printer on the computer as follows Access System Preferences Print Scan or Print Fax Click below the list Choose Canon CP820 Click Add 3 Turn...

Страница 34: ...ses PictBridge technology to print via USB PictBridge technical standards facilitate direct connection of cameras printers and other devices for easy printing This product is compliant with the DPS over IP standard that allows the use of PictBridge in network environments Printing Using Camera Settings DPOF Print Inserting a memory card with DPOF information configured on a camera will display DPO...

Страница 35: ... Printing via USB Cable Appendix Troubleshooting Troubleshooting Refer to these troubleshooting tips to resolve problems with SELPHY If the problem persists contact a Canon Customer Support Help Desk Power 36 Screen 36 Printing 36 Paper 37 Error Messages 37 COPY ...

Страница 36: ...that the memory card is fully inserted in the correct slot with the label face up 13 14 Confirm that the USB flash drive is fully inserted right side up 16 Confirm that the image format is supported 13 Confirm that a memory card requiring the use of an adapter has not been inserted without its adapter 13 Cannot print from a camera Confirm that your camera supports PictBridge 34 Confirm that SELPHY...

Страница 37: ...r more prints have not collected on the paper cassette Confirm that you are using paper designed especially for SELPHY 9 Cannot print the correct quantity unused paper left after ink runs out Some unused paper may remain if the ink runs out first 16 Paper jams If paper protrudes from the front or back paper ejection slot 5 carefully pull it out If you cannot remove the paper by gently pulling it o...

Страница 38: ...ructions for battery powered printing with an optional battery pack are given here along with printer specifications and handling and maintenance tips Printing without a Power Outlet 39 Attaching the Battery Pack 39 Charging the Battery Pack 39 Battery Powered Printing 39 Specifications 40 Handling and Maintenance 42 COPY ...

Страница 39: ... z z Slide the terminal end in the direction of the arrow and insert the other end until it clicks into place Charging the Battery Pack Connect the power cord to the charger adapter with the battery pack inserted z z Battery charging begins and the orange lamp is lit z z When charging is finished in about four hours the green lamp will be lit z z Charging continues if you turn on SELPHY with the c...

Страница 40: ...dedicated adapter Specifications Printing Method Dye sublimation thermal transfer with overcoating Resolution 300 x 300 dpi Gradation 256 shades per color Ink Dedicated color ink Y M C overcoating Paper Postcard L and card size including full page label and 8 labels per sheet configuration Print Size Borderless Bordered Postcard L Size Card Label on 8 label sheet square labels 100 0 x 148 0 mm 3 9...

Страница 41: ...x 60 0 x 30 5 mm 4 80 x 2 36 x 1 20 in excluding power cord Weight Approx 310 g 10 9 oz Charger Adapter CG CP200 Sold Separately Rated Input 24 V DC Rated Output 24 V DC Operating Temperature 5 40 C 41 104 F Dimensions 156 2 x 49 0 x 35 5 mm 6 15 x 1 93 x 1 40 in Weight Approx 134 g 4 7 oz Battery Pack NB CP2L Sold Separately Type Rechargeable lithium ion battery Nominal Voltage 22 2 V DC Nominal ...

Страница 42: ...irty wipe it with a soft dry cloth If the air vent 5 becomes dusty remove the ink cassette 15 before wiping the dust away to prevent dust from getting inside and affecting print quality Never wipe the printer with solvents such as benzene or thinner or neutral detergent which may cause deformation or peeling of the casing CAUTION RISK OF EXPLOSION IF BATTERY IS REPLACED BY AN INCORRECT TYPE DISPOS...

Страница 43: ...e that may cause undesired operation NOTE This equipment has been tested and found to comply with the limits for a Class B digital device pursuant to part 15 of the FCC Rules These limits are designed to provide reasonable protection against harmful interference in a residential installation This equipment generates uses and can radiate radio frequency energy and if not installed and used in accor...

Страница 44: ...ing of this type of waste could have a possible negative impact on the environment and human health due to potentially hazardous substances that are generally associated with EEE At the same time your cooperation in the correct disposal of this product will contribute to the effective usage of natural resources For more information regarding return and recycling of WEEE products please visit http ...

Отзывы: