background image

47

Chapter 3   Handling

4.

Adjust the document guides to fit the width of the 
document.

IMPORTANT

Make sure that document stacks placed in the feed tray do not 
exceed the document guides.

The number of sheets that you can place in the scanner at 
one time varies by paper size as follows.

A4/LTR Size or Smaller: 

Less than 60 sheets (22 lb bond (80g/m

2

)). Make sure 

stacks do not exceed 10 mm in height (including curls).

Sizes Larger than A4/LTR: 

Less than 40 sheets (22 lb bond (80g/m

2

)). Make sure 

stacks do not exceed 10 mm in height (including curls). 

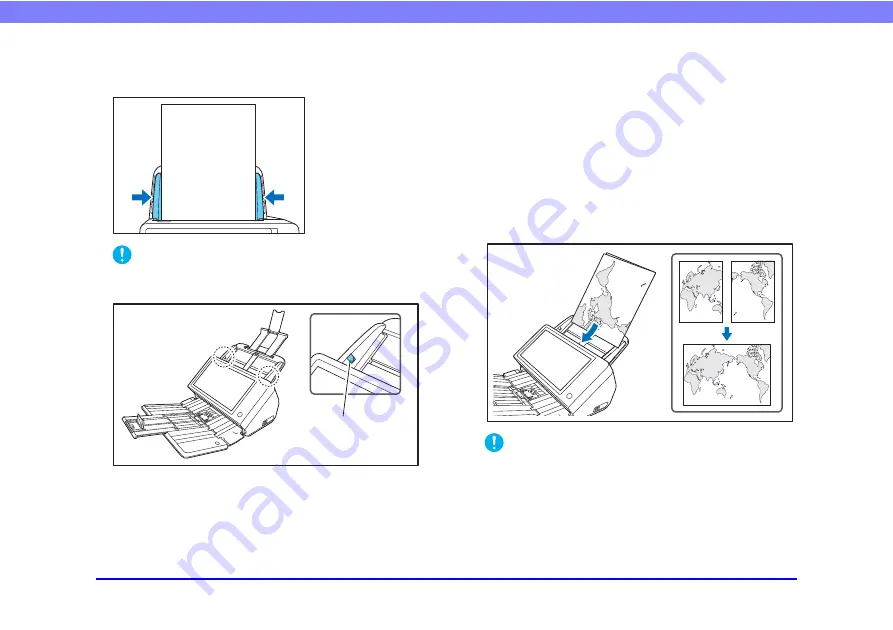
Placing a Folded Document

Folio Scan enables you to scan documents that are larger 
than A4/LTR and therefore do not fit in the feeder. (The 
maximum size is 11" × 17"/A3.) To use the function, fold 
the document in half lengthwise and place it into the 
feeder. The ScanFront will scan both sides and combine 
the scanned images into a single image.

IMPORTANT

• When folding the document, align the right and left sides and 

create a sharp, straight fold. Otherwise the document may jam 
or the image may not be aligned properly.

• The fold line itself will not be scanned. Keep this in mind if 

there is content such as photos, diagrams, or text that spans 
the fold.

Loading mark

Содержание ScanFront 400

Страница 1: ...Please read this manual before using the scanner After you finish reading this manual keep it in a safe place for future reference INSTRUCTIONS ...

Страница 2: ... 2 this device must accept any interference received including interference that may cause undesired operation Note This equipment has been tested and found to comply with the limits for a Class B digital device pursuant to Part 15 of the FCC Rules These limits are designed to provide reasonable protection against harmful interference in a residential installation This equipment generates uses and...

Страница 3: ...ng to the WEEE Directive 2002 96 EC and your national law This product should be handed over to a designated collection point e g on an authorized one for one basis when you buy a new similar product or to an authorized collection site for recycling waste electrical and electronic equipment EEE Improper handling of this type of waste could have a possible negative impact on the environment and hum...

Страница 4: ...ney or bank notes domestic and foreign Postage stamps revenue stamps or other similar stamps Stock certificates bond certificates promissory notes cheques or other valuable certificates Passports licenses or other certificates or documents issued by government officials or agencies This is not an exhaustive list Canon is not responsible for how this scanner is used by an individual Please note tha...

Страница 5: ...ses This product includes open source software For details on the license conditions for each open source software refer to the OpenSource txt file stored in the LICENSE folder on the software setup disc Copyright 2016 by CANON ELECTRONICS INC All rights reserved No part of this publication may be reproduced or transmitted in any form or by any means electronic or mechanical including photocopying...

Страница 6: ... 400 to a shared folder on a server PC or client PC on the network or to an FTP server send it to a printer for printing or deliver it to a remote location via e mail or Internet fax service When using the scanner without a network environment you can also save the image files to USB memory About the ScanFront 400 Web Application Mode The ScanFront 400 is equipped with an operation mode called Web...

Страница 7: ...ons for configuring the scanner settings as well as handling maintenance and troubleshooting information This manual is stored as a PDF file on the supplied application disc and requires Adobe Reader to open You can download Adobe Reader from the Adobe Web site Symbols Used in This Manual The following symbols are used in this manual to explain procedures restrictions handling precautions and inst...

Страница 8: ...scanner Chapter 5 Administrator Settings This chapter describes the Administrator Settings for the administrator to configure settings Chapter 6 User Settings This chapter describes the User Settings for the administrator to configure settings Chapter 7 ScanFront Administration Tool for SF400 This chapter describes how to install and use ScanFront Administration Tool for SF400 Chapter 8 Maintenanc...

Страница 9: ...ing the Network Cable 28 2 Turning the Power ON and OFF 29 Turning the Power ON 29 Turning the Power OFF 30 3 Configuring the Scanner Settings 31 Administrator Settings 31 4 Configuring Administrator Settings 34 Logging In to the Administrator Settings 34 Network Setting 35 Administrator Password 36 Backup Restore Setting Information 37 Select Login Type 38 Roller Counter Reset 38 Format ScanFront...

Страница 10: ... Registering a New Address 78 Modifying an Address 83 Copying an Address 84 8 Scan Send Settings 85 Scan Settings 86 File Formats 95 Security Settings for PDF Files 97 Send Settings 98 Batch separation using patch code sheets 101 Using patch code sheets 102 Chapter 5 Administrator Settings 1 Administrator Settings 105 2 User Administration 107 Registering New Users 108 Editing Users 114 Restrictin...

Страница 11: ... from an External Terminal s Web Browser 154 Chapter 6 User Settings 1 User Settings 156 2 User Administration 157 3 Address Book Settings 159 Registering New Addresses 160 Modifying Addresses 160 Copying Addresses 160 4 Job Button Settings 161 Registering New Job Buttons 161 Copying Job Buttons 161 Editing Jobs 162 Exporting Job Buttons 162 Importing Job Buttons 162 Chapter 7 ScanFront Administra...

Страница 12: ...Cleaning the Retard Roller 177 Cleaning the Feed Roller 179 2 Replacing the Rollers 181 Exchange Roller Kit 181 Checking the Page Count and Resetting the Counter 182 Chapter 9 Troubleshooting 1 Troubleshooting 185 2 Error Messages 191 3 Initializing ScanFront 196 Chapter 10 Appendices 1 Specifications 198 Unit Specifications 198 Network Specifications 200 Transfer Destinations 200 AC Adapter 100 t...

Страница 13: ...ion 14 Power 15 Moving the Scanner 15 Handling 15 Disposal 17 2 Features of the ScanFront 400 18 ScanFront 400 18 3 Names and Functions of Parts 21 Front and Document Feed and Eject Trays 21 Rear 22 4 Network Environment 23 Network Environment 23 Directory Service Support 24 ...

Страница 14: ...nt of dust accumulates Avoid warm or humid locations such as in the vicinity of a water faucet water heater or humidifier and avoid locations where the fumes from ammonia paint thinner or other volatile chemicals may be present Avoid locations that are subject to vibration Avoid exposing the scanner to rapid changes in temperature If the room in which the scanner is installed is cold but rapidly h...

Страница 15: ...nnected easily in an emergency Use only the AC adapter provided with this scanner Also do not use the AC adapter provided with the scanner with any other electrical devices Model MG1 5039 If you have any questions regarding the power supply contact your local authorized Canon dealer or service representative for further information Moving the Scanner When moving the scanner always hold it with bot...

Страница 16: ... which has been well wrung out Never use alcohol benzene paint thinner or any other flammable substances If the scanner makes strange noises or gives off smoke heat or strange odors or the scanner does not function or other abnormalities occur when you use the machine immediately turn the power OFF and disconnect the power plug from the power outlet Then contact your local authorized Canon dealer ...

Страница 17: ...s are placed around the power plug you will be unable to disconnect it in an emergency Do not allow water or flammable substances alcohol paint thinner benzene etc to spill into the scanner as this may result in a fire or electric shock Turn OFF the power for safety when not using the scanner for a long period of time such as overnight Also turn OFF the power and disconnect the AC adapter from the...

Страница 18: ...available scanning modes vary depending on the file format of the image to be transferred Fast Document Feeding The scanner can scan a maximum of 45 A4 documents per minute Scanning conditions Black and white simplex 200 dpi High Image Quality The 600 dpi optical resolution sensor incorporated in the scanner enables documents to be scanned with high image quality Supports USB Memory The scanner su...

Страница 19: ... sides of a document folded in half and create a single scanned image Double Feed Detection by Length When the scanner detects a double feed by comparing the lengths of documents it stops feeding Using the length of the first document as a reference the scanner detects a double feed when a document of a different length is fed Double Feed Detection by Ultrasonic Function In addition to the double ...

Страница 20: ...ion corrects the thickness of text and lines when the text and lines are not easily distinguishable in scanned images Card Scanning You can scan credit cards and IC cards that conform to ISO standards Passport Scan You can scan passports using the optional carrier sheet for passports Prescan This function prescans the first page of a document at the start of scanning and then stops scanning so tha...

Страница 21: ...Front c Panel Unit Open this when there is a paper jam or to perform maintenance See p 53 d Touch Panel Touch this screen to operate the ScanFront e Lock Lever Locks the panel unit Pull the lever toward you to unlock the panel unit See p 53 f Document Guides Adjust these to match the width of the document See p 47 g Document Feed Tray Place documents here See p 43 h Feed Support Pull this out to s...

Страница 22: ...ompatible USB memory device USB keyboard or USB mouse m Eject Tray Support Open this when scanning multiple documents of varying sizes at one time Scanned documents are arranged in the tray by supporting and lifting up the document eject tray from the bottom Rear n Kensington Slot This is an anti theft slot that enables a key chain or lock to be connected to prevent theft o Power Connector 24 V DC...

Страница 23: ...ber of IP addresses that can be obtained using DHCP is managed by the network administrator For details consult your network administrator 1000Base T Support The scanner supports 1000Base T However communication may be slower than the communication speed of the network depending on the other devices connected to the network and the type of hub SMTP E mail Server The scanner supports an SMTP server...

Страница 24: ...thentication server to be used for authentication to log in to the ScanFront A domain server that uses Windows NT Server for the operating system cannot be registered as an authentication server OpenLDAP Server The scanner supports OpenLDAP servers that can be connected to with the LDAP Lightweight Directory Access Protocol protocol You can authenticate ScanFront users and reference e mail address...

Страница 25: ...and OFF 29 Turning the Power ON 29 Turning the Power OFF 30 3 Configuring the Scanner Settings 31 Administrator Settings 31 4 Configuring Administrator Settings 34 Logging In to the Administrator Settings 34 Network Setting 35 Administrator Password 36 Backup Restore Setting Information 37 Select Login Type 38 Roller Counter Reset 38 Format ScanFront 39 Network Test 39 ...

Страница 26: ...e amount of dust accumulates Avoid warm or humid locations such as in the vicinity of a water faucet water heater or humidifier and avoid locations where the fumes from ammonia paint thinner or other volatile chemicals may be present Avoid locations that are subject to vibration Avoid exposing the scanner to rapid changes in temperature If the room in which the scanner is installed is cold but rap...

Страница 27: ...he AC adapter CAUTION Make sure to use only the AC adapter and power cord included with the scanner a Connect the power cord and AC adapter b Insert the plug of the AC adapter into the power connector c Connect the power cord to the wall outlet The shape of the power plug varies by country and region ...

Страница 28: ...28 Chapter 2 ScanFront Setup Connecting the Network Cable Insert the network cable connector RJ 45 into the LAN port ...

Страница 29: ...r is lit but nothing appears on the touch panel Display Off has activated to turn the panel display off You can touch the touch panel to restore the display See Adjust the wait time until the display automatically turns off on p 152 When the power indicator is flashing but nothing appears on the touch panel the Low Power mode has activated to temporarily stop scanner operations To switch out of Lo...

Страница 30: ...ner stops responding you can press and hold the power button to force shutdown In such cases any configured settings may be lost and startup may not be possible Pressing and holding the power button to force shutdown may result in malfunction so do not perform this operation under normal circumstances After ScanFront transitions to Low Power Mode while not connected to a network power will automat...

Страница 31: ...ome settings cannot be edited Yes See p 107 Yes partially See p 157 Address Book Settings Register and edit entries in the Shared Address Book You can register and edit entries in the Shared Address Book and My Address Book in the User Settings Users whose function privileges are restricted by the administrator cannot perform registration and editing Yes See p 120 Yes See p 159 Job Button Settings...

Страница 32: ...s See p 134 No Server Settings Register the mail server address book server and authorization server E mail Server FAX Register the SMTP server to be used for sending e mail and faxes Yes See p 138 No Authentication Server Register a domain server that can search users with Active Directory or OpenLDAP Yes See p 140 No Address Book Server Register an LDAP server that can search e mail address book...

Страница 33: ...version of the ScanFront module Yes See p 146 No System Administration Perform system administration for the ScanFront Login type setting Select the login screen for users Yes See p 59 No Network test Test the communication between the ScanFront and other devices on the network Yes See p 39 No Administrator Settings Set the password and email address of the administrator Yes See p 148 No Setting I...

Страница 34: ... settings Logging In to the Administrator Settings Follow the procedure below to configure the Device name and IP address needed to connect the scanner to a network 1 Press Administrator setting The Administrator Password input box appears 2 Press OK to display the Administrator setting screen No administrator password is set by default ...

Страница 35: ... to verify or modify settings in the network settings screen The device name is the name for the scanner used on the network When changing this setting make sure to select a unique name that is different from those of all other devices The device name can be a combination of letters A Z a z numbers 0 9 and hyphens up to 15 characters long The device name must begin with a letter You cannot end the...

Страница 36: ...then enter the address of the each server Administrator Password Configure the administrator password used for restricting login to the Administrator Settings with Administrator setting of the System administration screen CAUTION Be careful with the administrator password If you forget the password you will have to reformat the scanner and all registered data will be lost ...

Страница 37: ...ormation before you update the version of the ScanFront and then restore the setting information after the version update is finished When submitting the ScanFront for repairs Before you submit the ScanFront for repairs back up the setting information of the ScanFront IMPORTANT Set Allow remote operation see p 152 to ON before performing restoration If this is not set to ON before restoration info...

Страница 38: ...ars when users log in with Login type setting of the System administration screen For details see Login Screen on p 59 Roller Counter Reset Reset the counter after replacing the feed roller when the scanner no longer feeds properly For details see Replacing the Rollers on p 181 ...

Страница 39: ... the ScanFront to protect the saved user information When changing the operating environment Delete all the user information registered on the ScanFront when for instance the users have changed because you have changed the installation location Network Test Confirm whether communication is enabled between the ScanFront and other devices on the network Enter the IP address of a device and press the...

Страница 40: ...reparing the Document Feed Tray and Eject Tray 43 Changing the Feed Method 44 USB Port 44 3 Placing Documents 46 Placing a Document 46 Placing a Folded Document 47 Placing a Long Document 48 Placing a Card 48 Placing a Carrier Sheet 49 Placing a Carrier Sheet for Passports 50 4 Clearing a Paper Jam or Double Feed Error 52 ...

Страница 41: ...ment is dry before scanning it Scanning documents with the ink still wet may soil the rollers or scanning glass cause lines or smudges to appear on images or dirty other documents Always clean the rollers or scanning glass after scanning a document written in pencil Scanning documents with pencil written on them may soil the rollers or scanning glass cause stripes to appear in images or dirty othe...

Страница 42: ...37 54 mm 86 mm ISO standard Card thickness 0 055 1 4 mm or smaller Orientation Horizontal feeding only Embossed cards Embossed cards can be scanned Loading capacity 10 cards non embossed 1 card embossed CAUTION When scanning cards place them to be fed horizontally If you place cards to be fed vertically they may not be ejected properly and cards that get jammed may be damaged when you remove them ...

Страница 43: ...Front s Detailed Settings screen according to the type of document placed Preparing the Document Feed Tray and Eject Tray Prepare the trays in accordance with the type of document 1 Open the document eject tray a 2 Open the feed support b Hint Pull out the center tray extension when output documents are likely to fall out of the tray When scanning documents of different size at the same time the s...

Страница 44: ...an documents made of thick paper set Non Separation Feeding Mode to ON IMPORTANT When scanning multiple page documents that are fastened together such as invoices place the documents so that the edge that is fastened together is facing down USB Port You can insert a USB memory device into the USB port to store image files You can also connect a USB keyboard and USB mouse to operate the ScanFront I...

Страница 45: ...annot be written to the USB memory This scanner does not support USB memory equipped with password security data encryption or functions other than data storage Use a USB memory device that is formatted in the FAT16 FAT32 or exFAT file system Make sure that the USB memory has sufficient space to store images ...

Страница 46: ...n into the tray with the top edge of the document at the bottom of tray Placing a Document Follow the procedure below to place a document 1 Adjust the document guides to be wider than the width of the document 2 Fan the document 3 Place the document face down with its top edge at the bottom of the tray ...

Страница 47: ...ot exceed 10 mm in height including curls Placing a Folded Document Folio Scan enables you to scan documents that are larger than A4 LTR and therefore do not fit in the feeder The maximum size is 11 17 A3 To use the function fold the document in half lengthwise and place it into the feeder The ScanFront will scan both sides and combine the scanned images into a single image IMPORTANT When folding ...

Страница 48: ...han the standard formats set Page Size to Auto size When scanning a document that is folded in half set Resolution dpi to 300 dpi or less When scanning a document that is folded in half the Double feed detection by Ultrasonic function cannot be used Placing a Long Document You scan documents up to 120 3048 mm in length IMPORTANT When scanning a long document set Page Size to Auto size Long When sc...

Страница 49: ... Settings screen See p 94 Placing a Carrier Sheet When scanning a document that requires extra protection from damage insert the document into an optional carrier sheet before placing it in the scanner 1 Set Document type to Carrier sheet in the Detailed Settings screen See p 94 2 Insert the document into the carrier sheet 3 Load the document with the page you want to scan facing down After placin...

Страница 50: ... is about 1 000 scans involving a single sheet of 21 lb bond 80 g m2 paper per scan Placing a Carrier Sheet for Passports When scanning a passport insert the passport into an optional carrier sheet for passports before placing it in the scanner 1 Set Document type to Carrier sheet passport type in the Detailed Settings screen See p 94 2 Open the page of the passport that you want to scan and inser...

Страница 51: ...om the size of the carrier sheet document jamming may occur and the scanner s correction functions may not operate properly When scanning a passport place the passport so that the side with more pages is fed into the scanner The thickness limit for scannable documents is 0 236 6 mm with the passport inserted in the carrier sheet If 0 236 6 mm is exceeded document jamming may occur and the scanner ...

Страница 52: ...ouble feed error is detected at the first page of a document the following messages appear Hint If you press Complete the display returns to the previous screen If you want to continue scanning reset the document before progressing with screen operations Press Continue to resume scanning If a paper jam or double feed error is detected in the middle of a document the following messages appear ...

Страница 53: ...e scanned images up until the paper jam or double feed error are saved and scanning completes The display switches to the Send screen If you press Abort the scanned images are canceled and the display returns to the previous screen IMPORTANT When the message above is displayed and the scanner transitions to Low Power Mode all of the data scanned up until that point is discarded See Adjust the wait...

Страница 54: ...en In addition limit the number of documents placed on the scanner to about 10 sheets A dirty or worn feed roller or documents stuck together as a result of static electricity are common causes of paper jams or double feed errors If the feed roller is dirty clean it If paper jams or double feed errors continue to occur even after cleaning purchase an Exchange Roller Kit and replace the rollers fee...

Страница 55: ...on 65 Address Book Settings 66 Job Button Settings 66 Change Password 66 Show Operation History 67 6 Scanning Procedures 68 Scanning From the Home Screen 68 Scanning From the Job Button Screen 69 Address Selection Screen 69 USB Memory Screen 71 Print Settings Screen 72 Scanning 73 7 Registering and Editing Addresses 78 Registering a New Address 78 Modifying an Address 83 Copying an Address 84 8 Sc...

Страница 56: ...nistrator Settings screen See p 105 User Settings screen See p 156 The administrator password is registered in the Administrator Settings screen and the user password is registered in the User Settings screen Scan Send Settings screen See p 85 Scan The process after scanning differs depending on the Send Settings See p 98 Scanning finishes A document confirmation message appears See p 75 The docum...

Страница 57: ...n Screen on p 59 When the power indicator is lit but nothing appears on the touch panel Display Off has activated to turn the panel display off You can touch the touch panel to restore the display See Adjust the wait time until the display automatically turns off on p 152 When the power indicator is flashing but nothing appears on the touch panel the Low Power mode has activated to temporarily sto...

Страница 58: ...anner stops responding you can press and hold the power button to force shutdown In such cases any configured settings may be lost and startup may not be possible Pressing and holding the power button to force shutdown may result in malfunction so do not perform this operation under normal circumstances After ScanFront transitions to Low Power Mode while not connected to a network power will autom...

Страница 59: ... There are two types of login screen a list type login screen for selecting from a list of registered users and a key in type login screen for entering a user name and password List Type Login Screen Key in Type Login Screen Hint Set the type of login screen in System administration Login type setting of the Administrator Settings screen ...

Страница 60: ...splayed for selecting Device Authentication and Server Authentication IMPORTANT When you use server authentication to log in you are registered as a new user of server authentication List Type Login Use the procedure below to log in to the list type login screen 1 Select the user that will log in and press the Password entry box The keyboard screen appears ...

Страница 61: ... sensitive Make sure to enter the password correctly 3 Press Login to log in to the scanner 4 The Home screen or Job Button screen appears Key in Type Login In the key in type login screen enter your user name and password to log in 1 Press the User name Password entry box The keyboard screen appears ...

Страница 62: ... are case sensitive Make sure to enter the user and password registered during device authentication correctly If you do not know the user name and password registered for server authentication contact the domain server administrator 3 Press Login to log in to the scanner 4 The Home screen or Job Button screen appears ...

Страница 63: ...r buttons These buttons open an address selection screen See Scanning Procedures on p 68 b User Settings button Open the User Settings screen For details see User Settings Screen on p 65 c Administrator setting button Opens the Administrator Settings screen For details see Configuring Administrator Settings on p 34 IMPORTANT If a user whose use of the Home screen is restricted logs in the Home scr...

Страница 64: ...Keys Use these keys to find specific Job Buttons when there are many Job Buttons displayed for example IMPORTANT The document is scanned immediately after you press the job button Make sure to place your document before you press the job button See Placing Documents on p 46 Register and edit job buttons in the Administrator Settings screen or the User Settings screen If you are unable to edit a jo...

Страница 65: ... Settings of the currently logged in user perform registration or editing for the address book and job buttons and edit passwords For details see User Settings on p 156 User Administration Edit user names and email addresses and select the screen that appears after device login See User Administration on p 157 ...

Страница 66: ...k Settings on p 159 Job Button Settings Register and manage job buttons See Job Button Settings on p 161 Change Password You can register a new user password or change a user password registered Hint The old password does not need to be entered in order to change a password The new password that you entered is registered ...

Страница 67: ...67 Chapter 4 Operating Procedures Show Operation History This allows logged in users to refer to their operation history ...

Страница 68: ... press the destination E mail FTP Fax or Shared folder selection button in Address type the address selection screen opens to specify an address to send an image file If you press the USB memory destination selection button press Downward and specify the folder in the USB memory to which you want to save the image file If you press the Printer destination selection button configure the printer set...

Страница 69: ...ls on the overall flow from configuring settings to sending an image file see Flow of Scanner Operations on p 56 Job buttons cannot be used to save image files to USB memory or send them to printers for printing Address Selection Screen From the address selection screen you can select the address to send an image file and register addresses a Address Book type Selects the address book type Shared ...

Страница 70: ...ar button Clears all address selections f Edit button Enables you to register new addresses and edit addresses g Detail Info button Displays detailed information for the address h My E mail address Displays the email address of the currently logged in user when the user s email address is registered and Send to my mailbox p 109 is enabled in the User Administration screen Hint This is not displaye...

Страница 71: ...Enter the folder path of the USB memory You can also press Downward to select a folder b USB Memory Display Displays the inserted USB memory Hint When you insert a USB memory device you can assign a number to it If you want to insert or replace a USB memory stick while the USB memory screen is open press the Back button to return to the Home screen update the USB memory information and then reopen...

Страница 72: ... file system will not be changed Print Settings Screen The print settings screen enables you to specify the printer on which to use FTP printing a Printer IP address Enter the printer s IP address b User name Enter the user name configured for the printer s FTP printing c Password Enter the password configured for the printer s FTP printing d Save Password Save the entered password e Use passive m...

Страница 73: ...cify the folder in the USB memory to save the image file in Steps 2 to 4 See USB Memory Screen on p 71 1 Select a destination Press a destination button to select a destination The address selection screen appears 2 Use Address Book type and Address type to display the address to send the image file 3 Press a displayed address to select it A checkmark is added to the icon for the selected address ...

Страница 74: ...e a job button for scanning the subsequent procedure varies as follows in accordance with the job button settings For details see Registering New Job Buttons on p 124 If When you select this Job Button is set to Skip Scan Setting Screen and you press a job button scanning is started without displaying the Scan Send Settings screen of Step 4 If Send the files immediately after scanning is set to ON...

Страница 75: ...screen and the address confirmation screen of Step 10 appears When the confirmation message is left displayed and the scanner transitions to Low Power Mode all of the data scanned up until that point is discarded See Adjust the wait time until the Low Power Mode on p 152 7 Check the document and go to the next step Press Complete to go to the Send screen Press Continue to resume scanning Press Can...

Страница 76: ... 90 degrees clockwise Enlarge the image Reduce the image IMPORTANT Rotations and size modifications will be applied to all scanned images that can be displayed in the Send screen When you press Scan more pages the Scan Settings screen appears allowing you to change scan conditions After changing the settings press Check image and send to return to the Send screen Hint When the preview image is enl...

Страница 77: ...nd Settings screen the image is sent without displaying the address confirmation screen and the operation ends 10 Confirm the address and press OK to send the scanned image IMPORTANT If a send error message appears check the address settings and send destination and try again 11 Returns to the screen set for Screen after sending in Send Settings of the Scan Send Settings screen ...

Страница 78: ...ocedure below to register a new address or modify an address in the address book Registering a New Address 1 Make selections for Address Book type and Address type press Edit and then press New 2 Register the address in accordance with the setting conditions of the address type E mail Registration Screen Name Enter the name to appear in the address book E mail address Enter the sender s address fo...

Страница 79: ...ame of the shared folder and the path of the sub folder to register Hint If the path of the sub folder is unknown use the procedure below to specify the sub folder 1 Enter the host name user name password and domain and then press Browse to access the computer that is making the shared folder public 2 Specify any sub folder within the displayed folder 3 Press Downward to move to a level lower than...

Страница 80: ...pear in the address book FTP server Enter the address of the FTP server Folder path Enter the path of the sub folder when specifying a sub folder on the FTP server Hint If the path of the sub folder is unknown use the procedure below to specify the sub folder 1 Enter the server address user name and password and click Browse to log in to the FTP server 2 Specify any sub folder at the level of the ...

Страница 81: ... Private Key IMPORTANT Always enter the fingerprint when Protocol is set to SFTP Confirmation Confirm the fingerprint Use FTP proxy Traverse the firewall via an FTP proxy server to connect to an external FTP server Configure settings for the proxy server in the FTP Proxy screen see p 143 Use passive mode Use passive mode for sending to the FTP server IMPORTANT Use passive mode when normal communic...

Страница 82: ...up from Address Book type and Address type The selected addresses are displayed in the list IMPORTANT When you add shared folders to groups do not add multiple shared folders with different access privileges to one group Using a group to simultaneously send to shared servers and the like and multiple shared folders with different access privileges may result in a send error ...

Страница 83: ...address is wrong or has been changed 1 Select the type of the address to modify and press Detail Info Detailed information for the address appears 2 Check the detailed information for the selected address 3 Press Edit and then press Modify The edit screen for the address appears 4 Modify the address Hint For details on editing items see Registering a New Address on p 78 ...

Страница 84: ...red Address Book 1 Select the address book entry to copy 2 Select the address press Edit and then press Copy The Specify Destination and Confirmation screen appears 3 Select the type for the copy destination address book and press OK The address is copied and the address book of the copy destination appears ...

Страница 85: ...nt was fed askew and then straightens the image g Prescan button When scanning starts the first page of the document is scanned and then scanning stops You can view the image of the first page to check and adjust the brightness and contrast before scanning the entire document Hint Scanning pauses after the first page of the document is scanned and the image of the first page is displayed Use the d...

Страница 86: ...ion scanning side and brightness and detailed settings for scanning Basic Condition Settings Paper Size Select the size of the document you want to scan The paper sizes displayed will differ as follows depending on the Feeder flatbed setting in the Detailed Settings screen When Auto or Feeder is selected the paper sizes supported by both the ScanFront and the flatbed scanner are displayed When Fla...

Страница 87: ...ction The scanning speed may be reduced when the Auto Color Detection function is used Resolution Select the resolution for scanning IMPORTANT A resolution of 240 dpi or more cannot be set when Auto size Long is selected for Page Size A resolution of 400 dpi or more cannot be set when Folio is selected for Scanning Side Scanning Side Select the method for scanning the document Simplex Duplex Skip ...

Страница 88: ...ant to scan both sides of a document that has front and back sides of different densities you can change the settings for the brightness of the front side and back side separately in the detailed settings and then perform scanning Detailed Settings Press the Detailed settings button to open the Detailed Settings screen ...

Страница 89: ...eed is detected IMPORTANT Using the length of the first page of the document as a reference the scanner determines a double feed when it detects a document with a length at least 1 38 35 mm longer or shorter than the reference length Set Double feed detection by length to OFF when scanning a document that contains pages of different lengths Non Separation Feeding Mode Set Non Separation Feeding Mo...

Страница 90: ... orientation of the text is correct IMPORTANT The scanning speed may be reduced when Auto is selected Rotate 180 degrees Back Side Rotate the image of the back side 180 degrees during duplex scanning Hint The following two settings must be configured to enable Rotate 180 degrees Back Side Set the scanning side to Duplex or Skip Blank Page under Scan Settings in the Scan Send Settings screen See p ...

Страница 91: ...nned image so that the background is smooth Bleed through reduction Eliminates bleed through images in which images on the reverse side of a scanned document appear on the scanned page such as when scanning thin documents with text or images on both sides IMPORTANT Bleed through reduction cannot be set when the Text enhance mode is selected Hint When using bleed through reduction adjust the bleed ...

Страница 92: ...trast for the images to scan Back side Brightness contrast This is enabled when you scan both sides of a document and should be used when the document has front and back sides of different density Select Use back side brightness contrast to change the settings for the brightness and contrast of the front and back sides of the document ...

Страница 93: ...effect that emphasizes a specified color You can set each of these effects for the front side and back side IMPORTANT The color drop out settings are disabled when the scanning mode is set to Color Auto Color Detection Settings This is enabled when Auto Color Detection is selected and allows you to configure the following detection settings for determining whether to scan a document in color or bl...

Страница 94: ...uto color detect function cannot be used simultaneously with the color drop out or prescan function The scanning speed may be reduced when the Auto Color Detection function is used Document type Select the type of document to be scanned You can select from Plain paper Extra thin paper Extra thick paper plastic card Carrier sheet or Carrier sheet passport type Hint When Extra thick paper plastic ca...

Страница 95: ...00 dpi When using a Flatbed Scanner Unit 102 that is connected to the ScanFront place the document so that its top left corner aligns with the arrow on the flatbed scanner File Formats You can select from the four available file formats TIFF JPEG PDF and PNG and the modes available for scanning vary depending on the file format setting See Mode on p 87 TIFF format Select Single page Front back sep...

Страница 96: ...t to On character recognition is performed for the text within the scanned document and the text is embedded in the PDF file as text information The Language setting button enables you to select the language for character recognition Security settings If you set security settings to On and then press the Settings button the Security settings screen appears and you can configure the security settin...

Страница 97: ... Use permissions password to restrict editing security settings The following settings are restricted by the permissions password Printing allowed This permits printing of the PDF file with a printer Changes allowed This permits editing of the PDF file for example adding and deleting pages Enable copying of text images and accessibility This enables the copying of text information embedded with OC...

Страница 98: ...u can select Custom to add the custom file name to the file name of the scanned image see p 110 IMPORTANT Make sure you set either File name or Auto file name A message appears if you do not enter a file name and then set Auto file name to None When JPEG or PNG format is selected or when TIFF or PDF format is selected and set as a single page a 4 digit serial number starting from 0001 is automatic...

Страница 99: ... Job Button screen setting The Job Button screen is displayed for a user for which use of the Home screen is restricted by the ScanFront administrator Logout The user is logged out after sending images Select screen after sending A dialog box for selecting the screen after sending images is displayed Hint When no user is registered the Logout option does not appear Send index file Specify whether ...

Страница 100: ...ed and a patch code is detected among the scanned documents batch separation is performed For details see Batch separation using patch code sheets on p 101 When Specified Pages is selected batch separation is performed after the specified number of pages Patchcode Orientation Configure this when Batch separation settings is set to Patchcode Configure this according to the orientation of the patch ...

Страница 101: ...red on the supplied instructions and utilities CD ROM as PDF files IMPORTANT Print PATCH T A4 and PATCH II A4 on A4 size paper and PATCH T LTR and PATCH II LTR on letter size paper always in their original size If a patch code sheet is enlarged or reduced for printing the patch code may not be recognized Patch code pattern functions Patch codes are separated into two patterns PATCH T and PATCH II ...

Страница 102: ... PATCH II LTR on letter size paper always in their original size If a patch code sheet is enlarged or reduced for printing the patch code may not be recognized 2 Insert the patch code sheets in front of the pages that will head the separated files and place the documents in the feed tray 3 Open the Batch separation screen from the Send Settings screen 4 Set Batch separation settings to Patchcode a...

Страница 103: ...MPORTANT Adjust the positioning so that the patch code is within the following detection area When copying the patch code patterns do not alter their original size Avoid contaminating or dirtying printed or created patch code sheets In addition reprint or recreate patch code sheets that have been folded or creased 5 5 5 94 Patch Code Patch Code Detection Area Units mm ...

Страница 104: ...b Buttons 129 Importing Job Buttons 130 5 Device Configuration 131 Network Setting 132 Language Timezone 133 Date time settings 133 Auto Logout 134 SNMP Settings 134 6 Server Settings 137 E mail Server 138 FAX 139 Authentication Server 140 Address Book Server 141 FTP Server 142 HTTP Proxy Server 143 FTP Proxy Server 143 7 System Settings 144 Backing Up All Settings 145 Restoring All Settings 145 E...

Страница 105: ... settings for sending e mail from the ScanFront settings for using an authentication server compatible with a directory service settings for using an address book server compatible with LDAP and settings for using a function that transfers a scan result log during transfer to the FTP server f System Settings See System Settings on p 144 Configure the following settings for managing the ScanFront B...

Страница 106: ...strator Settings i Certificates See Certificates on p 149 Display and delete certificates j Private Key See Private Key on p 150 Display and delete Private Key to be used for Private Key Authentication when sending by SFTP ...

Страница 107: ...w user Address Edit Button Register and edit entries in My Address Book provided for each user For details on the address book settings see Address Book Settings on p 120 Job Edit Button Register and edit My Job Button provided for each user For details on the job button settings see Job Button Settings on p 124 b Jump Keys If there are many users and the user you want to display is not displayed ...

Страница 108: ...er account the e mail address is also registered automatically If an e mail address is not registered for the authentication server account the e mail address is not registered Register an e mail address by editing the user settings see p 114 1 Press Edit New User The New User screen appears 2 Enter the necessary information for each item and then press OK Hint When a user is registered the displa...

Страница 109: ...r name Confirm the user name and password with the user before entering them Otherwise have the user enter them directly in user administration see p 157 of the user settings Default Address Book screen Select whether to display My Address Book or Shared Address Book when opening the Address selection screen from the Home screen Default Job Button screen Select whether to display My Job Button or ...

Страница 110: ...ames that are determined by the settings configured here The order of the components that are included in the custom file name can be configured in the Custom file name item setting screen IMPORTANT The following characters cannot be used to set the custom file name Custom file name Displays the components included in the custom file name in the order specified in the settings Set the order of inf...

Страница 111: ...arator between character strings in the file name and select a character to use as the separator in the list box String Specify a string to include in the file name User name Select the Enable check box to include the user name in the file name Date Select the Enable check box to include the date in the file name and select a format for the date in the list box Time Select the Enable check box to ...

Страница 112: ...image files The order of the components that are included in the index file can be configured in the Index item settings screen IMPORTANT The following characters cannot be used in strings contained in the index file Order of information Displays the components included in the index file in the order specified in the settings ...

Страница 113: ...the user name in the index file You can change the default field name User as necessary Date Select the Enable check box to include the date in the index file and select a format for the date in the Format list box You can change the default field name Date as necessary Time Select the Enable check box to include the time in the index file and select a format for the time in the Format list box Yo...

Страница 114: ...d name PageNumber as necessary Destination path Select the Enable check box to include the destination path in the index file You can change the default field name Folder as necessary Sheets Select the Enable check box to include the number of pages that are in the scanned image in the index file You can change the default field name SheetNumber as necessary Editing Users You can change the settin...

Страница 115: ...can set the e mail address in the Edit screen When Use only Job Buttons is enabled as a function restriction only Job Button List is displayed for the Screen after Login setting Restricting User Functions You can restrict the functions available to a user IMPORTANT If you restrict the functions of Default User the functions are applied to newly registered users and users registered automatically b...

Страница 116: ... which the scanner can send images Deselect a destination to disable it Restriction to Edit Restrict the editing of address books and job buttons Deselect an address book or job button to disable editing for it Hint Configure this setting to make only the existing addresses and job buttons available to the user Restriction to Use Restrict the use of the LDAP address book when use of an address boo...

Страница 117: ...press Edit Delete A confirmation message appears 2 Press Yes Deleting by Server Synchronization If the authentication server is enabled See Server Settings on p 137 you can delete the users who are not registered on the authentication server from the user list 1 Press Edit Delete by Server Synchronization A confirmation message appears 2 Press Yes ...

Страница 118: ...are for example changing the server 1 Select the users to export and then press Edit Export The Export screen appears 2 Enter the save location information Hint Press Connection test to check the connection for the entered host name Press Browse to display the Shared folder screen and then specify the host and shared folder 3 Press OK Exporting starts When the process is complete a message appears...

Страница 119: ...nnection for the entered host name Press Browse to display the Shared folder screen and then specify the setting file 3 For How to write data select the action to perform when importing the user setting file Overwrite the file Deletes the currently registered users and overwrites them with the imported user data Abort sending Cancels importing if there is any user with the same name 4 Press OK Imp...

Страница 120: ...address book you can register a new address For details on how to register a new address see 7 Registering and Editing Addresses Registering a New Address on p 78 Hint The number of addresses that can be registered to Shared Address Book My Address Book is up to 1 000 in combination with the total number of addresses included in Shared Job Button My Job Button Up to 100 addresses can be registered...

Страница 121: ...ss in Shared Address Book and register it as a different address after changing some of the settings In the individual user address book settings displayed by pressing the Edit button in the address column in the user list of the User Administration screen you can copy addresses between Shared Address Book and My Address Book Deleting Addresses You can delete registered addresses 1 Select an addre...

Страница 122: ...d in another email client to that of a CSV file saved via address book export and then import the address book of the other email client and use it on the ScanFront 1 Press Edit Export The Export screen appears 2 Enter the necessary information for each item Hint Press Connection test to check the connection for the entered host name Press Browse to display the Shared folder screen and then specif...

Страница 123: ... Press Browse to display the Shared folder screen and then specify the host and shared folder 3 For How to write data select the action to perform when importing the address book setting file Replaces the whole data Deletes all currently registered address books and overwrites them with the imported address book data Appends data Adds the imported address book data to the currently registered addr...

Страница 124: ...in the User Administration screen b Job Button List Display the registered job buttons c Select unselect all Button Select all job buttons or clear all selected job buttons d Edit Button Register new job buttons and edit job buttons e Detail Info Button Display details on the job buttons f Jump Keys Use these keys to find specific Job Buttons when there are many Job Buttons displayed for example R...

Страница 125: ...g Screen Displays the Scan Setting screen when the job button is pressed Skip Scan Setting Screen Starts scanning without displaying the Scan Setting screen when the job button is pressed IMPORTANT If you select Skip Scan Setting Screen scanning starts as soon as the job button is pressed regardless of whether or not a document is inserted Custom File Name Settings Display the Custom file name Set...

Страница 126: ...ame 20160514154030123 mmddyyyy File name 05142016154030123 ddmmyyyy File name 14052016154030123 The last three digits indicate the number of milliseconds You can select Custom to configure additional file name settings The additional settings are identical to those in the Custom File Name Settings see p 110 under User Administration Index Settings Specify whether to attach metadata index files to ...

Страница 127: ...s In the individual user job button settings displayed by pressing the Edit button in the job column in the user list of the User Administration screen you can copy job buttons between Shared Job Button and My Job Button 1 Select the job button to copy and then press Edit Copy The Copy screen appears 2 Press OK A duplicate job button with the same name as the copy source is created 3 Change the na...

Страница 128: ...s You can edit the settings of a registered job 1 Select the job button to edit and then press Edit Modify The Edit screen appears 2 Change the job button settings and then press OK For details on the settings see Registering New Job Buttons on p 124 ...

Страница 129: ...a to a different server because you are for example changing the server 1 Press Edit Export The Export screen appears 2 Enter the necessary information for each item Hint Press Connection test to check the connection for the entered host name Press Browse to display the Shared folder screen and then specify the host and shared folder 3 Press OK Exporting starts When the process is complete a messa...

Страница 130: ...ection for the entered host name Press Browse to display the Shared folder screen and then specify the host and shared folder 3 For How to write data select the action to perform when importing the job button setting file Replaces the whole data Deletes all currently registered job buttons and overwrites them with the imported job buttons Appends data Adds the imported job buttons to the currently...

Страница 131: ...ed See Language Timezone on p 133 IMPORTANT The time zone setting also affects the time stamp of sent e mail c Date time settings Set the date time for the ScanFront scanner See Date time settings on p 133 d Auto Logout Set the duration after which auto logout is performed See Auto Logout on p 134 e ScanFront maintenance Display the ScanFront maintenance Mode screen See Device Operation Screen on ...

Страница 132: ... the device name and IP address used for connecting the ScanFront to a network See Network Setting on p 35 IMPORTANT Set a device name up to 15 characters long using a combination of letters numbers and hyphens A hyphen cannot be used at the end of the device name ...

Страница 133: ...he ScanFront will be used c Enable daylight saving time Apply daylight saving time for the region set as the time zone IMPORTANT If the correct time zone is not set the time stamps that are saved for the send times of e mail messages and for the saved image files will be incorrect When daylight saving time is enabled the correct time may not be reflected In this case set the correct time Date time...

Страница 134: ...o automatically log users out after a specified period of inactivity SNMP Settings Configure settings for managing the ScanFront using SNMP SNMP Service Set this to ON when using SNMP SNMP Agent Enter the installation location of the SNMP agent SNMP Community Settings ...

Страница 135: ...When Listed hosts is selected for Receive host settings enter the IP address of the host from which to accept SNMP packets Hint To change the registered community setting select the community in the SNMP Settings screen press Edit Modify and change the setting in the Modify screen SNMP Security Auth trap When ON is selected and an SNMP request is received from a community not registered under SNMP...

Страница 136: ...136 Chapter 5 Administrator Settings To register an SNMP trap press Edit New and configure the transmission destination for the SNMP trap and its community name ...

Страница 137: ...ver authentication server on which user accounts have been registered with Active Directory See Authentication Server on p 140 d Address Book Server Set these settings when using an LDAP server See Address Book Server on p 141 e FTP Server Set the function for transferring a scan result log along with an image file during transfer to the FTP server See FTP Server on p 142 f HTTP proxy server Confi...

Страница 138: ...o check the connection for the entered host name Port number Change the port number if necessary The standard port number is 25 Divided E mail Size If the image file to be attached to an e mail message is too large to send the file is divided into segments of the specified size before being sent IMPORTANT If the destination mail client does not support divided attachments it may not be possible to...

Страница 139: ...er the user name registered with your provider Password To use the password of the user specified in User name select Change Password and enter the password To Subject and Message Enter the e mail address To subject and message for e mails that will be sent to the Internet fax service If you enter the following input strings for these settings the strings will be replaced with the following replac...

Страница 140: ...o update its display For details on using and setting an authentication server contact your server administrator Authentication Server Select the authentication server to set Enable authentication server Select this check box to permit users registered on the authentication server to log in Use SSL Select this check box to use SSL to communicate with the Authentication Server Authentication Method...

Страница 141: ...or referring to e mail addresses Register Change password When you want to set a password for the above user select the check box and then enter a password Hint Changing the password updates the password information saved on the ScanFront but does not alter the password registered on the server When server authentication is set a list box for selecting device authentication or server authenticatio...

Страница 142: ...or transferring a scan result log along with an image file during transfer to the FTP server When this function is enabled a scan result log with the same file name as the image file is transferred to the same FTP folder as the image file The extension for the log file is log ...

Страница 143: ...roxy server to use when traversing a firewall to connect to an external FTP server via an FTP proxy server See p 143 Hint To connect via an FTP proxy server the Enable check box for Use FTP proxy must be selected in the FTP address registration screen see p 81 Proxy servers that require user names and passwords are not supported Host Name Address Enter the FTP proxy server s address Port number En...

Страница 144: ...k up the ScanFront settings See Backing Up All Settings on p 145 The following settings are not backed up IP address Device name Touch panel adjustment values b Restore All Settings Restore the ScanFront settings See Restoring All Settings on p 145 c Export Error Log Export the Error Log This is displayed when accessing from a web browser in an external terminal See Export Error Log on p 146 d Ver...

Страница 145: ...tered host name Press Browse to display the Shared folder screen and then specify the host and shared folder 3 Press OK Backing up starts When the process is complete a message appears 4 Press Yes Restoring All Settings You can restore backed up data to the ScanFront IMPORTANT Set Allow remote operation see p 152 to ON before performing restoration If this is not set to ON before restoration infor...

Страница 146: ...cation on the external terminal Hint This is displayed when accessing from a web browser in an external terminal When Export Error Log is clicked the screen of the specified location is displayed Version Information You can display the version information of the modules used by the ScanFront IMPORTANT If the ScanFront malfunctions the version information will be required when you contact the suppo...

Страница 147: ...strator Settings IMPORTANT Always back up the ScanFront s data before upgrading the version The version upgrade process will take some time After starting the process do not touch the ScanFront until after it has restarted ...

Страница 148: ...n p 39 c Administrator Settings Set the administrator password for logging in to the Administrator Settings screen See Configuring Administrator Settings on p 34 Administrator Settings You can set the password and mail address of the administrator Administrator Password If you want to change the administrator password select the Change Password check box and then enter a new password Administrator...

Страница 149: ...ont from a web browser in an external terminal open the certificates screen and then import by the displayed Import Cert Hint See Accessing from an External Terminal s Web Browser on p 154 or Displaying the Web Menu on p 171 for details about how to access from a web browser in an external terminal To import a certificate the certificate file must conform to the X 509 format Up to 50 certificates ...

Страница 150: ...of the SFTP server IMPORTANT To register private keys access ScanFront from a web browser in an external terminal open the private key screen and then specify the private key file from the displayed File name Hint See Accessing from an External Terminal s Web Browser on p 154 or Displaying the Web Menu on p 171 for details about how to access from a web browser in an external terminal Only 1 Priva...

Страница 151: ... Reset the counter after replacing the feed roller when the scanner no longer feeds properly See 2 Replacing the Rollers Checking the Page Count and Resetting the Counter on p 182 c Password setting Set the password for restricting the display of the ScanFront maintenance screen See Setting a Password on p 152 d To Web Application Mode Switch to Web Application Mode to use an external Web Applicat...

Страница 152: ...ges that were scanned prior to the suspending of scanning and that were not yet transmitted are discarded You will not be able to operate the scanner immediately after power is restored from Low Power mode Operation will be enabled after about 15 seconds so please wait a moment before attempting operation Allow remote operation Set this to ON to allow access to the ScanFront from an external termi...

Страница 153: ...ation Save the CA certificate file ca_cert cer to the root directory of the USB memory device and press Import after connecting it to the scanner to import the certificate file To update a CA certificate file press Delete to delete the registered certificate file and import the new file Client Certificate When EAP TLS is selected import the client certificate used for authentication Save the clien...

Страница 154: ...is enabled on an external terminal be sure to close the web browser that is accessing the ScanFront Hint Export of operation logs can only be performed from an external terminal s web browser While accessing the scanner from an external terminal s web browser you can select the terminal s storage as the download destination or upload source for files As a result the dialog boxes that appear when o...

Страница 155: ...tion 157 3 Address Book Settings 159 Registering New Addresses 160 Modifying Addresses 160 Copying Addresses 160 4 Job Button Settings 161 Registering New Job Buttons 161 Copying Job Buttons 161 Editing Jobs 162 Exporting Job Buttons 162 Importing Job Buttons 162 ...

Страница 156: ...59 Register and manage entries in Shared Address Book available to all users and My Address Book provided for each user c Job Button Settings See Job Button Settings on p 161 Register and manage job buttons in Shared Job Button available to all users and My Job Button provided for each user d Show Operation History Displays the operation history of logged in users Hint When history is selected and...

Страница 157: ...ministrator SMTP POP Before SMTP Authentication This is displayed when the administrator has set Mail Server Authentication Method to other than SMTP in the mail server settings see p 138 Enter the user name and password that will be used for authentication by the mail server IMPORTANT When entering a password select the Change Password check box before entry For a user logged in by server authent...

Страница 158: ... administrator has restricted use of the Home screen only Job Button screen is displayed for the Screen after Login setting For details contact your administrator Send to my mailbox Set this to Yes to display the email address of the logged in user in the address book If an email address is set for the user the user s email address will be displayed even if it has not been registered in the addres...

Страница 159: ...ess Selection Screen on p 69 IMPORTANT If the administrator has restricted editing of address books the address book settings will be as follows For details contact your administrator If editing is restricted for only one of My Address Book and Shared Address Book it is only possible to copy addresses from the restricted address book and paste them into the unrestricted address book If editing is ...

Страница 160: ...oup name so a group with 99 addresses registered to it is counted as having 100 addresses The available settings vary depending on the type of address E mail Shared folder FTP Server Fax or Group Modifying Addresses Modify an address when there is a send error because the information of the transfer destination registered for the address is wrong or has been changed For details on how to modify an...

Страница 161: ...ons e Detail Info Button Display details on the job buttons f Jump Keys Use these keys to find specific Job Buttons when there are many Job Buttons displayed for example Registering New Job Buttons You can register new job buttons For details on how to register new job buttons see Registering New Job Buttons on p 124 in Administrator Settings Copying Job Buttons You can copy job buttons and regist...

Страница 162: ...ngs Exporting Job Buttons You can save job button data to a specified folder as a file in DAT format For details on how to export job buttons see Exporting Job Buttons on p 129 in Administrator Settings Importing Job Buttons You can import exported job button data to the ScanFront For details on how to import job buttons see Importing Job Buttons on p 130 in Administrator Settings ...

Страница 163: ...ion Tool for SF400 Setup 167 Starting ScanFront Administration Tool for SF400 167 Registering ScanFront Scanners 167 4 Managing the ScanFront Scanners 169 Selecting a ScanFront 169 Checking ScanFront Connections 169 Entering Passwords 169 Changing IP Addresses or Device Names 170 Checking Detailed Information on the ScanFront 170 Displaying the Web Menu 171 Batch Processing 171 Importing Exporting...

Страница 164: ... using ScanFront Administration Tool for SF400 the following operations can be performed for ScanFront scanners on the same network Checking the current status of the ScanFront and network configuration information Configuring the ScanFront Checking connections Updating software Backing up and restoring configuration data Importing and exporting user data Hint When using ScanFront Administration T...

Страница 165: ...64 bit Windows Vista 32 bit 64 bit Windows 7 32 bit 64 bit Windows 8 1 32 bit 64 bit Windows 10 32 bit 64 bit This is the environment as of March 2017 For the latest software support information go to the Products page on the Canon website Other NET Framework 4 5 or later Installation 1 Insert the instructions and utilities CD ROM in the computer s CD DVD BD drive 2 Start the ScanFront Administrat...

Страница 166: ...ration Tool for SF400 4 Select I accept the terms in the license agreement and then click Next 5 Click Install Installation starts When installation is complete a screen indicating that installation is complete appears 6 Click Finish ...

Страница 167: ...the ScanFront to the ScanFront Administration Tool for SF400 list as follows 1 Click Add in the Edit menu The Create new items window appears 2 Enter information for the ScanFront you want to register Enter the IP address of the ScanFront in IP address Device name If an administrator password is configured for the ScanFront enter it in Administrator Password If a device password is configured for ...

Страница 168: ...ation Tool for SF400 Deleting Registered ScanFront Scanners In the ScanFront Administration Tool for SF400 list select the check box at the far left of the row for the ScanFront you want to delete and then click Delete in the Edit menu ...

Страница 169: ... click Select All all of the ScanFront scanners in the list will be selected If you select Except All all of the selections in the list will be cleared Checking ScanFront Connections Select a ScanFront scanner in the list and click Check the connection to check the connection of the selected ScanFront The results of the check appear in the Status column For example Connection Possible appears when...

Страница 170: ...re clicking OK Changing IP Addresses or Device Names Double click a ScanFront scanner in the list to display the IP Address Device Name dialog box and then change the IP address or device name of the selected ScanFront After you enter the IP address or device name and click OK the dialog box will close and the specified IP address or device name will be applied Checking Detailed Information on the...

Страница 171: ...selected ScanFront scanners at one time The following commands are available in the Processing menu Restore All Settings Load backed up ScanFront data stored on the computer and restore settings on all selected ScanFront scanners Backup All Settings Save the backup data of all selected ScanFront scanners to any location on the computer Hint All configurable setting items will be backed up or resto...

Страница 172: ...uter and import exported administration data Exporting Administration Data Click Export in the File menu specify a destination and file name for the administration data in the dialog box that appears and then click Save Importing Administration Data Click Import in the File menu specify the storage location and file name for the administration data in the dialog box that appears and then click Ope...

Страница 173: ...e Scanner Unit 174 Cleaning the Touch Panel 174 Cleaning the Scanning Glass and Rollers 175 Cleaning the Retard Roller 177 Cleaning the Feed Roller 179 2 Replacing the Rollers 181 Exchange Roller Kit 181 Checking the Page Count and Resetting the Counter 182 ...

Страница 174: ...r use thinner alcohol or other organic solvents to clean the touch panel Such solvents may deform discolor or melt the touch panel thus causing a malfunction Cleaning the Scanner Unit To clean the surface of the scanner unit use a cloth slightly dampened with water and well wrung out to remove any dirt and then use a clean dry cloth to wipe the scanner Cleaning the Touch Panel When cleaning the to...

Страница 175: ...d paper particles that have accumulated inside the scanner 3 Use a clean dry cloth to wipe any dirt off the scanning glass Hint There is one scanning glass for the front side of documents and another for the back side Wipe both of them clean CAUTION Do not spray water or detergent directly on the scanner Doing so may damage precision mechanisms such as the light source IMPORTANT Scratches on the s...

Страница 176: ...dirt from them See Cleaning the Retard Roller on p 177 See Cleaning the Feed Roller on p 179 IMPORTANT After you remove the retard roller and feed roller and finish cleaning them make sure to reattach them to the scanner 6 Gently close the panel unit Press on both sides of the unit until you hear a click which indicates the unit is locked 7 Gently close the document eject tray Clean the rollers wh...

Страница 177: ...eaning or replacement CAUTION Do not use excessive force when removing or attaching the retard roller Doing so may cause the roller to become deformed resulting in feed errors 1 Open the roller cover 2 Raise the document detection lever 3 Pull the left lever that secures the retard roller to the scanner and remove the roller ...

Страница 178: ... a cloth that has been soaked in water and thoroughly wrung out 5 Install the cleaned retard roller by inserting the right side first 6 Push the left side of the retard roller to secure it to the scanner 7 Lower the document detection lever and close the roller cover ...

Страница 179: ...acement CAUTION Do not use excessive force when removing or attaching the feed roller Doing so may cause the roller to become deformed resulting in feed errors 1 Open the roller cover 2 Remove the feed roller 3 Remove any dirt from the roller using a cloth that has been soaked in water and thoroughly wrung out 4 Install the feed roller ...

Страница 180: ...180 Chapter 8 Maintenance 5 Close the roller cover ...

Страница 181: ... service representative Product name Exchange Roller Kit Product code 1550C001 IMPORTANT The rollers are consumable parts When the total number of pages scanned with the rollers reaches 200 000 pages purchase an Exchange Roller Kit and replace the parts See Checking the Page Count and Resetting the Counter on p 182 When the rollers start to wear out problems such as paper jams and improper documen...

Страница 182: ...unts the number of pages fed by replaced rollers Always reset the roller counter after replacing the rollers 1 Log in to the Administrator setting screen 2 Press the Device Configuration ScanFront Maintenance Roller counter reset button to display the roller counter reset screen Roller counter reset screen Total pages scanned This counter is for the total number of document pages fed by the scanne...

Страница 183: ...revious roller change This counter is for the number of document pages fed by the scanner since the roller was replaced and the counter was reset 3 Press the Reset button to reset the counter 4 Press Close to log out of the Administrator setting screen ...

Страница 184: ...Chapter 9 Troubleshooting 1 Troubleshooting 185 2 Error Messages 191 3 Initializing ScanFront 196 ...

Страница 185: ...e The clock on the computer on which the shared folder is located and the clock on the ScanFront are out of sync Solution Sync the clocks Cannot update the settings Cause The ScanFront is being used or a user has not logged out Solution Check the ScanFront status and then try again Cannot create a new folder shared folder FTP server Cause Permission to write to the shared folder has not been grant...

Страница 186: ...e sender s address is not displayed at the destination of an e mail message Cause The e mail addresses of the user and administrator have not been registered See p 108 and p 148 Solution Contact the administrator and register the e mail addresses Cannot connect to the network IP address conflict problem Cause The IP address that was set is already being used by another device Solution Contact the ...

Страница 187: ...ase and lowercase letters for the user name and password correctly Cause Authentication Method is set to Active Directory for the authentication server and an IP address or PC name is specified in Host Name Solution Specify the FQDN in Host Name see p 140 and configure the DNS server to which the specified FQDN is registered in the Network Setting screen see p 35 Cause Authentication Method is set...

Страница 188: ...ppear in images Cause The scanning glass is dirty Solution Clean the scanning glass See p 175 If there are scratches on a scanning glass contact your local authorized Canon dealer Paper becomes jammed Cause The rollers are dirty Solution Clean the rollers See p 175 Cause A feed error related to the document type occurred Solution Set Document type to Extra thin paper in the Detailed Settings scree...

Страница 189: ...r Cause Non Separation Feeding Mode is set to ON See p 44 Solution Set Non Separation Feeding Mode to OFF Scanning starts immediately after I press a job button certain users only Cause Skip Scan Setting Screen is selected in the job button settings See p 125 Solution Change the job button setting or place the document and then press a job button Passports do not scan properly Cause The specified ...

Страница 190: ...itch is pressed Cause A USB memory device in inserted in the scanner Solution Remove the USB memory device and restart the scanner An invalid password error message appears even when the correct password is entered Cause The date and time settings on the computer and ScanFront 400 do not match Solution Match the date and time settings on the computer and ScanFront 400 If there is a discrepancy of ...

Страница 191: ...of E mail Server See p 138 This is restricted item Cause The administrator has set send restrictions for the selected e mail address See p 116 Solution Contact the administrator of the ScanFront Same Username exists Please change Username and try again Cause A user that has the same name as the user name to be registered is already registered Solution Check the user name prior to registration Pape...

Страница 192: ...rors occur repeatedly set Document type to Extra thin paper in the Detailed Settings screen In addition limit the number of documents placed on the scanner to about 10 sheets See p 54 You cannot paste the copied address to the different address type Cause The copy source and the paste address are of a different type Solution Make sure the copied address and paste address are of the same type Restr...

Страница 193: ...ed Please check the connection and setting of the server Cause The authentication server settings are incorrect Solution Check the authentication server settings Cause The computer acting as the authentication server is not turned on Solution Turn on the computer acting as the authentication server A character that cannot be used for a path is included Cause An invalid character exists in the spec...

Страница 194: ... file name Solution Make sure the custom file name does not contain any of the following characters Can not create folder Cause The USB memory device is not connected properly Solution Check the connection of the USB memory device A character that cannot be used for a host name is included Cause An invalid character exists in the specified host name Solution Do not use the following characters whe...

Страница 195: ...the index file Cannot write logfile Sending files will be aborted Cause Write permission has not been granted for the shared folder specified as the save destination of the log file Solution Check the settings and access permissions of the shared folder Please select user Cause User data is trying to be exported from the scanner without a user being selected at the user settings screen Solution Se...

Страница 196: ... to the ScanFront including user information address books and job buttons IMPORTANT Initializing the ScanFront deletes all registered information Always back up the data prior to initialization Do not turn OFF the scanner before initialization is complete The Home screen appears when initialization is complete 1 Log in to the Administrator setting screen 2 Press the Device Configuration Format Sc...

Страница 197: ...s 198 Unit Specifications 198 Network Specifications 200 Transfer Destinations 200 AC Adapter 100 to 240 V type 200 Consumable Parts 200 Optional Equipment 200 About the Flatbed Scanner Unit 102 201 201 External Dimensions 202 2 Index 203 ...

Страница 198: ... 30 mm Loading capacity A4 size or smaller 60 sheets 21 lb bond 80 g m2 Larger than A4 size 40 sheets 21 lb bond 80 g m2 Make sure stacks do not exceed 10 mm in height including curls for either of the above Business Card Size Width 1 97 50 mm and above Length 3 35 85 mm and above Thickness 101 33 lb Cover 380 g m2 and below Card Size 2 12 3 37 54 mm 86 mm ISO standard Card thickness 0 055 1 4 mm ...

Страница 199: ...200 dpi 90 images min Network Connector RJ 45 10Base T 100Base TX 1000Base T Interface Hi Speed USB 2 0 ports 3 Supported file systems for Scan to USB Memory FAT16 FAT32 and exFAT Other Double Feed Detection Deskew Folio Long Document scanning Skip Blank Page Document orientation Background smoothing Bleed through reduction Remove shadow Erase Dot Erase Notch Character Emphasis Color drop out enha...

Страница 200: ... See Replacing the Rollers on p 181 IMPORTANT Rollers are consumable parts When the rollers start to wear out problems such as paper jams and improper document feeding become more likely to occur If this happens replace the rollers regardless of the page count For information about the Exchange Roller Kit contact your local authorized Canon dealer or service representative Optional Equipment Flatb...

Страница 201: ...pports connection to and operation with the Flatbed Scanner Unit 102 201 Operating Environment The system requirements are identical to those of the Flatbed Scanner Unit 102 201 IMPORTANT When connecting to the ScanFront be sure to use the USB cable supplied with the flatbed scanner ...

Страница 202: ...202 Chapter 10 Appendices External Dimensions 9 06 230 mm 10 7 271 mm 4 13 105 mm 11 1 282 mm 2 99 76 mm 14 4 366 mm 12 305 mm ...

Страница 203: ...s 34 Network Settings 35 Roller Counter Reset 38 Roller counter reset 151 ScanFront 400 Initialization 39 Select Login Type 38 Authentication Server 140 C Card 42 Cleaning Rollers 175 Scanner Unit 174 Scanning Glass 175 Touch Panel 174 Conceptual Diagram of the ScanFront 6 Connecting the AC Adapter 27 Connecting the Network Cable 28 Consumable Parts 200 Copying Job Buttons 127 161 Custom File Name...

Страница 204: ... Type 59 List Type 59 Server Authentication 60 M Managing the ScanFront Scanners 169 Moving the Scanner 15 N Names and Functions of Parts 21 Network Cable 28 Network Environment 23 Non Separation Feeding 44 P Paper Jam 52 Placing a Card 48 Placing a Folded Document 47 Placing a Long Document 48 Placing Documents 46 Plain Paper 41 Preparing the Scanner 43 R Registering New Job Buttons 124 161 Regis...

Страница 205: ...gs 97 Send Settings 98 Server Authentication 60 Server Settings 137 Setting Up 31 ScanFront Administration Tool for SF400 167 Specifications 198 T Troubleshooting 185 Turning Off the Power 30 58 Turning On the Power 29 57 U USB Memory 71 USB Memory Screen 71 USB Port 44 User Settings Screen 65 Change Password 66 V Version information 146 ...

Страница 206: ...DA CANON EUROPA N V BOVENKERKERWEG 59 1185 XB AMSTELVEEN THE NETHERLANDS CANON AUSTRALIA PTY LTD BUILDING A THE PARK ESTATE 5 TALAVERA ROAD MACQUARIE PARK NSW 2113 AUSTRALIA CANON SINGAPORE PTE LTD 1 FUSIONOPOLIS PLACE 15 10 GALAXIS SINGAPORE 138522 CANON INDIA PVT LTD 7TH FLOOR TOWER B DLF CYBER TERRACES DLF PHASE III GURGAON 122002 HARYANA INDIA PUB CE IE 0985 02 CANON ELECTRONICS INC 2016 ...

Отзывы: