Chapter 5
5-3
F-5-5
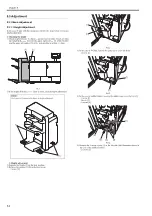
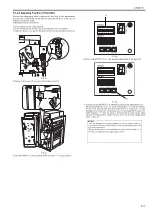
6) Measure height [A] from the floor (where the caster is landing) to the up-
per surface of the bottom plate using a scale, and check that the height is
within 86.3 +/- 0.3mm.
F-5-6
7) Loosen the caster's fixing nut [1] with the spanner (large) [2] in [A] direc-
tion.
F-5-7
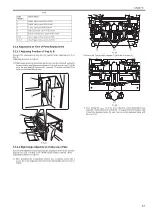
8) Rotate the adjustment bolt [1] with the spanner (small) [2]. Adjust the
height (that is measured in step 6)) to be within 83.6 +/- 0.3mm.
- To raise the height: rotate in [A] direction
- To lower the height: rotate in [B] direction
(Amount of height change per rotation: approx. 1.75mm)
F-5-8
9) Tighten the fixing nut [1] in [B] direction.
F-5-9
10) Adjust the other 3 casters as well (by repeating the steps above).
11) Connect the finisher with the host machine again and check the height.
Install the covers and other parts removed in the previous steps if the
height difference is /- 2mm. If not, repeat the steps above to
readjust the height.
5.3.1.2 Side Registration/Skew Adjustment
0021-1703
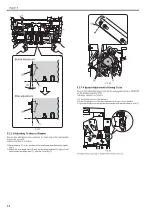
In the case of shaky vibration on this equipment (due to large operating level
of the side registration unit) or large skew, follow the steps below to execute
adjustment for side registration/skew.
1. Checking adjustment value
1) Turn ON the power switch of the finisher then the host machine.
2) Open the front cover and put the door switch tool into the door switch [1].
CAUTION:
Insert the spanner [3] thru the opening under the saddle bottom plate [2],
when loosening the caster fixing nut [1] at the front side of the saddle
finisher.
[1]
[2]
[1]
[2]
86.3
0.3mm
[A]
[1]
[2]
[A]
[1]
[2]
[3]
[1]
[2]
[A]
[B]
[1]
[B]
Содержание Saddle Finisher-AF2
Страница 1: ...SERVICE MANUAL Saddle Finisher AF2 MARCH 6 2009...
Страница 2: ......
Страница 6: ......
Страница 12: ...Contents...
Страница 13: ...Chapter 1 Specifications...
Страница 14: ......
Страница 16: ......
Страница 22: ......
Страница 23: ...Chapter 2 Installation...
Страница 24: ......
Страница 26: ......
Страница 55: ...Chapter 3 Functions...
Страница 56: ......
Страница 58: ......
Страница 104: ...Chapter 3 3 46...
Страница 105: ...Chapter 4 Parts Replacement Procedure...
Страница 106: ......
Страница 110: ......
Страница 157: ...Chapter 4 4 47 F 4 213 3 2 1...
Страница 158: ......
Страница 159: ...Chapter 5 Maintenance...
Страница 160: ......
Страница 209: ...Chapter 5 5 47 F 5 221 SW382 SW381 SW383 ENTER SW384 SW385 DSP381 1...
Страница 217: ...Chapter 5 5 55 3 Door switch tool Front door switch ON tool number FY9 8006 No Name Description Composition Remarks...
Страница 218: ......
Страница 219: ...Appendix...
Страница 220: ......
Страница 221: ...General Timing Chart General Circuit Diagram Finisher Sorter DeliveryTray Saddle Finisher AF2...
Страница 222: ......
Страница 224: ......
Страница 225: ...Contents 1 General Circuit Diagram 1 Signal Names 1 General Circuit Diagram 9...
Страница 226: ......
Страница 243: ......
Страница 244: ......


