background image

139

Network Settings on the Projector

Installation Manual

Connecting to a Networ

k

Registering a Network Pass-
word

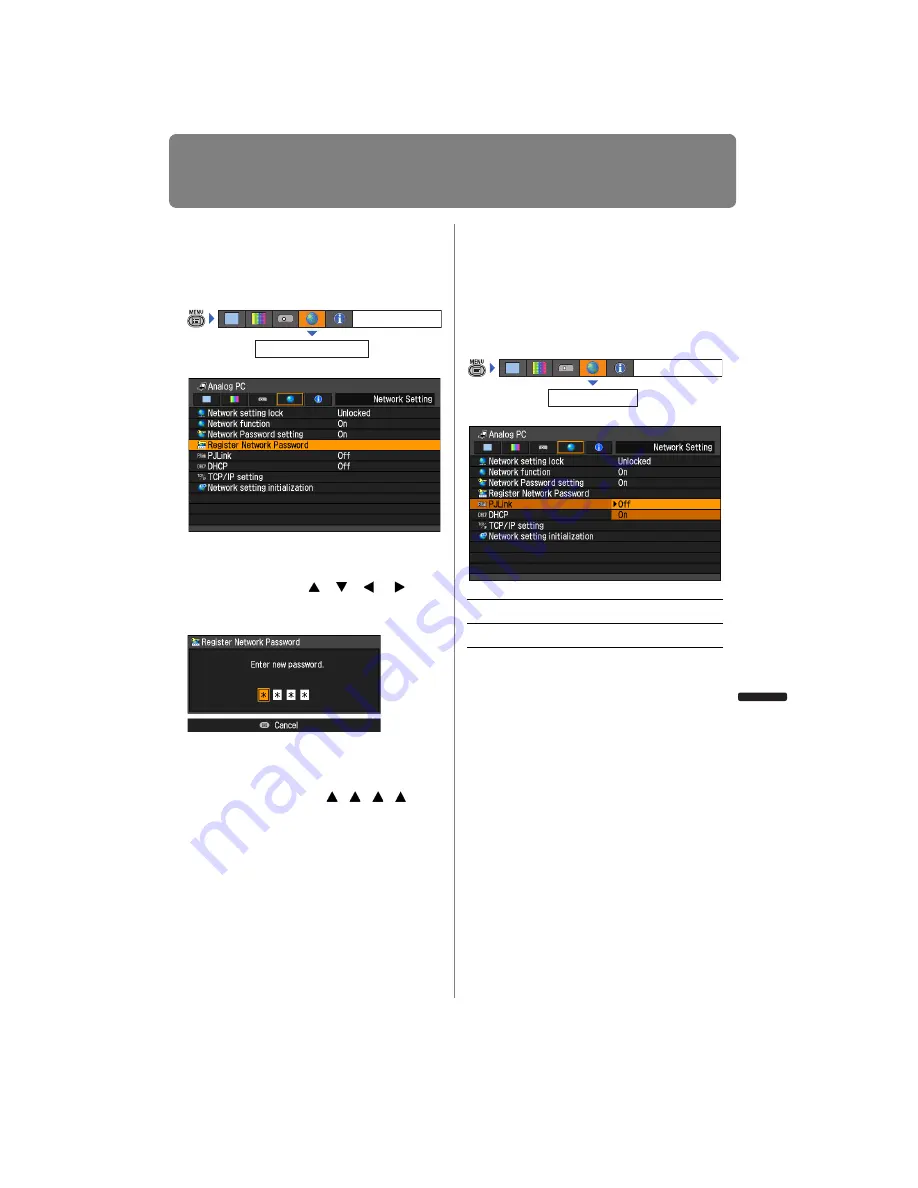
[Register Network Password]

Register the projector network password.

When [Register Network Password] is 
selected, the window shown below 
appears.  Press  the  [ ],  [ ],  [ ]  /  [ ]  but-
tons in any combination and enter the 4-
digit password.

Press the 

OK

 button to accept your setting 

and then press the 

MENU

 button.

• The factory default is [ ] [ ] [ ] [ ].

Turning On / Off the PJLink 
Function

[PJLink]

You can turn the PJLink network function 
on and off. When the function is turned on, 
control is possible via the LAN using com-
mands that meet PJLink standards.

Press the 

OK

 button to accept your setting 

and then press the 

MENU

 button.

• [On] is the factory default.
• This projector conforms to Class 1 as 

defined in the PJLink standards of the 
JBMIA (Japan Business Machine and 
Information System Industries Associa-
tion). This projector supports all com-
mands that are defined by PJLink Class 1, 
and has been verified as conforming to the 
PJLink standard Class 1 definition.

• For information about using PJLink, refer to 

“Setting PJLink” (

P152

).

Network Setting

Register Network Password

Off

Disables the PJLink function.

On

Enables the PJLink function.

PJLink

Network Setting

Содержание REALiS WUX4000 D

Страница 1: ...x Index Appendix Installation Manual Projecting an Image Safety Instructions Before Use Table of Contents Setting Functions from Menus Useful Functions Available During a Presentation User s Manual EN...

Страница 2: ...e control allows you to operate all functions of the projector In this document the button s operations are shown as below Indicate the buttons to be pressed Adjusting the Image Size The size of the p...

Страница 3: ...ecting Image P88 Making Fine Color Adjustments P92 Removing Noise P94 Temporarily Blacking Out an Image P68 Freezing the Picture P68 Adjusting the Volume P69 Muting the Sound P69 Zooming an Image P70...

Страница 4: ...l 26 Remote Control Operating Range 26 Part Names 27 Main Unit 27 Front Side 27 Rear Side 28 Bottom Side 28 Remote Control 30 Side Control 32 LED Indicator Displays 33 Input Terminal 34 User s Manual...

Страница 5: ...rming the Auto PC Function 51 Selecting Screen Aspect and Aspect 52 Selecting Screen Aspect 52 Selecting Aspect Ratio 56 Adjusting the Image Size 58 Adjusting the Focus 59 Adjusting the Image Position...

Страница 6: ...enu Position 84 Correcting the Screen Color 84 Reversing Projection 85 No Signal Screen 86 Screen When Blank 86 Selecting a Logo at Startup 87 Selecting Aspect Ratio of Screen 87 Selecting an Image Qu...

Страница 7: ...1 Installation 113 Installation Precautions 114 Precautions When Carrying the Projector 114 Installation Precautions 114 Precautions When Carrying and Transporting the Projector 114 When using mounted...

Страница 8: ...Network Settings 141 Configuring the Network From the Computer 142 Displaying and Configuring the Network Configuration Screen 142 Resetting to Factory Defaults 145 Setting Errors 145 Setting Up the N...

Страница 9: ...0 The Projected Image Is Blurred 171 You Cannot Project an Image Appropriately 171 The Projector Power Turns Off 171 You Cannot Operate the Remote Control 172 Relationship between Aspect and Screen As...

Страница 10: ...solutions in the Troubleshooting section in the back of this manual If the problem still persists contact the Canon Customer Sup port Center CAUTION TO REDUCE THE RISK OF ELECTRIC SHOCK DO NOT REMOVE...

Страница 11: ...inimum distances must be maintained Do not cover the ventilation slots on the projector Heat build up can reduce the service life of your projector and can also be dangerous If the projector is unused...

Страница 12: ...an unstable cart stand or table The projector may fall causing serious injury to a child or adult and serious damage to the projector Use only with a cart or stand recommended by the manufacturer or...

Страница 13: ...ector from the wall outlet and refer servicing to qualified service person nel under the following conditions a When the power cord or plug is damaged or frayed b If liquid has been spilled into the p...

Страница 14: ...Battery Directive 2006 66 EC and or your national laws imple menting those Directives If a chemical symbol is printed beneath the symbol shown above in accordance with the Battery Directive this indi...

Страница 15: ...harmful interference to radio or tele vision reception which can be determined by turning the equipment off and on the user is encouraged to try to correct the interference by one or more of the foll...

Страница 16: ...rd Failing to pay atten tion to these points could cause a fire electric shock or personal injury Do not place any objects on the power cord and do not allow it to become trapped under the projector T...

Страница 17: ...the base Additionally do not use a damaged power plug or an outlet that is loose If using an extension cord attached to the outlet make sure that the total electric power consumption of connected devi...

Страница 18: ...ay increase due to heat from the exhaust vents and this could result in an explosion As strong light beams are emitted while the projector is in use do not look directly into the projector lens Doing...

Страница 19: ...g so could cause a personal injury Before replacing the lens unit wait at least one hour after the projector is turned off to allow the projector to cool thoroughly Failure to do so could result in a...

Страница 20: ...doors to provide ventilation to the room If you inhale any gas emitted from the lamp or it has come into contact with your eyes or mouth consult a doctor immediately When disposing of a used mercury l...

Страница 21: ...jector at the time of purchase for transporting or shipping the projector Pro tection of the projector cannot be guaranteed if used packaging or shock absorbent materials are reused Fragments from sho...

Страница 22: ...to return to normal Do not install the projector in a location where the temperature is high or low Doing so may cause a malfunction Operating temperature 5 C to 35 C Humidity level up to 85 Storage...

Страница 23: ...rk Maintenance Appendix Index Appendix Installation Manual Projecting an Image Safety Instructions Before Use Table of Contents Setting Functions from Menus User s Manual Useful Functions Available Du...

Страница 24: ...it Remote control part No RS RC04 Batteries for the remote control AAA size x2 Power cord 1 8 m For the U S A and Canada For Continental Europe User s Manual Installation Manual CD ROM Warranty Card...

Страница 25: ...pt to recharge the batteries Remove the batteries when they are flat or when the remote control will not be used for a long period of time When replacing the batteries replace both batteries at the sa...

Страница 26: ...ontrol within an angle of 25 in any direction from directly in front of the infrared remote receiver The remote control may be inoperative if there is an obstacle between the remote control and main u...

Страница 27: ...on nectors Infrared remote receiver P26 Lens unit Air intake vent Power cord connector P45 Side control P32 Air filter P159 Anti theft lock hole An anti theft wire cable not included can be connected...

Страница 28: ...8 Rear Side Bottom Side Exhaust vent Infrared remote receiver P26 Do not block the air exhaust Doing so may cause a malfunc tion Lamp cover Adjustable feet P118 Screw holes for installation of ceiling...

Страница 29: ...ng on the installation environment an extension pipe part No RS CL08 or RS CL09 may also be required Contact the Canon Customer Support Center for more detailed information If you mount the projector...

Страница 30: ...on P57 Changes the aspect ratio mode D SHIFT KEYSTONE button P62 Corrects keystone distortion buttons For keystone adjustment Press D SHIFT KEYSTONE to correct keystone distortion Moves the image up d...

Страница 31: ...s the sound volume button Increases the volume button Decreases the volume BLANK button P68 Toggles between display non display of image P TIMER button P71 Displays the time elapsed since this button...

Страница 32: ...sound volume button Decreases the volume button Increases the volume Selects the upper lower left or right item in the menu 7 OK button P76 Determines the item selected from the menu POWER ON green Li...

Страница 33: ...ng on the power sta tus Off Lit Flashing LED indicator Operating status POWER ON green STAND BY red WARN ING red LAMP orange TEMP red Power is not connected Ready to turn power on standby Power is on...

Страница 34: ...DMI IN Terminal HDMI IN P41 Receives the digital content image signal HDMI Carries both video and audio signals across a single cable 5 Service Port CONTROL This terminal is used by servicing technici...

Страница 35: ...35 MULTIMEDIA PROJECTOR User s Manual Operation...

Страница 36: ...36...

Страница 37: ...f Contents Projecting an Image Useful Functions Available During a Presentation Setting Functions from Menus User s Manual Installation Connecting to a Network Maintenance Appendix Index Appendix Inst...

Страница 38: ...ned Images or Flickering of the Screen Using the Auto PC P51 Adjusting the Image Size P58 Adjusting the Focus P59 Adjusting the Image Position Lens shift P60 Adjusting Keystone Distortion P62 Making F...

Страница 39: ...tion VGA cable Input signal type Analog PC P48 Before connecting the cables turn off both the projector and computer Use a VGA cable in which all pins are connected If the cable is a type in which all...

Страница 40: ...stor Using an audio cable with a built in resistor will reduce the audio volume Computer Monitor output ter minal mini D sub 15 pin AUDIO OUT terminal AUDIO OUT BNC cable not included When inputting c...

Страница 41: ...se an audio cable without a built in resistor Using an audio cable with a built in resistor will reduce the audio volume Computer Digital image output terminal HDMI terminal HDMI cable not included Wh...

Страница 42: ...nected AV equipment Connecting to Digital Video Output Terminal Digital Connection HDMI cable Input signal type HDMI P48 Before connecting the cables turn off both the projector and AV equipment AV eq...

Страница 43: ...nent cable that fits the terminal type of the AV equip ment to create a relay connection Use an audio cable without a built in resistor Using an audio cable with a built in resistor will reduce the au...

Страница 44: ...m the projected images to AV equipment or amplified speakers Use an audio cable without a built in resistor Using an audio cable with a built in resistor will reduce the audio volume RCA terminal Spea...

Страница 45: ...is started Press the OK button to make the countdown window disappear 4 Turn on the computer or AV equipment power Fully insert the power cord plug into the socket After turning off the projector wai...

Страница 46: ...put screen appears Enter your password P103 When No signal Appears With a notebook computer the user must turn on the external monitor output P47 Press the INPUT button to select the input signal P49...

Страница 47: ...image screen aspect or a screen mode aspect according to the aspect ratio of the screen type of input image signal etc P52 P57 Select an image mode depending on the projected image P64 Changing Notebo...

Страница 48: ...e below shows the relationship among input signals supported by the projector input terminals and connection cables Input signal Input terminal Types of connection cables HDMI HDMI cable not included...

Страница 49: ...signal that is ready for projection is displayed in white When no signal is received it is displayed in gray HDMI and DVI D Digital PC may be displayed in gray even if they are ready for projection 2...

Страница 50: ...to select 1920 x 1200 pixels or the resolution closest to the output signal res olution of the computer 3 Click the OK button Windows Vista 1 Open the Control Panel from the start menu then select App...

Страница 51: ...esults will be stored If the projector is used again with the same com puter when the input signal is selected the image will be projected automatically under the same conditions that were previously...

Страница 52: ...You may need to change the setting depending on the resolution of the computer If the image is not projected with the desired aspect ratio see Relationship between Aspect and Screen Aspect on page 17...

Страница 53: ...en you use a screen with aspect ratio of 16 9 You cannot correct keystone distortion in this mode but you can move the image up or down with images being projected horizontally For the details on how...

Страница 54: ...elected as the screen aspect in order to display the window shown on the lower right 2 Use the buttons to move the image The minimum value is 60 and the max imum value is 60 3 When the image fits the...

Страница 55: ...mage The minimum value is 160 and the maximum value is 160 3 When the image fits the screen press the OK button Resetting the Image Shift Perform the following steps to reset the image shift adjustmen...

Страница 56: ...ge of 4 3 aspect ratio cannot be correctly projected in Auto mode Zoom The image with 4 3 aspect ratio is projected in the center of the screen enlarged to a 16 9 aspect ratio with the upper and lower...

Страница 57: ...ect an appropriate aspect ratio Press the ASPECT button to change the aspect ratio type For more details on the aspect ratios refer to page 173 Relationship between Aspect and Screen Aspect You can al...

Страница 58: ...oo small to adjust it with the zoom function P125 1 Press either the ZOOM button on the remote controller or the LENS button on the pro jector twice in order to display the window shown at lower right...

Страница 59: ...IL03WF refer to page 124 Relationship Between Image Size and Projecting Distance 1 Press either the FOCUS button on the remote control or the LENS button on the pro jector in order to display the wind...

Страница 60: ...ss the pointer buttons to adjust 3 When the desired position is reached press the OK button The available range for lens shift percentage of movement relative to the screen size var ies depending on t...

Страница 61: ...tment press and hold the LENS SHIFT button on the remote control or the LENS button on the projector to display the Lens shift Reset window The selections for the lens currently used are displayed Use...

Страница 62: ...sition so that it is completely straight The result of keystone adjustment is stored in memory If you place the projector in the same position the keystone adjustment is not necessary Signals are proc...

Страница 63: ...he following steps to reset the keystone adjustment Press the D SHIFT KEYSTONE button twice to display the Keystone reset window On the window select OK with the button and then press the OK button bu...

Страница 64: ...xt based images in a brightish room Dynamic Suitable for watching media played with video software in a brightish room VividPhoto Suitable for viewing images with vibrant colors in a moderately dark r...

Страница 65: ...ode changes each time the IMAGE button is pressed The displayed image modes vary depending on the selected input signal You can also select any image mode from the Image mode menu P88 User settings 1...

Страница 66: ...flashing to constantly illuminated after the cooling process is completed You cannot turn the projector on while the cooling process is in operation If you want to continue projecting without turning...

Страница 67: ...s Manual Safety Instructions Before Use Table of Contents Appendix Index Appendix Installation Connecting to a Network Projecting an Image Setting Functions from Menus Maintenance Installation Manual...

Страница 68: ...t Freezing the Pic ture Press the button to freeze the moving image The projector shows the following icon Press the button again to cancel the FREEZE function It is also cancelled when the input sign...

Страница 69: ...can also adjust the volume level of the speakers connected via the audio output terminal Muting the Sound Press the button to mute the sound The projector shows the following icon Press the button aga...

Страница 70: ...essed The magnification appears on the screen You can move the enlarged area by using the buttons You can restore the original size of the image by pressing the button Useful when Zooming in on an obj...

Страница 71: ...apsed time is displayed on the lower right corner of the screen Time is counted up to 59 59 The timer then returns to 00 00 Press the button again to stop the timer Press the button while the timer is...

Страница 72: ...72...

Страница 73: ...ore Use Table of Contents Useful Functions Available During a Presentation Setting Functions from Menus User s Manual Installation Connecting to a Network Maintenance Appendix Index Appendix Installat...

Страница 74: ...Input signal for which the menu item is displayed Input signal for which the menu item is not displayed Display settings tab P77 You can set the type of signal or the method of projection of the imag...

Страница 75: ...ress the MENU button to display the menu window 2 Use the buttons to select a tab If the tab position is not highlighted in orange use the buttons to move the highlight to the top 3 Use the buttons to...

Страница 76: ...ton or button to dis play a list of the contents 3 Use the buttons to select the desired contents 4 When you found the contents you desired press the OK button or 1 Select Contrast 2 Use the buttons t...

Страница 77: ...ode Display settings Aspect 4 3 The image is projected using an input signal aspect ratio of 4 3 Select this if an image of 4 3 aspect ratio cannot be correctly projected in Auto mode Zoom An image wi...

Страница 78: ...orted by the pro jector see the table on page 175 Selecting an Input Signal Type Component Input signal select You can select the proper component sig nal type if the video image from AV equip ment is...

Страница 79: ...cannot adjust the projected image correctly Adjust Input Signal Ana log PC Tracking Input signal settings Tracking You can fine tune the timing for generating an image from the image signal Adjusts t...

Страница 80: ...ed image correctly Adjust Input Signal Ana log PC Vertical position Input signal settings Vertical position You can adjust the vertical position of the screen when the projected image is shifted in th...

Страница 81: ...ot adjust the projected image correctly Adjust Input Signal Ana log PC Vertical pixels Input signal settings Vertical pixels You can adjust the number of the pixels in the vertical direction if the le...

Страница 82: ...ages will be improved and dark scenes will be rendered more realistically In this case select Auto or Expanded for the HDMI input level For more detailed information refer to the manual for the AV equ...

Страница 83: ...1035i 576i or 480i Select Off when flickers and horizontal lines are noticeable on a fast moving pic ture HDMI Component Digital PC Analog PC Off The entire input signal 100 is pro jected The images...

Страница 84: ...button Normal is the factory default HDMI Component Digital PC Analog PC Display settings Menu position HDMI Component Digital PC Analog PC Normal Select this if a standard type of pro jection screen...

Страница 85: ...ion adjustment will be reset HDMI Component Digital PC Analog PC None Select this to project an image normally Ceiling mounted Select this to project an image with the projector hung from the ceiling...

Страница 86: ...play a black or blue screen and temporarily blank out the projected image by pressing the BLANK button on the remote control Press the OK button to accept your setting and then press the MENU button B...

Страница 87: ...Auto may be automatically selected for the aspect depending on the screen aspect setting HDMI Component Digital PC Analog PC Skip Projects an input signal immediately after turning on the projector Ca...

Страница 88: ...ital PC Analog PC Standard Suitable for projecting a computer screen or watching media played with video software in a brightish room This image mode emphasizes white tones Presenta tion Suitable for...

Страница 89: ...nt advanced adjustment and lamp mode The number of displayed user memories is 5 however it is possible to save different set tings for when the connected equipment is a computer ANALOG PC DIGITAL PC o...

Страница 90: ...tone between the lightest and darkest portions of the image When you have completed the adjust ment press the MENU button The adjustment you have made is stored as adjusted values for the input signa...

Страница 91: ...see because they are too dark or bright Correction can be made by using the GAMMA button on the remote control When you have completed the adjust ment press the MENU button The adjustment you have mad...

Страница 92: ...he intensity of each color Increases the intensity of color Decreases the intensity of color Color balance Adjusts the color balance of a reddish or greenish image Corrects a reddish image Corrects a...

Страница 93: ...oto sRGB HDMI Component Digital PC Analog PC Off Projects an image with no correc tion Adjust You can specify the type and level brightness of the ambient light Image adjustment Advanced adjustment Am...

Страница 94: ...radation representa tion of light and dark portions of an image automatically Press the OK button to accept your setting and then press the MENU button The factory default settings are Off when the co...

Страница 95: ...lor adjust You can make fine adjustments to the image colors with RGB red green blue and CMY cyan magenta yellow When you have completed the adjust ment press the MENU button Off is the factory defaul...

Страница 96: ...e Tune Gamma then press the OK button The following Fine Tune Gamma screen for confirmation appears Use the buttons to select the color then press the OK button Next use the buttons to select a point...

Страница 97: ...Set tings Reset You can reset the current image settings to the default settings If reset is performed when user setting 1 5 is selected for Image mode the settings are returned to the settings that w...

Страница 98: ...nalog PC Off Disables the power management mode Standby If no input signal is received for 30 seconds the projector enters the standby mode turning off the lamp five minutes after start of count down...

Страница 99: ...ton Off is the factory default HDMI Component Digital PC Analog PC Off Disables the beep On Enables the beep System settings Beep HDMI Component Digital PC Analog PC Off Disables the key lock Main uni...

Страница 100: ...ntrol too Selecting a Channel on the Remote control You can change the channel on the remote control as follows HDMI Component Digital PC Analog PC Ch1 Ch2 Ch3 Ch4 Select the remote control channel to...

Страница 101: ...your setting and then press the MENU button On is the factory default The guide screen is shown at the following times Power is turned off by pressing the POWER button P66 No input signal can be dete...

Страница 102: ...con nected to the HDMI port Press the OK button to accept your setting and then press the MENU button HDMI Component Digital PC Analog PC Off The input status is not displayed On The input status is d...

Страница 103: ...ong password three times the power will be turned off The power is also turned off if no password is input for 3 minutes HDMI Component Digital PC Analog PC Off The projector can be used even if no pa...

Страница 104: ...ntered the password is automatically registered Press the MENU button to abort the regis tration Prohibiting Operation of the Lens Other settings Lens Ctrl Lock You can lock lens related button opera...

Страница 105: ...your setting and then press the MENU button Normal is the factory default The following display and operation are also changed HDMI Component Digital PC Analog PC Other settings System settings Lens...

Страница 106: ...Flickering Other settings Deflicker This function adjusts the image display in order to reduce flickering in the projected image HDMI Component Digital PC Analog PC Off The High temperature warning ic...

Страница 107: ...You can reset the lamp counter that indi cates the time for lamp replacement Select Lamp counter and press the OK button to display the lamp counter Select Reset and press the OK button HDMI Component...

Страница 108: ...urs of use of the lamp in the following way Less than 2 700 hours Displayed as a green bar 2 700 hours to less than 3 000 hours Displayed as a green and yellow bar When the lamp hours are 2 700 hours...

Страница 109: ...button to accept your setting and then press the MENU button This function does not reset the values for Lamp counter Language Remote con trol Input signal Network Setting Filter counter Focus positi...

Страница 110: ...displayed Firmware Current firmware version Serial No Serial number unique to this projector IP address IP address of the projector P141 Gateway address IP address of the gateway device P141 E mail se...

Страница 111: ...IMEDIA PROJECTOR Installation Manual Installation and Maintenance Do not attempt installation yourself Be sure to request installation from a qualified technician or contact the Canon Customer Support...

Страница 112: ...112...

Страница 113: ...ions Before Use Table of Contents Useful Functions Available During a Presentation Setting Functions from Menus Installation Connecting to a Network Maintenance Index Appendix User s Manual Installati...

Страница 114: ...lly The projector may tip over causing damage Do not block the cooling fan intake or exhaust vent If the intake or exhaust vent is blocked heat may accumulate inside the projector causing a malfunctio...

Страница 115: ...h bare hands Doing so may adversely affect picture quality Install at a Sufficient Distance from Walls and Other Obstructions Be Careful of Condensation If the temperature of the room rises suddenly m...

Страница 116: ...rections of 360 1 as shown in the illustration below However if projecting upward or downward the life span of the lamp may be shortened and it is necessary to change the settings of the projector If...

Страница 117: ...cedure Selecting the Projection Method and Installation Location P118 Installing Removing the Lens Unit P119 Setting Up the Projector P124 Connecting to AV Equipment P128 Selecting an Input Signal P48...

Страница 118: ...n position when installed on the floor To adjust the projection position when the projector is installed on the floor use the lens shift function P60 and P126 to adjust up down left right You can also...

Страница 119: ...ation There is the risk of injury When hanging the projector from a ceiling put the projector down on the floor or a workbench before attaching or replac ing the lens unit Failure to do so could resul...

Страница 120: ...is attached to the cosmetic panel and designed to prevent it from falling off 3 In order to prevent damage close the lamp cover and temporarily fasten the screw 4 Remove the sleeve screws 2 on top and...

Страница 121: ...stration insert the lens connector of the lens unit into the front right side of the projector slowly until it contacts the end At this time pull out the lens cable shown in the illustration and fix i...

Страница 122: ...he initializa tion operation to start up However if the lens has been replaced with a lens of the same model number initialization operation will not be performed The position will be the same as befo...

Страница 123: ...e sleeve 2 Disconnect the lens cable from the lens connector 3 Fix the lens cable as shown in the illustration and loosen the 4 screws to remove the lens unit The 4 lens unit screws are attached to th...

Страница 124: ...w and decide the distance between the projector and screen Be sure to place the projector parallel to the screen to ensure distortion free projection The screen must not be exposed to direct sunlight...

Страница 125: ...1077 605 898 673 16 1 52 8 24 1 79 1 673 0 550 1185 740 1185 666 987 740 17 7 58 1 26 6 87 3 740 0 600 1292 808 1292 726 1076 808 19 3 63 3 29 0 95 1 808 0 Long Zoom Lens RS IL02LZ 40 86 54 86 48 72...

Страница 126: ...he amounts of lens shift for the Standard Zoom Lens and Long Zoom Lens is 55 up 15 down and 10 left right With the Short Fixed Lens the amounts are 5 up down and 2 left right The diagram below shows t...

Страница 127: ...the up down direction reduces the available shift in the left right direction When the lens is shifted upward or downward to the maxi mum shift in the left right direction is not possible 90 At maximu...

Страница 128: ...pment P42 Digital video camera P42 Computer P39 P40 AV equipment P43 P132 P39 P40 P43 P40 DVI D IN terminal can only be used to connect to a PC P41 P44 Computer P41 Select play back mode be fore conne...

Страница 129: ...able not included Digital PC DVI D cable not included Analog PC COMPONENT IN VGA cable supplied item BNC cable not included Component COMPONENT IN Component cable not included BNC cable not included M...

Страница 130: ...130...

Страница 131: ...necting to a Network Maintenance Before Use Projecting an Image Useful Functions Available During a Presentation Setting Functions from Menus Installation User s Manual Appendix Index Appendix Install...

Страница 132: ...Network Connections is disabled switch it to On to enable it P138 Referring to Checking Projector Information P110 check that the projector IP address is not overlapped with other computers that are...

Страница 133: ...Right click Local Area Connection and open Properties 5 Select Internet Protocol Version 4 TCP IP and click the Properties button Take notes of the original network settings IP address subnet mask de...

Страница 134: ...IP and click the Properties button Take notes of the original network settings IP address subnet mask default gateway etc 6 Select Use the following IP address and set the IP address and subnet mask T...

Страница 135: ...k the Properties button Take notes of the original network settings IP address subnet mask default gateway etc 5 Select Use the following IP address and set the IP address and subnet mask The factory...

Страница 136: ...DNS server etc 4 Create a new network environment and set the IP address and subnet mask The factory default IP address for the projector is 192 168 254 254 Set an IP address which is different from...

Страница 137: ...he lock is re engaged If you change the network settings be sure to continue operating without closing the window Lock is the factory default For the default network password refer to page 139 Unlock...

Страница 138: ...he factory default Setting a Network Password Network Password setting You can set whether or not a password is required in order to change the projector network settings Press the OK button to accept...

Страница 139: ...d off When the function is turned on control is possible via the LAN using com mands that meet PJLink standards Press the OK button to accept your setting and then press the MENU button On is the fact...

Страница 140: ...on for network monitoring and control of projectors which will become the mainstream in the future Class 1 Standardization of control and monitoring specifications for basic projector functions Basic...

Страница 141: ...68 254 254 Subnet mask 255 255 255 0 Gateway address 0 0 0 0 Setting cannot be made when DHCP P140 is On If an invalid value is entered the message Invalid entry appears If this occurs enter a valid v...

Страница 142: ...er key The password input screen appears 3 Enter the user name and password on the password input screen then click OK The factory default user name is root and the password is system The projector we...

Страница 143: ...rojector Power Status The power status of the projector Lamp Time Normal Mode Lamp operating time in Normal lamp mode Lamp Time Quiet Mode Lamp operating time in Quiet lamp mode Lamp Time Converted La...

Страница 144: ...en enter the setting in the displayed field 2 and click OK 3 6 A confirmation window appears Check the contents and if they are correct click Apply The settings are applied to the projector and Save c...

Страница 145: ...teps 1 3 of Displaying and Configuring the Network Configuration Screen P142 to display the setting window 2 Click Initialize 3 A confirmation window appears Click OK Setting Errors When a setting rel...

Страница 146: ...send ing a test mail System failed to connect POP3 server Failed to connect to the POP3 server attempting to send a test mail System doesn t support this auth type An authentication type was set whic...

Страница 147: ...d symbols 4 15 characters system Confirm new password For confirmation enter the same password that you entered in New password system TCP IP DHCP Select whether to turn the DHCP function on or off If...

Страница 148: ...alphanumeric char acters and symbols 1 63 charac ters Projector canon co jp SMTP server IP address Enter the SMTP server IP address in 1 byte numbers 0 0 0 0 SMTP server port number Enter the SMTP se...

Страница 149: ...cannot be changed OFF User name Enter the user name to use for mail authentication in 1 byte alphanu meric characters and symbols 1 63 characters Blank Password Enter the password for mail authenti c...

Страница 150: ...trol of projectors which use SNMP Simple Network Management Protocol For the set ting procedure refer to Displaying and Configuring the Network Configuration Screen P142 Item Explanation To The recipi...

Страница 151: ...password in 1 byte alphanumeric characters and sym bols 8 15 characters This is also used as the password for trapping It can be set only when the SNMP version is V3 Blank Confirm password For confir...

Страница 152: ...ion Factory default setting PJLink Turn the PJLink function on or off If OFF is selected the PJLink func tion will be turned off and the other settings in this window cannot be changed ON PJLink authe...

Страница 153: ...web browser enter http projector IP address in the address bar and press the Enter key The password input screen appears The factory default IP address is 192 168 254 254 It is possible to check the I...

Страница 154: ...P147 Refresh Refreshes the displayed contents with the most recent informa tion Power Turns projector power on or off Input Select an input signal and click Apply to change to that input signal P48 As...

Страница 155: ...ver is open Check whether the lamp cover is installed properly If it is installed properly the lamp cover detection switch may be defective Contact your dealer Errors related to the cooling fan Error...

Страница 156: ...156...

Страница 157: ...ions Before Use Table of Contents Useful Functions Available During a Presentation Setting Functions from Menus Installation Connecting to a Network Maintenance Appendix Index Appendix User s Manual I...

Страница 158: ...cleaning the projector make sure to turn off the projector wait until the cooling fan stops disconnect the power plug from the AC outlet and let the projector stand for at least 1 hour Otherwise you m...

Страница 159: ...our finger onto the handle of the air filter on the side of the projector and pull the air filter out to remove it 3 Remove the filter from the air filter frame First disengage the tab on the inside t...

Страница 160: ...se a vacuum cleaner to remove the dust Bring the vacuum cleaner nozzle directly close to the side intake vent and the bottom exhaust vent in order to clean them If the filter replacement screen is dis...

Страница 161: ...ter this screen has been displayed for 10 seconds and disappeared all buttons become operable This message will not be displayed again if you select Cancel in response to the mes sage Do you want to d...

Страница 162: ...AC outlet and let the projector stand for at least 1 hour Otherwise you may get burned because the main unit is very hot immediately after the pro jector is turned off Be sure to use the specified la...

Страница 163: ...l out the lamp unit in the direction of the arrow Even when the screws are loosened they will not fall off the lamp unit 4 Fully insert a new lamp unit and secure it with the 3 screws 5 Close the lamp...

Страница 164: ...t Reset OK to reset the lamp counter It is recommended that you also replace the air filter when you replace the lamp Contact the Canon Customer Support Center for further information Replacement air...

Страница 165: ...165 MULTIMEDIA PROJECTOR Appendix...

Страница 166: ...166...

Страница 167: ...ctions Table of Contents Useful Functions Available During a Presentation Setting Functions from Menus Installation Connecting to a Network Maintenance Appendix Index Appendix User s Manual Installati...

Страница 168: ...r filter is clogged with dust The warning may indicate if the air flow in and out of the projector is blocked or if the internal temperature of the projector rises If the air filter is clogged clean o...

Страница 169: ...afety device is active the STAND BY indicator does not turn on when you connect the power cord You cannot disable this safety device Remove any obstacle that is blocking the air intake or exhaust vent...

Страница 170: ...go key and pressing the P key P47 The combination of keys used to perform this operation var ies depending on the model of notebook computer For more detailed information refer to the manual that came...

Страница 171: ...lens is stained Clean the lens P158 The tracking is bad Adjust the tracking with the AUTO PC or Tracking func tion P51 P79 Cause Countermeasure The projected image is inverted in the vertical or horiz...

Страница 172: ...con trol from the outside of the remote control operating range Check whether you are operating the remote control within the remote control operating range of the main unit of the projector P26 Ther...

Страница 173: ...or Full WSXGA WXGA 16 10 Project an image in the largest possible size on the screen Auto or Full Project the computer screen in the original resolution True size WXGA Project an image in the largest...

Страница 174: ...n aspect ratio setting PC Resolution of screen Purpose of projection Aspect setting 4 3 4 3 D image shift WUXGA 16 10 Project an image in the largest possible size on the screen Auto WSXGA WXGA 16 10...

Страница 175: ...0 56 250 50 000 67 500 60 000 1920 x 1200 WUXGA 74 038 59 950 Resolution dots Signal type Horizontal fre quency kHz Vertical fre quency Hz 640 x 480 D VGA 31 469 59 940 720 x 480 31 469 59 940 720 x 5...

Страница 176: ...UXGA WSXGA SXGA WXGA SXGA WXGA XGA SVGA VGA Scan frequency Horizontal 15 75 kHz Vertical 50 85 Hz Digital PC input WUXGA UXGA WSXGA SXGA WXGA SXGA WXGA XGA SVGA VGA Component input 1080p 1080i 720p 57...

Страница 177: ...ries 56 g Name Standard Zoom Lens Long Zoom Lens Short Fixed Lens Model number RS IL01ST RS IL02LZ RS IL03WF External View Focal length 23 0 34 5 mm 0 9 1 4 34 0 57 7 mm 1 3 2 3 12 8 mm 0 5 F number 1...

Страница 178: ...n 430mm 53mm 128mm 212mm 234 5mm 380mm 92mm 91mm 150mm 311mm 154 5mm 141 5mm Bolt holes M4 x 6 for installation of ceiling attachment 430 mm 16 9 92 mm 3 6 380 mm 15 0 53 mm 2 1 212 mm 8 4 234 5 mm 9...

Страница 179: ...PC INPUT A RGB CR 49h 4Eh 50h 55h 54h 3Dh 41h 2Dh 52h 47h 42h 0Dh Component INPUT COMP CR 49h 4Eh 50h 55h 54h 3Dh 43h 4Fh 4Dh 50h 0Dh Input source acquisition GET INPUT CR 47h 45h 54h 20h 49h 4Eh 50h...

Страница 180: ...3Dh numeric code 0Dh Contrast acquisition GET CONT CR 47h 45h 54h 20h 43h 4Fh 4Eh 54h 0Dh Aspect Auto ASPECT AUTO CR 41h 53h 50h 45h 43h 54h 3Dh 41h 55h 54h 4Fh 0Dh 4 3 ASPECT 4 3 CR 41h 53h 50h 45h...

Страница 181: ...181 Product Specifications Appendix Other Information...

Страница 182: ...54 Digital PC 40 48 129 Direct power on 98 Display Resolution Preparing the Comput er 50 Display settings menu 74 Displaying logo 87 DVI 40 48 129 DVI D IN 40 DVI D IN Terminal 34 Dynamic gamma 94 F...

Страница 183: ...etwork Password 139 Register password 104 Remote control 26 30 100 Reset 97 109 Reversing Projection Ceiling mounted Rear projection 85 S Screen aspect 52 87 173 Screen color 84 Screen when blank 86 S...

Страница 184: ...unit check the part number and use the correct lens unit Lamp Part No RS LP06 WUX4000 RS LP07 WUX5000 WUX4000 Black top panel Part No RS TC01 Air filter Part No RS FL01 Ceiling attachment Part No RS C...

Страница 185: ...tion P80 Vertical position P80 Horizontal pixels P81 Vertical pixels P81 HDMI input level HDMI P82 Auto Normal Expanded HDMI color space HDMI P82 Auto RGB YCbCr HDMI over scan 1 HDMI P83 Off On Progre...

Страница 186: ...nent the factory default is Weak regardless of the image mode Image mode COMMON P88 Standard Photo sRGB User 1 5 as creating profile Digital PC Analog PC P88 Presentation VividPhoto Component HDMI P8...

Страница 187: ...ngs Password settings Off P103 On Register password Password input P104 Lens Ctrl Lock Off P104 On Lens shift Reset Lens shift Reset P105 Menu display time Normal P105 Extended Overheat Warning Dis pl...

Страница 188: ...8305 Dietlikon Switzerland CANON GMBH Zetschegasse 11 A 1230 Wien Austria CANON Espa a S A Av De Europa 6 Alcobendas 28108 Madrid Spain CANON PORTUGAL S A Rua Alfredo da Silva 14 Alfragide 2610 016 Am...

Отзывы: